Setting up Join Now
You can set up easy-to-use memberships for your prospective members. These options are known as Join Now,
- Student
- Retired
- Associate
- Regular Member
The following will walk you through the process of setting up a Join Now Student membership:
These products will be combined to create all of the membership and subscription options for your new Join Now membership. Typical products include dues, subscriptions to industry or organization publications, and giving opportunities. Unless otherwise noted as (required), billing products in the following documentation are optional, and are used to illustrate a robust Join Now membership. All optional billing product types can be used several times to create multiple options for memberships and subscriptions.
- In the Advanced Accounting Console go to Settings > Billing > Billing products.
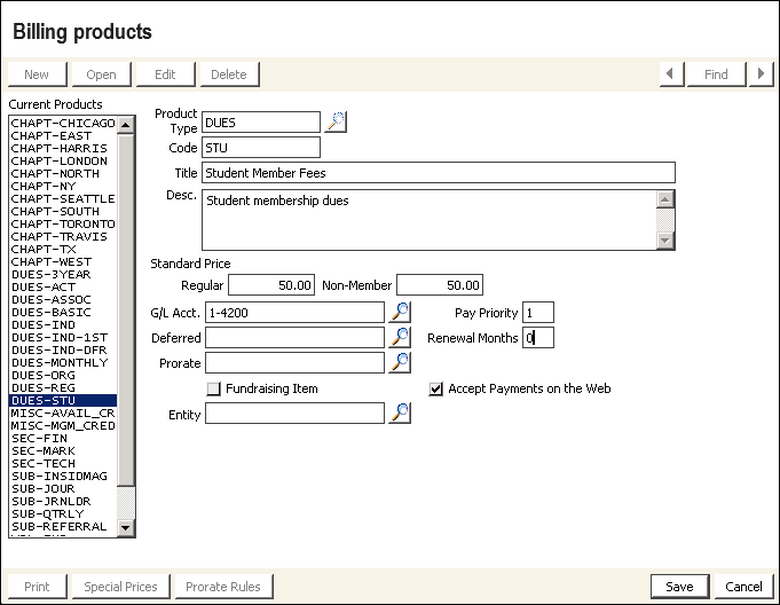
- Create a new Dues product. Dues products should be used for all normal membership dues items. The DUES code is used for standard, non-optional dues line items that are cross-referenced on the Set up customer types window. For more information, see Create a customer type.
 Click for details
- Select New, and choose a Product Type of DUES.
- Enter a Code. Choose a code that is unique and descriptive of your dues product. For example, for our Student membership, enter the code STU.
- Provide a Title and Description, as desired.
- Enter a Standard Price for Regular and Non-Member pricing.
- Select a general ledger account (G/L Acct.) for the income generated from the dues item.
- Enter a Pay Priority of 1. This priority determines the order in which the billing products are displayed and paid for. The higher the priority number, the lower the priority. A product with a Pay Priority of 1 will always come first.
- Click Save.
Note: The code entered should not contain any spaces or special characters other than an underscore ( _ ), and should contain no more than 15 alphanumeric characters.
Note: This price must be written in standard currency format.
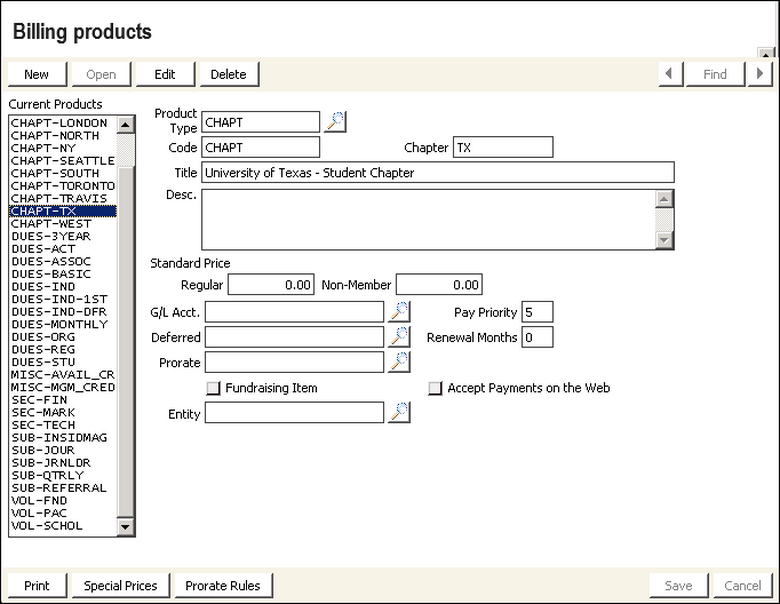
- (optional) Create a Chapter product to designate separate dues or memberships for chapters or local groups. You must assign a dollar amount to the chapter product to enable chapter billing.Click for details
- Select New, and choose a Product Type of CHAPT.
- Enter a Code. Choose a code that is unique and descriptive of your chapter product. When CHAPT is selected as the Product Type, then CHAPT is automatically populated in the Code field.
- Enter a Chapter to create a unique chapter name. For example, for our Student membership, enter a chapter of TX to name a university.
- Provide a Title and Description, as desired.
- Enter a Standard Price for Regular and Non-Member pricing.
- Select a general ledger account (G/L Acct.) for the income generated from the chapter item.
- Enter a Pay Priority of 5. This priority determines the order in which the billing products are displayed and paid for. The higher the priority number, the lower the priority. A product with a Pay Priority of 1 will always come first.
Note: The code entered should be unique, not contain any spaces or special characters other than an underscore ( _ ), and should contain no more than 15 alphanumeric characters.
Note: This price must be written in standard currency format.
- (optional) Create a Section product to provide opportunities to join specialty groups and sections. Section products represent groups that are joined only by request.Click for details
- Select New, and choose a Product Type of SEC.
- Use this code for optional add-on section memberships such as professional specialty groups.
- Enter a Code. Choose a code that is unique and descriptive of your section product.
- For our Student membership, enter a Code of MENT to designate the mentorship section.
- Provide a Title and Description, as desired.
- Enter a Standard Price for Regular and Non-Member pricing.
- Select a general ledger account (G/L Acct.) for the income generated from the section item.
- Enter a Pay Priority of 15. This priority determines the order in which the billing products are displayed and paid for. The higher the priority number, the lower the priority. A product with a Pay Priority of 1 will always come first.
Note: The code entered should be unique, not contain any spaces or special characters other than an underscore ( _ ), and should contain no more than 15 alphanumeric characters.
Note: This price must be written in standard currency format.
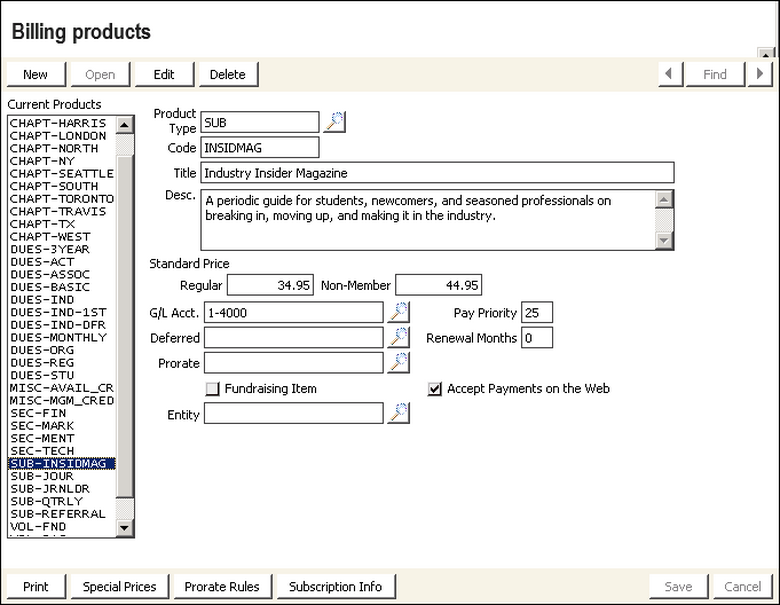
- (optional) Create a Subscription product to include Magazine or journal subscriptions.Click for details
- Select New, and choose a Product Type of SUB.
- Enter a Code. Choose a code that is unique and descriptive of your subscription product.
- Use this code for optional subscriptions such as journals and magazines. For our Student membership, enter a Code of INSIDMAG to designate the Industry Insider Magazine subscription.
- Provide a Title and Description, as desired.
- Enter a Standard Price for Regular and Non-Member pricing.
- Select a general ledger account (G/L Acct.) for the income generated from the subscription item.
- Enter a Pay Priority of 25. This priority determines the order in which the billing products are displayed and paid for. The higher the priority number, the lower the priority. A product with a Pay Priority of 1 will always come first.
Note: The code entered should be unique, not contain any spaces or special characters other than an underscore ( _ ), and should contain no more than 15 alphanumeric characters.
Note: This price must be written in standard currency format.
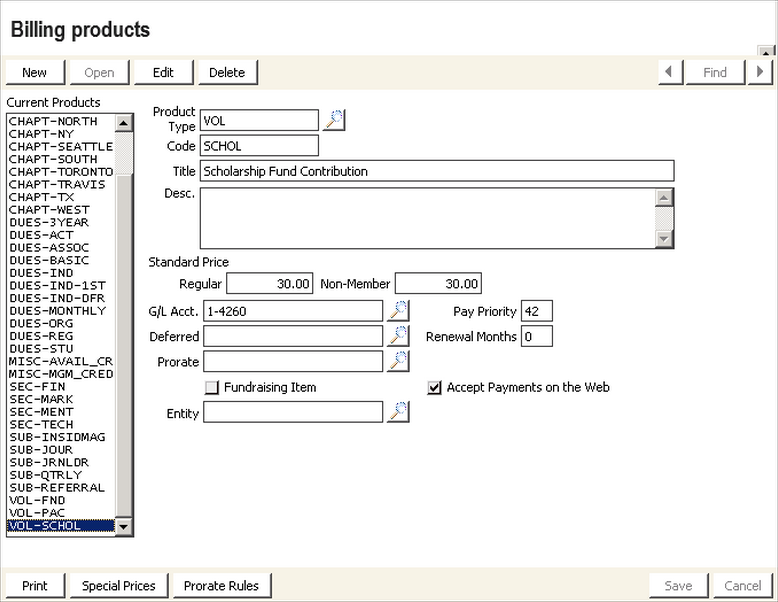
- (optional) Create a Voluntary Contribution product for suggested donations or contributions, such as gifts to PACs or foundations.Click for details
- Select New, and choose a Product Type of VOL.
- Enter a Code. Choose a code that is unique and descriptive of your voluntary contribution product.
- Use this code for optional subscriptions such as journals and magazines. For our Student membership, enter a Code of SCHOL to designate a scholarship fund.
- Provide a Title and Description, as desired.
- Enter a Standard Price for Regular and Non-Member pricing.
- Select a general ledger account (G/L Acct.) for the income generated from the voluntary contribution item.
- Enter a Pay Priority of 42. This priority determines the order in which the billing products are displayed and paid for. The higher the priority number, the lower the priority. A product with a Pay Priority of 1 will always come first.
Note: The code entered should be unique, not contain any spaces or special characters other than an underscore ( _ ), and should contain no more than 15 alphanumeric characters.
Note: This price must be written in standard currency format.
- Go to Settings > Membership > Activity types to ensure the Activity types for the following billing products are defined:
- CHAPT
- DUES
- MISC
- SEC
- SUB
- VOL
Create a new Activity type if not already defined. See Defining activity types for more information.
If you do not define activity types for your billing products, they might not display correctly on your Join Now pages. The Description for an activity type is displayed as the product header on your Join Now page.

Customer types define the categories to which you assign each customer record. These types designate the broad classification of customer categories. Assign a different type to each major customer class (Individual Member, Associate Member, Student Member, Hotel, and so forth) and at least one type to the Non-Member category. These membership categories define the membership levels and amount charged for membership or dues and subscriptions.
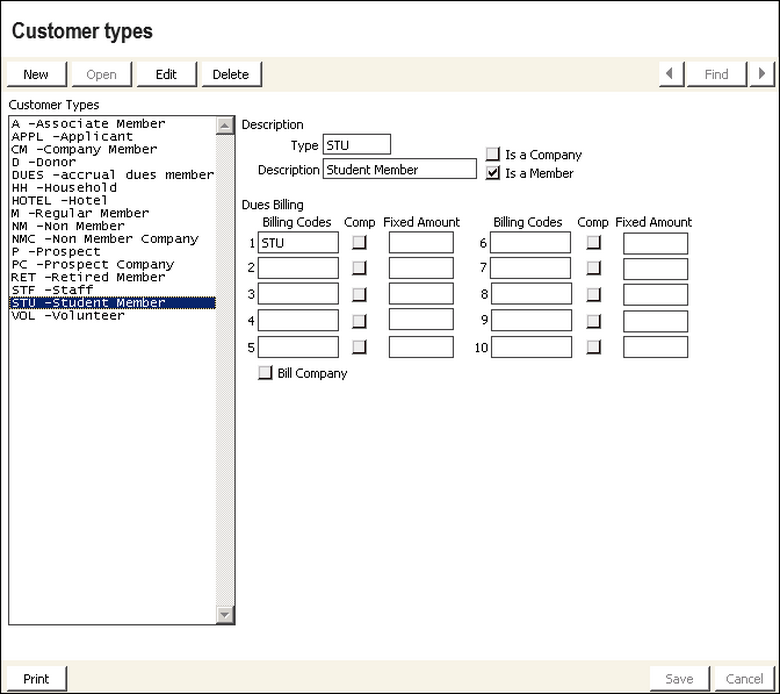
- In the Advanced Accounting Console, go to Settings > Membership > Customer Types, and click New.
- Enter a Type that is unique and meaningful. For our Student Join Now example, enter a type of STU, to correspond with the student billing product we created previously.
- In the Description field, enter the descriptive, full name of the customer group that corresponds to the code you assigned in the Type field.
- Select the Is a Member checkbox to indicate an individual member customer type.
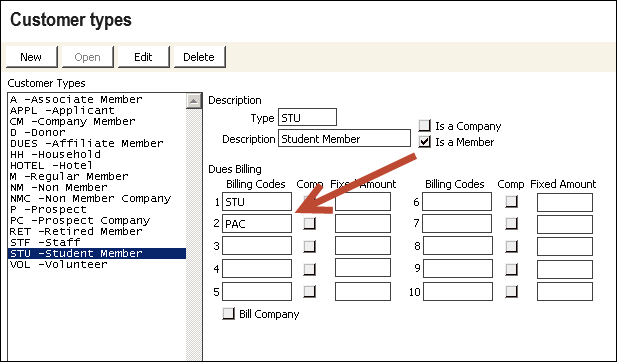
- Enter a Dues Billing Code that corresponds to the dues item created previously. These entries dictate the dues products that will be automatically billed for each customer type. Do not enter add-on products that are optional or that vary from customer to customer. For our example, enter STU.
- Click Save.
The billing cycle is used to define the product the General Product Display content item displays on the web. The billing cycle determines which items are included in the Join Now product, as well as the Member Type to which the person will be set when they submit the cart to purchase the Join Now item:
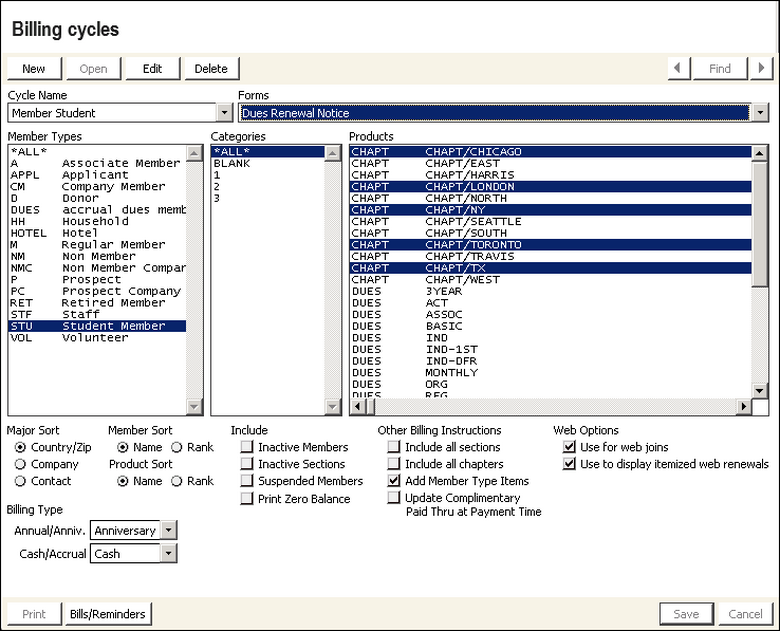
- In the Advanced Accounting Console, go to Settings > Billing > Billing Cycles, and click New.
- Enter a descriptive Cycle Name. The Cycle Name will appear as the title of the product in the content. We will enter Member Student since we are creating a student Join Now membership.
- From the Forms drop-down, select Dues Renewal Notice.
- Select only one Member Type to bill. This is the Member Type of the person once they check out. For our Student Member example, select the STU Member Type.
- Choose which categories to include. Select *ALL*.
- Select the Add Member Type Items checkbox to designate the billing cycle as a Dues billing. The billing codes defined in the Customer types window will also appear. For more information, see Defining customer types.
- Select any Products to include in addition to the Member Types items. How each product is displayed varies:
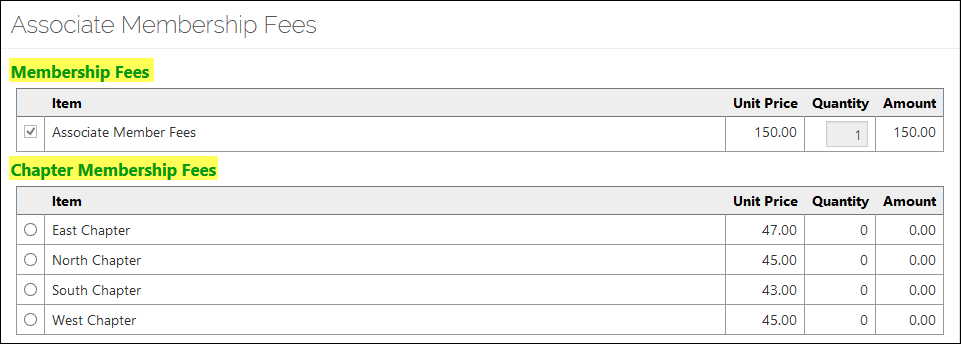
- CHAPT - Display as radio buttons, and only one can be selected at a time.
- DUES - Display as checkboxes that are automatically selected and cannot be unselected by the user.
- MISC - Display as checkboxes that are automatically selected and cannot be unselected by the user.
- SEC - Display as checkboxes that the user can choose to select or deselect.
- SUB - Display as checkboxes that the user can choose to select or deselect.
- VOL - Display as checkboxes that the user can choose to select or deselect. The user has control over the Amount field.
- Enable the Use for web joins and Use to display itemized web renewals checkboxes if you want to allow people to add or remove non member type items during renewals:
- Use for web joins – This option determines whether the billing cycle can be used to allow new members to join on the Web. If this option is selected, the billing cycle is available to be used to join online.
- Use to display itemized web renewals – If selected, each individual item in the renewal product is displayed. If not selected, you will see one product that contains the individual items.
- To avoid errors in displaying renewal invoices, do not select Add Member Type Items when Use to display itemized web renewals is selected. Also, do not select *ALL* in the Member Types list. Select each member type individually to view itemized dues renewal options.
- If the Use to display itemized web renewals option is selected, users will in some cases be redirected to a Renewal Detail screen when they add a renewal product to the shopping cart. The user will see all the billing products that are selected in the billing cycle as well as any other products that might be present in the invoice, and can add/remove products that are optional. Products of type DUES, CHAPT and MISC are mandatory. The renewal detail page appears only if the following are all true:
- The user was billed using only cash dues. If any dues were billed on a real/accrual invoice, then there will not be a link in the cart entry for the renewal fees, and any adjustments must be performed by Staff users in the Advanced Accounting Console.
- The billed amount and the current balance are the same. If they are not, then the user can pay the full amount due through the web-based sites, but cannot make adjustments. This can happen if the dues item is partially paid, has been manually adjusted by staff, or has a balance forward from a prior billing period.
- The Use to display itemized web renewals option is selected.
For accrual dues, all outstanding renewal invoices are represented in the Renew Now process. When a member clicks Renew Now, all outstanding invoices are placed in the cart. They can remove any invoice that they do not want to pay at that time. They can always pay outstanding renewal invoices from the Open Invoices list on their account page. For cash dues, if the Maintain Prev. Balance option has been enabled (go to Settings > Billing), and if a member has carried forward a balance, then the full amount due will be charged.
Note: Make sure that there are no dues products with a code that ends with _CREDIT selected in the Products area of the billing cycle when selecting the Use to display itemized web renewals option.
- Select Billing Types from the drop-downs:
- Annual/Anniv. – Anniversary or Annual
- Cash/Accrual – Cash
Note: To prorate the membership fee based on the date the member joins or to apply special user-defined prorating rules, you must bill on an annual basis. For more information, see Configuring billing options and Defining prorating rules.
Note: Join Now functionality supports only cash-based accounting. Using Join Now with an accrual dues system will still work, but iMIS will treat the dues as cash. Future renewal billings will be treated as accrual dues.
- Click Save.
Note: The billing cycle name should not have underscores in it, only spaces.
Note: To select multiple billing products from the list, use [CTRL]+click for each selection.
For more information about the Billing cycle window, see Overview of the Billing cycle window.
- From the Staff site, locate a sample Join Now page and make a copy.
- Open the content record and click Edit.
- Configure the General Product Display content item.
- In Default product to display, enter the name of the billing cycle (Cycle Name) created previously, replacing spaces with underscores. This is the product code for the billing cycle. For our Student Member example, enter Member_Student.
- Save and Publish.
Note: You can leave the Default product to display blank and use the same content record for multiple products. The product code (billing Cycle Name) should then be included as a URL parameter for iProductCode.
- Add the content record containing the General Product Display content item with your Join Now product (STU) to an easy-to-find navigation.
- Navigate to the Join Now page you have just created to ensure that the Join process reflects the chapters, subscriptions, and details that you need.