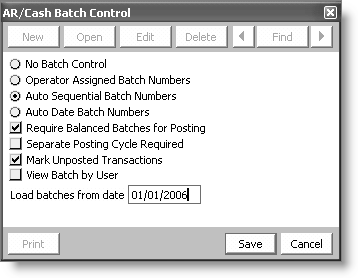
AR/Cash Batch Control window
This window specifies whether batch control is enabled, and if it is, the options that apply to batches throughout iMIS.

Batch control
The following options govern batch control in iMIS:
No Batch Control - Specifies that no batch control is used. This is a good option for simple or low-volume systems.
Operator Assigned Batch Numbers - Specifies that batch control is used and that data-entry operators can create their own batch numbers when needed. The batch number may be a combination of up to 15 alphanumeric characters.
Auto Sequential Batch Numbers - Specifies that batch control is used and that iMIS automatically assigns batch numbers to new batches using a sequential numbering system.
Auto Date Batch Numbers - Specifies that batch control is used and that iMIS automatically assigns batch numbers to new batches using a date-oriented technique. Multiple batches created on the same date are distinguished from each other with a sequential suffix attached to each new batch generated in a day. For example, 020515-1, 020515-2, and so forth.
Note: The following options are not displayed unless you enabled batch control by selecting one of the batch numbering options (Operator Assigned Batch Numbers, Auto Sequential Batch Numbers, or Auto Date Batch Numbers).
Require Balanced Batches for Posting
(Recommended) Specifies that unbalanced batches cannot be posted. For this option, iMIS considers a batch balanced when the following statements are true:
- The control amount is equal to the actual amount.
- The control count is equal to the actual count.
If either or both of the following statements are false, iMIS displays an error message, and does not post the batch.
Note: Hot posting (the default) reports transactions immediately.
Separate Posting Cycle Required
Specifies that transactions are not hot posted. Most users should not enable this option, because it prevents iMIS from automatically posting and updating accounting events to AR/Cash. Instead, transactions are posted only when the batch is posted.
Only in very high volume situations should you consider giving up the hot posting convenience, which saves processing time and speeds data entry.
Note: This option is not compatible with Service Central.
Mark Unposted Transactions
When selected, unposted transactions are preceded by (U) in the Description field on the Transaction Ledger window and line items with unposted transactions in the AR/Cash tab are preceded by (U).
Note: If the Separate Posting Cycle Required option is enabled, transactions are not displayed in the Transaction Ledger window until the batch is posted, so no transactions will be preceded by (U) if the Separate Posting Cycle Required option is enabled.
View Batch by User
Hides batches created by others from users whose authorization level for AR/Cash is less than 8. When this option is not selected, displays batches created by others. Hidden batches include the following batches:
- Accrual billing batches
- Orders with the Create New Batch for Invoicing option enabled
- AVAIL_CREDIT batches
- Importer batches (Billing, AR/Cash, Orders)
Load batches from date
Specifies a default date that is used to filter batches displayed in the Manage batches window. Users can override this filter.
To set up Batch Control
- From AR/Cash, select Set up module (see Set up module window for AR/Cash).
- Click Batch Control to open the AR/Cash Batch Control window.
- Click Edit.
- Select a batch control numbering option. The Auto Sequential Batch Numbers option or the Auto Date Batch Numbers option is recommended.
- (Recommended) Select the Require Balanced Batches for Posting option to require that the control amount equals the actual amount, and the control count equals the actual count, before posting.
- (optional) Select the Separate Posting Cycle Required checkbox.
- (optional) Select the Mark Unposted Transactions (see About marking unposted transactions) checkbox.
- (optional) Select the View Batch by User (see Limits on editing and deleting transactions) checkbox.
- Click Save.
- From AR/Cash, select Set up tables > Cash accounts to open the Set up cash accounts window.
- Make an entry for all cash accounts (see Setting up cash accounts) on the Cash Account window.
- Click Save.
Note: This option is incompatible with Service Central.