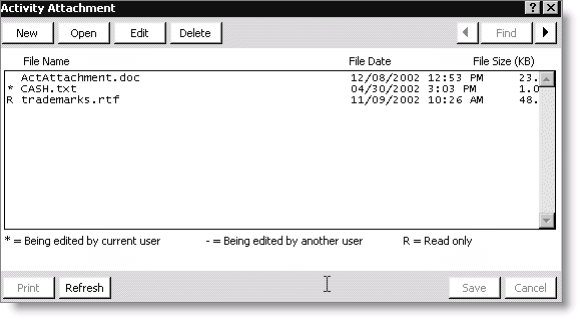
Activity Attachment window

Attachment List
Lists of attachments.
Attachment Legend
Indicates the current status of an attachment:
- * - Indicates an attachment is being edited by the current user.
- - - Indicates an attachment is being edited by another user.
- R - Indicates an attachment is only editable by an administrator.
Refresh
Rebuilds the list of attachments.
Attaching files to activity records
Activity attachments are managed in the Activity Attachment window. When you click Attachment on the Activity Detail window, the Activity Attachment window displays with a list of attachments, listed alphabetically according to file name, for the current activity. You can access the Activity Detail window by double-clicking a record in the Activities-All, Call, or Letters tab, or by accessing the View activity tasks window and double-clicking an activity task.
The total number of activity attachments that exists for an activity record displays in the Attachment(s) column on the Calls tab for call activities, and on the Activities-All tab for all activities.
To attach a file to an activity record
Note: Your administrator must enable the Allow user Edit option for the activity for which you want to add an attachment.
- From Customers, select Manage customers.
- Find a customer's record.
- Double-click the activity record to which you want to attach a file. The Activity Detail window displays.
- Click Attachment to open the Activity Attachment window.
- Click New. The Choose the file to attach to the Activity dialog displays. Browse to the file you want to attach to the activity record.
- Click OK. A message box opens and gives you the option to save as read-only.
- (optional) Enable the Save as read-only option to specify that only an administrator (a user with Customer authorization level of 8 or higher) is able to edit the attachment. If you do not enable this option, all users with appropriate permissions will be able to edit the attachment.
- Click Yes to save the attachment to the database and to add it to the list of attachments on the Activity Attachment window. Clicking No will cancel the activity attachment process.
Note: If you attempt to attach a file that exceeds the value specified by your administrator, iMIS displays a message that the file exceeds the file limit.
To create an activity and attach a file
You can add an activity record and attachment at the same time.
- From Customers, select Manage customers.
- Open a customer record.
- Select the Activities-All tab.
- Select the drop-down list located directly below the Sort by area, and select the activity type you want to create.
- Double-click the gray box containing the asterisk (*) to open the Activity Detail window.
- Click New.
- Enter an activity type in the Type field, or click the lookup icon to select an activity type.
- Enter values according to the fields that display.
- Click Attachment to open the Activity Attachment window. The activity record is automatically saved.
- Click New. The Choose the file to attach to the Activity dialog displays.
- Browse to the file you want to attach to the activity record.
- Click OK. A message box opens and gives you the option to save as read-only.
- (optional) Enable the Save as read-only option to specify that only an administrator (a user with a Customer authorization level of 8 or higher) is able to edit the attachment. If you do not enable this option, all users with appropriate permissions will be able to edit the attachment.
- Click Yes to save the attachment to the database and to add it to the list of attachments on the Activity Attachment window. Clicking No will cancel the activity attachment process.