Customer data entry
The Manage Customers window enables you to add to and edit customer information.
iMIS features such as address verification and duplicate record checking help ensure that you enter useful and maintainable customer information. Your administrator can configure these options to best fit your organization's business rules.
To enter a new customer record
From the Manage customers window you can maintain name, address, and demographic data relating to customers. The unique feature of the Manage customers window is that you can activate virtually all customer-specific operations within one window.
- From Customers, select Manage customers.
- Click New.
- (optional) Enter an ID number.
- (required) Select a Member Type description from the Member Type drop-down list .
- Select a status other than Active, if appropriate.
- (optional) Select a billing category description from the Category drop-down list.
- (optional) Select a prefix from the Prefix drop-down list.
- Enter the First Name, Middle initial, and Last Name.
- (optional) Select a Suffix from the drop-down list.
- (optional) Update the Informal Name as needed.
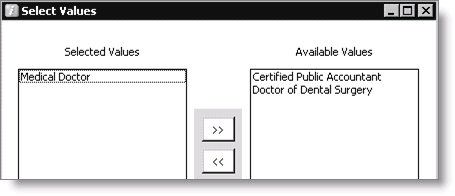
- (optional) Enter single or multiple (separated with a comma) Designation(s), or click the lookup icon to open the Select Values window and search designations defined by your administrator.
- (optional) Select a Member Title from the drop-down list.
- Click Save.
Note: The ID field is grayed out when the Auto Assign Member Number option is enabled by your administrator.
Note: If you do not have IDs auto-assigned, make sure you do not enter zero (0) for a customer ID.
Note: When entering a new record, First Name, Last Name, or Company Name is required.
Note: You can continue with assigning a Company ID to this customer record next.
To enter an address
The three primary address tabs in the Manage customers window are titled according to the prompts entered for Main, 2nd, and 3rd on the Customer Setup - Address and Notes window (Customers > Set up module > General, Address and Notes). By default, the first address is set as the preferred address for mailing, billing and shipping purposes. However, you can customize which address is to be used for each purpose by setting the Preferred Mail, Preferred Bill, and/or Preferred Ship indicators on each of the three primary address tabs.
Entering address information on the three primary address tabs:
- Enter the address information for each tab as needed.
- By default, the first address is automatically set as the preferred address for mailing, billing, and shipping purposes. However, you can customize which address is to be used for each purpose by setting the Preferred Mail, Preferred Bill, and/or Preferred Ship indicators on each of the three primary address tabs.
- Click Save.
If you need more addresses, populate the ADDRESS_PURPOSE general lookup/validation table with at least one value (see ADDRESS_PURPOSE (Validation)). When you log back in to iMIS, a New address tab appears after the three primary address tabs, which lets you select an address purpose.
- Select the New tab to open the New Address window.
- Select an address purpose from the drop-down list.
- Click OK.
Note: You can create more than one address with the same custom purpose (defined in the General Lookup/Validation table for ADDRESS_PURPOSE), but multiples are not allowed for the standard purposes (defined in Customer Setup > Address and Notes).
Note: When Accumail is licensed and installed, the Verify Addresses option is available.
To enter a new company record in iMIS Desktop
- From Customers, select Manage customers.
- Click New.
- (required) Select a Member Type description from the Member Type drop-down list.
- Tab to the Company ID field and enter the company name or click the lookup icon to open the Find Company window and search available company records (see Finding customer records).
- Click Save, or continue with entering an address for this company customer record.
Note: When entering a new record, Company Name is required.
Note: Company Sort is populated after you move out of the Company Name field.
To select values for the Designation field
- From Customers, select Manage customers.
- Click the lookup icon on the Designation field to select a value.
- Use one of the following methods to move items to the Selected Values list:
- Double-click the item in the Available Values list to move it to the Selected Values list.
- Select the item in the Available Values column and click << to move the item to the Selected Values list
- Use one of the following methods to remove items from Selected Values list:
- Double-click the item in the Selected Values list to move it to the Available Values list.
- Select the item in the Selected Values list and click >> to move the item to the Available Values list.
- Click OK to close the Select Values window.
- Click Save on the Manage customers window to save the value(s) in the Designation field to the database.
The Select Values window opens.
