Working in data grids
The History and Detail sections of the Manage customers window display information in a data grid. You can resize these sections of the window and resize the data grids, if needed.
To navigate within a data grid
Use the following keyboard controls to navigate within those tabs in the History and Detail sections of the Manage customers window that display information in a data grid (such as in the Salutations, Billing, or multi-instance, user-defined tab):
- Page Up - Press this key to move the focus on the grid up one full screen. If the current record is on the top page of the grid, pressing this key will move the focus to the top record of the grid.
- Page Down - Press this key to move the focus on the grid down one full screen. If the bottom visible row is already visible in the current display, pressing Page Down will move the focus to the last record in the grid.
- Home - Press this key to move the focus on the grid to the first column of the current row in the grid. If the cursor is in a cell and blinking and at least one character exists in the field (as in data entry mode), the tab focus will move to the beginning of the data in that cell. If you press Ctrl+Home, the focus moves to the top record in the entire grid, scrolling if necessary.
- End - Press this key to move the focus on the grid to the last column of the current row in the tab. If the cursor is in a cell and blinking and at least one character exists in the field (as in data entry mode), the tab focus will move to the end of the data in that cell. If you press Ctrl+End, the focus moves to the last record in the entire grid, scrolling if necessary.
To resize a data grid
You can resize data grids in the Detail and History sections according to the following:
- To adjust the width of a data grid, drag the boundary on the right side of the column heading until the column is the width you want.
- To adjust the height of a data grid, drag the boundary on the row heading until the row is the height you want.
- To hide an unused column of a data grid, drag the boundary on the left side of the column heading until the column you want to hide is no longer visible.
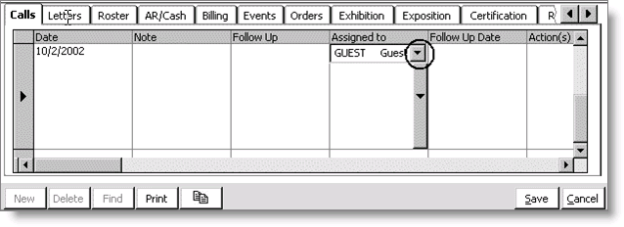
Note: When the height of a row is increased and a field contains a drop-down list, a single drop-down arrow displays. To select a value, you must double-click the single drop-down arrow (a second drop-down arrow displays at the top of the column) and click the top drop-down arrow.
Example 1
In the following example, to expand the Log Text field and lengthen the Date field to display more data, drag the boundary at the end of the Log Text field to the right and the boundary at the bottom of the field to the left of the Date field:

Example 2
To hide the Full Name and Company fields on the Relationships tab to view the Relationship Name without having to scroll, drag the boundary at the beginning of the Description field to the left until you reach the end of the ID column (the cursor changes to a half I-beam to indicate a field is hidden).


Example 3
To select a value from the Assigned to drop-down list on the Calls tab after increasing the height of a row, double-click the single drop-down arrow (a second drop-down arrow displays), and click the top drop-down arrow.
