Access Accounts for Windows
iMIS provided support to meet export requirements for Access Accounts for Windows 95 version 3.41B or greater. This support was in place in iMIS LAN as of version 3.50b and iMIS as of version 4.01.
To set up iMIS for Access Accounts
- From AR/Cash, select Set up module, and click G/L Interface to open the AR/Cash General Ledger Interface window.
- Click Edit.
- From the GL interface type drop-down list, select Access Accounts.
- Select an option from the Summarize by drop-down list.
- (Recommended) For the Output file path/name, enter the Access\Import subdirectory for the path and NOMJRNLS.TXT for the file. This is the default path location and file name where Access Accounts will use for importing general ledger transactions.
Note: Optionally, you can enter a different path and/or file name than the default settings, as outlined above. For example, you can enter a file name that contains the allowed special characters (for example, ? to append a sequential number, # to create multiple export files for multiple entities). If you elect to use a non-default path and/or file name, be sure to choose the Always Prompt for Files option in the Access Accounts setup.
To create the export file from iMIS (Access Accounts)
- Generate the general ledger transaction export files using AR/Cash > Process month-end procedures > Create GL Journal.
To import data into Access Accounts
- Open the Access Import/Export Utility.
- Select Access Accounts > Import.
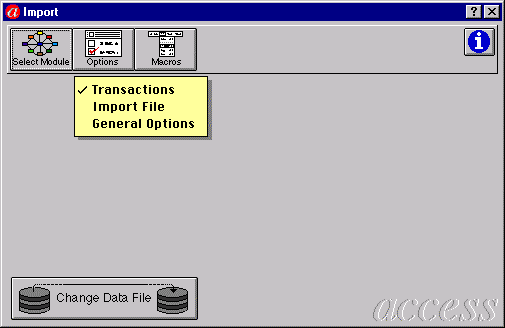
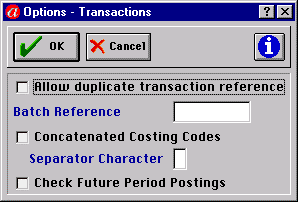
- Select Options > Transactions.
- (Recommended) Ensure that all options remain unchecked, as displayed below. Click OK.
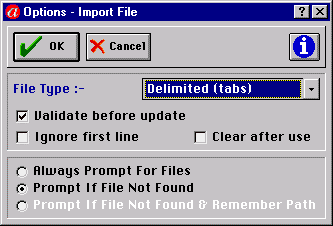
- Click the Options button and select Import File.
- Select Delimited (tabs) from the drop down list for the File Type.
- Enable the Validate before update checkbox.
- (Recommended) Select the Prompt if File Not Found radio button if the default path and file name were entered at the iMIS setup step 3 above. Otherwise, select the Always Prompt for Files options.
- Click OK.
To integrate the General Ledger from Access Accounts
- Open the Access Import/Export Utility.
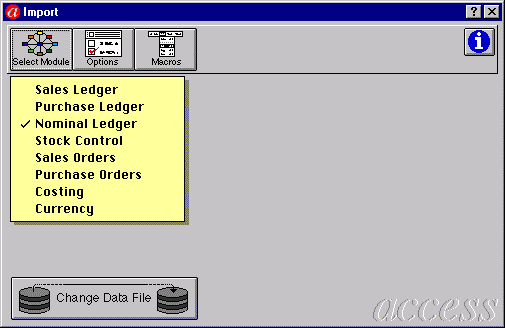
- Select Access Accounts > Import.
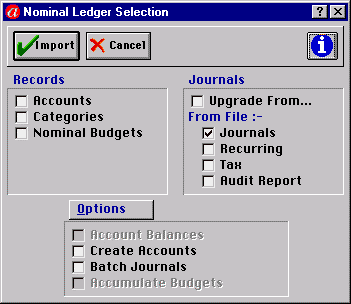
- Click the Select Module button and select Nominal Ledger.
- In the Nominal Journal Selection window, enable only the From File: - Journals checkbox only. Ensure that all other options are disabled or unchecked, as in the example below.
- Click the Import button.
- To proceed with the import validation process, answer or click Yes to the next four pop-up questions:
- Have you taken a backup of your data?
- The import routine may take a long time! Are you sure you wish to continue?
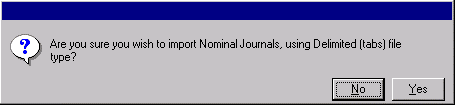
- Do you wish to validate Nominal Journals?
- Are you sure you wish to validate Nominal Journals, using Delimited (tabs) file type?
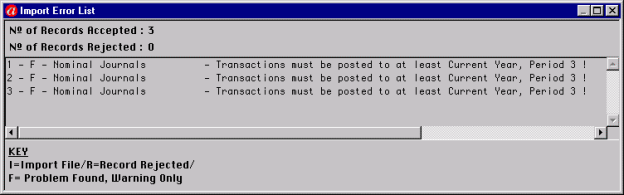
- As the transactions are tested for validity, an error list is generated. It is normal to get Warnings concerning the fiscal period. Investigate problems if you received other types of errors (for example, the No. of Records Rejected is greater than 0).
- Begin the actual import process by repeating steps 4 and 5 above.
- Answer or click No to Do you wish to validate Nominal Journals?
- Answer or click Yes to the following pop up question if you only received warning messages about the fiscal period.
- After the import is complete, you may receive another warning message about the fiscal period. You can close the window. Your iMIS GL Integration Entry should have posted to your Nominal Accounts area.
Export/Import File Example
The export/import file is a simple tab delimited file.
