Exact for Windows
The iMIS Financial Systems (GL) Interface module now provided support to meet import requirements for Exact for Windows version 3.11 or greater. This support was in place in iMIS version 4.11.
To set up iMIS for Exact
Step 1 – Change the GL Interface Type
- From AR/Cash, select Set up module, and click G/L Interface to open the AR/Cash General Ledger Interface window.
- Click Edit.
- From the GL interface type drop-down list, select Exact.
- Select an option from the Summarize by drop-down list.
- Enter the Output File Path/Name, which dictates how iMIS should name the export/import file and where it should be stored.
- Click Save.
Note: Each import file is limited to 999 detail lines. We recommend you do not choose the Detail option.
Step 2 – Set up a special EXACT General Lookup/Validation Table
Create a new General Lookup/Validation Table to setup Accounts Receivable entries for export to Exact.
- From Customers, select Set up tables > General lookup/validation to open the General lookup/validation window.
- Create a new General Lookup/Validation Table to setup Accounts Receivable entries for export to Exact. Go to Customers > Set up tables > General lookup/validation.
- Select (New Table) from the list of table types. The New Table Type window opens.
- Enter a New Table named EXACT and click Save.
- Click New and enter the following fields:
- Code: Must be a valid iMIS GL account for Accounts Receivable under Default Accounts for your Exact-compliant entity. In the example below, 1300 corresponds to the Domestic Debtors account in the demo data from Exact.
- Expansion: Must be a valid Debtor ID number from Exact (see Set up company – Financial > Debtor data > Debtors for a list of valid codes).
- Description: As appropriate.
To set up Exact
Note: iMIS assumes the General Journal number to be 90. If you do not have a journal 90 in place as a General Journal type, you should take the appropriate steps to enter one. Otherwise, the setup within Exact includes simple steps to modify the existing general journal import definition file, which will be used for both the Trial and Final Import processes.
Note: It is best to do this step with a sample or test export\import file available.
- From Exact for Windows, select Menu > Systems Maintenance.
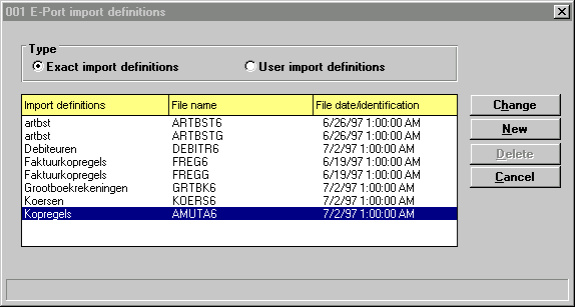
- Choose File Control > Import > Definitions.
- Select the Kopregels Import Definition (file name AMUTA6) and click the Change button.
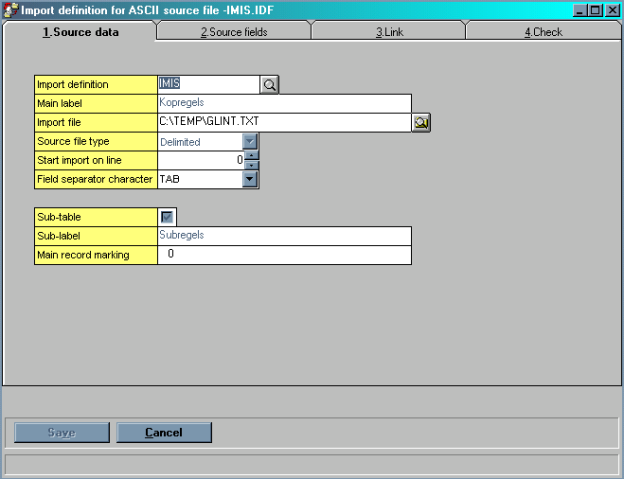
- From the Source Data tab, override the Import Definition name to iMIS. If appropriate, change the Import File or browse for the correct import path/file location.
- If you have a test import file, you can select the Check tab and click the Check button to validate the accuracy of the data.
- Click Save.
To create the export file from iMIS (Exact)
- Generate the general ledger transaction export files using AR/Cash > Process month end procedures > Create GL Journal.
To import data into Exact
- From Exact for Windows, select Menu > Systems Maintenance.
- Choose File Control > Import > Import.
- Select the User Import Definitions option.
- Select the Kopregels/IMIS line and click the Open button.
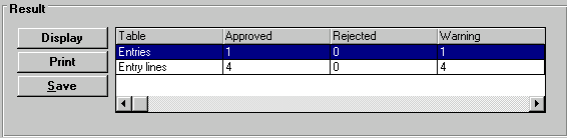
- Click the Check button to validate the import data. The summary results will display in the lower portion of the window. If there are any errors, you can highlight the line and click either the Display or Print buttons to review the warning or error messages.
- If the data checked out properly, you can import the unposted batch by clicking the Import button on this window. You will be prompted about the backup status. Enter Y to proceed with the import.
- To view the imported transaction, from the Financial menu select Enter > Enter > General Journal and do a lookup to locate the imported transactions. Note that you will not be able to edit the transactions from this window because the cash account is not normally included in a General Journal transaction.
- To post the imported transaction, from the Financial menu select Process > Post Entries and process in the same manner as a normal posting run.

Export/Import File Example
The GL Interface process creates a file with a single line header and multiple detail lines (one for each debit and credit). Note that date values exported in field #8 (Date) for both the Import Header and Detail Lines are in a rearranged date format (DDMMYY). E-Port automatically rearranges the format to comply with the MM/DD/YY format in Exact for Windows.
Import Header Line Sample
"0""M""90""04""97""""iMIS GL:02/11/2011-02/11/2011""110211"""""""""0.00"N""" ""0.00""""""0.00"""""B"0.00""""0.00"""""N"""0.000.000.000.00""""""
Import Detail Lines Sample (Summarized by Month)
"1""M""90""04""97""""PAY, DEMO-DUES-PAY""010411""1100"""""""300.00"""" ""0.00"""""" """"""0.00""""0.00"0""""N"""0.000.000.000.00""""""
"2""M""90""04""97""""DIST, DEMO-DUES-BASIC""010411""1120"""""""-150.00"""" ""0.00"""""" """"""0.00""""0.00"0""""N"""0.000.000.000.00""""""
"3""M""90""04""97""""DIST, DEMO-DUES-JOUR""010411""1130"""""""-65.00"""" ""0.00"""""" """"""0.00""""0.00"0""""N"""0.000.000.000.00""""""
"4""M""90""04""97""""DIST, DEMO-DUES-ACT""010411""1140"""""""-45.00"""" ""0.00"""""" """"""0.00""""0.00"0""""N"""0.000.000.000.00""""""
When an outstanding balance exists, the entry to Accounts Receivable contains two additional fields that are required by the iMIS import definition (based on AMUTA6.IDF) in Exact. The Debtor ID (field 10) is required for successful import, and the Invoice Number (field 12) is required to successfully post the imported AR transactions to the General Ledger. See the following Import Header Line 2 and note that the Debtor ID (1510) must correspond to a valid entry in Exact.
The Invoice Number (00000001) is an arbitrary numeric constant. If necessary, you can manually modify this number from within Exact after the transactions have been imported, but before the GL entries are posted to the General Ledger.
To modify the invoice number
- Go to the Financial menu. Select Enter > Enter > General Journal.
- In the Jrnl field, enter the appropriate journal number (for example, 90).
- Enter the appropriate FY.
- Enter the appropriate Per. and Seq. for the corresponding GL entries, or click the magnifying glass icon to select the batch from a list.
- Modify the Invoice field for the desired AR entries and click Save.
Import Header Line Sample
"0""M""90""03""11""""iMIS GL:03/15/11-03/15/11""150311"""""""""0.00"N""" ""0.00""""""0.00"""""B"0.00""""0.00"""""N"""0.000.000.000.00""""""
Import Header Line Sample (Summarized by Batch)
"1""M""90""03""11""""110311-1: EXACT Cash Rece""150311""1111"""""""150.00"""" ""0.00"""""" """"""0.00""""0.00"0""""N"""0.000.000.000.00""""""
"2""M""90""03""11""""110311-1: EXACT-AR-AR""150311""1300""1510""""00000001"50.00"""" ""0.00"""""" """"""0.00""""0.00"0""""N"""0.000.000.000.00""""""
"3""M""90""03""11""""110311-1: EXACT-AR-EXACT ""150311""4000"""""""-200.00"""" ""0.00"""""" """"""0.00""""0.00"0""""N"""0.000.000.000.00""""""