Quickbooks Pro
iMIS provides support to meet export requirements for Quickbooks Pro version 5.0 or greater. This support is in place in iMIS LAN version 3.50d or greater and iMIS as of version 4.10.
In Quickbooks Pro, all receivable and payable accounts must be cross-referenced to a customer or vendor account, respectively. For this purpose, you must set up a special iMIS customer in Quickbooks Pro to which the accounts receivable entries are linked. If you have to charge sales tax through iMIS processing, you must map the appropriate Vendor code to the tax liability account in iMIS. These required setup steps are outlined below.
To set up iMIS for Quickbooks Pro
The setup steps from iMIS include making appropriate choices on the AR/Cash General Ledger Interface window and an optional step to establish a Quickbooks Pro general/lookup validation table.
The iMIS setup steps are described in detail below:
Step 1 – Change the GL Interface Type
- From AR/Cash, select Set up module, and click G/L Interface to open the AR/Cash General Ledger Interface window.
- Click Edit.
- From the GL interface type drop-down list, select Quickbooks Pro.
- Select an option from the Summarize by drop-down list.
- Enter the Output File Path/Name, which dictates how iMIS should name the export/import file and where it should be stored. Although you can be flexible in what name and directory you assign to the export file, Quickbooks Pro will, by default, look in the qbooksw directory for import files with an .IIF extension. If you follow these defaults, there will be fewer steps required to importing.
- Use a # sign in the file name to instruct iMIS to create files for each iMIS organization code, with the ORG code inserted in the file name.
- Use a ? mark in the file name to instruct iMIS to create sequentially numbered files with each subsequent file that is generated.
- Click Save.
For best results, set the extension of the file name to .iif (i.e., I:\IMIS\GLINT.iif).
For example, #glint?.iif will create ORG1glint1.iif and ORG2glint1.iif for the first export and ORG1glint2.iif and ORG2glint2.iif for the next export.
Step 2 – Set up a special QUICKBOOKS General Lookup/Validation Table
You must follow these steps if you process sales tax through iMIS. If not, you can skip them. Creating this validation table will associate the QuickBooks vendor with your tax account in the GL_ACCOUNT table. All entries in the export file for this GL Account will be assigned to the appropriate vendor, instead of the Quickbooks customer “iMIS”.
- From Customers, select Set up tables > General lookup/validation to open the General lookup/validation window.
- Select (New Table) from the list of table types. The New Table Type window opens.
- Enter a New Table named QUICKBOOKS and click Save.
- Click New and insert a new record with the code equal to your tax liability account in the Code field.
- In the Expansion field, fill in the Quickbooks Vendor Name associated with your tax liability account.
- Click Save.
To set up Quickbooks Pro
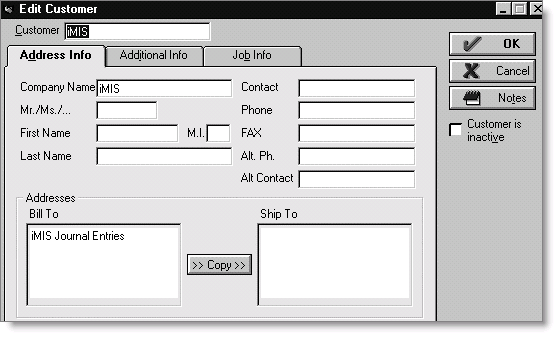
- The setup within Quickbooks Pro includes a simple step to set up a special iMIS customer account to which all accounts receivable amounts will be linked.
- Select Lists > Customer:Job List.
- From the Customer:Job List window, select New from the Customer:Job List drop-down list.
- Assign the code “iMIS” as the Customer Name and complete any other fields, as desired.
- Click OK.
To create the export file from iMIS (Quickbooks Pro)
- Generate the general ledger transaction export files using AR/Cash > Process month-end procedures > Create GL Journal.
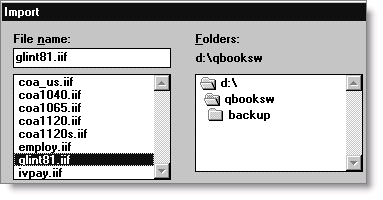
To import data into Quickbooks Pro
- Select File > Import.
- In the Import window, locate and double-click the appropriate iMIS export/import file.
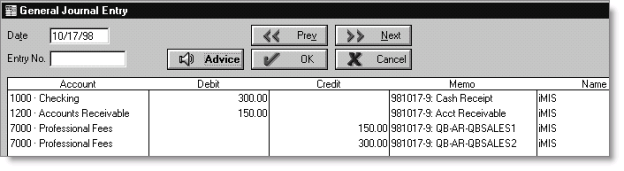
- Once imported, you can view the data by selecting Activities > Make Journal Entry and choosing the Previous and/or Next buttons until the entry or entries are located.
Export/Import File Example
The export/import file is a simple fixed-length export/import file that contains a heading section, a transaction header line for each journal entry to be created, and detail document lines for each additional debit or credit entry in that group (determined by the Summarize By field in iMIS). For example, if you summarize by batch, the first line of the export file for a batch containing payments and meeting registrations may show the Accounts Receivable total for the batch on the first line, followed by lines with totals for each additional GL account/pseudo-account in that batch.
Each group of entries are posted to QuickBooks under a single transaction, with transaction type of JOURNAL. iMIS generates a new journal entry each time the following is encountered:
- A new transaction date (for Day or Detail summary methods)
- A new batch (for Batch summary methods)
The following export/import example shows a small interface file for two batches across one date, summarized in iMIS by batch. Each batch is set off by a beginning line that starts with
TRNS and an ending line containing only “!ENDTRNS.” Each set of entries is recorded in QuickBooks
!TRNS TRNSTYPE DATE ACCNT NAME MEMO AMOUNT
!SPL TRNSTYPE DATE ACCNT NAME MEMO AMOUNT
!ENDTRNS
TRNS GENERAL JOURNAL 03/10/11 1-1100 iMIS PAY, DEMO-ORDER-PAY 38.00
SPL GENERAL JOURNAL 03/10/11 1-1150 iMIS DIST, DEMO-ORDER-INV -12.57
SPL GENERAL JOURNAL 03/10/11 1-1200 iMIS AR, Acct Receivable 120.25
SPL GENERAL JOURNAL 03/10/11 1-2350 iMIS DIST, DEMO-ORDER-TAX/TX -2.25
SPL GENERAL JOURNAL 03/10/11 1-4000 iMIS DIST, DEMO-MEETING-BAMS/TECH -50.00
SPL GENERAL JOURNAL 03/10/11 1-4000 iMIS DIST, DEMO-ORDER-V101 -30.00
SPL GENERAL JOURNAL 03/10/11 1-4500 iMIS DIST, DEMO-MEETING-BAMS/GOLF -70.00
SPL GENERAL JOURNAL 03/10/11 1-4900 iMIS DIST, DEMO-ORDER-HANDLING_2 -1.00
SPL GENERAL JOURNAL 08/30/05 1-5150 iMIS DIST, DEMO-ORDER-COGS 12.57
SPL GENERAL JOURNAL 03/10/11 1-5400 iMIS DIST, DEMO-ORDER-FREIGHT_2 -5.00
ENDTRNS
TRNS GENERAL JOURNAL 03/10/11 1-1200 iMIS AR, Acct Receivable 38.00
SPL GENERAL JOURNAL 03/10/11 1-4500 iMIS DIST, DEMO-MEETING-BAMS/GOLF -38.00
ENDTRNS