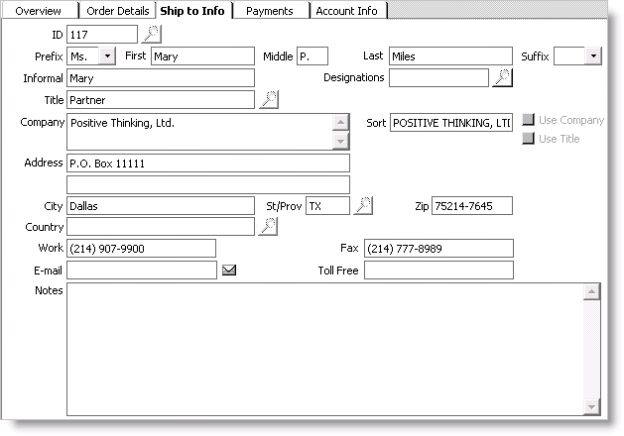
Enter and edit orders window - Ship to Info tab

ID
Enter a 'Ship to' customer's ID; select the Find icon to look up an ID. By default, the ID field displays the 'Bill to' customer's ID, and the Ship to Info tab displays the 'Bill to' customer's name and address information. When an ID other than the 'Bill to' customer's ID is entered in the ID field, the new 'Ship to' customer's name and address information populate the tab.
Prefix
Select a 'Ship to' customer's prefix from the drop-down list, such as Mr., Ms., or Dr.; prefixes are defined on the PREFIX general lookup/validation table (from Customers, select Set up tables > General lookup/validation).
First
Enter a 'Ship to' customer's first name.
Middle
Enter a 'Ship to' customer's middle name.
Last
Enter a 'Ship to' customer's last name.
Suffix
Select a 'Ship to' customer's suffix from the drop-down list, such as Jr., Sr., or III; suffixes are defined on the SUFFIX general lookup/validation table (from Customers, select Set up tables > General lookup/validation).
Informal
(Defaults to the 'Ship to' customer's First name) Enter a 'Ship to' customer's informal name or nickname.
Designations
Enter a 'Ship to' customer's professional designations, such as CPA or MD. Select the Find icon to look up a designation; designations are defined on the DESIGNATION general lookup/validation table (from Customers, select Set up tables > General lookup/validation).
Title
Enter a 'Ship to' customer's professional title. Select the Find icon to look up a title; titles are defined on the TITLE general lookup/validation table (from Customers, select Set up tables > General lookup/validation).
Company
Enter a 'Ship to' customer's company name. Depending on the length of the name entered, iMIS may truncate the company name in the Ship to Address area of the Enter and edit orders window.
Sort
Specify a value by which you want to sort a company record (Name.COMPANY_SORT). iMIS automatically removes the first instance of the word “The” from a company name.
Use Company
Enable to include the company name with the Ship To address on reports. This affects only the Ship To address that prints on reports and does not apply to the Bill To address. The Bill To (preferred billing) address's Use Company option is defined on the Customer Setup - Address and Notes window.
When entering product orders, iMIS automatically sets this option to equal the settings on the Customer Setup - Address and Notes window for the customer's preferred billing address (designated on the Manage customers window). You can override the setting on the Ship to Info tab as necessary for the customer's Ship To address (does not affect the Bill To address).
Note: The label for the Use Company option is customizable, so your system may display another label for this option. The value entered in the Institute Type field on the Customer Setup - Basic Options window defines the option's label.
Use Title
Enable to include the customer title with the Ship To address on reports. This affects only the Ship To address that prints on reports and does not apply to the Bill To address. The Bill To (preferred billing) address's Use Title option is defined on the Customer Setup - Address and Notes window.
When entering product orders, iMIS automatically sets this option to equal the settings on the Customer Setup - Address and Notes window for the customer's preferred billing address (designated on the Manage customers window). You can override the setting on the Ship to Info tab as necessary for the customer's Ship To address (does not affect the Bill To address).
Address
Enter a 'Ship to' customer's street address in one or both of the fields. Depending on the length of the address entered, iMIS may truncate the address in the Ship to Address area of the Enter and edit orders window.
City
Enter a 'Ship to' customer's city.
St/Prov
Enter a 'Ship to' customer's state or province. Select the Find icon to look up a state or province.
Zip
(Accepts up to nine characters) Enter a 'Ship to' customer's ZIP code.
Country
(Leave blank to accept the default) Enter a 'Ship to' customer's country. Select the Find icon to look up a country.
Work
Enter a 'Ship to' customer's work telephone number.
Fax
Enter a 'Ship to' customer's fax number.
Enter a 'Ship to' customer's e-mail address.
Toll Free
Enter a 'Ship to' customer's toll free telephone number.
Notes
Enter any specific notes about an order.
Note: Do not enter special characters (such as square brackets) in the Notes field. Entering special characters generates an error message and does not allow an order to be completed.
To enter 'Ship to' customer information
- From Orders, select Enter and edit orders to open the Enter and edit orders window. The Overview tab displays by default.
- Open the order (see Finding orders) for which you want to edit the 'Ship to' customer's information.
- Select the Ship to Info tab.
- Click Edit.
- (optional) If you are shipping an order to a customer other than the 'Bill to' customer:
- Enter the 'Ship to' customer's ID in the ID field.
- Press Tab to populate the window with the 'Ship to' customer's name and address information.
- Make any necessary changes to the 'Ship to' customer's name and address information. Any changes made affect only the current order and not the customer's record.
- Skip the following step.
- (optional) Edit the 'Ship to' customer's name and address information. Any changes made affect only the current order and not the customer's record.
- Click Save.
The 'Ship to' customer's information displays in the Ship to and Ship to Address fields on the Enter and edit orders window.