Defining value ranges
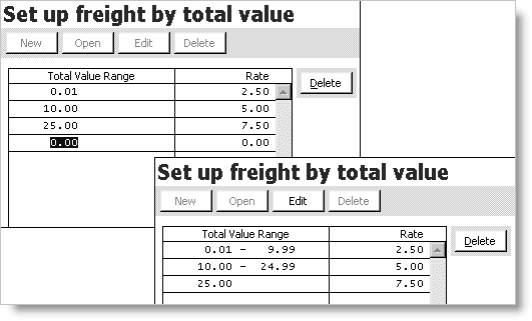
Freight rates can be defined for any range of order values, and no limit exists to the number of value ranges and rates that can be defined. When defining a rate's value range, only the low value of the range is entered in the Total Value Range field. The high value of the range is not entered; it is calculated upon completing and saving the table.
When defining a value range's low value, the low value must be greater than $0.00, such as $0.01; $0.00 cannot be the beginning range. In addition, if your beginning range's lowest value is $5.00 for example, then freight will not be calculated for any orders valued less than $5.00.
Each range's high value is determined by each succeeding range's low value; a range's high value equals the low value of the succeeding range minus .01.
To define a single value range
- Enter the low value in the Total Value Range field. (Low values must be greater than $0.00; $0.00 cannot be the beginning range.)
- Enter the Rate for the order value range.
- Enter the low value of the succeeding range in the Total Value Range field.
For example, say you need to define rates for the following three order value ranges:
- Orders with a value greater than $0.00 and less than $10.00 will cost $2.50 to ship.
- Orders valued between $10.00 and less than $25.00 will cost $5.00 to ship.
- Orders valued above $25.00 will cost $7.50 to ship.
To set up value ranges for required rates
- Define the first value range:
- Enter 0.01 in the Total Value Range field for the first range's low value.
- Enter 2.50 for the Rate of the first range.
- Press Tab.
- Define the second value range:
- Enter 10.00 in the Total Value Range field for the second range's low value. By entering 10 for the second range's low value, the first range's high value will equal 9.99 when the entire table is completed and saved.
- Enter 5.00 for the Rate of the second range.
- Press Tab.
- Define the third value range:
- Enter 25.00 in the Total Value Range field for the third range's low value. By entering 25.00 for the third range's low value, the second range's high value will equal 24.99 when the entire table is completed and saved.
- Enter 7.50 for the Rate of the third range.
- Click Save.
The Total Value Range field will calculate and display the low and high values for each range.

To define a value range
- From Set up freight by total value window, click Edit.
- Enter the first range's low value in the Total Value Range field. (Low values must be greater than $0.00; $0.00 cannot be the beginning range.)
- Enter a Rate for the first value range, and press Tab.
- Enter a value in the Total Value Range field. The value entered determines the following:
- The high value of the preceding range.
- The low value of the current range you are defining.
- (optional) Repeat this process for each additional value range you are defining.
- Click Save.
To add a value range
When adding value ranges, you can add additional, expanded ranges as well as ranges that fall between other ranges.
- From Set up freight by total value window, click Edit.
- Place your cursor on the Rate of the last value range, and press Tab to display a new line (0.00).
- Define the new range:
- Enter the new range's low value in the Total Value Range field.
- Enter a Rate for the new range.
- Click Save. When you save the new range, it will be inserted in the table, and the high value will be calculated.
To edit or delete a value range
- From Set up freight by total value window, click Edit.
- Select the total value range you want to edit (you only can edit the low value of a range and the Rate). To delete a total value range:
- Select the row of the range you want to delete.
- Click the Delete button to the right of the table.
- Click Save.
The ranges are recalculated.