Implementing Payflow Pro as an authorization gateway
Note: Payflow Pro authorizes credit card transactions up to $9,999.00.
Before you go live with card authorization using Payflow Pro (from PayPal, previously VeriSign), you must take several steps:
- Ensure you have set up card authorization in iMIS.
- Register with the Payflow Pro card authorization gateway.
- Verify your registration setup.
- Apply for a merchant bank account at a financial institution.
- Submit and review test transactions.
- The acquiring financial institution approves the application and notifies the authorization gateway.
- Switch from test mode to live mode.
This process generally takes 2 to 4 weeks to complete.
To register for a Payflow Pro gateway
You must set up an account with PayPal (previously, VeriSign) for your Payflow Pro card authorization gateway.
- Go to the PayPal website at www.paypal.com.
- Select Business from the menu.
- Under Merchant Services, select Payflow Gateway > Get Started.
- From the Solution options, select Payflow Pro.
- From the Country drop-down list, select your country.
- Click Go.
- Complete the registration.
Note: Please make a note of your user login and password. You will need it to configure iMIS and to view reports on the PayPal website. ASI Technical Support does not have access to this information.
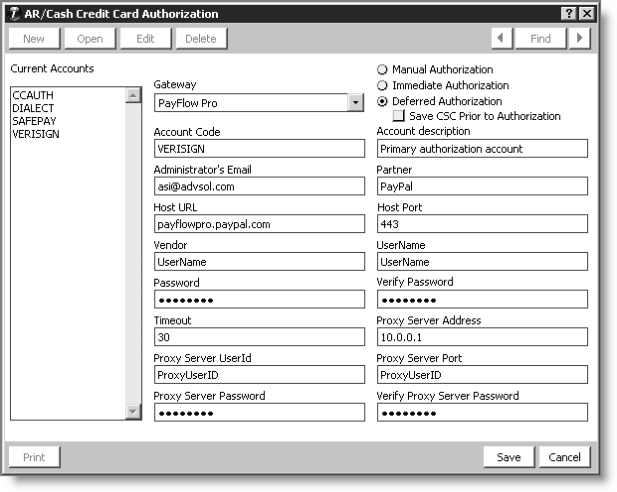
To set up a Payflow Pro card authorization account
- Select AR/Cash, Set up module, Credit Card Auth.
- Click New and select Payflow Pro from the Gateway drop-down list.
- Specify the authorization type: Manual, Immediate, or Deferred.
- Enter an Account Code, which will appear in the Select a Value window that opens for lookup on the CC Auth Account field on the Set up cash accounts window.
- Enter an Account description, which will appear under the CC Auth Account field on the Set up cash accounts window.
- Enter the Administrator’s Email.
- Enter the Partner value supplied in your account information.
- In the Host URL field, enter the test or live mode:
- Test mode: pilot-payflowpro.paypal.com
- Live mode: payflowpro.paypal.com
- Enter 443 in the Host Port field.
- Enter the values created during the Payflow Pro sign-up process:
- Enter the UserName in the Vendor field.
- Enter the UserName in the UserName field.
- Enter the Password in the Password field and in the Verify Password field.
- Enter 30 in the Timeout field. (This is a recommended value.)
- If you are using a proxy server, enter the values as supplied by your network administrator:
- Proxy Server Address
- Proxy Server UserId
- Proxy Server Port
- Proxy Server Password
- Verify Proxy Server Password
- Click Save.
- Repeat the steps for each account.
- Restart iMIS.
Note: For Credit Card Auth to display, you need a relevant license, such as CCAuth or Service Central.
Note: Once you save a card authorization account, you cannot change the Gateway field.
Note: Once you save a card authorization account, you cannot change the Account Code field.
Warning!
Do not go live without first setting the Host URL to test mode to verify the registration.
Troubleshooting
- If you do not restart iMIS after creating a new account, all transactions will have an authorize code of “DEFER” even if you enabled the Immediate Authorization option.
- You cannot delete a card authorization account that has been assigned a cash account.
- If you change the CC Auth account for a cash account (from one gateway to another or to a different account on the same gateway) and attempt to edit or delete transactions that were created earlier in the day before the change of the CC Auth account, there may be undesirable results, particularly if the CC Auth account was changed to a Payflow Pro account.
To associate an authorization account with a credit card cash account code
Before you can use card authorization you must set up credit card cash accounts on the Set up cash accounts window (from AR/Cash, select Set up tables > Cash accounts).
- From AR/Cash, select Set up tables > Cash accounts to open the Set up cash accounts window.
- Select a code to edit from the Current Cash Accounts list.
- Click Edit.
- Enter a CC Auth Account or click the Find icon to select a value.
- Click Save.
More:
Editing and deleting credit card payments
UNKNOWN and DECLINED Payflow Pro transactions