Using the Crystal Print Manager
The Print Manager allows you to save a report for a specified period and to reprint the stored report.
To set the Print Manager system defaults
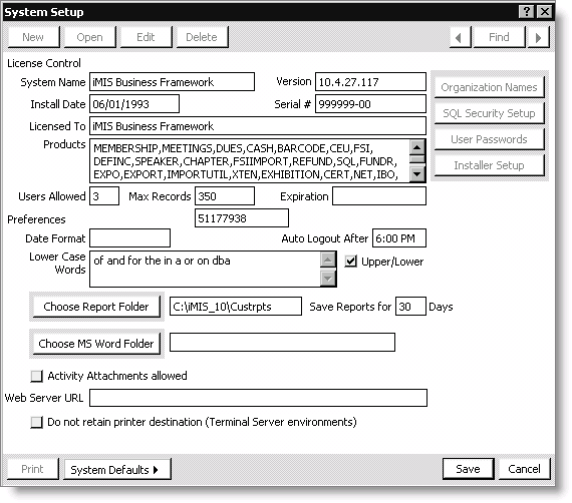
On the System Setup window, specify the location and default number of days for storing the report.
- Open iMIS.
- Select File > System Setup to open the System Setup window.
- Click Edit.
- Click Choose Report Directory to open the Browse for Folder window.
- Select the directory where the report will be stored, and click OK.
- In the Save Reports for _ Days field, enter the default number of days to store the reports. If a different period is set on the Detail Report Parameters window for the report, the days set for the report override the System Setup.
- Click Save.
Note: Select a network drive that is mapped on all iMIS clients. If a local drive is selected, users on the network are not able to print the reports from the Print Manager.
To save a Crystal report
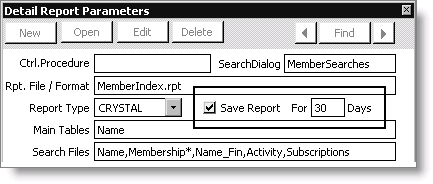
To save a report to the Print Manager to be accessed or printed later, you must enable the Save Report option on the Detail Report Parameters window.
- Open iMIS.
- Select Utilities > Report Specs to open the Report Specifications window.
- Select the Crystal report.
- Click Edit.
- Click Parameters to open the Detail Report Parameters window.
- Enable the Save Report option. When this option is enabled, a new field displays.
- When the Save Report option is enabled, the For __ Days field displays with the default number of days that was set on the System Setup window (select File > System Setup). This is the number of days the report will be stored and displayed in the Print Manager window. Override the default days if necessary.
- Click Save.
More:
Hands-on exercise: Set the number of days to save a report
Hands-on exercise: Run a saved Crystal report
Hands-on exercise: Run a report from the Print Manager
Troubleshooting when reports are not being stored