Loading import template files
To load import template files in the Import Utility
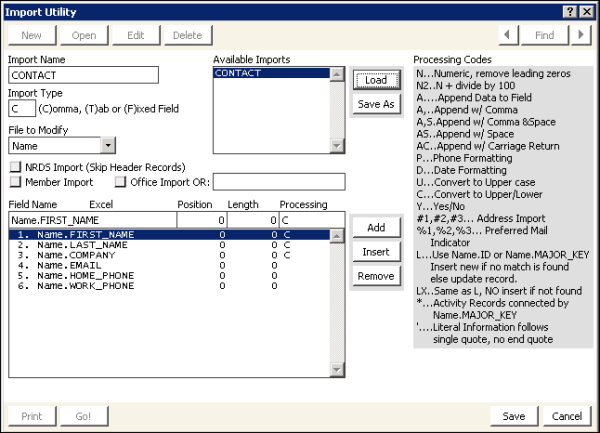
- In the Advanced Accounting Console tool bar, go to Utilities > Data Transfer Utilities > Import Utility to open the Import Utility window.
- Click New.
- Enter the Import Name (description of the import task). For this example, use CONTACT.
- Select an Import Type:
- Select (C)omma for comma-delimited (.csv) files.
- (NRDS only) Select (F)ixed Field for Import Type when working with NRDS imports.
- Select Name for the File to Modify.
- (NRDS only) Select the NRDS Import (Skip Header Records) checkbox when performing a NRDS import. This instructs the import utility to skip the header records.
- (NRDS only) Select the Member Import or the Office Import checkbox to specify whether you are importing the NRDS Member file or the NRDS Office file.
- Click Save.
- Click Edit.
- Click Load and select the template.txt file.
- Edit the template as needed, if necessary:
- In the template area, click Add to append a record row to the end of the template, or click Insert to add a row within the template. You can highlight a record row and click Delete to remove the record row.
- Click Ctrl+Z to open an edit window.
- Specify the fields to be edited:
- Enter the Field Name in the conversion table.
- (NRDS only) Enter the record Position from the NRDS file for that field.
- (NRDS only) Enter the Length of the field.
- Enter the Processing Code option, if used. This code identifies which record to update. The Processing Codes table on the window lists the options and their descriptions.
- #1 – Updates the member’s current main address
- #2 – Updates the member’s second address
- #3 – Updates the member’s third address
- H = 1 – Main Address in the Name Maintenance window
- M = 2 – Second Address in the Address window
- O = 3 – Third Address in the Address window
- Click Save to save the changes to the template.
If the field is a Name_Address field, for example, ADDRESS_1, CITY, STATE_PROVINCE, and so forth, you will need to specify which address purpose to use. The #1, #2, #3 processing codes specify the first, second or third address purpose. When importing address information, you need only specify the ADDRESS_1, CITY, STATE_PROVINCE, COUNTRY, and ZIP fields in Name_Address. iMIS will build the FULL_ADDRESS field and populate the corresponding fields in the Name table. The same is true for Name information. If you populate the LAST_NAME and FIRST_NAME, iMIS will automatically build the FULL_NAME field.
(NRDS only) The following table defines some NRDS-related processing codes used in the import templates:
|
Code |
Definition |
|---|---|
| #1, #2, #3 |
Address format. Used with one of the three PURPOSEs used in iMIS. This must match the address exported to the National Association of REALTORS® (NAR). |
| N |
Numeric format, removes leading zeroes. Do not use N for importing international phone numbers. |
| P |
Phone format. |
| L |
Instructs the import utility to insert a new Name.ID or Name.MAJOR_KEY if no match is found for that field. |
| D |
Date format. The NRDS import file contains two fields for zip code. To convert these fields to the iMIS zip code format, enter two zip code fields in the table. Specify Length = 5 for the first field. For the second code, specify Length = 4 and specify A- processing code (Append Data to Field, followed by a hyphen). Use the A- processing code (Append Data to Field, followed by a hyphen) for importing Social Security numbers in the standard format (999-99-9999). |
The Member import template uses the following additional Processing Codes:
|
Code |
Definition |
|---|---|
| @ |
Takes the NRDS ID number in the import file and finds the Name record in iMIS where this number is populated in the MAJOR_KEY field to get the iMIS ID. The utility then populates the Name.CO_ID field with this iMIS ID for the member record to be imported. Any necessary company information flowdown is then processed. |
| % |
Used to populate the preferred mail checkbox. The import file contains a field consisting of H, M, or O. The Import Utility maps each letter to a specific address. In the Name_Address.PREFERRED_MAIL field, enter a % processing code with a 3-digit code representing each of your three iMIS addresses. For example, using %312 means the third address in iMIS corresponds to the Home Address, the Main Address corresponds to the mailing address, and the Second Address corresponds to the office address. |