Managing batches
Transaction records are created for the various financial actions, such as membership joins, membership renewals, product purchases, event registrations, open invoice payments, and donations, that take place on your website. iMIS automatically groups these transactions in batches by date.
Managing batches in the Advanced Accounting Console
The Manage batches window in the Advanced Accounting Console enables you to perform several different batch functions:
- Create new batches
- Control which batches display on the window
- Post existing batches
This window displays a table of the batches that are available to you and the commands for editing and managing them. The authorizations and credentials of each user record (see Creating iMIS user records Creating iMIS user records) control what aspects of this feature can be seen and used.
Note: If iMIS is configured to hide batches created by other users, you can view only your own batches, unless your logon's authorization level for AR/Cash is 8. This restriction applies to batches that are created automatically by iMIS or by importing transaction data.
- The batches that are available to you depend upon the authorization level and access keywords assigned to your login, and the batch control options that the administrator has selected for your site.
- The Manage batches and Open Batches windows are equivalent. The Manage batches window appears only in Finance. The Open Batches window appears when you are in an iMIS module other than Finance, and when no open batch is selected when you attempt to enter or edit a transaction.
- System-generated batches are designed to be posted unmodified. When you edit a system-generated batch, or add transactions to a system-generated batch, you must designate a cash account for the batch before your changes can be saved, and before the batch is posted.
- Window items that are self-explanatory for the typical users of this window are not described.
Setting up batch control consists of enabling batch control, configuring numbering and viewing options, and setting up cash accounts. These steps are required even if you only have one account.
AR Importer batches are auto-created and auto-numbered and do not recognize specific iMIS users. These batches are assigned to the Manager user in iMIS, and require a security level of 8 to view, edit, or delete transactions when the View Batch by User option is selected.
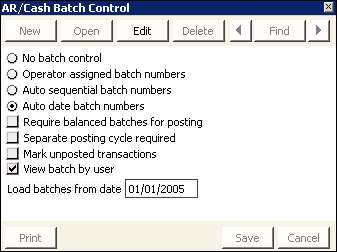
In the Advanced Accounting Console, go to Finance > Options > Configure accounting options, then click Batch Control.
Batch control
The following options govern batch control in iMIS:
- No Batch Control - Specifies that no batch control is used. This is a good option for simple or low-volume systems.
- Operator Assigned Batch Numbers - Specifies that batch control is used and that data-entry operators can create their own batch numbers when needed. The batch number may be a combination of up to 15 alphanumeric characters. This option is not supported for Staff site batches.
- Auto Sequential Batch Numbers - Specifies that batch control is used and that iMIS automatically assigns batch numbers to new batches using a sequential numbering system.
- Auto Date Batch Numbers - Specifies that batch control is used and that iMIS automatically assigns batch numbers to new batches using a date-oriented technique. Multiple batches created on the same date are distinguished from each other with a sequential suffix attached to each new batch generated in a day. For example, 020515-1, 020515-2, and so forth.
Note: The following options are not displayed unless you enabled batch control by selecting one of the batch numbering options (Operator Assigned Batch Numbers, Auto Sequential Batch Numbers, or Auto Date Batch Numbers).
Require Balanced Batches for Posting
(Recommended) Specifies that unbalanced batches cannot be posted. For this option, iMIS considers a batch balanced when the following statements are true:
- The control amount is equal to the actual amount.
- The control count is equal to the actual count.
If either or both of the following statements are false, iMIS displays an error message, and does not post the batch.
Note: Hot posting (the default) reports transactions immediately.
Separate Posting Cycle Required
Specifies that transactions are not hot posted. Most users should not enable this option, because it prevents iMIS from automatically posting and updating accounting events to AR/Cash. Instead, transactions are posted only when the batch is posted.
Only in very high volume situations should you consider giving up the hot posting convenience, which saves processing time and speeds data entry.
Note: This option is not compatible with Service Central.
Mark Unposted Transactions
When selected, unposted transactions are preceded by (U) in the Description field on the Transaction Ledger window and line items with unposted transactions in the AR/Cash tab are preceded by (U).
Note: If the Separate Posting Cycle Required option is enabled, transactions are not displayed in the Transaction Ledger window until the batch is posted, so no transactions will be preceded by (U) if the Separate Posting Cycle Required option is enabled.
View Batch by User
Hides batches created by others from users whose authorization level for AR/Cash is less than 8. When this option is not selected, displays batches created by others. Hidden batches include the following batches:
- Accrual billing batches
- Orders with the Create New Batch for Invoicing option enabled
- AVAIL_CREDIT batches
- Importer batches (Billing, AR/Cash, Orders)
Load batches from date
Specifies a default date that is used to filter batches displayed in the Manage batches window. Users can override this filter.
Do the following to set up batch control:
- In the Advanced Accounting Console, go to Finance > Options > Configure accounting options.
- Click Batch Control to open the AR/Cash Batch Control window.
- Click Edit.
- Select a batch control numbering option. The Auto sequential batch numbers option or the Auto date batch numbers option is recommended.
- (Recommended) Select the Require balanced batches for posting option to require that the control amount equals the actual amount, and the control count equals the actual count, before posting.
- (optional) Select the Separate posting cycle required checkbox.
- (optional) Select the Mark unposted transactions checkbox.
- (optional) Select the View batch by user checkbox.
- Click Save.
- Go to Finance > Options > Set up tables > Cash accounts to open the Cash accounts window.
- Make an entry for all cash accounts.
- Click Save.
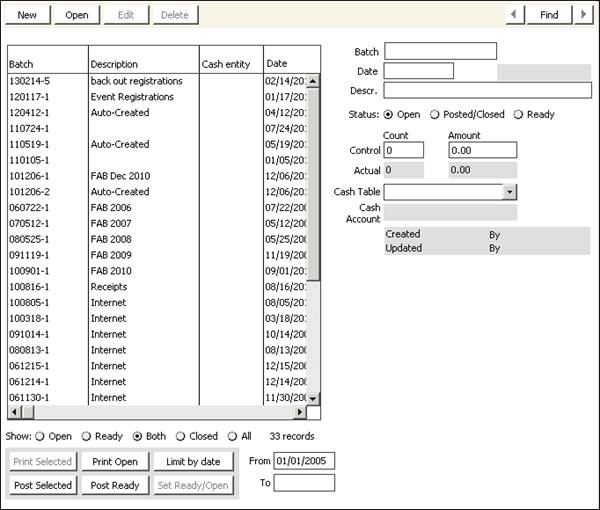
In the Advanced Accounting Console, go to Finance > Processes > Manage batches.
Batch table
This table displays the batches that are available to you. You can sort the batch table by clicking on the column headings. The batch table includes these columns:
- Batch – The batch available for selection.
- Description – Description of the batch.
- Cash entity – Specifies the entity that owns the cash account for the cash received.
- Date – Specifies the transaction date of the batch.
- Date created – Specifies the date that the batch was created.
- Created by – Specifies by whom the batch was created.
- To GL – Specifies whether at least one transaction in the batch has been exported to the General Ledger.
- Status – The current status of the batch.
- Last updated – Specifies the last date that a change was made to the batch status or transactions in the batch.
- Updated by – Specifies by whom a change was made to the batch status or transactions in the batch.
- Event – When a user registers for an event over the Web, a batch is created automatically.
- Meeting – (if enabled) Specifies whether the batch is closed when the corresponding meeting is closed.
If the table contains too many batches to view easily, filter the table with the display controls.
Batch table display controls
- Open – Open batches are open and in process.
- Ready – Ready batches are ready for posting.
- Both – Displays both open and ready batches.
- Closed – (if enabled) Displays only closed/posted batches.
- All – (if enabled) Displays all of the batches that are available to you.
Batch controls
- Print Selected – Prints a transaction report for all selected batches
- Print Open – Prints a transaction report for all open batches
- Limit by date – Displays only batches with creation dates that fall between the dates in the From and To fields
- Post Selected – Posts the selected batch
Note: To post a batch, the sum of all transaction debits in the batch must equal all transaction credits. In addition, your login must have an authorization level of 4 or higher.
- Post Ready – Posts all ready batches
- Set Ready/Open – Changes the status of the selected batch from open to ready, or from ready to open
- View Batch – Displays the Batch window, which remains open in the area below the task list when you switch to different iMIS modules.
Batch creation/editing
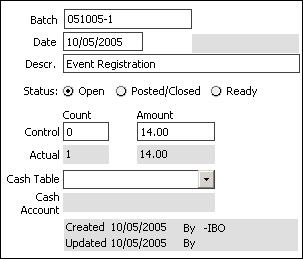
The Manage batches window data edit/entry area:
- Batch – (read-only, unless batch auto-numbering is not enabled) The unique identifier of this batch. (if no auto-numbering) For new batches, you must specify this identifier (maximum of 15 characters).
- Date – The accounting date of all transactions in this batch. For new batches, the default is the current system date.
- Descr. – The description of this batch (maximum of 60 characters).
- Status – (read-only, except authorization level 8) The status of this batch.
- Open – Entry/editing/balancing of data is in progress. Authorized users are allowed to add or modify transactions in this batch, and to change the status to Ready.
- Posted/Closed – All entry/editing/balancing of data is finalized. No users are allowed to modify transactions in this batch, but authorized users can change the status of this batch to Open or Ready.
- Ready – Temporary transition between Open and Posted/ Closed. A batch should only be marked Ready if it is balanced and ready for posting individually or in a group. No users are allowed to modify transactions in this batch but authorized users can change the status of this batch to Open or Posted/ Closed.
- Control Count – The maximum number of transactions this batch can contain.
- Control Amount – The total value of cash receipts or deposits that can apply to this batch. This enables you to validate the batch balance after data entry.
- Actual Count – (read-only) The current number of transactions in this batch.
- Actual Amount – (read-only) The current total value of all transactions in this batch. As you enter transactions, the system keeps an internal count of accumulated transactions.
- Cash Table – (read-only) The cash account code to which all cash receipts in this batch are assigned.
- Cash Account – (read-only) The GL account associated with the selected Cash Table value.
Note: This field is required for all user-created batches, even if you only have one cash account, and even if you do not process any cash receipt transactions in this batch.
Batch window
The Batch window displays information about the current open batch, and provides a button for selecting a different open batch.
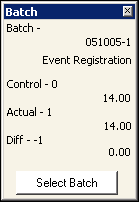
This window specifies the following information:
- Batch – The name and description of the current open batch
- Control – The control count and control amount
- Actual – The actual count and actual amount
- Diff – The differences between the control and actual values
- Select Batch – Displays the Open Batches window
Do the following to create a new batch:
- In the Advanced Accounting Console, go to Finance > Processes > Manage batches.
- Click New.
- Enter the batch information.
- Click Save.
Note: You must designate a cash account type in the Cash Table field before you can save a new batch.
After you finish your batch transaction work and have verified that the information is accurate and in balance, complete the process by posting the batch. Until you post the batch, you can make changes, edit, or delete any transaction within the batch (even if you are using the hot posting feature).
Note: If your administrator has selected Require balanced batches for posting, iMIS will not post a batch unless the control amount equals the actual amount. When you click Post Ready or Post Selected on the Manage batches window and a batch is unbalanced, iMIS displays an error message and does not post the batch.
- From the Manage batches window, select the batch to be posted.
- Click Post Selected. A warning window asks you to confirm that you want to post the batch.
- Agree to post the batch. For each batch posted, iMIS prints the final detail and summary batch transaction report and marks the batch as Posted or Closed.
Note: After a batch is closed, you cannot add, modify, or delete any transactions in that batch.
- From the Manage batches window, choose the Show:Both option beneath the batch list. This will filter the batches to show only those with an Open or Ready status. Ready batches are ready for posting.
- Ensure that any batches you want to post have a status of Ready:
- Select an Open batch.
- Click Set Ready/Open.
- Repeat for each Open status batch that you want to post.
- Ensure that any batches you do not want to post do not have a Ready status:
- Select a Ready batch.
- Click Set Ready/Open.
- Repeat for each Ready batch that you do not want to post.
- Click Post Ready. A warning window asks you to confirm that you want to post the batches.
- Agree to post the batches. All batches with a Ready status are posted.
Managing batches in the Staff site
From the Staff site, you can perform the following batch management tasks:
- Configure the batch mode for staff web transactions
- View and print information about existing batches
Note: You must perform many basic batch management tasks in iMIS Desktop or the Advanced Accounting Console.
You can place all web transactions in a single batch or create separate batches for staff and public web transactions. Placing staff web transactions in their own batch allows for easier auditing of the transactions by a system administrator.
- Go to Settings> Commerce > General > Batch mode for staff web transactions (BatchMode).
- Select the appropriate Batch mode for staff web transactions. You can choose from three options:
- Staff transactions in same batch as public transactions - The default option places staff and public users’ web transactions in the same batch. One batch of web transactions is created for each day.
- Separate batches for staff and public transactions - This option places staff and public users’ web transactions into two separate batches per day. If a batch does not exist for either category of users for the day, it is created.
- Individual batch for each staff user per day - This option places each staff user’s web transactions into a separate batch per day. All web transactions by public users are placed into one batch for the day. If a batch does not exist for a specific staff user or for public users, it is created.
You can easily view and print information about batches from the Staff site.
- In the Staff site, go to Commerce > View batches. A list of open batches displays.
- (optional) To find other batches, click Select a query. You can choose from the following search queries:
- Open batches - Displays all open batches. This search query runs by default when you navigate to the initial View batches screen.
- Ready batches - Displays all batches with a status of Ready. These batches are ready to be processed and no longer accept new transactions.
- Search all batches - Displays search criteria fields that allow you to filter the batches that display in the list. Enter the appropriate search criteria and click Find.
A list of batches matching your search query displays. You can export this list to a .doc,.xls, .pdf, .csv, or .xml file.
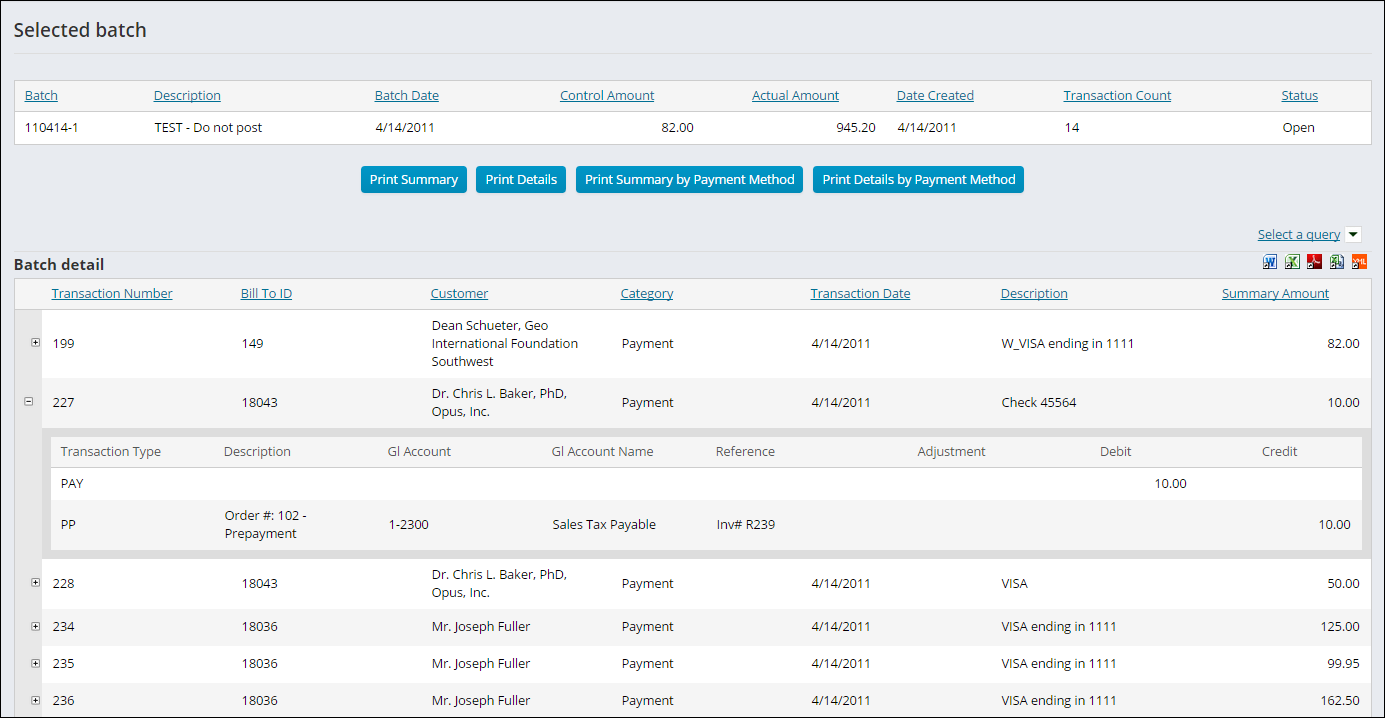
- To view information about the transactions in a batch, click its Batch Number. The Selected batch row summarizes essential information about the batch. The Batch detail lists one transaction summary row for each transaction number in the batch.
You can export the Batch detail to a .doc, .xls, .pdf, .csv, or .xml file. The exported file only includes a list of the transactions. It does not include the transaction’s details (i.e., individual lines that comprise the transaction). - (optional) If you would like to view Batch Data Reports, you can choose from the following:
- Print Summary(Prints Batch Transaction Summary): A summary batch that lists in sequential order one summary line for each transaction in the batch (similar to the summary that is listed in the view).
- Print Details(Prints Batch Transaction Details): A detailed batch report that is similar to the Crystal batch report by providing a header for each transaction and printing each detail line, showing the applicable debit or credit amount and any adjustment amount.
- Print Summary by Payment Method(Prints Batch Transaction Summary by Payment Method): This report assists in the reconciliation of bank accounts with sorting and summarizing the transactions by Cash GL Account and the payment method within the GL Account. The transactions in the batch that have no payments are sorted and summarized at the end of the report. The report has the following groupings and subtotals:
- Broad category sorts and subtotals for Payment Transactions, Application of Open Credit, and Non-Payment transactions
- Within the Payment broad category only
- High level sort and summary by Cash GL Account
- Within Cash GL Account, intermediate sort and summary by payment method
- Sequentially by TRANS_NUMBER within each sort group.
- Print Details by Payment Method(Prints Batch Transaction Details by Payment Method): A detailed batch report, sorted and subtotaled by each unique combination of Cash GL Account and payment method. It is followed next by a section of application of open credit (if such transactions exist in the batch), and with all non-payment transactions sorted and grouped at the bottom of the report.
Note: Adjustment amounts only apply to cash dues payments.
The report also prints a transaction recap located at the end of the report. The recap lists a GL transaction summary (grouped for each transaction owner financial entity represented in the batch) and summarized by either GL Account and Pseudo Account.
- (optional) To filter the listed transactions, choose Select a query. You can choose from the following search queries:
- Batch detail - Displays all transactions that are part of the selected batch. The transactions retrieved by this query display by default when you select a batch to view.
- Batch detail search - Displays search criteria fields that allow you to filter the listed transactions. Enter the appropriate search criteria and click Find.
- To view a transaction’s details (i.e., the individual lines that comprise the transaction), expand its row in the Batch detail area.
Note: These search queries are saved at $/Accounting/DefaultSystem/Queries/Batches/Batch Search in the Intelligent Query Architect. To modify the search criteria, you can copy the query, adjust the copied query, and add it to the Batch Search folder. All of the queries in the Batch Search folder are included in the Select a query list.
Note: The BatchInfo query generates the information in the Selected batch row. You can view the query at $/Accounting/DefaultSystem/Queries/Batches/Batch Info in the Intelligent Query Architect.
Note: The individual amounts for each transaction within a batch may not add up to the total Actual Amount for that batch. The Actual Amount only includes payments received in the current batch, whereas the lBatch detail lines for transactions can include summary amounts that have not been paid, such as open invoices.
Note: These search queries are saved at $/Accounting/DefaultSystem/Queries/Batches/Batch Details in the Intelligent Query Architect. To modify the search criteria, you can copy a query, adjust the copied query, and add it to the Batch Details folder. All of the queries in the Batch Details folder are included in the Select a query list.
Note: The Control Amount for the Selected batch is the amount of the deposit to the bank for the transactions in the batch and is used for balancing and auditing transactions. Once the Control Amount equals the Actual Amount, the batch can be posted.
