Managing committees
Committees and committee members can be managed directly from the Staff site, and committee members can access their committees directly from the Member site.
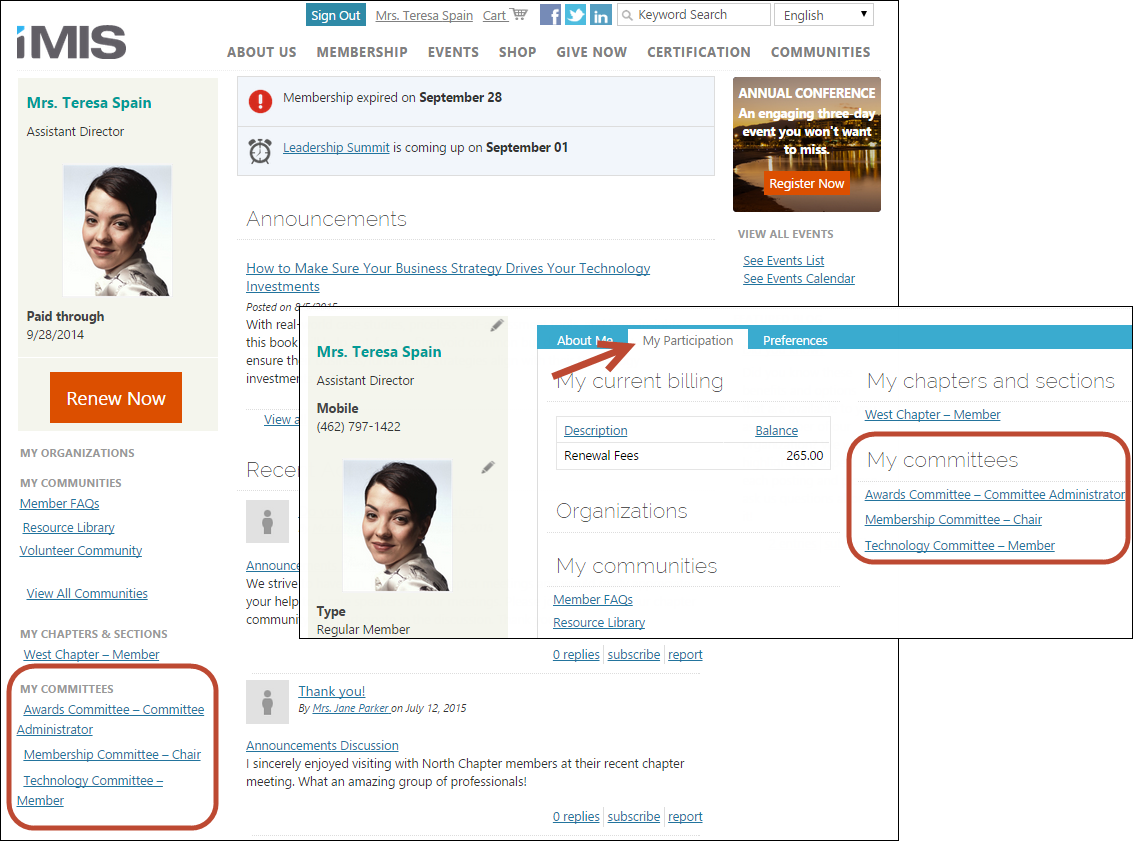
From the initial login page, committee members can see a link to their committees. Members can also access their committees from the My Participation tab on their profile page.

Committees are typically groups made up of a specific number of individuals charged with a specific purpose. Committees usually include officer positions with term lengths of one year or more. Many committees are integral parts of the operation and management of a non-profit, while others are focused on a specific project, event, or program.
Committee management with iMIS offers an easy and efficient way of updating committee memberships for specific committees. The Committee Administrator has the ability to add, delete, and update committee memberships through the website. The committees have configurable layout page that help manage the committee roster, positions, and term dates.
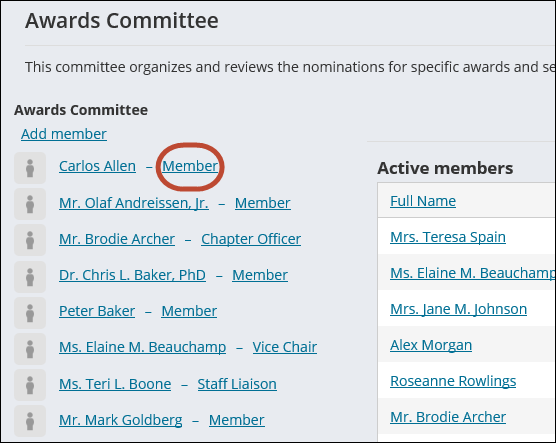
The list of participants includes information on all active committee members by default. Staff users can select to view active, future, or past members, or search for members. The list includes information about the position and term dates of each member, with a link to each member’s profile or account page.
The committee positions allow you to define the particular or appropriate standing within the committee for each individual member.
Depending on the committee, each position or membership on the committee might be term-limited. Use the term Begin and End dates to specify the length of a term. If there are no terms associated with the membership or position, you can leave the dates blank.
To create a new committee, you must define an alphabetic committee code and title for the committee.
Defining committee codes
- In the Advanced Accounting Console, go to Settings > Membership > Set up tables > Committee codes.
- Click New to create a new committee, or select an existing committee from the Current Committees list and do the following:
- Click Edit to modify the committee description.
- Click Delete to remove the committee code.
- Specify the committee code information.
- Click Save.
Changing committee status
- In the Advanced Accounting Console, go to Settings > Membership > Set up tables > Committee codes.
- In the Committee codes window, select the committee from the Current Committees list whose status you want to change.
- Click Edit.
- Enter I (for Inactive) in the Status field.
- Click Save. A warning message box is displayed.
- Click Yes.
- Click Save.
Note: When you change a committee to inactive, iMIS searches the Activity table for any committee members with a Thru date greater than today. If any are found, iMIS will notify you and ask if you want those Thru dates automatically changed to yesterday's date. If you answer yes, iMIS will set those activities' Thru dates back to the previous day's date.

- Current Committees - Lists the codes assigned to each committee.
- Code - Specifies a unique code for each member. The maximum length is 15 characters.
- Show on Web - Enables all committees and committee members associated with this committee code to be listed on the Committees page in the Staff site. Clear this checkbox to prevent the associated committees and committee members from being listed.
- Title - Specifies a descriptive name for the committee. The maximum length is 60 characters.
- Status - Use this field to identify the status of the committee as A for active or I for inactive. If you wish to discharge a committee, set its status to I for inactive. Click the lookup icon to select an available value.
- Group - Use to collectively group related committees together. Click the lookup icon and select an available value.
- Paid Thru Validation - Specifies a validation code that links a committee to a dues-product code for a given chapter or area. This field is used to verify that a potential committee member has purchased the required chapter or area dues-product. Click Edit to see a drop-down list of available chapters.
- Description - Describes the purpose of the committee. This description is displayed in the committee roster and is available for printing on other reports. The maximum length is 255 characters.
- Notes - Stores miscellaneous notes that are printed on reports and directories. The maximum length is 32,000 characters.
- Print - Prints information stored in the Committee Codes tables.
Note: To use the search feature, the COMMITTEE_STS general lookup/validation table must be set up.
Note: To use the search feature, the COMMITTEE_GROUP general lookup/validation table must be set up.
After setting up the committee in the Committee codes table, you must set up the Committee positions table. In the Committee positions window, you assign a code, a description, and a rank (order indicator) for each position that might be held within any committee:
- In the Advanced Accounting Console, go to Settings > Membership > Set up tables > Committee positions.
- In the Committee positions window, click New.
- Enter a code in the Code field that represents the position you are defining. Create codes to represent all committee appointees, even those who do not hold officer-level positions. Characters entered in this field are capitalized automatically.
- Enter the descriptive name for the committee position in the Title field.
- (optional) Enter a unique number that represents the order of importance in the Rank field. For example, enter 1 for the Chair (to display first on the roster), enter 2 for the next most important position, and so on. Assign the highest number to the lowest position such as a regular committee member.
- Click Save.
You can reassign these ranks at any point, but in order to more easily add new positions in the future, you can skip numbers between ranks. For example, if Chair is ranked as a 1, enter a 3 for the second most important position. If you do not enter a rank, iMIS sorts the members in alphabetic order.
By default, iMIS sets the membership duration (the date represented in the Thru field in the Manage committees window) to 12. For example, when you type a date in the From field, the Thru date will default to 12 months from the date in the From field.
- In the Advanced Accounting Console, go to Settings > Membership > Configure membership options and click Advanced to open the Customer Setup - Advanced window.
- Click Edit.
- Set up the options and customer duration for your committees:
- (optional) Enter labels in the Minutes1, 2, 3, and 4 Prompts for options that activate in the Minutes window. The options activate in the Minutes window only when a label is entered in a Minutes Prompt field in the Customer Setup - Advanced window.
- (optional) Enter the number of months in the Default Duration (months) field that you want iMIS to use when calculating the default Thru date in the Manage committees window. To indicate that the committee appointment does not expire, leave this field blank, or set it to 0.
- (optional) Enable the Use Co ID Hierarchy option to link a committee to the ID of a company record. A sub-set of customers associated with the company branch of the committee is created.
- Click Save.
Adding
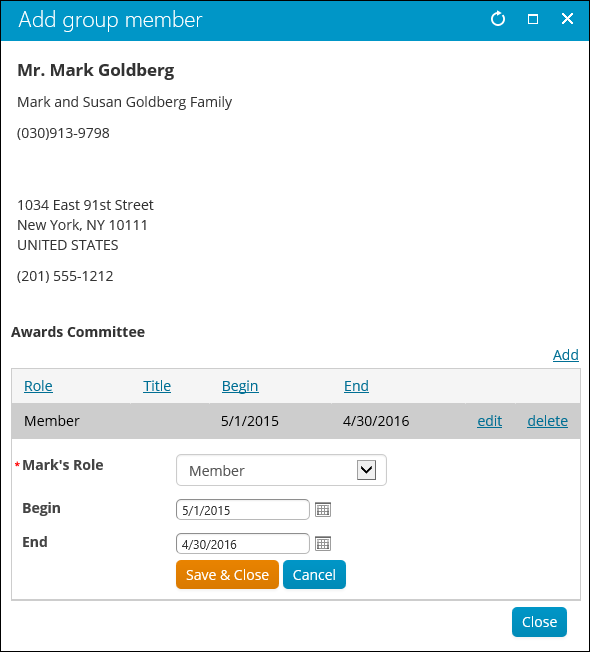
Staff users and Committee Administrators can add new members to a committee. To add new members to a committee, do the following:
- From the Staff site, go to Community > Committees.
- Select a committee.
- Select Add member.
- Search for and select the contact to be added to the committee. To add a contact that is not in the database, select Add New.
- Select a Role from the drop-down.
- Enter a Begin and End date for the committee member's term.
- Click Save & Close. Your new member will appear in the committee Active members list.
Note: You can add, edit, and delete active community members only. Staff users are able to search for future or past committee members using the Find other members drop-down.
Editing
Staff users and Committee Administrators can edit member roles and term dates. To edit roles and term dates, do the following:
- From the Staff site, go to Community > Committees.
- Select a committee.
- Select the committee role of an existing member.
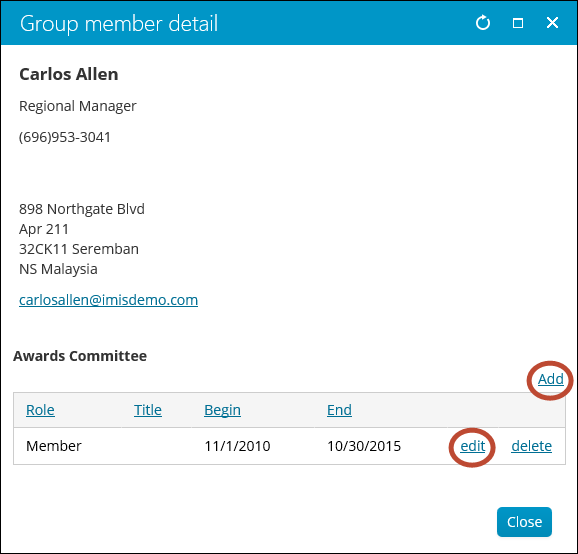
- Select edit to make adjustments to a current membership term, or select Add to add a new role or term.
- Click Save & Close.
Note: Clicking on the name of the member will open their staff account page.
As a Staff user, you can assign the Committee Administrator role to non-Staff members of your committees. Committee Administrators are then able to assign the Committee Administrator role to other committee members. Committee Administrators are able to do the following actions:
- Add committee members (existing contacts and new contacts)
- Assign Committee Administrator role to an existing member (by either editing a committee member’s existing roles, or adding an additional role for a committee member)
- Update committee membership (edit the current roles assigned to a committee member)
Do the following to assign a Committee Administrator role to a committee member:
- From the Staff site, go to Community > Committees.
- Select a committee.
- Select the role of the member you want to assign as a committee administrator.
- Select Add to add a new Committee Administrator role to this member, or select edit to edit the existing role.
- Select the Committee Administrator role from the drop-down.
- Enter a Begin and End date for the committee member's term.
This chart compares the responsibilities between the Company Administrator, Committee Administrator, and Chapter Administrator.
Company Administrators can perform actions on records linked to the company for which they are the administrator. Chapter Administrators can perform actions on records within a given chapter.
| Role | Company Administrator | Committee Administrator | Chapter Administrator |
|---|---|---|---|
| License required | No | No | Yes |
| Can add contacts to the group? | Yes
Company Administrators can add new contacts to the organization. |
Yes | No |
| Can edit contacts in the group? | Yes | No | Yes |
| Can edit the group? | Yes
Company Administrators can edit the organization. |
No | No |
| Can add new roles through the group member detail window? | Yes | Yes | Yes
The Chapter Administrator can add the Chapter Administrator role only. |
| Can edit roles through the group member detail window? | Yes
Company Administrators can edit two roles only: Member and Company Administrator. |
Yes
Committee Administrators can edit multiple roles (committee positions). |
No |
| Can delete roles through the group member detail window? | Yes | No | Yes
The Chapter Administrator can delete the Chapter Administrator role only. |
| Can select other queries or email? | No
Only staff users can edit the queries. |
No
Only staff users can edit the queries. |
No
Only staff users can edit the queries. |
| Can add a new contact to the database? | Yes |
Yes |
Yes |
| Can assign the role to other members? | Yes Company Administrators can assign the Company Administrator role to other members within their company participant list. |
Yes | Yes |
| Can pay invoices and membership renewals for members? | Yes
Company Administrators can pay invoices and membership renewals for members. The invoice can be billed to the company. |
No | Yes
Chapter Administrators can pay invoices and membership renewals for members. The invoice cannot be billed to the chapter. |
| Can register members for events and bill registrations to the organization? | Yes | No | No |
Staff users can send an email to the entire roster of active committee members. You can also search for other committee members to send an email using the Find other members drop-down.
To send an email to all active committee members, do the following:
- From the Staff site committee page, click Email.
- Compose your email or load an email template as you would for any communication.
- Click Add attachment and set a communication Type if desired.
- Click Preview, then click Send Now.
You can send emails to other members by clicking the Find other members drop-down.
Note: Staff site Committee management does not utilize the No Mail option available in the Desktop. To provide an opt out option for your committee members, use communication types.
Searching
Staff users can search for applicants and proposed members who are not yet members of a committee. The results can be filtered on term date, role, or committee member name. Do the following to search for committee members:
- From the Staff site, go to Community > Committees.
- Select a committee.
- From the Find other members drop-down, select one of the following queries to view the associated members:
- Active members
- Future members
- Past members
- Search members
If you would like to add custom queries to the Find other members drop-down, navigate to $/ContactManagement/DefaultSystem/Queries/Groups/Committees/Members.
Note: Committee settings defined in Desktop, such as Show on web and Paid thru validation do not apply to the Staff site. The only committees defined through the Desktop that will show on the web are those with no status or with a status of A.
Deleting
Only Staff users can delete existing committee member roles or remove members from a committee. To delete a committee member, do the following:
- From the Staff site, go to Community > Committees.
- Select a committee.
- Select the role of an existing member to view their membership details.
-
Do one of the following to delete a committee member:
- Select delete next to all roles for a committee member to completely remove them from the committee.
- Edit the term’s Begin or End dates for the member. If the member’s term is not current, they will no longer display as an active member of the committee, but their information will still be available.
Note: Clicking the name of the member will open their staff account page.
- From the Advanced Accounting Console, go to Membership > Committees.
- Select the committee from the Group list.
- Click More, then select Minutes.
- Click New.
- The cursor moves to the Date field and automatically populates it with the current date. Enter the date for which you want the minutes to be recorded.
- Enter the minutes of the committee meeting in the Minutes field.
- Click Save.
- To print the minutes, select the date of the minutes you want to print, then click Print.
There are three Committee report types:
- Committee
- Proposed
- Applicant
From the Advanced Accounting Console, you can customize these reports by selecting various committees, positions, and terms in the search.
- From the Advanced Accounting Console, go to Membership > Committees.
- Select the committee from the Group list, then click Print.
- Select a Report Type, then select the desired Available Report format.
- Click Run to open to Committee Selection window.
- Select the committee options that you want your report to contain. The options available vary depending on the type of report selected.
- Click OK.


