Segmentation
Use Segmentation with Campaign Management to group contacts and prospects into targeted audiences. With Segmentation, you can:
- Create targeted contact and prospect lists according to demographic and behavioral patterns or other include/exclude criteria.
- Split segments into multiple lists and prioritize the segments.
- Eliminate duplicates in lists.
- Perform controlled and repeatable list pulls.
- Create n-Select or random select segments for message or delivery testing.
- Get counts for communications collateral before production.
- Assign unique source codes to segments to effectively analyze an effort's success.
- Copy segmentation jobs and purge inactive jobs.
- Reuse query definitions for multiple campaigns.
Segmentation drives the criteria that will be used to select and segment those customers who will receive our marketing efforts. A segmentation job is a set of queries that are run in a specific order and result in the selection of the first occurrence of each matching record.
Segmentation data is prepared and run before it is attached to its source code and the final output is generated. This allows for data criteria testing, test or dummy selects, or to get counts before the final list is prepared. And, because the data can be purged and lists can be run again, you can continue to target your message.
Segmentation jobs have two levels of hierarchy:
- The job: the job can have a 'universe query' attached to it. It's not essential that a universe query be attached to a job.
- The segment: the segment definition also has a query associated with it. This query is called the 'population' query and contains the minute criteria we need to define who falls into which segment.
The steps to create segmented lists are:
- Create a segmentation job.
- Add, split, and/or delete segments.
- Populate the segments to create lists.
This diagram maps out the core tasks in Segmentation by the approximate order they occur (top-left to bottom-right) and by the organizational area that usually performs them.
Task map: Segmentation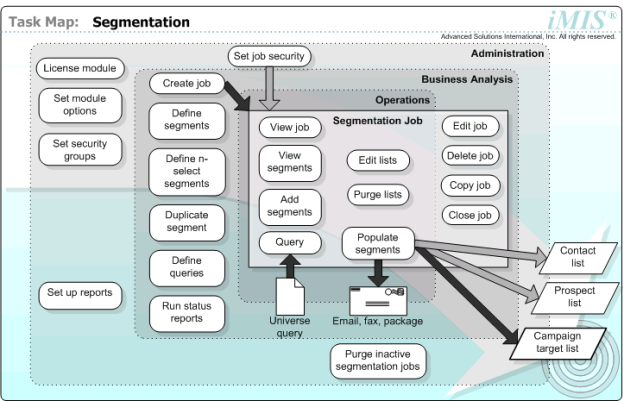
You can view all segmentation jobs or you can filter your view of segmentation jobs by creation date, creator, description, name, or by active jobs.
If you filter the segmentation jobs view by description, all segmentation jobs with matching description fields display.
If you filter the segmentation job view by creation date, you can view segmentation jobs created on a specified date or during a specified date range:
- To view segmentation jobs created on a specified date, enter the date.
- To view segmentation jobs created during a specified date range, enclose each date in double quotes and separate the dates with a comma (for example, “1/4/2008,” ”1/8/2008” specifies jobs created January 4, 2008 through January 8, 2008, inclusive).
A segmentation job contains the job definition, security settings, and segment definitions used to generate contact or prospect lists.
There are two types of segmentation jobs:
- Contact jobs – All queries for a Contact segmentation job must contain the Contact business object as a source.
- Prospect jobs – All queries for a Prospect segmentation job must contain the Prospect business object as a source.
Note: When you set the type as Contact or Prospect, the system automatically defaults to the correct business object.
Each segment is assigned an execution order to make sure duplicates are not generated. What is often different from appeal to appeal is the exclusion criteria you apply.
Note: Note: After selecting an additional source table, you must define a Custom relationship between the tables; in most cases, you can use the ID field for the join.
- Universe queries:
- A "universe" query defines the entire population of contacts for a segmentation job. When a universe query is present, a contact must be a member of the universe query for the contact to be included in any of the segments within the segmentation job.
- If a universe query is defined for the segmentation job, it must be included as a source for any segment-level queries. The system automatically populates this. Universe queries are required only when defining n‑Select segments.
Note: When adding a pre-existing universe query, check the source to make sure that the Contact business object is one of the sources. If Contact is not a declared source, the query will fail.
- n-Select segments:
- n-Select segments list contact/prospect records returned by a selection filter in a number (n) of segments, with an equal number of contacts or prospects in each segment.
- To create n-Select segments, you must include a universe query in the segmentation job. The universe query can include the results of a previous segmentation job as a source.
Note: If you have defined n-Select segments for a segmentation job, you must create these segments before you can populate the lists.
- To ensure that your n-Select segments are successfully populated, make sure you do not exceed the total number of records returned by the universe query when you define the n-Select segments. For example, if the query returns 500 records, you can define n number of segments, each consisting of x number of contacts or prospects per segment, as long as n times x is less than or equal to 500.
- Exclusion segments:
- Exclusion segments are any segments in the segmentation job that are not linked to a source code. Since each record can only be retrieved once, creating an exclusion segment in the segmentation job results in any records retrieved by an exclusion segment not being retrieved by later segments. For example, if two appeals are being dropped in a short period of time, you may want to include one or more segments in one appeal but not in the other.
- Exclusions are applied at the segment level, and they can appear anywhere within a list of included segments, with these exceptions:
- Universal exclusions (No Mail Flag or Bad Address) should be the first segments entered in the segmentation job.
- Include segments have a link to a defined source code and should be defined after any universal exclusion segments.
- If you specify a number of random records to return for a segment, the resulting list may contain fewer than the specified number of records. The segments are first populated and then checked for duplicate contacts or prospects. If duplicates are found, they are removed, and the segments from which they were removed will contain fewer than the specified number of records.
- From Marketing, select Segmentation > Define segments.
- Select Add a Job and enter the job definition.
- From the drop-down menu, select the Type.
- (optional) Apply a filter (universe) query to the job. You can create a new query or use an existing query. These queries can be added later.
- (optional) To define and create n-Select segments, click the n-Select tab. Enter the number of segments and the number of contacts per segment.
- (optional) To modify the security settings for the job, click the Security tab.
- (optional) To define explicit segments, click Segments:
- Enter segment definitions.
- Select an existing query or create a new query.
- (optional) Select the number of random records to use to populate the segments.
- (optional) Modify the Priority.
- Select Save.
Note: Add or edit segments before closing the job.
Before you begin
- Create the source lists for which you want to create source codes.
- Create the segmentation job and add segments to the job.
- Generate output so that the lists are populated.
To automatically create source codes based on segment definitions
- Select Marketing > Campaigns > Define campaigns.
- Open a campaign, appeal, and solicitation.
- Select a solicitation.
- Click Create Source Codes from List.
- Create the source codes:
- If you want to build source codes based on solicitation lists, click an available solicitation to add it to the Current Solicitations list and then click Create Source Codes.
- If you want to build source codes based on segments, click the Create from Segments tab, and then click an available populated segmentation job to add it to the Select Segmentation Definition list. If you select Job Name, you automatically select all the segments in the job, or you can pick and choose among the segments by selecting just the segments from which you want to create source codes. Click Create Source Codes.
- To view the automatically created source codes, click the Source Codes tab on the campaign.
By reusing segmentation jobs or copying and editing them, you can work efficiently. After a targeted list pull, you can save the job and refresh the list to run it again. As the campaign progresses, you can copy the job, rename it, and adjust the segments to be included.
Consider creating segmentation templates that can be copied and reused with minimal manipulation. If you build a template with the core of the segmentation requirements, the user can copy it and modify it at any time.
- All segments in a segmentation job are copied when the segmentation job is copied. However, any contacts or prospects contained in a segment are not copied. You must populate the segments in the copied segmentation job to generate contacts or prospects to fill the segments.
- When you copy an existing segmentation job, for convenience the new segmentation job is named "Copy of OriginalJobName" (for example, "Copy of Contacts"). Rename the copied segmentation job and edit it as desired.
- If any segment editor pages from the original job were open when the job was copied, these windows will still reference the original job. To edit the segments in the copied segmentation job, you must select the Segments tab after copying the segmentation job and open the segments individually.
- Select Marketing > Segmentation > Define segments.
- Open an existing job. Click Save As and rename it.
- Open the new job.
- Edit, add, and/or remove segments.
- Adjust query filters.
- Click Populate Segments.
In this example, we want to mail catalogs to individuals who have not yet registered for conference and exclude those who have registered.
Exclude: Already Registered for the Conference
Include:
- Last attended 2014
- Last attended 2013
- Last attended in 2010 or earlier
- Never attended – Members
- Never attended – Non-members
Execution order is important. We want to first exclude those who have registered, and then populate the list with contacts in each segment who have not registered.
Example: Segmentation job
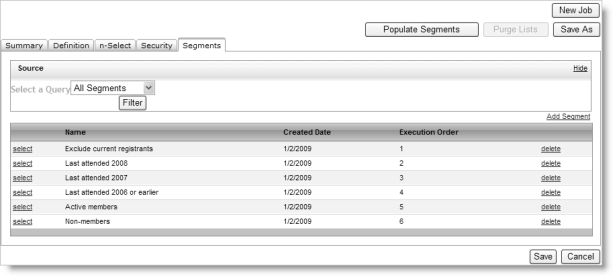
You can view all segments or filter your view of segments by creation date, description, or name.
- Select Marketing > Segmentation > Define segments.
- Open the segmentation job.
- Select the Segments tab.
- (optional) Select a filter (by creation date, description, or name) if needed. By default, all segments display.
- Select the segment to view. The segment definition displays.
- If the segments have been populated, select the Results tab to view the segment contents.
A segment definition is used to generate contacts or prospects based on demographic behaviors (for example, gender, location, age) and/or transactional behaviors (for example, attending events, purchasing books, or making donations).
Note: Note: After selecting an additional source table, you must define a Custom relationship between the tables; in most cases, you can use the ID field for the join.
Note: Note: Add or edit segments before closing the job.
- Select Marketing > Segmentation > Define segments.
- Open the segmentation job.
- Select the Segments tab and add a new segment.
- Enter the segment definition.
- Using the Population buttons, select an existing query or create a new query.
- (optional) Select the number of random records to use to populate the segments.
- (optional) Modify the Priority.
- Click Save
If there is an existing segment definition that is similar to the segment definition you need to create, you can duplicate the existing segment definition and modify it as needed. The new (duplicated) segment appears in the same segmentation job as the original.
If you add or insert a new segment in an existing segment, you must manually change the order numbers of all the segments within the segmentation job.
- Select Marketing > Segmentation > Define segments.
- Open the segmentation job.
- Select the Segments tab.
- (optional) Select a filter (by creation date, description, or name). By default, all segments display.
- Select the segment to view.
- The segment definition displays. The Duplicate Segment button does not display until the segment definition has been saved and the segment has been reopened in the Segment Definition Editor window. The Duplicate Segment button does not display when a segment definition is initially created and saved.
- If you do not see the Duplicate Segment button enabled when you open an existing segment definition, either you lack permissions to edit the definition or the lists have not been generated for the segmentation job.
- Click Duplicate Segment.
- The Segment Definition Editor page closes and the new (duplicated) segment displays in the segments list directly above the segment that was duplicated. Both segments will have the same name.
- Open the new (duplicated) segment.
- Edit the segment definition.
- Click Save.
You can split a segment into multiple segments (A/B split) by creating additional segments that use the same query.
- Define the segments in sequence (using the same query).
- Run the query to determine the segmentation count.
- After deciding how many records should be retrieved for each segment, retrieve each segment and specify the count for each segment.
Note: Do not specify a count for the last segment; the last one will return all of the unretrieved records.
You can delete a segment from a segmentation job if the segments have not yet been populated. To delete a segment from a job after the segments have been populated, you must first purge the lists (see "Purging lists").
Warning!
Deleting a segment that is referenced in a campaign source code renders that source code unusable.
After you create a segmentation job and add segments, populate the segments in the job to create contact or prospect lists.
When segments are populated, iMIS ensures that segments are not populated with any record that would be a duplicate of a record in another segment that is defined for the same segmentation job.
Populating segments can be a very lengthy operation. Segments are populated as a workflow task; you can continue using iMIS for other tasks while segments are being populated.
You cannot view the results in the populated segments until the segment population workflow task has been completed.
To repopulate segments that have already been populated, you must first purge the lists and then populate the segments.
After the segments have been populated, you cannot edit the segment definitions. To edit a segment definition after the segments have been populated, you must first purge the lists.
- Select Marketing > Segmentation > Define segments.
- Open the segmentation job.
- Click Populate Segments.
- If no segments are defined, an error message displays.
- If the segments have already been populated, Populate Segments is disabled.
- Select the segment to view.
- Select the Results tab to view the segment contents.
After lists have been populated, you can add contacts or prospects as well as disable any that are already listed (contacts and prospects are enabled by default).
Verify that contacts or prospects to be added are not already in the list. No duplicate checking runs for manually added contacts/prospects.
To edit a contact or prospect list:
- Select Marketing > Segmentation > Define segments.
- Open the segmentation job.
- Select Segments.
- Select the segment that contains the list to be edited.
- Select the Results tab.
- (optional) To add a contact or prospect, click Add Contact.
- (optional) To enable or disable a contact or prospect, select or deselect the checkbox displayed to the left of the contact or prospect.
- Select Save.
Purge lists to remove those that you no longer need or to repopulate segments.
Note: The Purge Lists button is available only if the segments are populated.
To purge segmentation lists:
- Select Marketing > Segmentation > Define segments.
- Select the segmentation job.
- Click Purge Lists.
Organizations may use external lists. External lists are brokered with individual list agreements that govern how long and how the use can be used.
Sometimes lists are given to the organization with all names and contact information attached. Other times, lists are used once with the organization only seeing the names of the contacts within it when the customer responds.
Lists with names can be imported into the iMIS Acquisition Management tool. Campaigns and Segmentation can query this list and generate lists from it. One of the most important segmentation considerations is being able to test against different list rentals, therefore, it's important to have a testing model.
Lists without names can still be tracked in Campaigns. At the source code level, assign the quantities included in the list rental. Track the list rental/purchase cost at the package level. Remember that the package gets attached to the source code. Different packages have different list costs so it's important to apply the cost to the package to properly calculate the ROI.
The following is an example of how a segmentation strategy can appear or be mapped during implementation. This example shows one audience that is separated into "life stages." It relies upon keeping track of customer contact preferences and uses RFM as the fundamental segmentation strategy.
For this example, Life Cycle Stage and Contact Preferences are the include/exclude selection criteria. RFM segment definitions will apply to everyone who has who has been selected during core criteria segmentation.
Example: Life cycle stages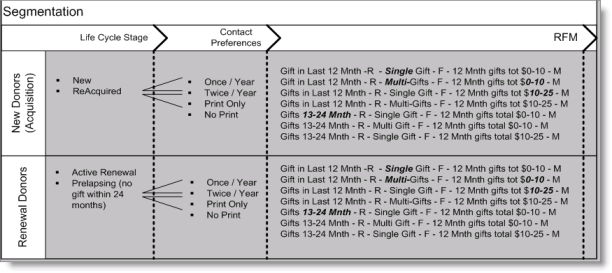
Organization XYZ is preparing to market its annual conference. The venue is booked and sponsors and expo sales are under way. It's time to start raising awareness for the event and getting event registrations through the door.
In this example,there are two different marketing efforts that the organization runs to meet these goals. The first is one tests a creative concept for the event. They want to understand which creative concept is more likely to get people to register.
After the creative concept is finalized and 80% of the speakers have been set, the organization is ready to recruit attendees by mailing the event brochure.
- Marketing Goal - To recruit attendees for the annual conference.
- Marketing Objective - To recruit 500 full conference attendees, 200 partial attendees. The goals and objectives for this campaign are fairly straight forward. But accomplishing these goals is more complex.
- First Mailing: Post Cards - First, XYZ does an A/B Split of the file to understand which creative concept is the better one to use for the rest of the conference marketing series.
- Second Mailing: Full Brochure - The second mailing is where we apply some value ranks to our mailing. Full conference brochures are expensive and our goal is to cut numbers to save costs from groups who are least likely to respond.
Planning the campaign:
- Segmentation will be used in two different ways:
- Mailing 1 = Simple Split
- Mailing 2 = Ordered from most to least likely to respond
 Click to view table
Campaign
Appeal
Solicitation
Source Code
Annual Conference
Save the Date Postcard Mailing
Fountain Creative A
Source Code
Dessert Creative B
Source Code
Full Brochure Mailing
Past Attendees
Last Attended 08
Last Attended 07
Last Attended 06 or earlier
Non-Attendees
Active Members
Non-Members
The process to accomplish this scenario is:
- Create a segmentation job with an A/B split.
- Build the campaign structure for the event.
- Generate output and pickup file for the solicitation.
- Review responses to choose most successful concept.
- Create a segmentation job with all segment definitions.
- Mail brochure to list.
Add a new segmentation job:
- Name = Annual Conference
Create a new query:
- Source – NetContact.
- Filter – Is A Company = No.
Define the n-Select segments:
- Number of Segments = 2
- Use all query results = selected
- Contacts per Segment: Enter the number of records at which you want to cap your segments. If you want two random groups with no cap, leave the 'Use All query Results' checked and enter the number of segments as two.
Populate the segments.
Two segments are created; both have an Execution Order of zero.
Example: Conference post card list with A/B split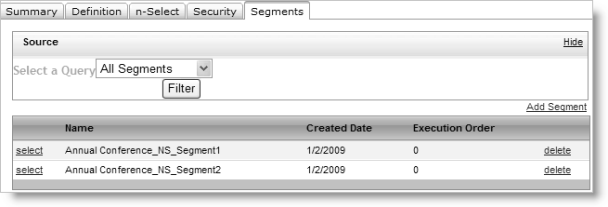
Define the campaign structure:
- Name = Annual Conference
- Appeal = Save the Date postcard
- Solicitations = Creative A and Creative B
Attach the populated segments to the campaign:
- Select the job that contains the A/B split.
- Select a source code. The source code is attached automatically as the source list for the query.
- Select an insert and attach it to the source code.
After the list and insert are attached, generate the output on the source code. This process will:
- Update the pie chart and metrics for non-responders
- Produce the output defined in the insert
The brochure mailing will use many different segments. Each segment will become a source code.
|
Campaign |
Appeal |
Solicitation |
Source Code |
|---|---|---|---|
|
Annual Conference |
Full Brochure Mailing |
Past Attendees |
Last Attended 08 |
|
|
|
|
Last Attended 07 |
|
|
|
|
Last Attended 06 or earlier |
|
|
|
Non-attendees |
Active Members |
|
|
|
|
Non-members |
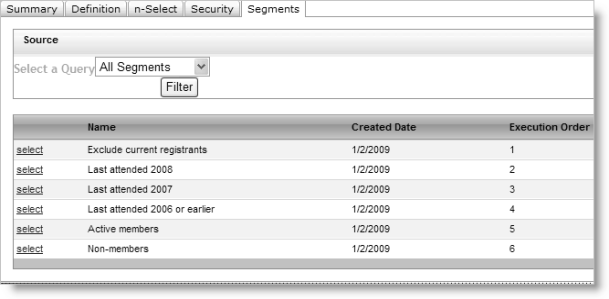
Open the segmentation job for this mailing and click the Segments tab. Your display may look like the following example.
Example: Segments list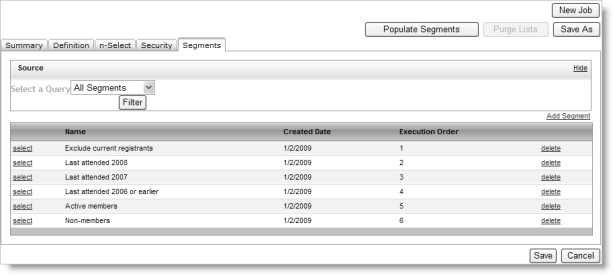
Set up six segments.
The first segment is called Exclude - Current Registrants. It includes a query that produces a list of people who are already registered for the conference. By creating this first segment, XYZ will be able to use this job repeatedly.
The Execution Order determines the order in which records will be selected. A loyal member has probably:
- Registered for this year's event
- Attended last year's and prior years
- Renewed their membership so they're an active member
Therefore, attach all of the segments to the job except the first. Duplicates in the file will be checked automatically to make sure that a record is only selected once.
- Select everyone who has registered for the event (don't mail them).
- Of the records left in the database, select everyone who registered last year. That segment is the first source code and are also the most likely people to respond this year
- Of the records left in the database, select everyone who registered the year before last. That segment is the second source code and are the second-most likely to respond this year
- Of the records left in the database, select everyone who attended two years ago. That segment is the third source code.
- Continue with the remaining segments.
- Add a new segmentation job.
- Define the first segment by writing a simple query that defines who should be selected.
- Define the remaining segments.
- Assign each segment an execution order that determines the order in which to execute the duplicate checking process.
- Populate the segments.
- Campaign = Annual Conference
- Appeal = Full Conference Brochure
- Solicitations:
- Past attendees
- People who have never attended
- Source Codes (first mailing):
- Last attended last year
- Last attended two years ago
- Last attended three or more years ago
- Source Codes (second mailing):
- Never attended (members)
- Never attended (non-members)
