Styling your website’s primary navigation
If you customize your website with a new look and feel, you will want to restyle the primary navigation to match the rest of the site. In iMIS, the primary navigation bar is built with Telerik RadControls, providing powerful tools for creating dynamic menu systems.
You can change your navigation menu’s style by:
- Choosing an out-of-the-box skin provided by Telerik
- Customizing the font or color of an existing Telerik skin using Telerik’s Visual Style Builder
- Styling your menu with CSS instead of using the Telerik tools
PageNavR is a control that iMIS uses to display a website's primary navigation. The navigation bar automatically populates with each top-level navigation item, and each sub-item displays in a drop-down list that can expand to multiple levels. PageNavR wraps around a Telerik RadMenu control, so all PageNavR styles are controlled by Telerik's base styles.

Skin files allow you to override default control behaviors in a theme-dependent way. If you set a property for a control in one theme’s skin file, it will not affect how the control displays in other theme’s skin files.
Consider this section of the Aspen.skin file in App_Themes/Aspen:
<asi:PageNavR runat="server" Skin="Aspen" EnableEmbeddedSkins="false"
          EnableRootItemScroll="false" Flow="Horizontal"
          DefaultGroupSettings_Flow="Vertical" DefaultGroupSettings_OffsetX="0"
          Width="100%"/>
These are just a few of the PageNavR properties available for the control in the skin file. The two properties which affect the navigation bar’s style are Skin and EnableEmbeddedSkins.
The EnableEmbeddedSkins property determines whether Telerik embedded skins should be loaded as the default. If you are creating your own custom skin, you must set this property to "false".
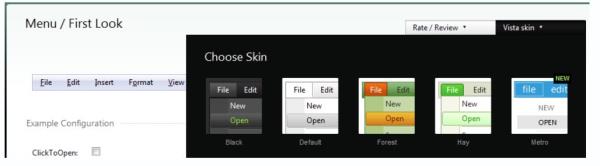
Do the following to style the navigation using a Telerik-provided skin:
- Choose an existing Telerik skin at Telerik RadMenu Demo: First Look to use to style the navigation menu.
- Change the Skin property of the PageNavR control in the theme’s skin file to the name of the skin you selected.
- Change the EnableEmbeddedSkins property of the PageNavR control to
"true". The navigation bar’s styling will change to that of the Telerik skin you selected.
For more information, see MSDN's guide to ASP.NET Themes and Skins.
If you want to customize the colors or font for a particular Telerik skin, you can use Telerik's Visual Style Builder:
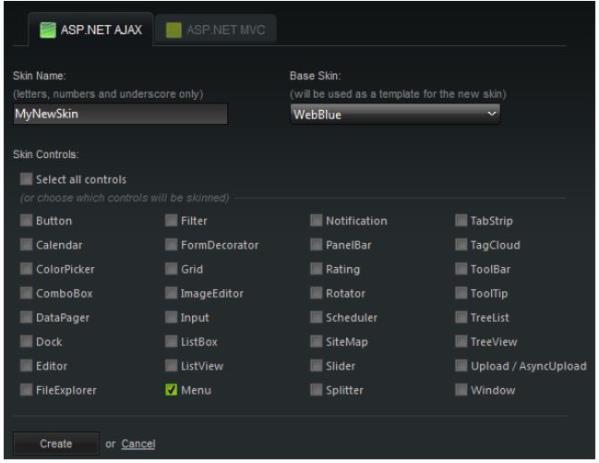
- Open the Telerik Visual Style Builder and select New Skin.
- Name your new skin, select your base skin, and check the Menu checkbox.
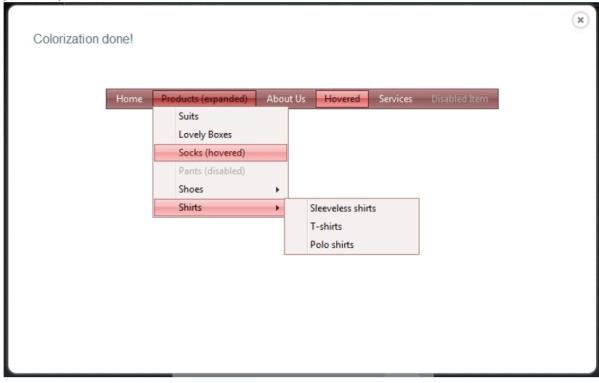
- Click Create. Visual Style Builder will open on the Colorize tab.
- Select your preferred color for the menu. You can fine-tune the hue and saturation of the color on the Shift colors tab in the color window that is open.
- Click Save to preview your new skin. If you are satisfied with the preview, you can download the generated images and CSS and skip to step 10.
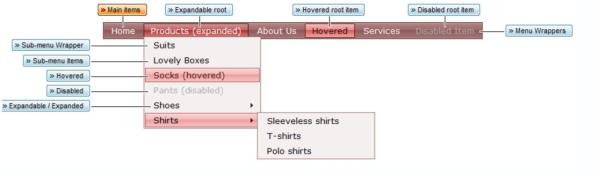
- For additional customizing, click the Fine-tune tab of the Style Builder.
- Begin with any universal changes you would like to make, such as changing the font on the navigation nodes. Click Main items to make changes to the font on the main navigation node.
- Each time you make a change the example dynamically responds. Each of the blue items opens a different set of configuration options.
- When you are finished, click Save and then Download to get the necessary code and images.
- Copy the unzipped files to your theme's folder. Open the .skin file and set EnableEmbeddedSkins to
"false"and Skin to the name of your new skin.
Note: The Visual Style Builder is in beta. For best results, use Internet Explorer as it is not fully functional in any other browser.
Note: The fine-tune functionality can be unpredictable. Save frequently so that if you do not like the way a change turns out, you can click load last save to undo it.
For more information and a video tutorial, see Telerik's Visual Style Builder Overview.
If you do not like the Telerik-provided skins, you can create your own image-free styling using CSS with the aid of your browser’s developer tool. If you choose to work manually, you might find it helpful to start with a working skin, and adjust to suit your needs.
- Rename all of the base-level selectors in your working skin file to RadMenu_[Your theme name].
- Use your browser’s developer tools to help you figure out how to modify the CSS to get the desired result.
- In your theme's skin file set EnableEmbeddedSkins to
"false"and Skin to the name of your skin.
Here are some links that may be helpful to you while theming your website:
- w3schools.com: CSS Tutorial
- Creating a unique homepage with CSS and Javascript – includes a very helpful video if you're unfamiliar with browser developer tools
- ASP.NET Themes and Skins
- Telerik RadControl Demos - RadMenu
- Telerik Visual Style Builder
- Telerik Visual Style Builder Overview