Using social media to log in
You can allow website users to sign in to your website using their Facebook and LinkedIn accounts. Social media integration creates a seamless user experience that increases convenience and satisfaction for your users. Users’ social media accounts are linked to their existing iMIS accounts, and when a new user signs in with a social media account, a new iMIS account is automatically created and linked. Eliminating the need for users to keep track of multiple usernames and passwords will result in more visits to the essential content on your website!
Note: System administrators will not be able to sign in to your website using social media accounts if multi-factor authentication has been enabled. For more information, see Multi-factor authentication.
When a user first signs in to iMIS with a Facebook or LinkedIn account, certain information is conveniently copied into their iMIS account.
| Info Copied to an Existing iMIS Account | Info Copied to a New iMIS Account |
|---|---|
|
|
To obtain the necessary credentials for the social media applications you want to add to your iMIS site, you must first register as a developer, and create an app, through the respective social media sites.
To obtain an App Id and an App Secret from Facebook to enter as Social Media Settings in the iMIS Staff site, complete the following steps:
- Review the following:
- Registering and configuring the Facebook app.
- Facebook's Login Review process.
- Register as a Facebook developer.
- Create a new app.
- Enter the requested information and create the app.
- From the Staff site, go to Site Builder > Manage websites, select your website, and copy the URL(s) pointing to the IIS website root.
- Paste the URL(s) pointing to the IIS website root to the Valid OAuth redirect URI in Facebook, and save.
- Remember to test your app before going live.
Note: Remember to check your Contact Email address for your five-digit confirmation code from Facebook. You must enter this code in Facebook to verify that you own the email address.
Note: You must add /signin-facebook to the Valid OAuth redirect URI. For example, www.mydomainname.com/signin-facebook.
To obtain an App Id (Client ID) and an App Secret (Client Secret) from LinkedIn, complete the following steps:
- Register as a LinkedIn developer.
- Create a new app.
- A Client ID and Client Secret are automatically assigned. You will need to enter these items as Social Media Settings in the iMIS Staff site.
- Enter the Authorized Redirect URLs for all iMIS websites that would like to sign in with LinkedIn.
- From the Staff site, go to Site Builder > Manage websites, select your website, and copy the Secure URL(s) pointing to the IIS website root.
- Paste the Secure URL(s) pointing to the IIS website root to the Authorized Redirect URL in LinkedIn.
- You must add /signin-linkedin to the Authorized Redirect URL.
- In the Settings, complete all of the required fields.
Note: The Client ID is the App Id and the Client Secret is the App Secret in iMIS.
www.mydomainname.com/signin-linkedin
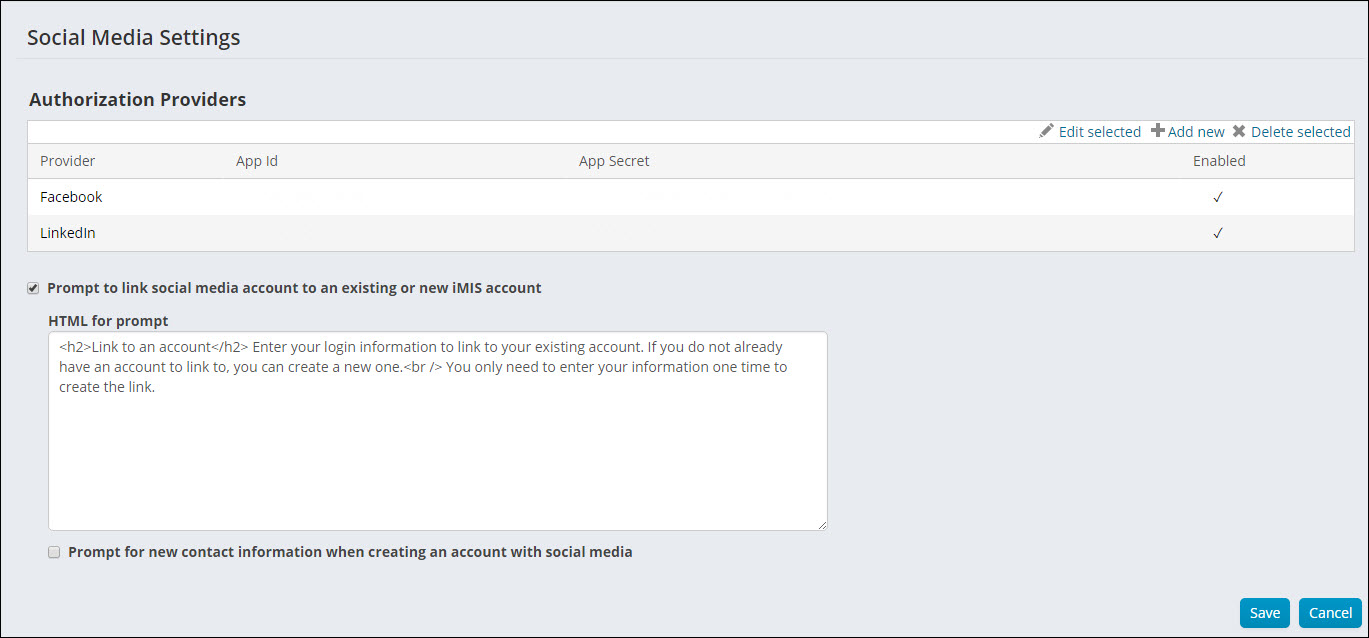
To integrate your websites with a social medial network, navigate to Settings > Contacts > Social media.
- In the Authorization Providers table, add a new provider.
Specify the Provider.
- Enter the App Id and App Secret you received from the Provider when you created your app. You can find your App Id and App Secret in the dashboard or basic settings on your Facebook developer site.
- Enable the provider to display a button in the Contact Sign In content item that allows website users to sign in with a social media account from the provider. Enabling a provider also allows:
- You to configure any Contact Account Creator on your site to allow users to sign up with a social media account.
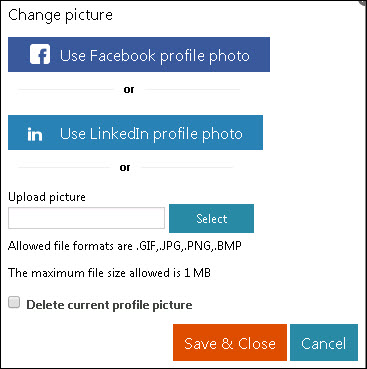
Users, when updating their profile photo in the Contact Profile Picture content item, to use their Facebook or LinkedIn profile photo on your website.
- Reset the Asi Scheduler application pool, or reset IIS.
-
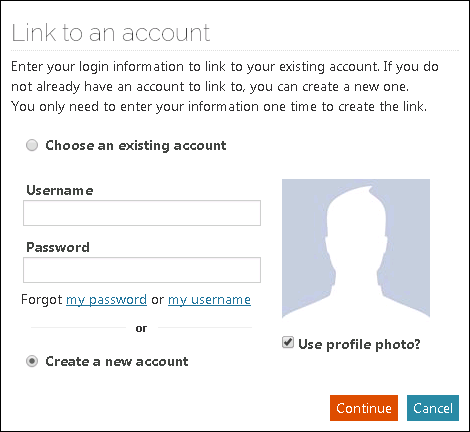
To prompt users to link their social media and iMIS accounts the first time they attempt to sign in with a social media account, confirm that Prompt to link social media account to an existing or new iMIS account is selected. An additional window displays the first time users sign in with a social media account, prompting them to enter their iMIS username and password. A user can also choose to use their Facebook or LinkedIn profile photo as their profile photo on your website during the linking process.
Note: If you do not prompt users to link their social media and iMIS accounts, a new contact is created and linked. Since users do not see a visual prompt to link to an existing iMIS account, there is an increased chance for creating duplicate contacts when users use different email addresses for the social media and iMIS accounts. However, if a user uses their Facebook or LinkedIn email with their iMIS account, they will still be prompted to link to the existing account instead of creating a new account.
- (optional) If you prompt users to link their social media and iMIS accounts, you can tailor the HTML for prompt or use the default message.
-
(optional) If you want users who choose to link to a new iMIS account to enter additional contact information in a Contact Account Creator content item, select Prompt for new contact information when creating an account with social media.
Note: When you prompt users to enter new contact information when creating an account with social media, users are directed to the content at the CreateAccountSocialMedia shortcut. This content contains a Contact Account Creator out-of-the box, but it can be modified. The Contact Account Creator in this content, however, must always be configured to include an option to create an account.
When a user signs in to your website for the first time using their Facebook or LinkedIn credentials, they are prompted to link their iMIS and Facebook or LinkedIn accounts. They can Choose an existing account or Create a new account.
You can use the default message for the user prompt or enter a message tailored to your organization in the social media settings.
In the user prompt, a user can choose to use their social media profile photo as their profile photo on your website. If a user makes this selection, their iMIS profile photo is updated with their current social media profile photo every time they sign in to your website with their social media account.
If the user does not have a profile photo, Facebook will upload a default image whereas LinkedIn will not display an image or the option to use the profile photo.
If the user later decides they do not want to use the social media profile photo in iMIS, they can unlink the photo in the Contact Profile Picture content item on their profile page.
A user who is not linked to their Facebook account can choose to use their Facebook profile photo as their iMIS profile photo in the Contact Picture Profile content item. This action will link the iMIS and Facebook accounts.
A user who has already integrated their LinkedIn account with iMIS can choose to use their LinkedIn OR Facebook profile photo as their iMIS profile photo in the Contact Picture Profile content item. If a user has already integrated their Facebook account, the option to use their LinkedIn profile photo as their iMIS profile photo will not be available.
Note: If a user enters their Facebook or LinkedIn password incorrectly three times in the Contact Picture Profile content item, iMIS will not use the social media profile photo and the Facebook and iMIS accounts are not linked. Instead, the user is redirected to a social media page where they can try to enter the password again or reset the password.
You can choose not to prompt users to link their iMIS and social media accounts by deselecting Prompt to link social media account to an existing or new iMIS account in the Social Media Settings at Settings > Contacts > Social media. In this scenario, a new iMIS account is automatically created for the user and linked to their Facebook or LinkedIn account. If the email associated with their Facebook or LinkedIn account is also associated with an iMIS account, the user is prompted to enter their iMIS credentials.
Note: Although deselecting the Prompt to link social media account to an existing or new iMIS account option creates a more seamless user experience, it results in duplicate iMIS accounts when a user with an existing iMIS account uses a different email address for their Facebook or LInkedIn account.
Users choosing to link to an existing iMIS account must enter their usernames and passwords, reducing the number of duplicate accounts.
If a user chooses to create a new account, a new iMIS account is automatically created for them and linked to their social media account. If the email address used for social media matches an email associated with an iMIS account, they are prompted to enter their iMIS username and password.
If you would like to gather additional information about users who create new accounts, you can configure iMIS to prompt the user to enter additional contact information. In the Social Media Settings at Settings > Contacts > Social media, select Prompt for new contact information when creating an account with social media. This option redirects users to the content at the CreateAccountSocialMedia shortcut, which when used out-of-the-box contains a Contact Account Creator content item where users can fill in additional contact information. You can modify the content at this shortcut, but in order to link the iMIS and social media accounts, the Content Account Creator must be configured to include an option to create an account.
When signing in with Facebook or LinkedIn is enabled in the social media settings, you can also configure any Contact Account Creator content item on your site to allow users to sign up using Facebook or LinkedIn.
Note: If a website user denies Facebook or LinkedIn email permissions to the iMIS app, they will not be able to log in to iMIS using social media. They can grant email permissions to the iMIS app in their Facebook or LinkedIn account’s App Settings.
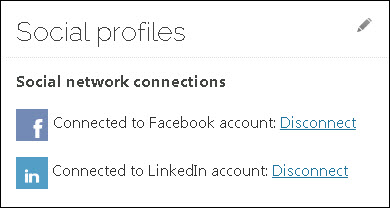
A user can disconnect their iMIS account or the account from a social media account. Disconnecting unlinks the two accounts and removes all previously granted permissions to Facebook or LinkedIn.
- In the Social network connections section on the user’s account page, choose to Disconnect the connected social media account. You can also Disconnect when editing the information.
- Save your changes.
Note: Social network accounts associated with the user's account display in the Social Profile List Creator content item. The Social network connections section only displays in the content item on the account page if that iMIS account is currently linked to a social media account.
If the user attempts to sign in with the disconnected social media account again, they are prompted to grant permissions and link their iMIS and social media accounts.


