iMerge
iMerge is designed to do what the end user cannot do. That is, merge activities, financial transactions, orders, event registrations, and certification from one record to another. It can optionally delete the name information from the old or "bad" record.
In addition, iMerge is designed to protect you from corrupting the two merged records. For instance, iMerge will warn you if both records have the same subscription and one of them needs to be removed.
iMerge also:
- Will not create duplicate event registrations. It will warn you that it is removing the registration on the "bad" record provided it does not have an outstanding balance.
- Can optionally mark the old or "bad" record for deletion
- Supports option of merging IDs fields that exist in other non-iMIS tables
- Has the ability to optionally call a stored procedure at the beginning or end of the merge for unlimited flexibility.
- Can be run in batch mode when mass cleanup is needed.
- Has the ability to search for duplicate records.
Note: iMerge is not a tool for merging Name and Demographic (user defined table) information. For instance, iMerge will not "by default" take data from a user defined table such as demographics and move it from one ID to another. You can however call a stored procedure to do this. An example is provided on page 18.
Keep in mind the following:
- There is no unmerge procedure. The merge process involves many different tables and thus cannot be undone.
- Custom triggers are not supported.
- The Campaign Management Module is not supported at this time.
iMerge basic system requirements
The following system specifications are required to successfully run iMerge:
- Windows 10 or higher
- iMIS 20.2.26 or higher
- Microsoft .NET Framework 3.5 & 4.0
- SQL Server 2012/2014/2016/2019
- UDP 1434 must be open on the SQL Server
- Direct SQL Access is required if on EMS
iMerge terms
Duplicate ID: Record containing duplicate information, record that activities will be merged from
Merge to ID: Record that duplicate ID activity records will be merged to
Record Set: Set of records containing an original record and duplicate record
Single Instance: One record set to be merged
Installing iMerge
Note: It is best practice for all users to be on the same version of iMerge.
Do the following to install iMerge:
- Download iMerge form https://customer.csiinc.com to your workstation.
- Unzip the file.
- The Setup Wizard will launch.
- Click Next.
- The License Agreement will display. Select I accept…
- Click Next.
- Verify the default installation folder.
- Click Next.
- Click Install to start the installation. A screen will then show, displaying the progress of the install.
- A screen will confirm that iMerge has been successfully installed.
- Click Finish.
- Restart your computer if prompted by the installer.
Note: You will need your CSI Website User Name and password. If you do not have this information, contact support.
About the iMerge license key
When you first log into iMerge, the license process will attempt to register your license key automatically by calling back to CSI to get your iMIS information. If the information that CSI has on record is accurate then you will not be prompted with any license key information. It will update your license information automatically.
If the process cannot call CSI or the license key information does not check out with what CSI has on record, then you will be prompted to enter a license key manually. You will need to obtain this key by contacting support. After the license key has been validated and entered, you will be able to use iMerge on your iMIS database. Since the license key is stored in your iMIS database, you will only need to enter this key once per database. Installing iMerge on a new computer will not require you to re-enter your license key.
Note: Changing the "Licensed To:" name for iMIS will require a new license key. If the license key detects a change in this, it will follow the same process as above trying to call back to CSI to verify your product information. In most cases, if you are prompted for license information it is likely that we do not have your updated iMIS information. Contact support with a screen shot of the current iMIS System Setup and a new key will be emailed to you.
- Log into iMIS as an administrator (manager).
- Click File > System Setup in the top toolbar.
- Copy and send to support.
Using iMerge
Do the following to use iMerge:
Note: iMerge will lock each table briefly as it performs its merge. If you are running iMerge in batch mode you should consider running iMerge after hours.
- Launch the iMerge application.
- You will be prompted for a user name and password. You must have a user level of at least 4 in the membership module to use iMerge. If you are unable to log in, contact your system administrator and ask them to increase your privileges in the membership module.
- Log into iMerge using your iMIS username and password.
- DNS represents your iMIS 10 ODBC server location.
- The web server represents your iMIS 15 (and above) application server location.
- The first time you use iMerge a dialogue box will appear asking if you would like iMerge to make changes to iMIS database. Click OK.
- You will then be prompted to enter your SA password. Contact your System Administrator if you do not have this information. Click OK.
iMerge options
The following options are available for iMerge:
Mark for Deletion
Selecting this option will mark the Duplicate ID with a status of D when a successful merge is completed. If this option is selected, Delete Duplicate ID will automatically be unselected.
Delete Duplicate ID
This option will perform a Delete on the Duplicate ID just as iMIS would if you were to delete the record through Customer Portfolio. The deletion occurs after the merge provided there were no errors during the merge. This option cannot be used if the Mark for Deletion option is selected and is not recommended.
Flowdown Data (Company Name & Address)
This option will flow down name and address fields to child records just as iMIS would if you were to change the CO_ID on a record. This option should be used when merging two company records together. This option should not be used if you do not want addresses and company names updated for the child records.
Edit Custom Merge fields
iMerge can merge records from additional tables outside of iMIS such as a custom table for the web, and not just those included within iMIS. As long as the table has a non-unique ID field, iMerge is capable of merging records in it. The tables can be located in any database on your server; they do not need to be part of the same database. Single-Instance User Defined Tables are not available. However, Multi-Instance User Defined Tables are available for use.
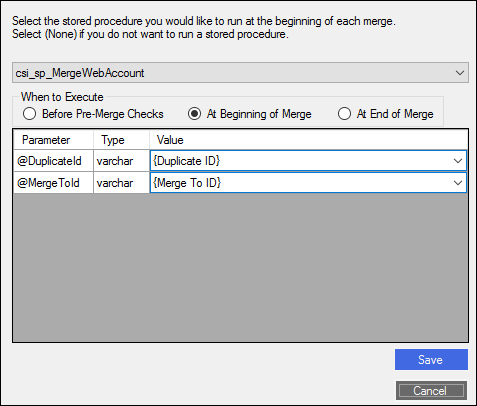
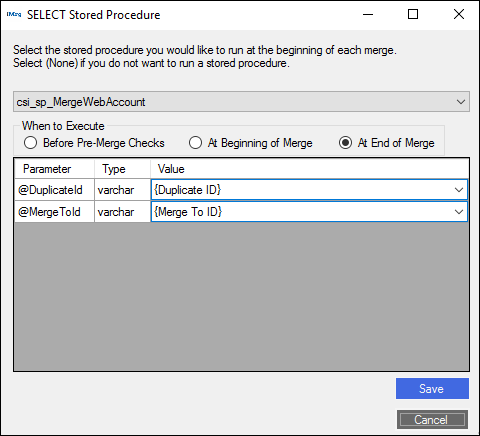
Call Stored Procedures (Before Pre-Merge, Beginning of Merge, End of Merge)
You can select a stored procedure to execute Before Pre-Merge Checks, At Beginning of Merge, and At End of Merge. For example, to select a stored procedure to execute before pre-merge checks, click the radio button "Before Pre-Merge Checks", then pick a stored procedure name from the combo box, and then specify a value for each of the parameters. The value template "{Duplicate ID}" and "{Merge To ID}" will be replaced by the actual duplicate ID and merge to ID at run time.
Example one
Before Pre-Merge Checks: Prior to beginning a merge, iMerge performs some checks (duplicate subscriptions, registered for the same meeting twice, etc.). If a check fails the merge will not continue. This stored procedure runs BEFORE these checks.
Example: A stored procedure that deletes a duplicate subscription.
Example two
At Beginning of Merge: The stored procedure runs before the merge, but after the pre-merge checks.
Example: A stored procedure that makes sure two IDs that you never want merged are not being merged.
Example three
At End of Merge: The stored procedure runs after the merge is complete.
Example: A stored procedure that updates a demographic table or sends an email.
Example: Using iMerge in Normal Mode
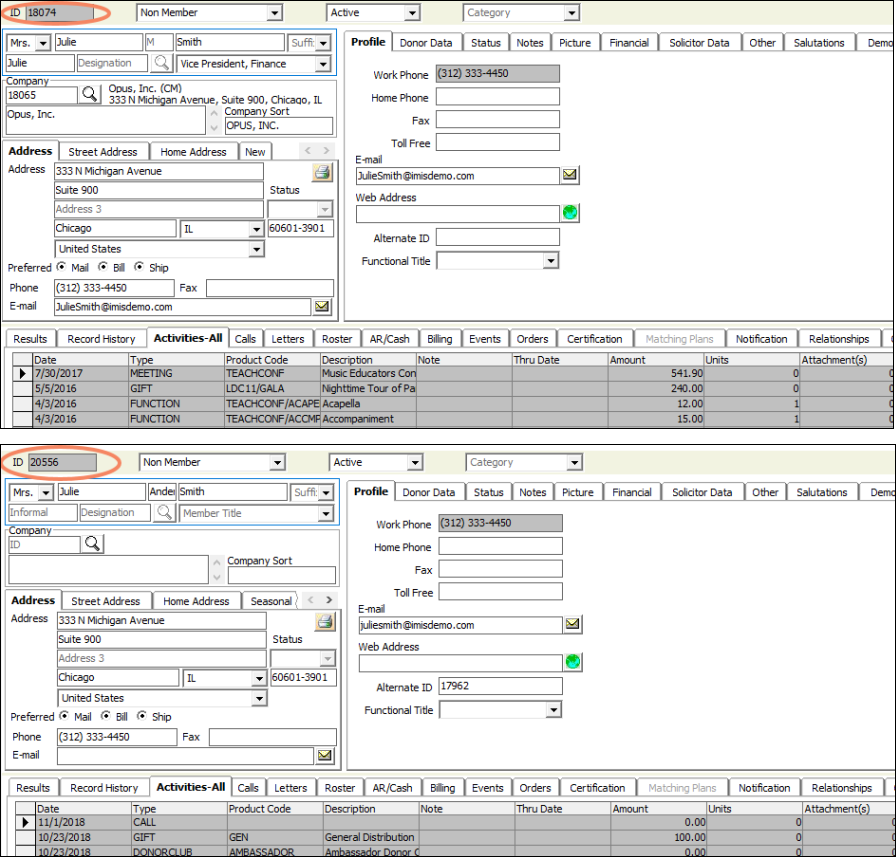
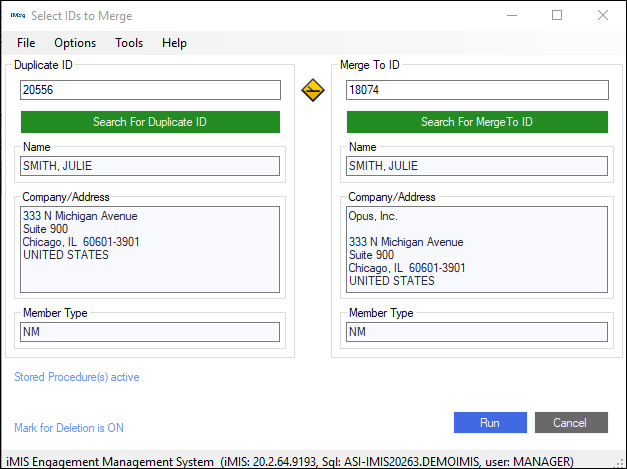
- In our database, we currently have a duplicate record for Julie Smith, ID #s 18074 and 20556.
- Both records have activity and financial records associated with them.
- In this case we need to merge the activities/financial transactions from ID #20556 into ID #18074, call the two specified stored procedures and mark the duplicate ID as Marked for Deletion.
- Enter the duplicate ID into the field on the left and the ID to keep into the field on the right.
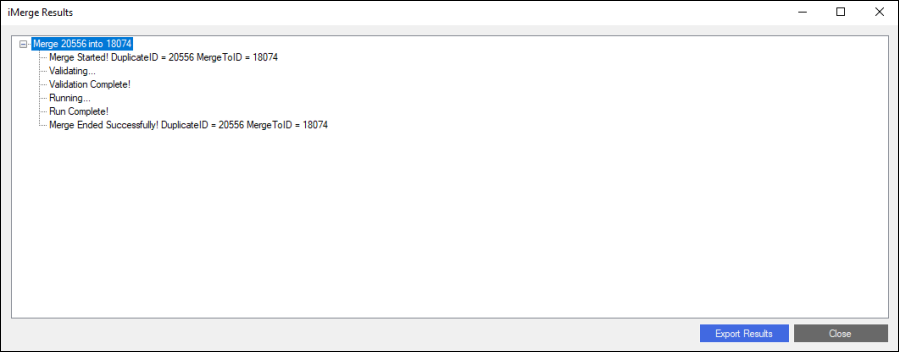
- Click Run to start the merge.
- A status report appears.
- After the merge is complete, only the Merge To record appears in iMIS if Delete Duplicate ID option is turned on. Otherwise, two Name records will still appear but all linked data, such as activities/financial transactions, will be connected to ID 18074. ID 20556 will not have any data connected to it.
- Activities from the duplicate record now appear in the correct one.
- The Change Log in iMIS will reflect the changes made during the merge.
- If the Duplicate Record is not deleted, the Change Log in iMIS for the Duplicate Record will also reflect the merge:


Using iMerge in Batch Mode
Use iMerge in batch mode to merge more than one record set. Do the following:
- Go to Start > Programs Folder.
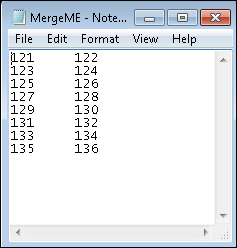
- Open the Notepad.exe to create a merge file.
- Enter the duplicate ID.
- Press Tab.
- Type the Merge to ID.
- Press Enter.
- Type the next record set, continuing until you have entered all the record sets. Spaces are ignored.
- Save the file as merge.txt
- Close Notepad.
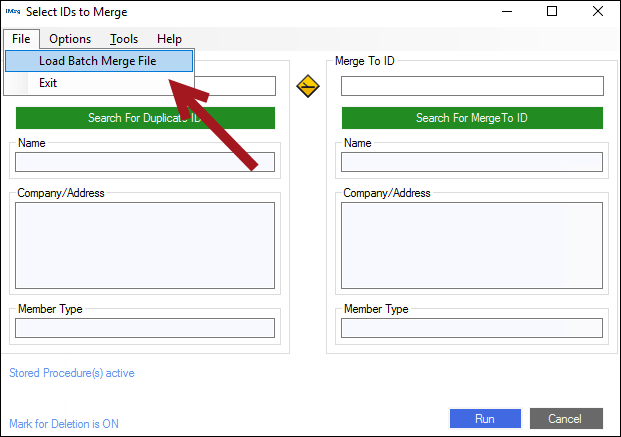
- Go to the File menu and click Load Batch Merge File.
- Navigate to your merge file that you just created and need to process and click Open.
- A prompt will appear asking if you would like to disable informational messages:
- If you select "Yes": Any errors, questions, or prompts will be suppressed, and displayed in a log format at the end of the batch. Any records that have questions or errors will not be altered in the database. When the merge completes, you will then be able to run a second batch with just the problem records in order to address each prompt individually.
- If you select "No": The batch will run normally, and any prompts or errors that arise will require user interaction to continue.
- Once you select "Yes" or "No", the batch file will be loaded and processing will begin.
- iMerge will perform the merge and display a Status Report.
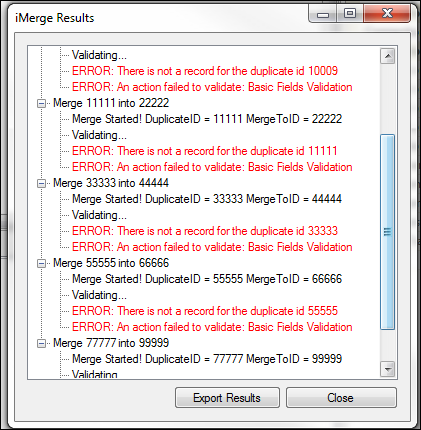
Errors are reported in the merge results. While the specific merges that fail are identified, the reasons for their failures are not. By using interactive mode to repeat the failed merges you can identify why they failed.
Custom records merge and multi-instance merging
iMerge can merge records from additional tables such as a custom table for the web, and not just those included with iMIS. As long as the table has a non-unique ID field, iMerge is capable of merging records in it. The tables can be located in any database on your server; they do not need to be part of the same database. Single-Instance User Defined Tables are not available. However, Multi-Instance User Defined Tables are available for use with this feature.
Below is a chart illustrating which tables are available for merging:
| Table type | Instance type | Available in Custom Fields Merger |
|---|---|---|
|
iMIS |
Single Instance |
Available |
|
iMIS UDT |
Single Instance |
NOT Available |
|
Non-iMIS |
Single Instance |
Available |
|
iMIS |
Multi Instance |
Available |
|
iMIS UDT |
Multi Instance |
Available |
|
Non-iMIS |
Multi Instance |
Available |
Using iMerge to merge custom tables
Do the following to merge custom tables:
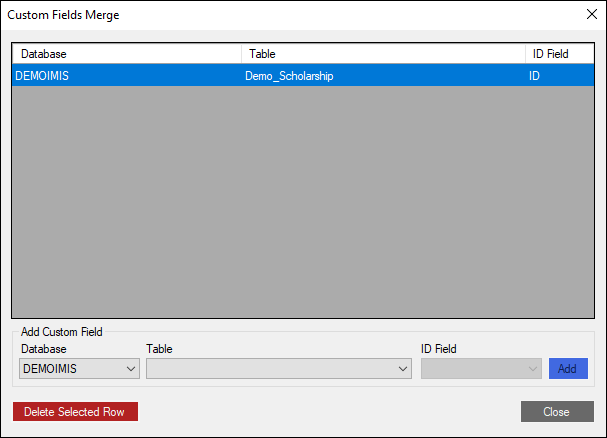
- After logging into iMerge, select Options > Edit Custom Merge Fields from the menu:
- A window will display titled Custom Fields Merge. You may add a new merge field by selecting the Database, Table, and ID Field then click Add.
- To Delete a Custom Merge Field select the field and click Delete Selected Row.
- When you are finished click Close.
Note: Remember, the only iMIS Tables that should be selected here are Multi-Instance User Defined tables (Single Instance User Defined tables are not available here, only through a custom built script, as defined later in this User Guide). Also note that in order for iMerge to properly see other Databases/Tables, both MANAGER_dbname and IMISUSER_dbname must have SQL permissions (replace dbname with the name of your database).
Calling a stored procedure at different stages of the merge process
iMerge is capable of calling custom stored procedures at different stages of merge process. The stored procedures that iMerge calls can do almost anything from writing to a custom table, or even performing changes across multiple databases. Now almost anything that you can do with a stored procedure The stored procedure must work properly when called from within a begin and commit transaction pair. It also must properly roll back when a rollback transaction command is issued., iMerge can also perform automatically at the specified stages.
Using iMerge to call stored procedures at different stages of the merge process
Do he following to call stored procedures at different stages of the merge process:
-
After logging into iMerge select Options>Call Stored Procedure from the menu.
A window will come up titled Select Stored Procedure.
The combo box at the top will show the currently selected stored procedure. In this case it is "csi_iMergeProc_PreMerge", and it will be executed at the beginning of merge. If the combo box says "(none)", then no stored procedure will be called at the specified stage.
To select a different stored procedure, click the combo box at the top and select the stored procedure from the list.
- Only stored procedures that contain at least 2 varchar fields will appear.
- The stored procedures must work properly when in a Begin and Commit transaction pair and must be able to properly roll back.
- The stored procedure may return an error message (This is a new feature in Version 4).
- The stored procedure must have a return code of 0 if it succeeds and a non-zero return code if it fails
Once selected, the bottom area of the window will populate with all the parameters of the stored procedure. You may type whatever you wish for each of the parameters. They will be evaluated like constants. If a parameter is a varchar field, you can assign it either "{Duplicate ID}" or "{Merge To ID}". If you choose to do this, when a merge is run, iMerge will pass the Duplicate ID and/or the Merge to ID to the stored procedure as the parameter you selected.
Using the same approach, you can select a stored procedure to execute Before Pre-Merge Checks and/or At End of Merge as well.
When you are finished, click Save to save your work or Cancel to go back to the previous settings.
If you click Save, iMerge will test the stored procedures by first issuing a begin transaction statement, then running the selected stored procedures using a Duplicate ID of "100" and a Merge To ID of "101" and then issuing a rollback transaction. This will leave the database in the same state as before the stored procedure is called.
Note: If you enable Delete Duplicate ID and you choose to execute a stored procedure "At End of Merge", and you use the "{Duplicate ID}" token, a warning will appear on the stored procedure form. This is because the duplicate ID will already be deleted from the database when the stored procedure is run, so the duplicate ID record in the database will no longer exist, which can potentially cause problems for the stored procedure.
Developing a stored procedure iMerge can call
The stored procedure must do the following:
- Have At Least 2 varchar fields:
- This is to narrow the choices of stored procedures that appear in the iMerge's combo box. The 2 varchar fields do not have to use the Merge to ID or the Duplicate ID, they just must be there. If, however, you do want to use the Merge to ID and/or the Duplicate ID, you must make sure the varchar fields are of length 10 or more. This is currently the size of an iMIS ID field so any ID being passed to your stored procedure may be of length 10.
- This is to narrow the choices of stored procedures that appear in the iMerge's combo box. The 2 varchar fields do not have to use the Merge to ID or the Duplicate ID, they just must be there. If, however, you do want to use the Merge to ID and/or the Duplicate ID, you must make sure the varchar fields are of length 10 or more. This is currently the size of an iMIS ID field so any ID being passed to your stored procedure may be of length 10.
- Return a failure or success code
- Returning a failure or success code involves issuing the command "return @int_variable". This will return the value in @int_variable to iMerge. If the return value is 0, iMerge assumes that the stored procedure was successful and commits the transaction. If the stored procedure returns a non-zero value, then the stored procedure encountered a problem and iMerge rolls back the transaction. iMerge will also roll back the transaction if a SQL error is encountered by iMerge when it calls the stored procedure.
- Returning a failure or success code involves issuing the command "return @int_variable". This will return the value in @int_variable to iMerge. If the return value is 0, iMerge assumes that the stored procedure was successful and commits the transaction. If the stored procedure returns a non-zero value, then the stored procedure encountered a problem and iMerge rolls back the transaction. iMerge will also roll back the transaction if a SQL error is encountered by iMerge when it calls the stored procedure.
- Return a detailed failure error message to the user
- When iMerge identifies a return value that is 0, it will roll back the transaction and can now give the user a useful and detailed message of why this occurred. Declare an error message variable (@ErrorMessage) of varchar(255). Then set the variable when you receive an error in your procedure. Simply perform a "Select @ErrorMessage" then "Return @ErrorCount". This will return the error message to iMerge to communicate to the user.
- When iMerge identifies a return value that is 0, it will roll back the transaction and can now give the user a useful and detailed message of why this occurred. Declare an error message variable (@ErrorMessage) of varchar(255). Then set the variable when you receive an error in your procedure. Simply perform a "Select @ErrorMessage" then "Return @ErrorCount". This will return the error message to iMerge to communicate to the user.
- Run inside a transaction and be able to fully roll back
- iMerge calls all stored procedures after calling a begin transaction statement. This means that the stored procedure must be able to work inside a transaction. It also means that creating new tables, truncating tables, and other commands that do not perform logging are off limits as they will not roll back correctly.
- iMerge calls all stored procedures after calling a begin transaction statement. This means that the stored procedure must be able to work inside a transaction. It also means that creating new tables, truncating tables, and other commands that do not perform logging are off limits as they will not roll back correctly.
- The Stored Procedure Must NOT Return Any Recordsets (This does not include the error message from above.)
- This means that it must not do any unnecessary select statements. The stored procedure can open cursors, perform "Insert Into (…) Select …" and execute other similar statements. It must not, however, do select statements that return recordsets. You can tell if your stored procedure is returning recordsets by running it in query analyzer and looking at the output. If you see output that looks similar to the output you see when you simply type a select statement, your stored procedure is returning one or more recordsets
Sample Stored Procedures
Below is a sample stored procedure. This procedure performs three distinct operations:
- Keeps the oldest join date of the two merged records
- Keeps the most recent paid thru date of the two merged records
- Moves the spouse name (a user defined field, you may or may not have) from the duplicate record to the merge to record, if the merge to record does not have a spouse.
- Add an appropriate Name Log entry, for each of the 3 updates listed above (Note: The below sample script… CSI_SP_for_iMerge, is broken down below over the next several pages of this user guide. It is, however, a single script.)
IF EXISTS (
    SELECT *
    FROM sys.objects
    WHERE object_id = OBJECT_ID(N'[dbo].[csi_sp_for_iMerge]')
      AND type IN (N'P', N'PC')
)
    DROP PROCEDURE [dbo].[csi_sp_for_iMerge];
GO

CREATE PROCEDURE [dbo].[csi_sp_for_iMerge]
    @DuplicateID VARCHAR(10),
    @MergeToID   VARCHAR(10)
AS
BEGIN
    DECLARE @ErrorCount INT = 0;

    ---------------------------------------------------------------------------
    -- Part 1: Keep the OLDEST Join Date of the two records.
    ---------------------------------------------------------------------------
    INSERT dbo.Name_Log (DATE_TIME, LOG_TYPE, SUB_TYPE, USER_ID, ID, LOG_TEXT)
    SELECT
        GETDATE(),
        'CHANGE',
        'CHANGE',
        CONVERT(VARCHAR(60), ISNULL(OBJECT_NAME(@@PROCID), 'csi_sp_for_iMerge')),
        m.ID,
        CONVERT(VARCHAR(255),
            'Name.JOIN_DATE: '
            + ISNULL(CONVERT(VARCHAR(10), m.JOIN_DATE, 101), '')
            + ' -> '
            + ISNULL(CONVERT(VARCHAR(10), d.JOIN_DATE, 101), '')
        )
    FROM dbo.Name m
    JOIN dbo.Name d ON d.ID = @DuplicateID
    WHERE m.ID = @MergeToID
      AND d.JOIN_DATE IS NOT NULL
      AND ISNULL(m.JOIN_DATE, CONVERT(DATETIME, '17530101')) >
          ISNULL(d.JOIN_DATE, CONVERT(DATETIME, '17530101'));

    UPDATE m
    SET m.JOIN_DATE = d.JOIN_DATE
    FROM dbo.Name m
    JOIN dbo.Name d ON d.ID = @DuplicateID
    WHERE m.ID = @MergeToID
      AND d.JOIN_DATE IS NOT NULL
      AND ISNULL(m.JOIN_DATE, CONVERT(DATETIME, '17530101')) >
          ISNULL(d.JOIN_DATE, CONVERT(DATETIME, '17530101'));

    SET @ErrorCount += @@ERROR;

    ---------------------------------------------------------------------------
    -- Part 2: Keep the MOST RECENT Paid Thru of the two records.
    ---------------------------------------------------------------------------
    INSERT dbo.Name_Log (DATE_TIME, LOG_TYPE, SUB_TYPE, USER_ID, ID, LOG_TEXT)
    SELECT
        GETDATE(),
        'CHANGE',
        'CHANGE',
        CONVERT(VARCHAR(60), ISNULL(OBJECT_NAME(@@PROCID), 'csi_sp_for_iMerge')),
        m.ID,
        CONVERT(VARCHAR(255),
            'Name.PAID_THRU: '
            + ISNULL(CONVERT(VARCHAR(10), m.PAID_THRU, 101), '')
            + ' -> '
            + ISNULL(CONVERT(VARCHAR(10), d.PAID_THRU, 101), '')
        )
    FROM dbo.Name m
    JOIN dbo.Name d ON d.ID = @DuplicateID
    WHERE m.ID = @MergeToID
      AND ISNULL(m.PAID_THRU, CONVERT(DATETIME, '17530101')) <
          ISNULL(d.PAID_THRU, CONVERT(DATETIME, '17530101'));

    UPDATE m
    SET m.PAID_THRU = d.PAID_THRU
    FROM dbo.Name m
    JOIN dbo.Name d ON d.ID = @DuplicateID
    WHERE m.ID = @MergeToID
      AND ISNULL(m.PAID_THRU, CONVERT(DATETIME, '17530101')) <
          ISNULL(d.PAID_THRU, CONVERT(DATETIME, '17530101'));

    SET @ErrorCount += @@ERROR;

    ---------------------------------------------------------------------------
    -- Part 3: Example of moving demographics if missing on the kept record.
    ---------------------------------------------------------------------------
    INSERT dbo.Name_Log (DATE_TIME, LOG_TYPE, SUB_TYPE, USER_ID, ID, LOG_TEXT)
    SELECT
        GETDATE(),
        'CHANGE',
        'CHANGE',
        CONVERT(VARCHAR(60), ISNULL(OBJECT_NAME(@@PROCID), 'csi_sp_for_iMerge')),
        m.ID,
        CONVERT(VARCHAR(255),
            'Name_Demo.SPOUSE: ' + m.SPOUSE + ' -> ' + d.SPOUSE
        )
    FROM dbo.Name_Demo m
    JOIN dbo.Name_Demo d ON d.ID = @DuplicateID
    WHERE m.ID = @MergeToID
      AND m.SPOUSE <= ' '
      AND d.SPOUSE > ' ';

    UPDATE m
    SET m.SPOUSE = d.SPOUSE
    FROM dbo.Name_Demo m
    JOIN dbo.Name_Demo d ON d.ID = @DuplicateID
    WHERE m.ID = @MergeToID
      AND m.SPOUSE <= ' '
      AND d.SPOUSE > ' ';

    SET @ErrorCount += @@ERROR;

    RETURN @ErrorCount; -- Returning anything other than 0 rolls back all transactions
END;
GO

-- Grant execution permission
GRANT EXECUTE ON [dbo].[csi_sp_for_iMerge] TO [IMIS] AS [dbo];
GO
Below is another sample stored procedure. This procedure performs distinct operations allowing you to call two stored procedures at once.
-- Remove existing main script definition
DROP PROCEDURE [dbo].[csi_sp_for_iMerge_Main]
GO
-- Create main stored procedure to be called by iMerge
CREATE PROCEDURE [dbo].[csi_sp_for_iMerge_Main]
    @DuplicateID as varchar(10), @MergeToID as varchar(10)
AS
DECLARE @ErrorCount as int; SET @ErrorCount = 0

-- Output information message
PRINT('Running script: csi_sp_for_iMerge_Main')

-- Execute 1st secondary script(s) below...
EXECUTE @ErrorCount = [dbo].[csi_sp_for_iMerge_First] @DuplicateID, @MergeToID
-- Check error count returned by secondary script
IF @ErrorCount <> 0
BEGIN
    RAISERROR('Error in script: csi_sp_for_iMerge_First',16,1)

END
ELSE
BEGIN
    -- Execute 2nd secondary script(s) below...
    EXECUTE @ErrorCount = [dbo].[csi_sp_for_iMerge_Second] @DuplicateID, @MergeToID
    -- Check error count returned by secondary script
    IF @ErrorCount <> 0
    BEGIN
        RAISERROR('Error in script: csi_sp_for_iMerge_Second',16,1)
    END
END

RETURN @ErrorCount -- Returning anything other than 0 will rollback all transactions
GO
-- Grant execution permission to main script
GRANT EXECUTE ON [dbo].[csi_sp_for_iMerge_Main] TO [IMIS] AS [dbo]
GO
(Main stored procedure to be called by iMerge)
-- Remove existing secondary script definition
DROP PROCEDURE [dbo].[csi_sp_for_iMerge_First]
GO
-- Create secondary stored procedure to be called by main script
CREATE PROCEDURE [dbo].[csi_sp_for_iMerge_First]
    @DuplicateID as varchar(10), @MergeToID as varchar(10)
AS
DECLARE @ErrorCount as int; SET @ErrorCount = 0

-- Output information message
PRINT('Running script: csi_sp_for_iMerge_First')

-- TODO: Add your custom code here below
SELECT @ErrorCount = @ErrorCount + @@ERROR -- track errors

RETURN @ErrorCount -- Returning anything other than 0 will rollback all transactions
GO
-- Grant execution permission to secondary script
GRANT EXECUTE ON [dbo].[csi_sp_for_iMerge_First] TO [IMIS] AS [dbo]
GO
(Secondary stored procedure to be called by main script)
-- Remove existing secondary script definition
DROP PROCEDURE [dbo].[csi_sp_for_iMerge_First]
GO
-- Create secondary stored procedure to be called by main script
CREATE PROCEDURE [dbo].[csi_sp_for_iMerge_First]
    @DuplicateID as varchar(10), @MergeToID as varchar(10)
AS
DECLARE @ErrorCount as int; SET @ErrorCount = 0

-- Output information message
PRINT('Running script: csi_sp_for_iMerge_First')

-- TODO: Add your custom code here below
SELECT @ErrorCount = @ErrorCount + @@ERROR -- track errors

RETURN @ErrorCount -- Returning anything other than 0 will rollback all transactions
GO
-- Grant execution permission to secondary script
GRANT EXECUTE ON [dbo].[csi_sp_for_iMerge_First] TO [IMIS] AS [dbo]
GO
(Another secondary stored procedure to be called by main script)
Below is another example that shows you how to return a detailed error message to your user from a stored procedure:
-- Remove existing script definition
DROP PROCEDURE [dbo].[csi_sp_TestReturnError_iMerge]
GO
-- Create stored procedure to be called by iMerge
CREATE PROCEDURE [dbo].[csi_sp_TestReturnError_iMerge]
    @DuplicateID as varchar(10), @MergeToID as varchar(10)
AS
DECLARE @ErrorMessage varchar(225), @ErrorCount int
SET @ErrorMessage = ''
SET @Errorcount = 0

-- Pre-merge test
SELECT @ErrorMessage=
    CASE @MergeToId
        WHEN '200' THEN 'You cannot merge to this ID'
        ELSE ''
    END

IF DATALENGTH(@ErrorMessage) > 1
BEGIN
    SELECT @Errorcount = 10
    RAISERROR(@ErrorMessage,16,1)
END

RETURN @ErrorCount -- Returning anything other than 0 will rollback all transactions
GO
-- Grant execution permission to script
GRANT EXECUTE ON [dbo].[csi_sp_TestReturnError_iMerge] TO [IMIS] AS [dbo]
GO
(optional) Transfer User Credentials
Sometimes it might be necessary to transfer a user's login credentials from one record to another. The following steps will allow you to accomplish this. It will move the user name and password from the Duplicate ID to the Merge To ID if the last login date/time is NEWER on the Duplicate ID)(opi
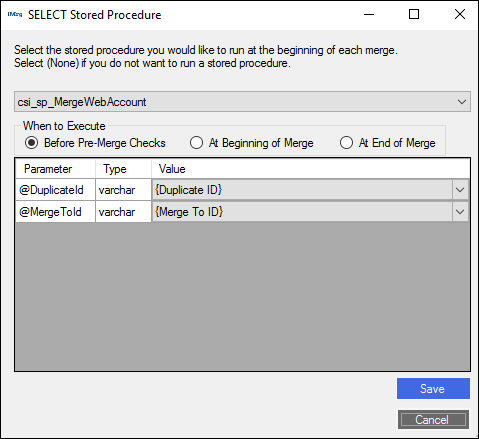
- Click on the Options menu and select Call Stored Procedure.
- Select the stored procedure: csi_sp_MergeWebAccount. Then select "At End of Merge" for When to Execute. Finally, select the Duplicate ID and Merge To ID parameter values. Once you hit Save, you are ready to run the merge of your records.
Duplicate Finder
Duplicate Finder is a tool to aid the user in searching for and merging potential duplicate records.
To launch the Duplicate Finder tool, select it from the Tools dropdown menu of your main iMerge screen.
Profile Overview
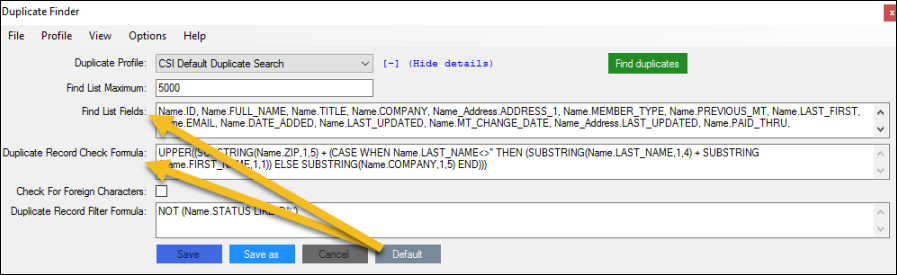
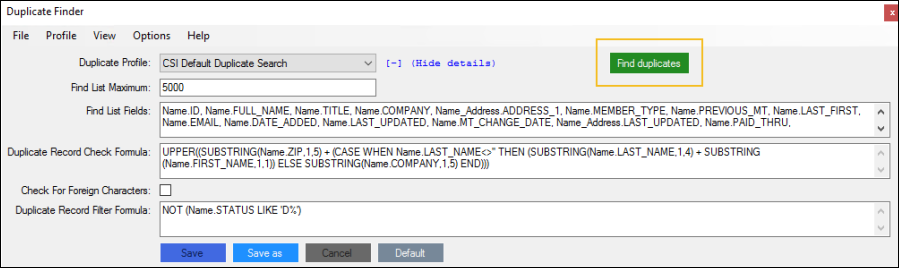
Duplicate searches are done by first creating a profile, made up of 5 settings:
- Find List Maximum - How many potential duplicates to return. '0' will return all potential duplicates.
- Find List Fields - The iMIS database table and fieldnames to display in the result grid. It lists the individuals' ID, last name, first name, company, city and state/province.
Example: Name.ID, Name.LAST_NAME, Name.FIRST_NAME, Name.COMPANY, Name.CITY, Name.STATE_PROVINCE
- Duplicate Record Check Formula - A syntactically correct SQL expression containing iMIS database table and fieldnames used to determine potential duplicates. The default formula is the Duplicate Record Check Formula defined in iMIS.
- Check For Foreign Characters - Checking this option causes the Duplicate Finder query engine to check for foreign characters in the data returned by the Duplicate Record Check Formula and convert them to their English alphabet equivalent before determining if a duplicate exists. Foreign characters are typically those that contain a diacritic mark, like a tilde, apostrophe, caret or umlaut.
Example: à, è, ì, ò, ù, â, ê, î, ô, û, ã, ñ, õ, ä, ë, ï, ö and ü.
The foreign character check/conversion can be a very time consuming operation and may significantly increase the search run time. If your iMIS data does not typically contain foreign characters, it is recommended that this option be unselected. If you choose to select this option, you may need to increase the Connection Timeout option.
- Duplicate Record Filter Formula – A syntactically correct SQL clause containing iMIS database table and fieldnames used to include or exclude records from being searched.
- The above would exclude individuals whose primary address has a state/province of "TX".
- The above would only include member types A and B, with Status = A, whose Paid Thru date is greater than or equal to 1/1/2014.
Example: Name.State_Province <> 'TX'
Example: Name.MEMBER_TYPE IN ('A','B') AND Name.STATUS = 'A' AND Name.PAID_THRU >='1/1/2014'
Example: SUBSTRING(Name.ZIP,1,5) + (CASE WHEN Name.LAST_NAME<>'' THEN (SUBSTRING(Name.LAST_NAME,1,4) + SUBSTRING(Name.FIRST_NAME,1,1)) ELSE SUBSTRING(Name.COMPANY,1,5) END)
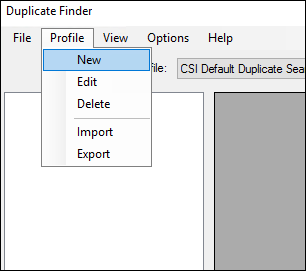
Creating a new profile
Do the following to create a new profile:
- Go to Profile > New.
- Give the profile a name and fill in the profile's five settings, as outlined in Profile Overview. You may use the standard iMIS internal duplicate formula by clicking Default.
- Click Save.
- When not in New or Edit mode, you may select a profile from saved profiles by selecting one from the dropdown.
To edit an existing profile, select an existing profile, then select Profile > Edit. Make the desired changes and click Save.
To delete an existing profile, select an existing profile, then select Profile > Delete. You will be prompted to confirm your decision to delete the profile.
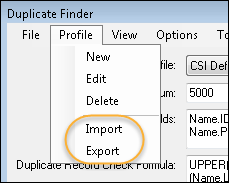
You may import/export a single set of profile settings from/to an XML file by selecting either Import or Export from the Profile menu item. Note: When importing settings, you should first start a New profile, give it a name, import the settings, then Save the profile.
To run a profile to check for duplicates, click Find duplicates.
Note: If the Find List Fields, Duplicate Record Check Formula or Duplicate Record Filter Formula entry is invalid you will receive an error message.
To hide and show the settings for a profile, click the - and + buttons, respectively.
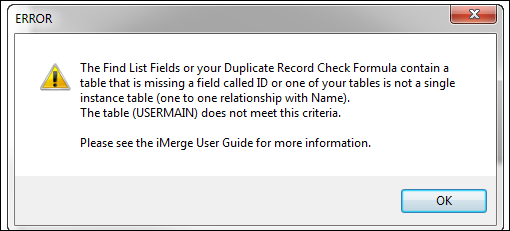
If you receive the error below, this means you have or are attempting to include a table that either does not contain a field called "ID" (i.e. USERMAIN) or a multi-instance table. The error will identify those tables which must be removed. The following section includes instructions on how to include this information by creating a view.
Using Views with Duplicate Finder
The 'Find List Fields' and 'Duplicate Record Check Formula' area of Duplicate Finder, can include any Table or View in iMIS, that meets the following criteria:
- All tables must be Single Instance. Any Multi Instance table used (i.e. Activity) will greatly skew the results.
- You cannot include a table that does not have a field called ID, nor one that is Multi-Instance.
Table UserMain, for instance, has an ID field in it, but it’s called ContactMaster – therefore, inclusion of this table in Duplicate Finder will result in an error. A valid workaround would be to create a VIEW of such a table, alias the field as ID, then the use the View in the ‘Find List Field’ or ‘Duplicate Record Check Formula’.
Building on this logic, one could create a View to use with Duplicate Finder, that might greatly assist with determining which record to keep. Below is an example of such a view, that clients have found helpful (Note: the view can be called whatever is dictated by business rules):
Create view   VCSI_Name_Counts as

 SELECT    N.ID, N.FULL_NAME
        , ISNULL(S.Count_SubscriptionsTable,0) AS Count_SubscriptionsTable
        , ISNULL(A.Count_ActivityTable,0) AS Count_ActivityTable
        , ISNULL(C.Count_Committees,0) AS Count_Committees
        , ISNULL(T.Count_TransTable,0) AS Count_TransTable
        , ISNULL(O.Count_OrdersTable,0) AS Count_OrdersTable
        , '' AS [Fundraising?], '' AS [Orders?], '' AS [Events?]
FROM    Name AS N
        LEFT JOIN (    SELECT    ID, COUNT(*) AS Count_SubscriptionsTable
                    FROM    Subscriptions
                    GROUP BY ID) AS S ON N.ID = S.ID
        LEFT JOIN ( SELECT    ID, COUNT(*) AS Count_ActivityTable
                    FROM    Activity
                    GROUP BY ID) AS A ON N.ID = A.ID
        LEFT JOIN ( SELECT    ID, COUNT(*) AS Count_Committees
                    FROM    Activity
                    WHERE    ACTIVITY_TYPE = 'COMMITTEE'
                    GROUP BY ID) AS C ON N.ID = C.ID
        LEFT JOIN ( SELECT    ST_ID, COUNT(*) AS Count_TransTable
                    FROM    Trans
                    GROUP BY ST_ID) AS T ON N.ID = T.ST_ID
        LEFT JOIN ( SELECT    ST_ID, COUNT(*) AS Count_OrdersTable
                    FROM    Orders
                    WHERE    STAGE = 'COMPLETED'
                    GROUP BY ST_ID) AS O ON N.ID = O.ST_ID
Basic Operations
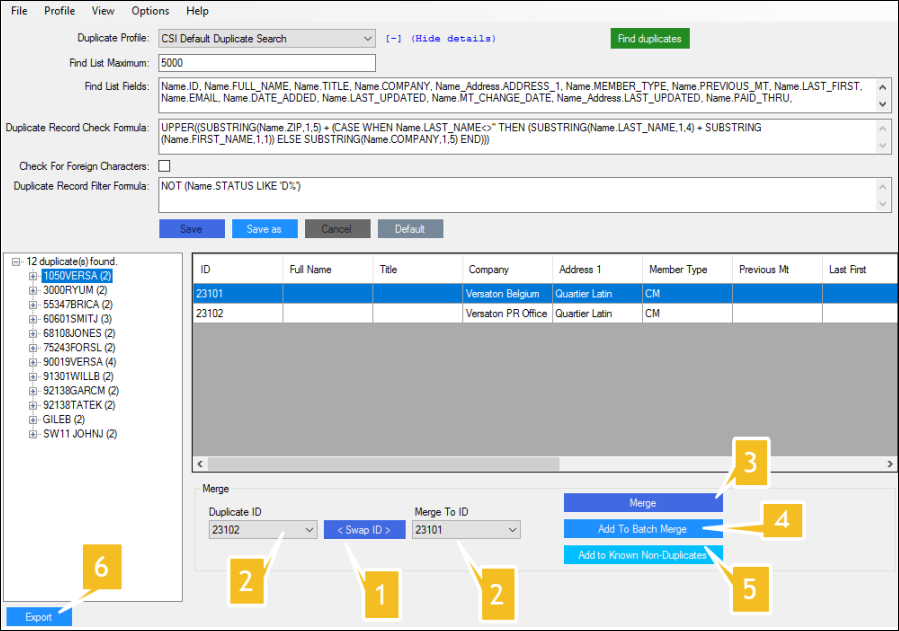
Once you have returned a set of potential duplicates, you may perform the following operations.
- < Swap ID >: Switch the Duplicate ID and Merge To ID.
- Select the IDs you would like to use for the merge from the list shown in the table above.
- Merge: Merge the Duplicate ID into the Merge To ID.
- Add to Batch Merge: Add the merge operation to a batch list of merges that will be performed at a later time.
- Add to Known Non-Duplicates: Add the IDs to the list of known non-duplicates. This will omit these IDs from being considered duplicates in future searches. See below on how to maintain the known non-duplicates list.
- Export: Export the duplicate results to a spreadsheet.
Known non-duplicates list
Do the following to view or make changes to the known non-duplicates:
- In iMerge, go to Tools > Duplicate Finder.
- Select View > Known Non-Duplicates.
Here you can remove existing entries, add new entries, or export the list to a file.
Tip: If you find yourself frequently adding records to Known Non-Duplicates, consider altering Duplicate Record Check Formula and/or Duplicate Record Filter Formula.
Purge Orphans: By clicking Purge Orphans, a new window will open that allows you to purge known non-duplicate records whose IDs no longer exist in iMIS. This will allow for more time efficient duplicate searches.
The "Include record(s) with status codes beginning with 'D'" checkbox will purge those records that have been marked for deletion.
Click Purge to complete this process.
Processing batch lists
Do the following to view or process a batch list of merges
- Click View > Batch List. Here you have the ability to add new IDs to a batch list, and remove IDs from the existing list.
- To process all of the merges as a batch, click Actions > Send To iMerge. This will automatically run the merge.
- After processing the batch lists, do one of the following:
- To save to a text file of the IDs in the batch list, click File > Save.
- To manually create a new batch list of IDs to merge, select File > New. Then click Add and Remove to maintain the list.
Note: The batch list is session-based only. The list will reset once you close out the Duplicate Finder application.
Using the Connection Timeout option
If, when you run the profile to find duplicates, you experience a connection timeout due to the large size of the database, or the use of the Check for Foreign Characters option, you may increase the connection timeout setting.
- Go to Options and click Connection Timeout: <existing setting>.
- There will be a pop up window that allows you to adjust the time for connection timeout.
- Click Save.
Using AutoSizing
You also have the ability to enable Allow Column AutoSizing and Allow Row AutoSizing for your search results. This will allow your columns and rows to be automatically adjusted to the search results of the duplicate search.
You can turn these options on/off by going to Options> Allow Columns AutoSizing and Allow Rows Autosizing.
To optimize performance it is recommended that this be disabled, especially when Find List Maximum is set to a large value.
Using priority grouping
Under Options you have the ability to edit priority grouping. By enabling this, you can search for duplicate records and have them separated into three groups that are defined on date selections. You have the ability to search by a Fixed Date or Fixed Day.
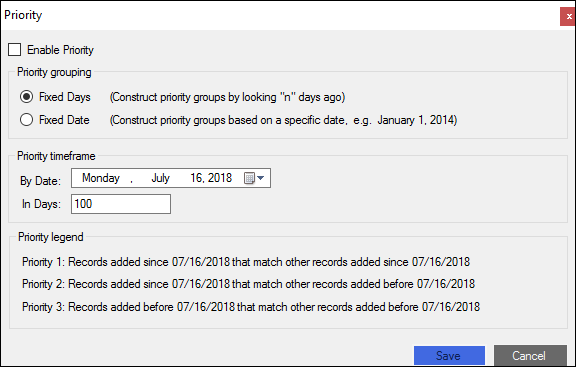
Fixed Days: Allows you to construct priority groups by looking "n" days ago. For example, In Days is set to 60:
- A search executed 2/1/2014 will create Priority Groups based on 12/3/2013 (60 days prior)
- A search executed 3/1/2014 will create Priority Groups based on 12/31/2013 (60 days prior)
Fixed Date: Allows you to construct priority groups based on a certain calendar date.
- For example, using a date of "1/1/2014," Duplicate Finder will always use this date to create the Priority Groups; whether the duplicate search is performed today, next week, or next month.
The Priority Legend outlines how the Priority Groups are defined.
- Priority 1: Records added since [date] that match other records added since [date]
- Priority 2: Records added since [date] that match other records added before [date]
- Priority 3: Records added before [date] that match other records added before [date]
Best practices and tips for managing duplicates
- When first using Duplicate Finder the results list may contain thousands of records. Knowing where to start may be overwhelming. Some tips:
- Set Find List Maximum to 0. Perform a duplicate search. Export the results. Divide the exported list into multiple lists and share it amongst multiple individuals. Have the individuals create batch lists for later use with iMerge's Batch Mode functionality.
- Consider using a temporary staffing service or interns for a few days to process the bulk of records. Afterwards it will be much easier to maintain the results through regularly scheduled duplicate reviews.
- Enable Priority Grouping. Select Fixed Days and set In Days = 60. Work through the results from Priority 1 -> Priority 2 -> Priority 3.
- The length of time it takes to complete a duplicate search largely depends on the quantity of duplicates returned. In the table below, notice how Search Time performance decreases as the quantity of Duplicates Found increases.
DatabaseRecords Find ListMaximum Duplicate RecordFilter formula DuplicatesFound SearchTime 300,000
2,000
NOT (Name.STATUS LIKE 'D%')
2,000
12 seconds
300,000
10,000
NOT (Name.STATUS LIKE 'D%')
4,000
27 seconds
300,000
10,000
(no filter)
9,600
4 minutes 40 seconds
To improve performance consider making the following changes:
- Set Find List Maximum to a smaller value (e.g., 5,000 or lower)
- Disable Allow Columns AutoSizing and Allow Rows AutoSizing
- Disable Check for Foreign Character
- Consider creating multiple profiles to improve duplicate search accuracy, exclude unnecessary records, or perform different types of duplicate searches (e.g., weekly, quarterly, and annually).
- Resize the Duplicate Finder window to view all Find List Fields at one time (i.e., without scrolling horizontally).
- Most importantly, after going through the hard work to clean up your database, set up a maintenance plan to ensure duplicates are cleaned up on a regular basis. [It is recommended to do this weekly , with Priority Grouping set to Fixed Days = 60.]
- In iMerge, use a custom stored procedure to update IDs in multiple databases and tables. Be sure to update it regularly as new databases, tables, and fields are added/removed in your environment.
- In iMerge, a good way to purge unneeded records from the database is by creating a generic non-member iMIS record (e.g., Mr. Deleted Deleted). Afterwards, merge "bad" records into this ID.
Correct Change Log Format Tool
The Correct Change Log Format Tool is a tool to aid the user in updating the change log format output to the latest version within iMIS. To launch the Correct Change Log Format Tool, select it from the Tools dropdown menu of your main iMerge screen.
- You will see a prompt asking you if you would like to scan for records with an outdated format in the change log.
- Select yes, and the tool will inform you if it found any applicable records and how many of them if they exist.
- Select yes again and the tool will update the records change log format and notify you it has done such.