If you already accept credit cards online, you can set up Express Checkout with PayPal to integrate with your content item-based sites. This additional payment option is a convenience for your members, customers, registrants, and donors, which means more revenue for your organization. This option also reduces your liability for holding cardholder data, because their credit card information is stored securely at PayPal.
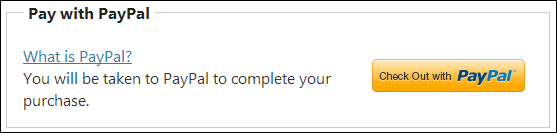
The Check Out with PayPal block appears in the Payment Creator content item if you set up a cash account as a PayPal service.
PayPal payments can apply to a full range of items offered in iMIS sites:
- Products and product kits
- Event registrations
- Renewal invoices, for both accrual and cash dues
- Donations
iMIS handles PayPal Express Checkout differently for products that are not shipped:
- Shippable items (products and kits) require a deliverable address, which both iMIS and PayPal verify. iMIS sends the contact’s name and address to PayPal, which displays the information on its site for the payer to verify.
- Non-shippable items (renewals, registrations, donations) require no delivery address, so none is sent to PayPal. Because of this, PayPal displays the name and address of the payer that it has on file, which might differ from the name and address stored in iMIS.
Your site visitors can complete transactions quickly and easily without entering credit card information:
- After adding all items to their cart (or completing a standalone donation), customers click Check Out with PayPal.
- Customers are redirected to PayPal and sign in, where they complete their payment:
- Customers can see their payment item details.
- Customers can review their shipping info.
- Customers can select their payment method and complete payment.
- PayPal automatically returns the necessary information needed to confirm and fulfill the order. Your customer is returned to your website to view their confirmation.
You can set up style elements in your PayPal account so that customers will feel comfortable that it is a continuation of their shopping experience from your site.
Note: The Check Out with PayPal option is hidden whenever the signed-in user is working On Behalf Of another.
Once your organization establishes a PayPal Business or Premiere account, you can integrate PayPal Express into iMIS to offer a preferred payment option to your site visitors. Setting this up involves creating your sandbox account with PayPal, creating the PayPal service in iMIS, and testing transactions between iMIS and PayPal.
Refer to the documentation on the PayPal Developer site (developer.paypal.com) for more information.
Note: The specified default currency symbol will not be displayed on your iMIS site. If the customer’s merchant account is set to a different currency than the default currency set on the iMIS site, then the total that appears on the customer’s PayPal site will correspond with the currency that they have set in their merchant account. See Quick setup for more information.
- Sign up for Express Checkout.
- Log in, or select Sign Up.
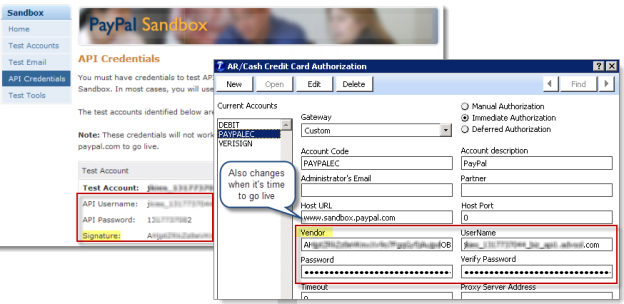
- Set up a PayPal Sandbox account to use for testing, with at least two test accounts:
- A merchant account to represent your organization.
- A personal account to represent your buyer.
- Sign into your sandbox account, click API Credentials to collect the information you need to enter into iMIS to begin your setup and testing:
Note: Express Checkout requires a Business or Premier account.
Keep in mind that you will be moving between test (sandbox) mode and live mode, which requires a different Host URL and set of PayPal API Credentials. Before you begin your iMIS testing, remember that you must be signed in on the PayPal sandbox site.
Note: Keep a separate instance of iMIS configured to use your sandbox settings, for ongoing testing.
Do the following to set up PayPal authorization in iMIS:
- From the Staff site, go to Settings > Finance > Gateway accounts.
- Select PAYPALEC. If the PayPal account does not exist, create it:
- Select Add new gateway account.
- From the Gateway drop-down, select Custom.
- Enter an Account code of PAYPALEC.
- In the Host Url, enter the appropriate PayPal URL: www.sandbox.paypal.com (test) or www.paypal.com (live).
- Enter your organization's values for Vendor (the API Signature for your PayPal account), Username, and Password.
- Click Save.
Note: These values are case-sensitive. Also, remove any trailing spaces from these fields.
- Go to Settings > Finance > Cash accounts, and add a cash account with the following features:
- Code: PAYPAL
- Name: PayPal (case-sensitive)
- Type: Service
- Gateway account: PAYPALEC
Note: The Code, Name, Type, and Gateway account must match exactly as they appear above.
- Add the PayPal payment method to a payment method set. See Payment method sets for more information.
- Verify that your web.config includes PayPal as a payment gateway provider, and that the authorization Account Code matches what you defined previously.
- If you are designing your own checkout pages, be sure that the Payment Creator and Submit Order Button content items are on same page.
Note: Your payment method set Display Name for PayPal must exactly match the title: PayPal. If there are any variations, PayPal will not be displayed in the cart.
Note: If you are not self-hosted, you must contact your host for assistance modifying web.config files.
<paymentGatewayService>
  <providers>
    <add name="PayFlowProPaymentGatewayProvider" type="Asi.PaymentGateway.PayflowProPaymentGatewayProvider, PayflowProPaymentGatewayProvider" authorizationAccounts="VERISIGN,PaymentTech,PAYFLOWPRO" />
    <add name="NoProcessingPaymentGatewayProvider" type="Asi.PaymentGateway.NoProcessingPaymentGatewayProvider, NoProcessingPaymentGatewayProvider" authorizationAccounts="NOPROCESS,DEBIT" />
    <add name="PayPalPaymentGatewayProvider" type="Asi.PaymentGateway.PayPalPaymentGatewayProvider, PayPalPaymentGatewayProvider" authorizationAccounts="PAYPALEC" />
    <add name="MonerisPaymentGatewayProvider" type="Asi.PaymentGateway.MonerisPaymentGatewayProvider, MonerisPaymentGatewayProvider" authorizationAccounts="MONERIS" />
    <add name="TnsPayPaymentGatewayProvider" type="Asi.PaymentGateway.TnsPayPaymentGatewayProvider, TnsPayPaymentGatewayProvider" authorizationAccounts="TNSPAYAC,TNSPAYP" />
    <add name="DataVaultPaymentGatewayProvider" type="Asi.PaymentGateway.DataVaultPaymentGatewayProvider, DataVaultPaymentGatewayProvider" authorizationAccounts="DVPAYFLOWPRO,SECUREPAY,IATS" />
  </providers>
</paymentGatewayService>
Note: Open your PayPal sandbox test site.
Do the following to test your PayPal setup:
- Go to developer.paypal.com and log in to your Business or Premier account.
- On your iMIS site, complete a PayPal transaction:
- Put an item in your cart. When configured correctly, the Check Out with PayPal panel appears directly above the payment methods drop-down in the cart and on the Give & Go page.
- Click Check Out with PayPal, which redirects to the PayPal site.
- Log in to PayPal with your personal test account (not your Business or Premier account).
- Verify that your order details appear on the PayPal site, and click Pay Now to complete the transaction. PayPal redirects you to the confirmation page in iMIS.
- Verify that the transaction information was stored correctly in iMIS:
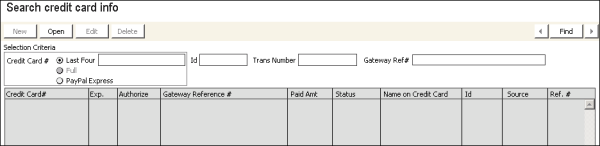
- In Advanced Accounting Console, go to Finance > Transactions > Search credit card info.
- To find the transaction, select the PayPal Express option.
- Enter the iMIS Id, Trans Number, or Gateway Ref#, which contains the Transaction ID that PayPal assigned.
If you want to switch to accepting payment through PayPal Express Checkout only for public users, you can reconfigure iMIS so that the Payment Creator content item allows payment through PayPal alone.
Note: These steps will restrict payment methods to PayPal alone only for public users. Staff users will still see other payment methods as defined.
To achieve PayPal-only payments, you must configure iMIS so that PayPal is the only web-enabled cash account. The following is a quick way to achieve this for public users without deleting any existing credit card accounts:
- From the Staff site, go to Settings > Finance > Cash accounts.
- Add a cash account that is a copy of your PAYPAL account, named Z_PAYPAL. This new account must point to your existing PAYPALEC authorization account.
- View your site and add an item to the cart to verify that Payment Creator is hiding the credit card options.
Note: To re-enable credit card processing, simply repeat the first two steps and restore the value.
The Payment Creator content item supports the PayPal Express Checkout panel when it appears outside of the context of the shopping cart, on a standalone donation page. The PayPal integration preserves any entries in the Display Name Editor (List As) and Tribute Gift Editor content items. The PayPal option can enhance your campaign success by giving visitors to your site the reassurance of a known and secure payment method.
Note: On contact account pages, the Giving History content item lists donations paid using PayPal as having a Type of Cash.
To reconcile transactions in your iMIS database with the PayPal Express entries, use the transactions report to obtain the Transaction IDs, Gross and Net amounts, dates, and PayerIDs. On the PayPal site, you can look up a PayerID to identify the purchaser.
To reconcile transactions in your iMIS database with the reports in PayPal, look at the Transaction ID that appears in the Details for an entry on the Overview page.
Note: Keep in mind that it is possible for addresses and even names to differ between iMIS and PayPal for a single Transaction ID. The Transaction ID in the merchant account listing is what pairs the two.
- Log on to paypal.com using your seller account.
- Select your account and enter the site.
- Locate the most recent transaction, verifying that the amount matches the order.
- Click the Details link for that line.
- Click Unique Transaction ID # that appears next to the text Express Checkout Payment Received.
- In Advanced Accounting Console, look up the values as appropriate:
- Go to Customer Service > Orders. Find an order and select the Payments tab. Find the Gateway Ref #.
- Go to Events > Register for an event. Find an event and select the Payments tab. Find the Gateway Ref #.
- Go to Finance > Transactions > Search credit card info, and use any combination of iMIS ID, iMIS transaction ID, and Gateway Ref #.
Refunding customer payments always involves the Advanced Accounting Console, where you cancel out the payments and issue refunds. When PayPal is the payment method, refunds must be made using PayPal as well.
Note: The only time that both iMIS and PayPal process payments automatically is when they are first entered by customers on your site. Any subsequent transactions affecting that payment must be entered manually into both PayPal and the Advanced Accounting Console.
Do the following to reverse a PayPal payment (for example, removing payment for a registration):
- Log in to PayPal and process the refund using PayPal’s standard procedures.
- In the Advanced Accounting Console, go to Finance > Transactions > Cash receipts and create a new payment to cancel the prior one:
- Enter the following:
- ID
- PayPal cash account (typically PayPal) in the Check/CC field
- Negative payment amount
- Apply the negative payment to the original transaction:
- Edit the transaction.
- Enter a negative amount in the Amt Paid field, so that it has a balance due.
- Enter the following:
If the transaction is not paid by another method and you need to reverse the original purchase, use the normal procedures to cancel a registration, order, or donation.