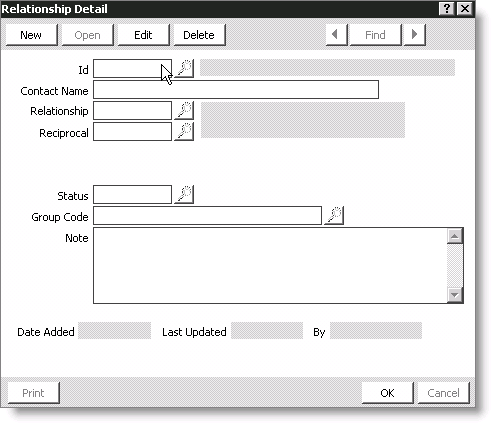
Relationship Detail window

Id
Specifies the ID of the contact, or click the lookup icon to search for the contact's ID.
Contact Name
Specifies the name of the contact when the ID is not in the contact database.
Relationship
Specifies the relationship code for the contact, or click the lookup icon to select the relationship code from a list.
Reciprocal
If the relationship code you entered in the Relationship field has a reciprocal relationship with another type, the code for that reciprocal relationship type automatically displays in this field.
Status
Specifies the status of the contact (Active, Marked for deletion, or Suspended), or click the lookup icon to select a value.
Group Code
Specifies a code for the group type (ROLE or DONOR), or click the lookup icon to select a group type.
Note
Specifies any notes you want to keep about the contact.
Date Added
This is a display-only field that shows when a relationship was added.
Last Updated
This is a display-only field that shows when a relationship was updated.
By
This is a display-only field that displays the ID of the person who entered the update to the relationship information.
To add a relationship to a customer record
- Select Customers.
- Click the lookup icon to open a contact's record in the Manage customers window.
- Select the Relationships tab.
- On the Relationships tab, click New. The Relationship Detail window opens.
- On the Relationship Detail window, click New.
- In the Id field, enter a contact ID, or click the lookup icon to select the contact's ID.
- In the Relationship field, enter the relationship code, or click the lookup icon to select the appropriate code. If the relationship code you entered has a reciprocal relationship with another relationship type, the Reciprocal field auto-populates.
- (optional) Enter a Title, or click the lookup icon to select a value.
- (optional) Enter a Functional Title, or click the lookup icon to select a value.
- (optional) Enter a Status, or click the lookup icon to select a value.
- (optional) Enter the From and Thru dates.
- (optional) Enter a Group Code, or click the lookup icon to select a value. (For more information on using Group Codes to display relationships on the Role tab, see Managing Role Activities.)
- (optional) Enter any additional information in the Note field.
- Click Save.
Note: If you're adding a relationship with a contact that does not exist in the customer database, leave the ID field blank and enter the contact's name in the Contact Name field.
Note: The Title and Functional Title fields only display when the relationship type entered has the Use Title option enabled in the Relationship types window.
Note: Status codes are limited to 5 characters.
Note: The From and Thru date fields only display when the relationship type entered has the Use Dates option enabled in the Relationship types window.
To view an existing relationship
- Select Customers.
- Click the lookup icon to open a contact's record in the Manage customers window.
- Select the Relationships tab.
- Double-click on the relationship you want to view to open the Relationship Detail window for that relationship.
To edit an existing relationship
- Select Customers.
- Click the lookup icon to open a contact's record in the Manage customers window.
- Select the Relationships tab.
- Double-click on the relationship you want to edit to open the Relationship Detail window for that relationship.
- On the Relationship Detail window, click Edit.
- Make the desired edits. At least two fields must contain information: the Relationship field and either the Id or the Contact Name field.
- Click Save.
To delete an existing relationship
You can delete relationship records that display on the Relationships tab, provided your administrator has assigned you the appropriate authorization level.
- Select Customers.
- Click the lookup icon to open a contact's record in the Manage customers window.
- Select the Relationships tab.
- Double-click on the relationship you want to delete to open the Relationship Detail window for that relationship.
- On the Relationship Detail window, click Delete. A message displays asking you to confirm the deletion.
- Click Yes to have the record deleted from the tab and the database or click No to cancel the deletion.
Note: You can also delete a record by pressing the Delete key on the keyboard.