Adding Crystal reports to the menu
You can insert new Crystal reports or clone existing ASI standard Crystal reports so that the customized reports can be accessed from the iMIS Reports menu.
When you insert reports into the iMIS Reports menu, it is important to determine where the report is stored. If you enter a report name with no path shown, iMIS assumes the report is stored in the stdrpts folder or the custrpts folder. iMIS will look for the stdrpts folder or the custrpts folder in either:
- Your local workstation, if the iMIS libraries were installed locally
- A server, if the iMIS libraries were installed on a server
Note: The custrpts folder is not included with your copy of iMIS. Create one locally or on your server to ensure that your reports do not get overwritten
Note: Make sure to place custom or cloned reports in the custrpts folder. Make sure to rename cloned reports. The iMIS standard reports are kept in the stdrpts folder and are overwritten during an install or upgrade.
To clone an ASI standard Crystal report
Note: Make sure to place custom or cloned reports in the custrpts folder. Make sure to rename cloned reports. The iMIS standard reports are kept in the stdrpts folder and are overwritten during an install or upgrade.
Cloning allows you to copy the specifications from an existing report and modify the cloned version. Cloning saves time compared to creating a new report from scratch.
- Copy the ASI Crystal report to the custrpts directory, and rename the report.
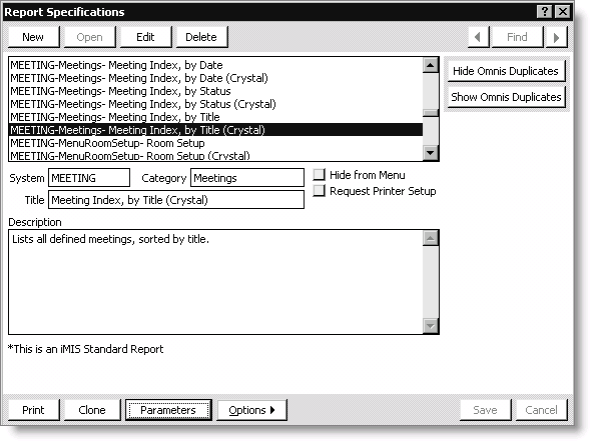
- From the task bar, select Utilities > Report Specs to open the Report Specifications window, which contains a list of all standard reports sorted by module (System) and type (Category).
- Highlight the report to be cloned, and click Clone at the bottom of the window.
- Enter the System and Category in which you want the report to appear, or leave the report in the same module and as the same report type.
- Enter a name for the cloned report in the Title field. If you are creating a Crystal report based on a cloned Omnis report, add “Crystal” in parentheses (Crystal). Adding “Crystal” to the report name helps to identify the Crystal reports.
- Enter a Description for the cloned report.
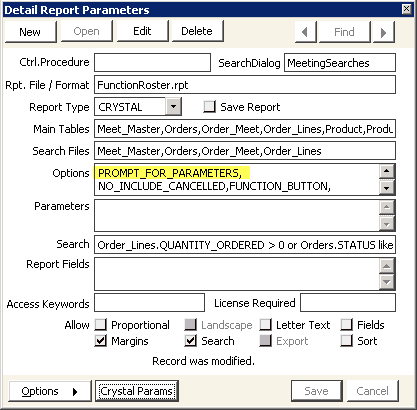
- Click Parameters to open the Detail Report Parameters window.
- Delete the displayed Ctrl Procedure.
- In the Options field enter PROMPT_FOR_PARAMETERS.
- Click Save on the Detail Report Parameters window to save the report specifications.
- To map Crystal parameters to iMIS variables:
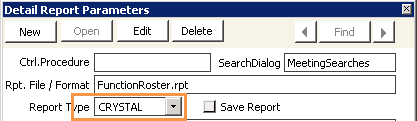
- Enter the report name in the Rpt File / Format field. The Crystal report should have an .rpt extension.
- Enter the complete directory path if the report does not reside in the stdrpts or custrpts folder.
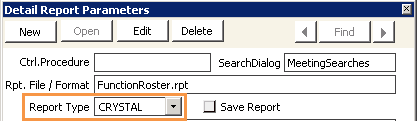
- Click the Report Type drop-down list, and select CRYSTAL. The Report Type names the tool in which the report was developed. The tools currently supported are the Omnis Report Writer and the Crystal Report Writer.
- If you have set parameters in the Crystal report:
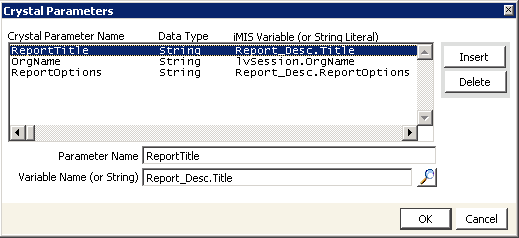
- Click Crystal Params to open the Crystal Parameters window.
- Click OK to save the parameters and return to the Detail Report Parameters window.
- Click Save on the Detail Report Parameters window to save the report specifications.
Note: If the report includes other pre-entered options, separate each using a comma.
Optionally, you can press Ctrl+L to browse to the report directory and select the file. This lookup option is available only when a CRYSTAL report type is selected. The report name displays without the directory path shown.
The Crystal Parameters window allows you to map Crystal parameters to iMIS variables or to a string literal. You must map Crystal parameters to a corresponding iMIS variable for the data to pass into iMIS and to display in the report.
To convert an older Crystal report
Convert older Crystal reports so they can use Crystal report functionality.
- Prompts for search parameters will no longer be passed through to iMIS if they were set up in the Crystal report. All search parameters should be set up in iMIS.
- In iMIS, select Utilities > Report Specs.
- Select the report, and click Edit.
- Click Parameters to open the Detail Report Parameters window.
- Remove the $ character from the report file name.
- Click the Report Type drop-down menu, and select CRYSTAL.
- If the following parameters are used in the Crystal report, click Crystal Params, click Insert on the Crystal Parameters window, and map the parameters to an iMIS variable. Click OK to save the parameters and return to the Detail Report Parameters window.
- If the OrgCode or OrgName parameters are used, map OrgCode to the iMIS lvSession.OrgCode variable, and map OrgName to the iMIS lvSession.OrgName variable.
- If the report uses the automatic Report Title Set feature, create a new Crystal parameter (for example, ReportTitle), place the parameter in the report layout, and map the Crystal parameter to the iMIS Report_Desc.Title variable.
- If a formula was entered in the Parameters field on the Detail Report Parameters window, the formula must be migrated to Crystal using the Crystal formula editor. If the formula used a runtime iMIS variable value, the iMIS variable value must be passed in as a parameter.
- Enable the Save Report option to store the Crystal report in the Print Manager so that it can be accessed or printed later.
- When the Save Report option is enabled, the For __ Days field displays with the default number of days that was set on the System Setup window (File > System Setup). This is the number of days the report will be stored and displayed on the Print Manager window. Override the default days, if necessary.
- Tab to the Parameters field. You can enter overlay text or a Message parameter. In general, parameters to be passed to Crystal reports must be specified on the Crystal Parameters window.
- If a message parameter is used, a Message formula in the Crystal report must be created and placed into the report layout appropriately.
- If the report uses OrgCode or OrgName, click Crystal Params, map OrgCode to the iMIS lvSession.OrgCode variable, and map OrgName to the iMIS lvSession.OrgName variable.
- Click OK.
To add custom Crystal reports to the menu
- Create the Crystal report.
- (optional) Copy the Crystal report to the custrpts subdirectory.
- Select Utilities > Report Specs to open the Report Specifications window, which contains a list of all standard reports sorted by module (System) and type (Category).
- Click New.
- Enter the name of the system module in which the report is to appear. For example, if the report is based on the Events module, enter EVENTS in the System field.
- Enter the category in which you want the report to display on the module-specific Reports window. The category displays as Report Types on the module-specific Reports window. For example, if the report appears in the Events module, you could enter Badges in the Category field.
- Enter a descriptive Title for the new report followed by “Crystal” in parentheses (Crystal). Adding “Crystal” to the report name helps to identify the Crystal reports.
- Enter a Description of the report.
- Click Parameters to open the Detail Report Parameters window.
- To use Crystal parameters (or to prompt for values):
- Tab to the Rpt File / Format field.
- In the Options field enter PROMPT_FOR_PARAMETERS.
- Click Save on the Detail Report Parameters window.
- To map Crystal parameters to iMIS variables:
- Enter the report name in the Rpt File / Format field. The Crystal report should have an .rpt extension.
- Enter
- Enter the complete directory path if the report does not reside in the stdrpts or custrpts folder.
- Select the Report Type drop-down list.
Optionally, you can press Ctrl+L to browse to the report directory and select the file. This lookup option is available only when a CRYSTAL report type is selected. The report name displays without the directory path.
Note: If the report includes other pre-entered options, separate each using a comma.
Select CRYSTAL, the Report Type names the tool in which the report was developed.
The tools currently supported are the Omnis Report Writer and the Crystal Report Writer.
- If you have set parameters in the Crystal report, click Crystal Params to open the Crystal Parameters window.
The Crystal Parameters window allows you to map Crystal parameters to iMIS variables or to a string literal. You must map Crystal parameters to a corresponding iMIS variable for the data to pass into iMIS and to display in the report. - Click OK to save the parameters and return to the Detail Report Parameters window.
- Click Save on the Detail Report Parameters window to save the report specifications.