Limiting access to or hiding custom windows
Custom (user-defined) windows can store detailed information about your customers such as annual salary, major gifts, and political affiliations. However, you might not want all system users to view this information or to enter or edit information in the custom window.
The iMIS Desktop client allows you to assign access keywords that allow only certain users to view or to enter and edit information on custom windows. You can apply the access keywords to custom windows on a tab-by-tab basis.
How access can be limited
- For single-instance user-defined tabs, if an access keyword has been set up for that tab (other than HIDDEN), and the user has no access keywords assigned, then the tab will display but will not allow editing or inserting.
- If the HIDDEN access keyword is setup for the tab, and the user has no access keywords assigned, then the tab will not display.
- If a multi-instance window has an access keyword associated with it, only users that have the matching access keyword and a Customers authorization level of three or higher will be permitted to edit the tab; the tab will display in read-only mode for users who do not have the matching access keyword. If the tab has more than one access keyword associated with it, the user must have at least one matching access keyword for the tab to display in enter/edit mode.
- If a multi-instance window has one or more access keywords associated with it, including the HIDDEN keyword, the tab will only be visible to users who have at least one of the access keywords. The tab will not display for users who do not have one of the assigned keywords in their profile.
- If a multi-instance window does not have any access keywords associated with it, any user is permitted to view the tab. If there are customer type restrictions on the underlying table, these will be honored as usual; the tab will be disabled if the current customer type does not have permissions to access the tab.
To limit access to or hide custom windows
- Create keywords (see Creating Access Keywords) in the ACCESS_KEYWORDS lookup table.
- From Customers, select Set up module > General, and click Additional Windows to open the Customer Setup – Additional Windows window.
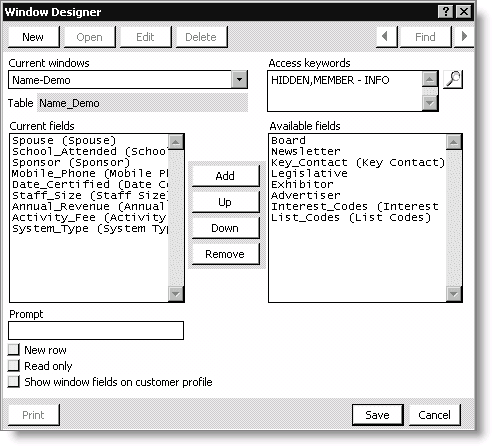
- Click Define Windows to open the Window Designer window.
- Select the desired user-defined window from the Current windows drop-down list.
- Click the Find icon to the right of the Access keywords field to select from the available access keywords. You can assign access keywords to user-defined windows in three ways:
- Assign one or more access keywords to the window, but not the reserved keyword HIDDEN. All users will be able to see the window, but only those with one of the access keywords will be able to enter and edit information in the window.
- Assign both the reserved keyword HIDDEN and one or more access keywords to the window. The window will be hidden from all users except those who have one of the access keywords for the window.
- Do not assign the reserved keyword HIDDEN or any access keywords to the window. Everyone will be able to see the window, and everyone will be able to enter and edit information in the window.
- Double-click the selected keyword(s) to move the keyword(s) from the Available field to the Selected field.
- Click OK. The selected keywords display in the Access Keywords field.
- Click Save.
- Assign the keywords to the user (see Assigning Access Keywords to users).