Several of these configuration options are now accessible from the Staff site (Settings > Commerce > System options). See System options for more information. The configuration options that are not accessible through the Staff site are described below.
Staff users can configure a wide range of commerce options, including:
- Order Staging
- Add-on Charges
- Backorders
- Inventory
- Web
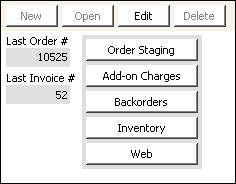
In the Advanced Accounting console, go to Settings > Commerce > Configure commerce options.
- Last Order # - (read only) Displays the order number of the last order entered.
- Last Invoice # - (read only) Displays the invoice number of the last order invoiced.
In the Advanced Accounting Console, go to Settings > Commerce > Configure commerce options and click Order Staging.
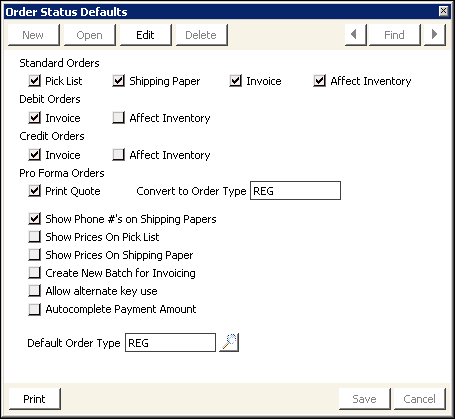
Enable to have customer's phone numbers print on shipping papers (packing slips) below the Ship to Address. This is a requirement for some international businesses.
Enable to print extended price amounts on pick lists.
Enable to print extended price amounts on shipping papers.
Enable to create a new batch each time you generate invoices (recommended). If you do not enable this option, the transactions created when you invoice orders are included in the original batch in which payment was entered.
Note: There is one exception to the standard behavior when this option is not enabled. If the invoicing run includes items whose original order batch has a status of Ready or Posted (closed), a new batch is created automatically and iMIS displays a message informing you that a new batch was created for transactions whose original batch is no longer available.
When processing invoices individually using the Print button, the transactions created when you invoice orders are subject to the following rules:
- If Create New Batch for Invoicing is enabled, the following rules apply:
- If you have an open batch selected in your current session, invoices will be generated into that open batch.
- If you have no open batch selected in your current session, the system will prompt you to select or create an open batch into which the invoice entry will be generated.
- If Create New Batch for Invoicing is not enabled, the following rules apply:
- If the original batch in which the order was generated is open, the invoice entry will be generated into that same batch.
- If the original batch in which the order was created is closed, but another batch is selected and open in your current session, the invoice entry will be created into that batch.
- If the original batch is closed, and there is no batch selected and open in your current session, the system will prompt you to select or create an open batch into which the invoice entry will be generated.
Note: Enable the Create New Batch for Invoicing option if you are using the iMIS Orders backorder feature. For example, with the Create New Batch for Invoicing option enabled, an order that is invoiced in April that has a backorder that is filled in June will be in the June batch. Without the Create New Batch for Invoicing option enabled, the invoice for the backorder will be in the original April batch. The invoice will reflect the current date, but the AR statement will reflect the old batch date, which is incorrect for aging.
Enable to use identifying numbers for customers other than customer IDs. For example, you might want to use a Social Security number, which is derived from the Major Key field. If you enable this option, the Escape Character field is displayed.
(Available when the Allow alternate key use option is enabled) Enter an appropriate character, such as a forward slash, to differentiate the entry of the major key. Prefix the major key in the BT_ID field with this character (forward slash, as an example).
Enable to automatically populate the Payment Amount field with the order amount after the order is invoiced if you enter credit card information on the Payments tab on the Orders window (go to Customer Service > Orders) but do not enter a payment amount (or if the payment amount is zero).
If this option is disabled and the Payment Amount field on the Payments tab on the Orders window is blank or the payment amount is zero, a message displays to confirm that the Payment Amount field is blank. If you select Yes, the credit card information is saved and the credit card is not charged when the order is invoiced. If you select No, all of the information in the credit card fields is deleted.
This option is disabled by default.
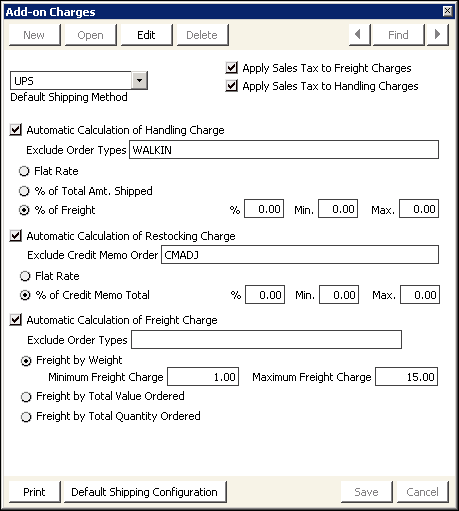
In the Advanced Accounting Console, go to Settings > Commerce > Configure commerce options and click Add-on Charges.
Enable if you want iMIS to calculate restocking charges automatically for credit memo orders.
The following fields are displayed when you enable the Automatic Calculation of Restocking Charge option:
- Exclude Credit Memo Order - Enter the credit memo order types you want to exclude from automatic restocking charges. Separate multiple credit memo order types by commas.
- Flat Rate - Enable to define a single, flat restocking charge for credit memo orders. When you enable this option, the following fields are displayed for defining your flat restocking charge:
- Rate - Enter the default, fixed dollar amount of the restocking charge.
- Min. Credit Memo Amount - Enter the minimum dollar amount for which restocking charges will apply. For example, no restocking charges will apply to credit memo orders under $20.00 if you enter 20.00. Entering a zero means no credit memo orders are excluded from restocking charges.
- % of Credit Memo Total - Enable to calculate restocking charges as a percentage of a total credit memo order. When you enable this option, the following fields are displayed for calculating your restocking charge:
- % - Enter a percentage to calculate restocking charges. For example, if you enter 5.00, a credit memo order for $100.00 would have restocking charges of $5.00.
- Min. - Enter a minimum dollar amount for restocking charges. For example, entering 1.00 would charge a minimum restocking charge of $1.00 regardless of the percentage defined in the % field. Entering a zero means no minimum exists for restocking charges.
- Max. - Enter a maximum dollar amount for restocking charges. For example, entering 100 would charge a maximum restocking charge of $100.00 regardless of the percentage defined in the % field. Entering a zero means no maximum exists for restocking charges.
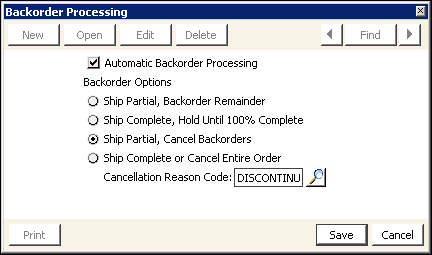
In the Advanced Accounting Console, go to Settings > Commerce > Configure commerce options and click Backorders.
Enable Automatic Backorder Processing to release backorders automatically when you enter and post product inventory receipts.
When you enable Automatic Backorder Processing, there are several Backorder Options that you can enable on the Backorder Processing window. The Backorder Options allow you to define specific parameters for how iMIS processes backorders:
The Ship Partial, Backorder Remainder option is enabled by default when you enable Automatic Backorder Processing, and is the most widely used backorder processing option. The Ship Partial, Backorder Remainder option performs the following backorder processing tasks when enabled:
- Backorder Entire Order - When all of the products ordered are on backorder, iMIS automatically places the order in backorder status. When any ordered products become available through posted inventory receipts, the order is released from backorder status to the first processing stage for the given order type. If any of the ordered products remain on backorder, the order follows the processing steps for a partially shippable order.
- Ship Partial Order - When some of the products ordered are on backorder, iMIS automatically places the order in the first processing stage for the given order type, such as PICKLIST, SHIPPAPER, or INVOICE, as with complete orders.
- iMIS recalculates the original order's product totals to include only the quantities actually shipped.
- iMIS generates an extended suborder, which is assigned the original order transaction number plus .01, such as 208.01. The extended suborder consists only of the backordered products remaining when the original order was invoiced. The original order retains the backordered product's product code with an Extension price of 0.00 as displayed on the Orders window (go to Customer Service > Orders).
- Any prepaid cash amounts are split appropriately between the original order and the extended suborder. The original order's cash amount equals the lesser of the full cash amount or the invoiced total. All remaining cash applies to the extended suborder.
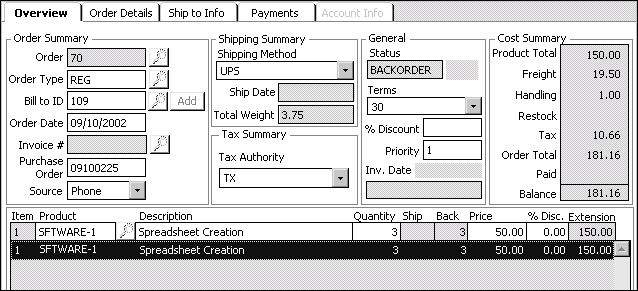
Example of a backorder.
If one or more of the ordered products remain backordered when the order is invoiced, iMIS proceeds with the following steps during the invoicing stage:
Note: An extended suborder can continue to generate additional extended suborders for products that remain on backorder.
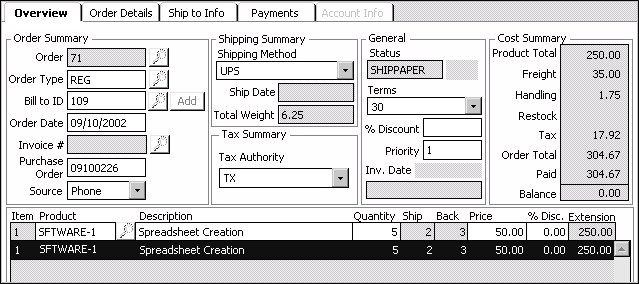
Example of a partially shippable order with full payment before invoicing.
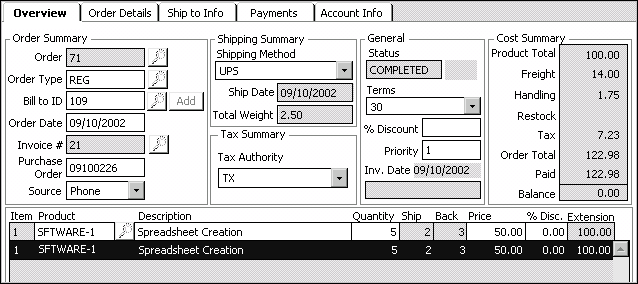
Example of a partially shipped order after invoicing. Note that the Extension price does not reflect the backordered products. Taxes were recalculated for the shipped products, and only the cash relevant to the shipped total is applicable for the order.
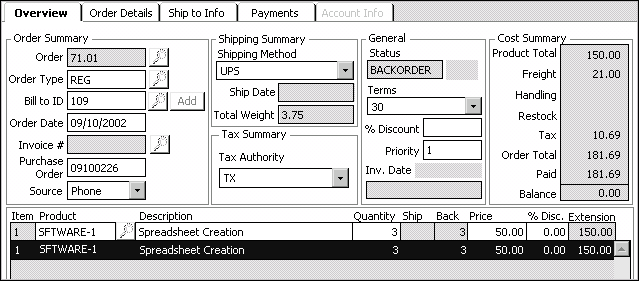
Example of an extended suborder, Order # 71.01, generated for Order # 71. Note that the remaining prepaid cash has been applied to suborder 71.01. Handling fees are charged on original orders and not on extended suborders.
If you enable the Ship Complete, Hold Until 100% Complete option, iMIS does not ship an order until all ordered products are available in inventory. Orders for products with insufficient inventory are placed on backorder whether or not the products are fully backordered or partially shippable. No extended suborders are generated because the order does not have any backordered quantities remaining when it is shipped and invoiced.
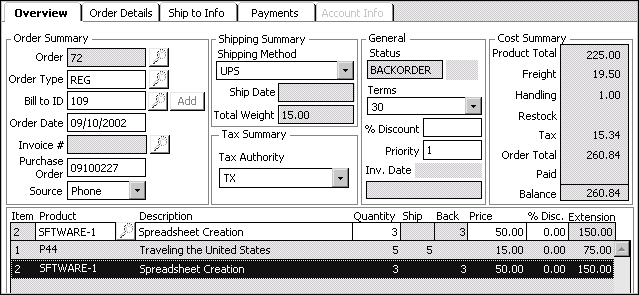
Example of a partially shippable order in backorder status when the Ship Complete, Hold Until 100% Complete option is enabled.
If you enable the Ship Partial, Cancel Backorders option, iMIS treats backorders as normal orders upon data entry. However, unlike complete and ship partial orders, you are prompted to cancel the backordered products (or the entire order if it is completely backordered) at the Invoice orders processing stage.
If you do not cancel the backordered products when invoicing the order, an extended suborder is generated for the backordered products. The original order then goes automatically to the first processing stage for the given order type, such as PICKLIST, SHIPPAPER, or INVOICE.
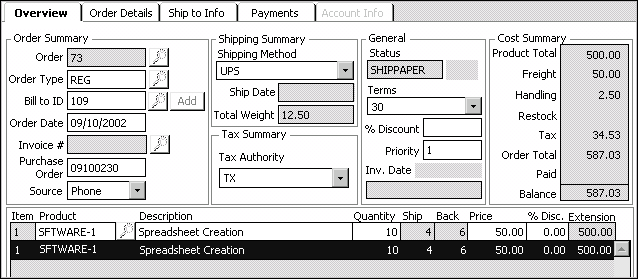
Example of a partially shippable order before invoicing when the Ship Partial, Cancel Backorders option is enabled.
If you enable the Ship Complete or Cancel Entire Order option, you can cancel partial or completely backordered orders at order entry. When an order is entered for any product on backorder, a message is displayed prompting you to cancel the order instead of generating a backorder. If you elect not to cancel the order, the order does not ship until all products are available in inventory just as if the Ship Complete, Hold Until 100% Complete option were enabled.
(Displayed when the Ship Partial, Cancel Backorders option is enabled)
Enter a reason code for cancelling orders. Select the Find icon to look up a cancellation reason code.
Cancellation reason codes are defined on the CANCELLATION general lookup/validation table (go to Settings > Membership > Set up tables > Lookup/validation tables).
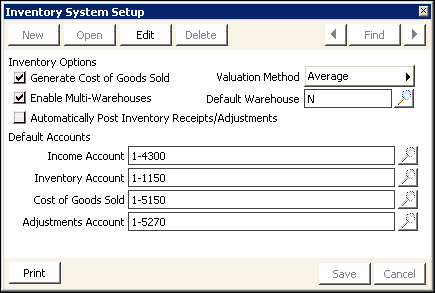
In the Advanced Accounting Console, go to Settings > Commerce > Configure commerce options and click Inventory.
- Generate Cost of Goods Sold - Enable to track the cost of the products you sell. The cost of the products sold posts to the Inventory and Cost of Goods Sold accounts during the Invoice orders process.
- Valuation Method - (Displayed when the Generate Cost of Goods Sold option is enabled) Select the method you want to use to value your product inventory:
- Average - Select this method to determine the cost of goods sold as averaged over time.
- The total average unit cost of all invoiced products is subtracted from the average total inventory cost.
- The average total inventory cost then is divided by the updated product inventory on hand.
- Standard Cost - Select this method to use a fixed cost to determine the cost of goods sold. Depending on whether Multi-Warehouses is enabled, the Standard Cost is entered manually on either the Inventory or the Warehouses window, allowing you to build overhead costs into your cost of goods sold.
Average unit cost is calculated by dividing average total inventory cost by inventory on hand. Average total inventory cost is calculated using a two-step process:
A product's inventory on hand is recalculated each time products are invoiced. A product's average unit cost and average total inventory cost are recalculated each time inventory transactions are posted. The Product_Inventory.AVERAGE_COST field is updated upon invoicing.
When you invoice a product order, the product's average unit cost is calculated according to the product quantity on hand and the average total product inventory cost. This average total inventory cost can change every time you post an inventory transaction.
For example, if you post inventory receipts for an individual product at a cost of $10 and $15 per unit, the total inventory on hand is two units, the average total inventory cost is $25, and the average product cost is $12.50. If you then sell one product and invoice the order, the total inventory on hand is one unit, the average total inventory cost is $25, and the average product cost is $12.50.
However, if you then post another single product receipt for $15, the total inventory on hand is again two units, but the average total inventory cost and average product cost will be different: The average total product inventory cost will be $27.50 and the average product cost will be $13.75.
To calculate the average total product inventory cost, subtract the total average product cost of the invoiced products ($12.50) from the average total product inventory cost ($40 - $12.50 = $27.5). To calculate the average product cost, divide the new average total product inventory cost ($27.5) by the current product inventory on hand ($27.5 / 2 = $13.75).
- Enable Multi-Warehouses - Enable if individual products are stored in multiple warehouse locations. Warehouse locations are defined on the LOCATION general lookup/validation table (go to Settings > Membership > Set up tables > Lookup/validation tables).
- Default Warehouse - (Displayed if the Enable Multi-Warehouses option is enabled) Enter the default warehouse you want to use when defining new products. Select the Find icon to look up a warehouse. Warehouse locations are defined in the Warehouses window (go to Settings > Commerce > Warehouses).
- Automatically Post Inventory Receipts/Adjustments - Enable to post inventory transactions automatically. If you do not enable this option, you still can verify and edit your inventory transactions before posting them.
Enabling the Enable Multi-Warehouses option after posting products to inventory does not directly affect product inventory. As with all system setup changes throughout iMIS, changes do not update existing records. You simply need to enter your products' warehouses and inventory information on the Warehouses window (go to Commerce > Inventory > Products, highlight a product, and click Warehouses).
The warehouse entered is displayed by default in the Default Warehouse field on the Products window (go to Commerce > Inventory > Products) when defining new products. You can override a product's default warehouse on the Products window at any time.
Warning!
Since posted inventory transactions cannot be edited, automatically posting inventory receipts, adjustments, and transfers is not recommended. Also, if you automatically post inventory receipts, iMIS automatically commits the products in inventory and releases backorders.
- Income Account - Enter the default income account to which income is posted. This account is used when an income account is not defined at the warehouse, product, or category level. If you leave this field blank, the income account will not be populated.
- Inventory Account - Enter the default inventory account used for recording inventory reductions. This account is used when an inventory account is not defined at the warehouse, product, or category level. If you do not track your product inventory, you do not need to enter an account number.
- Cost of Goods Sold - Enter the default account used for recording inventory costs when invoicing orders. This account is used if you do not define a Cost of Goods Sold account at the warehouse, product, or category level.
- Adjustments Account - Enter the default account used for posting inventory adjustments. This account is used if you do not define an inventory account at the warehouse, product, or category level. The Adjustments Account offsets inventory when you post inventory adjustments, for example, when inventory cost and quantity are adjusted for loss or damage.
Note: iMIS does not create an accounting entry when inventory is received. The system assumes that the entry is made to the General Ledger or Accounts Payable when receiving or paying for inventory.
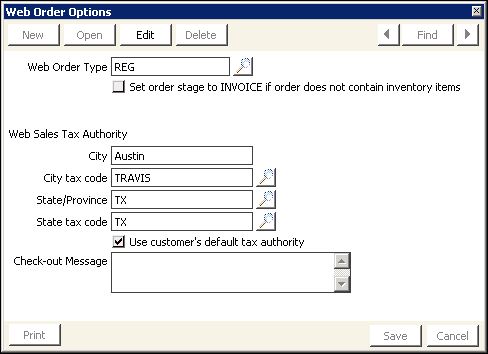
Enter the message you want to display on your order checkout page.