The Commerce settings are crucial for any organization that actively adds new products or gifts.
These features are available to System Administrators only. To access these configuration settings, go to Settings > Commerce.
From the Staff site, go to Settings > Commerce > General to specify settings such as the order confirmation template, default currency code, and batch mode.
- Communication Template to use for Order Confirmations - Specify the communication template used to send order confirmation emails. You can edit the default template or define a new one.
- Default currency code used by RiSE components - Define the default currency code that will be used to pass the correct currency values to gateways. The currency code must be the three-character ISO-4217 code.
- Batch mode for staff web transactions - Specify how staff web transactions are placed in batches. By default, all staff transactions are placed in the same batch as public transactions. You can also choose to create separate batches for staff and public transactions or to create an individual batch for each staff user per day. See Managing batches for more information.
- Number of days before credit card deletion - To ensure PCI compliance, the number of days credit card data is stored before deletion can be configured using this setting. Enter a numeric value for the number of days outdated credit card data should remain in the database. The credit card data will be deleted after this period. The default value for this setting is 0; a value of 0 removes credit card data that is older than a year from the current date. This setting works in conjunction with the PCI Data Retention cleanup task.
- Membership renewal prior to billing - Allows for membership renewals to be generated before billing is issued for renewals (memberships have not yet expired). Once generated, users have the option to immediately pay the renewal invoice, or pay the invoice later.
- Disabled - No one is able to process membership renewals before billing is issued.
- Allow for staff only - The early-renewal button will appear on all profile pages, but only staff users will have the ability to generate the renewals on behalf of users.
- Allow for staff and members - The early-renewal button will appear on all profile pages, allowing members and staff users to renew memberships in advance.
- Number of days prior to expiration that members can renew in advance - Specifies the number of days in which the Membership renewal prior to billing button will appear for eligible users. For example, entering “30” in this field means that the button will begin to appear 30 days prior to a member’s expiration date. Setting this field value to “0” means that the button will always appear. If Membership renewal prior to billing is Disabled, this field takes no effect, and the button will never appear.
- Enable non-dues subscription purchase and renewal - This setting is disabled by default. Select the setting to allow end users to purchase subscription products outside of the membership process. Users can purchase and renew subscription products separately from membership fees and subscriptions.
- Web order type - Select the default order type for orders placed over the Web.
- Order stage if order does not contain inventory items - Standard order types only - Select the stage that standard, non-inventory orders placed over the web will be advanced to:
- Default per order type settings - The stage is determined based on the configuration of the selected Web order type.
- Ready for invoice printing - The order will be advanced to the INVOICE stage ready for the invoice to be printed.
- Completed - The order will be automatically invoiced and advanced to the COMPLETED stage (hot-posted). iMIS immediately generates the Invoice and Activity records, and you no longer need to manually post the batch.
Note: This option only applies when the Web order type is set to a standard order type.
- Split orders with both inventory and non-inventory items into separate orders - Enable this option if you wish for orders that contain inventory items and non-inventory items to be split into separate orders.
- Purchase order value used for no charge checkout - Enter a value to populate the Purchase Order field when a purchase does not incur charges. The default value is NOCHARGE.
The following renewal options are available:
Note: Additional steps are required before you can begin utilizing this functionality. See Allowing members to renew in advance for more information.
Select a pro forma (PF) order type to verify the customer and order information before creating a standard (REG) order. After verification, convert and process an order through its appropriate order processing stages.
Select a standard (REG) order type to bypass the pro forma stages and process inventory availability immediately when the cart is submitted. Standard orders that do not contain inventory items have the option of being transitioned directly to the invoice stage.
Only enable this option when the Web order type is set to a standard order type and the Set order stage to INVOICE if the order does not contain inventory items is also enabled.
Note: This option only applies when the Web order type is set to a standard order type and the Order stage if order does not contain inventory items is set to Ready for invoice printing or Completed.
Staff users can define order types by going to Settings > Commerce > Order types. Staff users must be assigned the Orders: 5 - Table Maintenance authorization level in order to have access to this navigation item.
Order types determine the number and types of stages an order goes through in processing. Different order types require different processing stages. Order types must be defined before orders can be entered and processed. Each time a product order is entered, an order type must be selected. Order types that have been assigned orders cannot be deleted.
Order types fall into one of four system-defined order type categories:
- Standard
- Debit memo
- Credit memo
- Pro forma
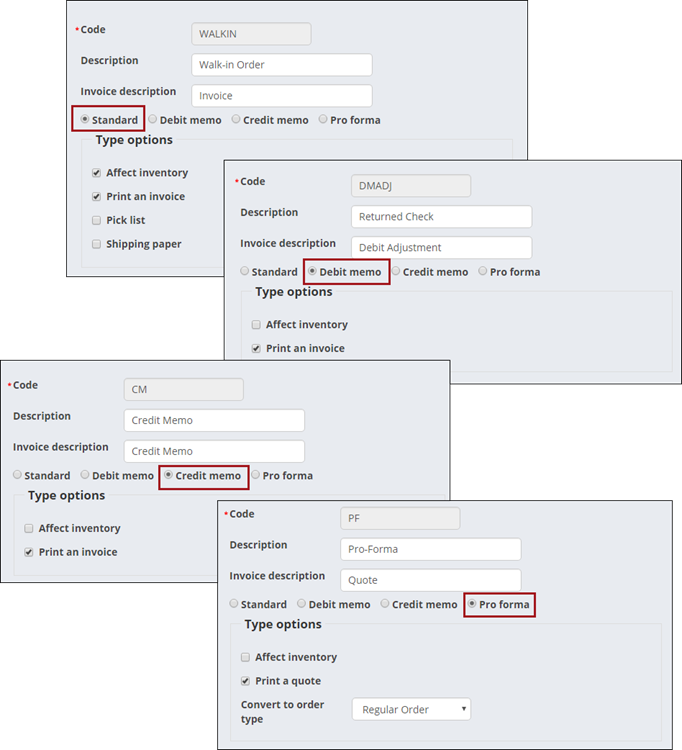
You can define an unlimited number of order types for each order type category. The category selected for an order type determines the available Type options, or order processing stages, for the order type. Of the available Type options, you select which are required, and determine if an order type affects inventory.
Do the following to define order types:
- From the Staff site, go to Settings > Commerce > Order types.
- Select Add new order type.
- Enter a Code for the order type.
- Enter a full-name Description for the order type.
- Define an Invoice description. This description will be printed on invoices.
- Select a category for the order type:
- Standard – Enable to classify an order type as a standard order.
- Debit memo – Enable to classify an order type as a debit memo order.
- Credit memo – Enable to classify an order type as a credit memo order.
- Pro forma – Enable to classify an order type as a pro forma order. Create pro forma order types only after defining standard order types. This allows you to select a valid standard order type from the Convert to order type drop-down.
- The category selected determines which Type options are displayed:
- Affect inventory – Enable if you want the order type to affect product inventory. For example, a standard order would reduce a product's physical inventory, and a credit memo order would increase a product's physical inventory if the Affect Inventory option were enabled.
- Print an invoice – Enable if you want the order type to generate a printed invoice for invoiced orders.
- Pick list (Displays for Standard order types only) – Enable to process the order type through the Print pick list order processing stage. A pick list will print for the order type.
- Shipping paper (Displays for Standard order types only) – Enable to process the order type through the Print shipping papers order processing stage. Shipping papers (Packing Slips) will print for the order type.
- Print a quote (Displays for Pro forma order types only) – Enable to process the order type through the Print quotes order processing stage. An order Quotation will print for the order type.
- Convert to order type (Displays for Pro forma order types only) – Select the default order type for converted pro forma orders.
- Click Save & Exit.
Product categories allow you to classify your products, and you must define your product categories before defining your individual products. Each time you define a product, you must assign it to one of your product categories.
Product categories are used to assign default accounts and to enable category options for groups of products. Do the following to define product categories:
- From the Staff site, go to Settings > Commerce > Product categories.
- Select Add product category.
- Enter a code for the product category in the Category field.
- Enter a Description of the product category.
- Enable the applicable Category options. Select the options that you want enabled by default when defining new products. You can override all settings at the product level:
- Commissionable – (This option currently only provides useable functionality through the iMIS Desktop) Enable if you want the sale of a product within a category to generate a commission.
- Commissionable % – Enter the default commission rate generated by the sale of a product in this category. For example, a 5.00% commission rate would generate a 5.00 commission on a 100.00 sale. Make sure to enter the rate as a percentage and not as a decimal.
- Product kit – Enable to indicate that the product category consists of product kits. To continue setting up your product kit, see Defining product kits.
- Stock item – Enable to indicate that products within this category have physical inventory. You can track inventory only for items stocked in inventory.
- Taxable – Enable to indicate that the product category is taxable.
- Use publication demographics – (This option currently only provides useable functionality through the iMIS Desktop) Enable to define publication demographic information for a category's products. If the option is enabled, the Publication button displays and enables on the Manage products window (in the Advanced Accounting Console) for products belonging to that category. Clicking the Publication button on the Manage products window opens the Publication Demographics window used for defining demographic information for publications.
- Commissionable – (This option currently only provides useable functionality through the iMIS Desktop) Enable if you want the sale of a product within a category to generate a commission.
- (These options currently only provide useable functionality through the iMIS Desktop) Enter the User defined field captions that will display and generate text boxes when creating a new product through the iMIS Desktop or Advanced Accounting Console.
Enter captions in the User defined field 1, User defined field 2, User defined field 3, and User defined field 4 fields that will display on the Product Detail window. Each caption that you define generates a text box on the Product Detail window for products belonging to that category. You can define the same or different captions for any product category.
When entering or editing an order, some products may require additional order information before an order can be shipped. The user-defined fields on the Product Detail window allow you to record this additional information.
You also have the ability to define general lookup/validation tables for each of the user-defined fields, and any predefined data can be accessed by selecting each field's Find icon on the Product Detail window. Regardless of whether general lookup/validation tables have been set up, you always have the ability to enter any necessary order information.
General lookup/validation tables are set up for product category user-defined fields by combining the product category codes and field labels defined on the Set up product categories window. When setting up a table for a user-defined field, the product category code and field label must be separated by an underscore.
- Enter any applicable Default accounts. These accounts allow you to define the default accounts for products within this category. You can override the accounts at the product level, and at the warehouse level if Multi-Warehouses is enabled.
When defining product-level accounts, the most specific accounting information takes precedence. For example, iMIS first looks for warehouse level accounts. iMIS then looks for product level accounts. If you have not defined product-level accounts, iMIS uses the default product category accounts. If you have not defined default product category accounts, iMIS uses the accounts defined on theInventory System Setup window (from the Advanced Accounting Console, go to Orders, select Set up module, and click Inventory).
- Income – Select a product category's default Income account number.
- Inventory – Select a product category's default Inventory account number.
- Cost of goods sold – Select a product category's default Cost of goods sold account number.
- Adjustments – Select a product category's default Adjustments account number.
Note: Defining Inventory, Cost of goods sold, and Adjustments default accounts only apply to functionality that exclusively exists in the iMIS Desktop.
- Click Save.
Staff users can define Shipping options from the Staff site (Settings > Commerce > Shipping). Staff users must be assigned the Orders: 5 - Table Maintenance authorization level in order to have access to this navigation item.
Shipping charges are applicable for orders that involve delivery by some type of transportation. Shipping charges are defined based on the following options:
- Weight - The total weight of the shipment
- Value - The total pre-tax value of an order (excluding handling and restocking charge)
- Quantity - The total product quantity ordered
When calculating shipping charges by weight, an order's shipping method, shipping postal code, and weight are factors in calculating the charges.
Note: Shipping and handling charges will be applied for products unless shipping minimum values are set to 0, or the shipping method calculation is set to ship by weight. A minimum shipping is applied to items with a weight of 0 even if a ship zone is defined for a weight of 0.
Before an order's shipping charges can automatically be calculated by weight , the following actions must be performed:
- Define shipping methods
- Define shipping zones
- Define weight tables
- Enable Automatic calculation of shipping charge
- Enable Shipping by weight
Shipping methods can be defined for any form of transport, or for any specific carrier that ships orders. Examples of shipping methods include UPS, USP, FEDEX, Truck Freight, Air Freight, and Rail Freight.
To define shipping methods, you first must add to or create the SHIP_METHOD general lookup table (from the Staff site, go to Settings > Utilities > General lookup tables).
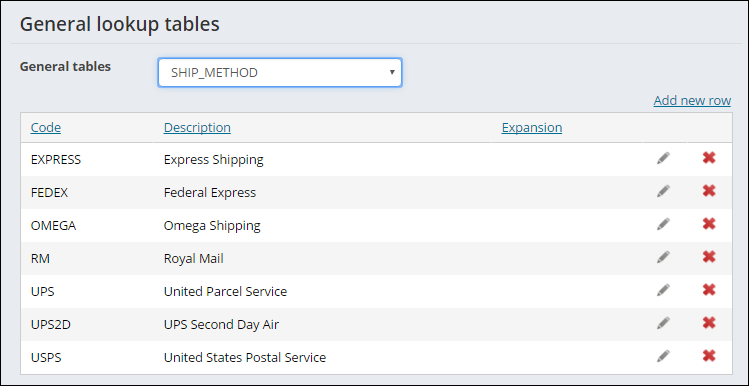
Note: The ship method Code must be 10 characters or less.
Shipping zones are based upon the following:
- Shipping method
- Country (if applicable)
- Zip or postal codes
You can set up shipping zones for multiple shipping methods and for countries that use these shipping methods. Depending on your organization's needs, you can define a single postal code as shipping zone, or divide the postal code into separate shipping zones.
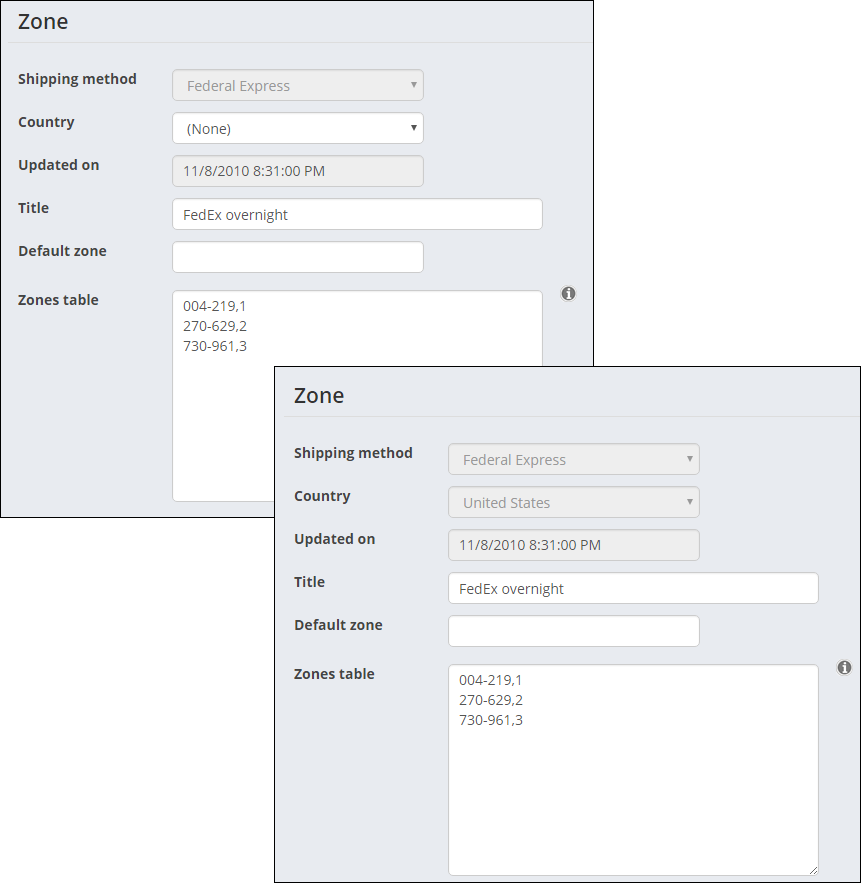
Do the following to define shipping zone tables:
- From the Staff site, go to Settings > Commerce > Zones.
- Select Add new zone.
- Select a Shipping method. Shipping methods are defined using General lookup tables.
- Specify a Country for the zone table. If you are updating an existing zone table and the Country field is not populated, you can enter a country for the zone table. However, once the Country field is populated and saved, it can no longer be edited. To add a new country, see Countries.
- The Updated on field is read-only, and displays the last date and time that the selected zone table was modified.
- Enter a descriptive Title for the zone table.
- Specify a Default zone designation for the selected zone table, which must have a matching value in the Zone field defined on the By weight tab (Settings > Commerce > Shipping). This Default zone is used only when an order's Ship to address specifies a country for which a zone table exists, and any of the following conditions exists:
- The Ship to address:
- Does not specify a postal code
- Specifies a postal code that does not match any of the entries in the Zone Table list
- The Ship to address of an order specifies a postal code, but the Zone Table list for the zone table does not contain any entries.
For example, if a UPS zone table and a UPS-USA zone table both exist, the UPS zone table is used if an order does not specify a country name in the Ship to address. However, if USA is specified in the order's Ship to address, the UPS-USA zone table is used instead. If the Ship to address in this second case does not specify a postal code, or it specifies a postal code that isn't listed in the UPS-USA zone table, then the specified Default zone designation would be used to determine the appropriate shipping charges by looking for a matching value from the Zone field defined on the By weight tab.
- The Ship to address:
- Specify shipping zone values in the Zones table.
- Click Save & Exit.
To define a default zone table for a shipping method, leave the Country field blank. Default zone tables are used for orders that do not list a country.
The table format for defining zones is XXX,Z where XXX represents the first three characters of a postal code, and Z represents the zone designation. In addition, you also can enter a postal code in the format XXX-YYY,Z where XXX represents the first three characters of the beginning postal code, YYY represents the first three characters of the ending postal code, and Z represents the zone designation. Zone designations are used when setting up weight tables.
For example, if you define a shipping zone for a single postal code, such as 75208, you would enter 752 followed by a comma. You then would enter either a numeric or alphabetic value for the zone designation, such as a 1. The shipping zone would display as 752,1. A shipping zone defined for a group of postal codes could be entered as 900-999,2.
As long as you follow the correct table format, you can define as many zone codes as necessary. You must define shipping zone tables before defining shipping tables.
When entering orders, the following rules determine which zone table is used:
- A country is defined for the Ship to address – The zone table used is the zone table for which the Shipping method and Country combination matches an order's Ship to address Country and Shipping method.
- A country is not defined for the Ship to address – The zone table used is the zone table for which the Shipping method matches an order's Shipping method. The zone table has a blank Country field.
After the correct zone table has been determined, the following rules determine whether the Default zone defined in that zone table is used:
- The Ship to address does one of the following:
- Does not specify a postal code.
- Specifies a postal code that does not match any of the entries in the Zones table list for the zone table.
- The Ship to address of an order specifies a postal code, but the Zones table list for the zone table does not contain any entries.
After defining your shipping zones, you can define weight tables for your user-defined shipping zones. Weight tables allow you to calculate shipping rates for individual shipping methods, and rates are calculated according to an order's shipping weight and shipping zone. When defining rates, high value determines the weight break for each rate.
Do the following to define weight tables:
- From the Staff site, go to Settings > Commerce > Shipping.
- Click the By weight tab.
- Select a Shipping method to add the new rates to.
- Select Add new shipping rate.
- Specify the Zone, Weight, and Rate set. Be sure to define at least one entry for every zone designator that is used in the various shipping zone tables that use this shipping method. These designators are used in the Zone Table and Default Zone fields of the Zone window (from the Staff site, go to Settings > Commerce > Zones).
- Click Save.
- Go to Settings > Commerce > System options.
- Enable Automatic calculation of shipping charge.
- From Calculation type, select Shipping by weight.
- Click Save.
For example, assume you have defined a UPS zone table and a UPS-USA zone table, and you have used zone designators A, 1, 2, and 3 in those two UPS-based zone tables. In this example, you would define weight-rate sets for those four zone designators.
Note: The maximum shipping charge is applied if an item has a weight that exceeds the maximum defined zone shipping price for a selected shipping method and location. If your zone table for a chosen country defines prices for weights up to 10, and an item with a weight of 11 is purchased, the maximum shipping charge will apply.
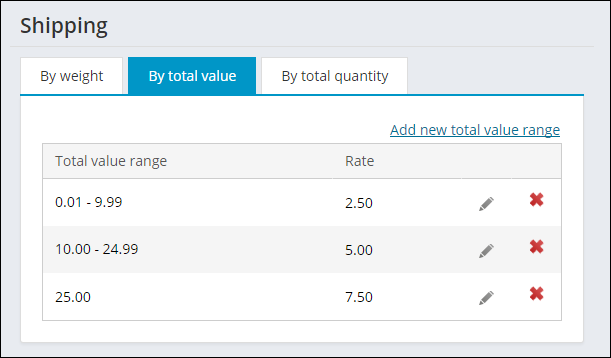
When calculating shipping charges by total value, iMIS uses an order's total pre-tax value excluding handling and restocking charges. To calculate shipping charges by total order value, you must define shipment rates for ranges of order values.
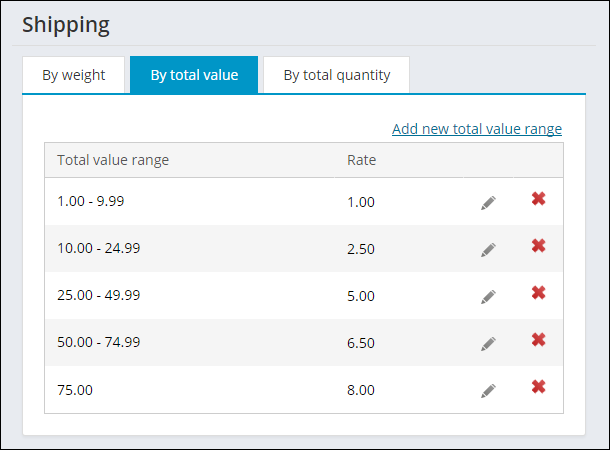
To automatically calculate shipping by order value, you must define value ranges and enable shipping to be calculated by the total value.
Shipping rates can be defined for any range of order values, and no limit exists to the number of value ranges and rates that can be defined. When defining a rate's value range, only the low value of the range is entered in the Starting value for range field. The high value of the range is not entered, because it is calculated upon completing and saving the value.
Each range's high value is determined by each succeeding range's low value; a range's high value equals the low value of the succeeding range minus .01.
For example, say you need to define rates for the following three order value ranges:
- Orders with a value greater than 0.00 and less than 10.00 will cost 2.50 to ship.
- Orders valued between 10.00 and less than 25.00 will cost 5.00 to ship.
- Orders valued above 25.00 will cost 7.50 to ship.
To define these value ranges, do the following:
- From the Staff site, go to Settings > Commerce > Shipping.
- Click the By total value tab.
- Select Add new total value range.
- Define the first value range:
- Enter 0.01 in the Starting value for range field for the first range's low value.
- Enter 2.50 for the Rate.
- Click Save.
- Define the second value range:
- Enter 10.00 in the Starting value for range field for the second range's low value. By entering 10 for the second range's low value, the first range's high value will equal 9.99 when the entire table is completed and saved.
- Enter 5.00 for the Rate.
- Click Save.
- Define the third value range:
- Enter 25.00 in the Starting value for range field for the third range's low value. By entering 25.00 for the third range's low value, the second range's high value will equal 24.99 when the entire table is completed and saved.
- Enter 7.50 for the Rate.
- Click Save.
Select the edit icon to edit a value, or select the delete icon to delete a value. You are only able to edit the low value of a range, as well as the rate. After editing or deleting, the ranges will be recalculated. There is no limit to the amount of values/rates that can be added, and you are also able to add values/rates that fall in between existing values/rates.
If an order's pre-tax value exceeds the highest defined value range, the order's shipping charges will be calculated at the rate defined for the highest value range. If an order's pre-tax value is below the lowest defined value range, no shipping charges will be calculated or charged.
To enable shipping to be calculated by total value, do the following:
- From the Staff site, go to Settings > Commerce > System options.
- Enable Automatic calculation of shipping charge.
- (optional) Enter the order types to be excluded from automatic shipping charges in the Exclude order types field. Separate multiple order types by commas.
- From Calculation type, select Shipping by total value ordered.
- Click Save.
When calculating shipping charges by quantity, the total product quantity ordered determines an order's shipping charges. To calculate shipping rates by order quantity, you must define rates for ranges of product quantities.
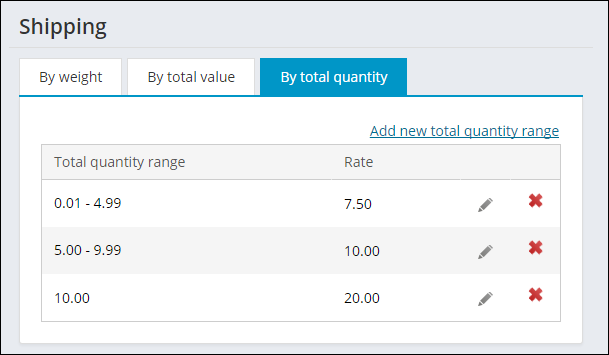
To automatically calculate shipments by order quantity, you must define quantity ranges, and then enable shipments to be calculated by quantity.
Shipping rates can be defined for any range of product quantities, and no limit exists to the number of quantity ranges and rates that can be defined. When defining a rate's quantity range, only the minimum quantity of the range is entered in the Total quantity range field. The maximum quantity of the range is not entered, because it is calculated upon completing and saving the table.
When defining a quantity range's minimum quantity, the minimum quantity must be greater than 0.00, such as 0.01. A 0.00 value cannot be the beginning range. In addition, if your beginning range's minimum quantity is 5.00 for example, then shipping will not be calculated for any orders for quantities of less than 5.00. Each range's maximum quantity is determined by each succeeding range's minimum quantity; a range's maximum quantity equals the minimum quantity of the succeeding range minus .01.
For example, say you need to define rates for three different product quantity ranges:
- Orders with a product quantity of more than 0 and less than 5 will cost 7.50 to ship.
- Orders with a product quantity of between 5 and less than 10 will cost 10.00 to ship.
- Orders with a product quantity of 10 or more will cost 20.00 to ship.
To set up these quantity ranges, do the following:
- From the Staff site, go to Settings > Commerce > Shipping.
- Click the By total quantity tab.
- Select Add new total quantity range.
- Define the first quantity range:
- Enter 0.01 in the Starting quantity for range field. Low values must be greater than 0.00. The value 10.00 cannot be the beginning range.
- Enter 7.50 for the Rate.
- Define the second quantity:
- Enter 5.00 in the Starting quantity for range field.
- Enter 10.00 for the Rate.
- Define the third quantity range:
- Enter 10.00 in the Starting quantity for range field.
- Enter 20.00 in the Rate field.
- Click Save.
To edit a quantity range, click the edit icon. To delete a quantity range, click the delete icon. If an order's product quantity exceeds the maximum defined quantity, the order's shipping charges will be calculated at the rate defined for the maximum quantity. If an order's product quantity is less than the minimum defined quantity, no shipping charges will be calculated, and no shipping will be charged.
To enable shipping to be calculated by total quantity, do the following:
- From the Staff site, go to Settings > Commerce > System options.
- Enable Automatic calculation of shipping charge.
- (optional) Enter the order types to be excluded from automatic freight charges in the Exclude order types field. Separate multiple order types by commas.
- From Calculation type, select Shipping by total quantity ordered.
- Click Save.
Shipping zones are based upon the following:
- Shipping method
- Country (if applicable)
- Zip or postal codes
You can set up shipping zones for multiple shipping methods and for countries that use these shipping methods. Depending on your organization's needs, you can define a single postal code as shipping zone, or divide the postal code into separate shipping zones.
See Defining shipping zones for more information.
Note: Although creating warehouses is available through the Staff site, the management of the warehouses along with the related functionality is a Desktop-only feature. If you are using an online store, the warehouse functionality is not available to you.
Warehouses must be defined before you can begin establishing inventory parameters based on warehouses.
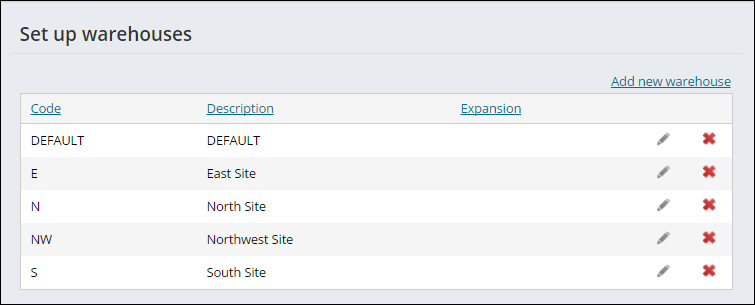
Do the following to define warehouses:
- From the Staff site, go to Settings > Commerce > Set up warehouses.
- Select Add new warehouse.
- Enter a Code for the warehouse. After the warehouse is saved, the Code cannot be updated.
- Enter the warehouse's full name in the Description field.
- Click Save & Continue.
- Continue adding warehouses, then click Close.
To edit a warehouse Description, click the edit icon, then click Update. To delete a warehouse, click the delete icon. In order to be able to delete a warehouse, the following conditions must be true:
- The warehouse is not the default warehouse for any product
- No orders are open for products stored in the warehouse
- The warehouse is empty of all inventory
Staff users can define a wide range of commerce-specific configuration options from Settings > Commerce > System options. Staff users must be assigned the Orders: 8 - System Setup authorization level in order to have access to these configuration options.
The Standard orders options that you enable become the selected default options when you define a standard order type:
- Pick list - Enable to process standard orders through the Print pick list processing stage. When enabled, a pick list (sorted by product code) prints for each standard order. Pick lists show the total number of products needed for each order, and are useful if you have an intermediate staging area where products are gathered for filling orders.
- Shipping paper - Enable to process standard orders through the Print shipping paper order processing stage. When enabled, packing slips print for each order.
- Invoice - Enable to process standard orders through the Invoice orders order processing stage. When enabled, an invoice prints for each order.
- Affect inventory - Enable to automatically reduce product inventory when an order is invoiced.
A debit order is a special order type category used for entering adjustments for invoiced orders, such as increasing the number of products purchased. Debit orders are entered against an original order's invoice; however, they do not update the original, invoiced order. Any order type created as a debit order can only generate an invoice and affect inventory levels .
The Debit orders options that you enable here are the default options for a debit order type:
- Invoice - Enable to process debit orders through the Invoice orders order processing stage. When enabled, an invoice prints for each debit order.
- Affect inventory - Enable to automatically reduce product inventory when a debit order is invoiced.
A credit order is a special order type category used for reversing invoiced orders. Since invoiced orders cannot be cancelled, credit orders are used to reverse invoiced orders. Credit orders are entered against an original order's invoice; however, they do not update the original, invoiced order.
The Credit orders options enabled here are the default options selected when a new credit order type is defined:
- Invoice - Enable to process credit orders through the Invoice orders order processing stage. When enabled, an invoice prints for each credit order.
- Affect inventory - Enable to automatically increase product inventory when a credit order is entered.
A pro forma order is a price quote that you can convert to a standard order. The Pro forma orders options enabled here are the default options selected when a new pro forma order type is defined:
- Print quote - Enable to process pro forma orders through the Print quotes order processing stage. When enabled, a quote prints for each pro forma order.
- Convert to order type - Select the default order type for converted pro forma orders. The selected order type is the default order type for converted pro forma orders.
- Select the Default shipping method to be used when shipping orders. Shipping methods are defined on the SHIP_METHOD general lookup table.
- Enable Apply sales tax to shipping charges in order to automatically apply sales taxes to shipping charges for taxable products.
- Enable Apply sales tax to handling charges in order to automatically apply sales taxes to handling charges for taxable products.
- Enable Automatic calculation of handling charges in order for iMIS to automatically calculate handling charges.
- Exclude order types - Enter the order types that will be excluded from automatic handling charges. For example, you might want to exclude on-site or walk-in customer orders from any handling charges. Separate multiple order types by commas.
- Select a Calculation type for the automatic calculation of handling charges:
- Flat rate - Defines a single, flat handling charge for orders.
- Rate - Enter the default, fixed amount of the handling charge.
- Minimum order - Enter the minimum amount for which handling charges will apply. For example, no handling charges will apply to orders under 20.00 if you enter 20.00. Entering a zero means that no orders are excluded from handling charges.
- Percentage of total amount shipped - Calculates a one-time handling charge as a percentage of an order’s total cost, regardless of which products from the order actually ship at the time of the original order. For example, due to backorder, if two of five products ship with the original order, the entire handling charge is included in the original invoice.
- Percentage - Enter a percentage to calculate handling charges. For example, if you enter 5.00, an order that costs 100.00 would have handling charges of 5.00.
- Minimum - Enter a minimum amount for handling charges. For example, entering 1.00 would charge a minimum handling charge of 1.00 regardless of the percentage defined. Entering a zero means no minimum exists for handling charges.
- Maximum - Enter a maximum amount for handling charges. For example, entering 100 would charge a maximum handling charge of 100.00 regardless of the percentage defined in the Percentage field. Entering a zero means no maximum exists for handling charges.
- Percentage of shipping - Calculates handling charges as a percentage of shipping costs.
- Percentage - Enter a percentage to calculate handling charges. For example, if you enter 5.00, an order with shipping costs of 100.00 would have handling charges of 5.00.
- Minimum - Enter a minimum amount for handling charges. For example, entering 1.00 would charge a minimum handling charge of 1.00 regardless of the percentage defined in the Percentage field. Entering a zero means no minimum exists for handling charges.
- Maximum - Enter a maximum amount for handling charges. For example, entering 100 would charge a maximum handling charge of 100.00 regardless of the percentage defined in the Percentage field. Entering a zero means no maximum exists for handling charges.
- Flat rate - Defines a single, flat handling charge for orders.
- Enable Automatic calculation of shipping charge to automatically calculate shipping charges based on the shipping Calculation type.
- Exclude order types - Enter the order types to be excluded from automatic shipping charges. Separate multiple order types by commas.
- Select a Calculation type for the automatic calculation of shipping charges:
- Shipping by weight - Enable to calculate shipping charges based on order weight. See Shipping by total weight for more information.
- Minimum shipping charge - Enter a minimum amount for shipping charges. For example, entering 5 would charge a minimum shipping charge of 5.00 regardless of an order's shipping weight or destination. Entering a zero means no minimum exists for shipping charges.
- Maximum shipping charge - Enter a maximum amount for shipping charges. For example, entering 250 would charge a maximum shipping charge of 250.00 regardless of an order's shipping weight or destination. Entering a zero means no limit exists for shipping charges.
- Shipping by total value ordered - Calculates shipping charges based on the total pre-tax order value, excluding handling and restocking charges. See Shipping by total value for more information.
- Shipping by total quantity ordered - Calculates shipping charges based on the total product quantity ordered. See Shipping by total quantity for more information.
- Shipping by weight - Enable to calculate shipping charges based on order weight. See Shipping by total weight for more information.
Note: A Default shipping method is required for a Member site.
Note: (VAT only) Even if iMIS is configured for VAT-exclusive pricing, the website's cart will show shoppers VAT-inclusive product prices and shipping/handling fees, to comply with sales tax rules.
Note: (VAT only) Even if iMIS is configured for VAT-exclusive pricing, the website's cart will show shoppers VAT-inclusive product prices and shipping/handling fees, to comply with sales tax rules.
When Automatic calculation of handling charges is enabled, the following fields appear:
The following fields are displayed when Automatic calculation of shipping charge is enabled:
The Web sales tax authority options allow you to define the tax codes for orders placed over the Web. If the customer's ship to address (city or state) matches the options configured here, the web view shows the calculated taxes. If these settings do not match, no taxes are assessed. The logic behind this is that you are assessed taxes if the organization you are ordering from is located in the same city or state.
Configure the following Web sales tax authority options:
- City - Enter the city from where Web orders are generated.
- City tax code - Select the tax code for the city or municipality entered in the City field if taxes are applicable. See Tax codes for more information.
- State/province - Select the state from where Web orders are generated. See States and provinces for more information.
- State tax code - Select the tax code for the state or province selected in the State/province field. See Tax codes for more information.
- Use customer's default tax authority - When enabled, iMIS automatically calculates taxes for product orders placed over the web based on the customer’s Default Tax code in the Desktop go to Customers > Manage customers > Financial tab). If a Default Tax code is not defined for the customer, the City tax code is used when the ship-to city and state match. The State tax code is used when only the ship-to state matches.
Note: You must select a tax authority and a tax code for taxes to be calculated and applied. For example, if you specify a State/province but no State tax code, no tax is calculated.
When this option is disabled, the City tax code is used when the customer's ship-to city and state match. The State tax code is used when only the ship-to state matches.
If there is no match for ship-to city or ship-to state and/or the tax codes are unassigned, no tax is applied. When using Canadian or VAT Taxation methodsthis option will not display.
