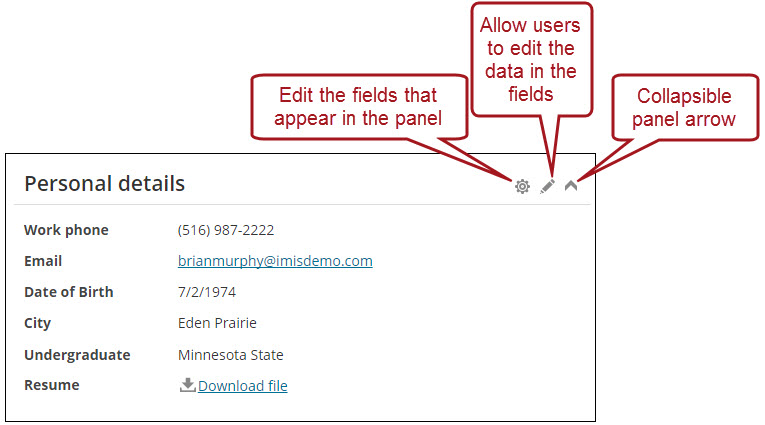
Panels are custom displays of data that you are able to name, build, arrange in grids, and add to your site. Using panels, your users can browse, edit, add, and delete their data, as you specify.
You can conveniently manage your custom data directly from the web pages where you place these content items:
- Panel Editor - Creates panels and shows one panel
- Panel Collection Editor - Combines existing panels into tabbed displays
Note: Panels are shared. When you update one panel or field, it updates within every content item that uses it.
With the Panel Designer, you can craft reusable panels that combine fields from many tables. You can also define new data structures (business objects and properties) to manage information for your organization. Without special tools or knowledge of the iMIS schema, you can add data sources right from your browser. When you save the panel, you save your newly created data sources as iMIS business objects.
Note: You can see your new data source show up as a business object in Business Object Designer, but it will be read-only. Continue to edit and manage these special sources in Panel Designer. A ContactKey is automatically generated for the business object that represents the panel data source. The ContactKey is a unique value used to join the business object to other panel data sources and business objects in IQA. It is also used as the iMIS ID for linking in IQA.
Access the Panel Designer in the following ways:
- From the Staff site, go to RiSE > Panel Designer. Select an existing panel to edit, or select Add panel definition to create a new panel.
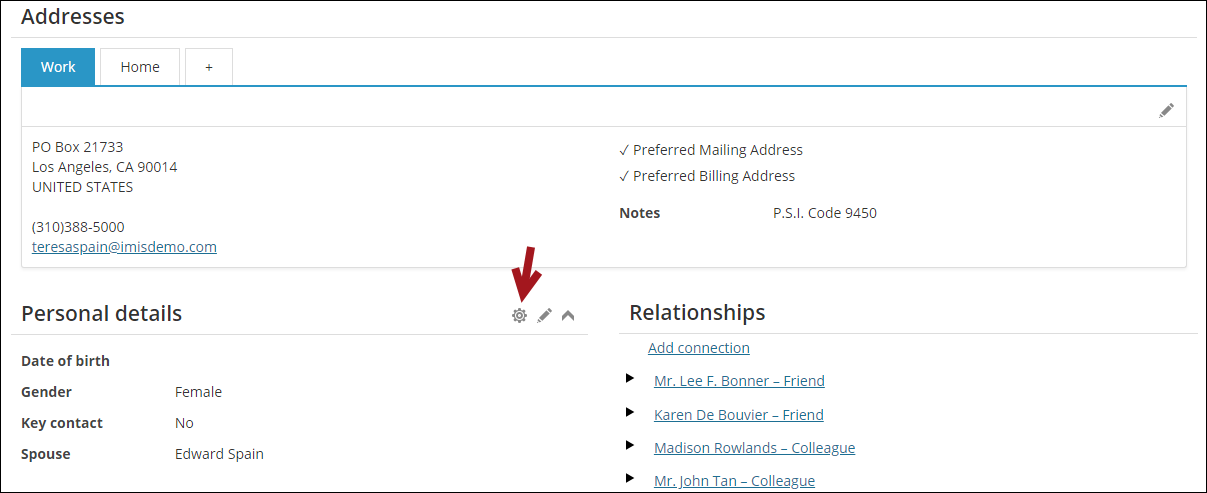
- Edit the Panel Editor content item directly from a content record by clicking the gear cog icon.
Here are key layout features to help you optimize screen display:
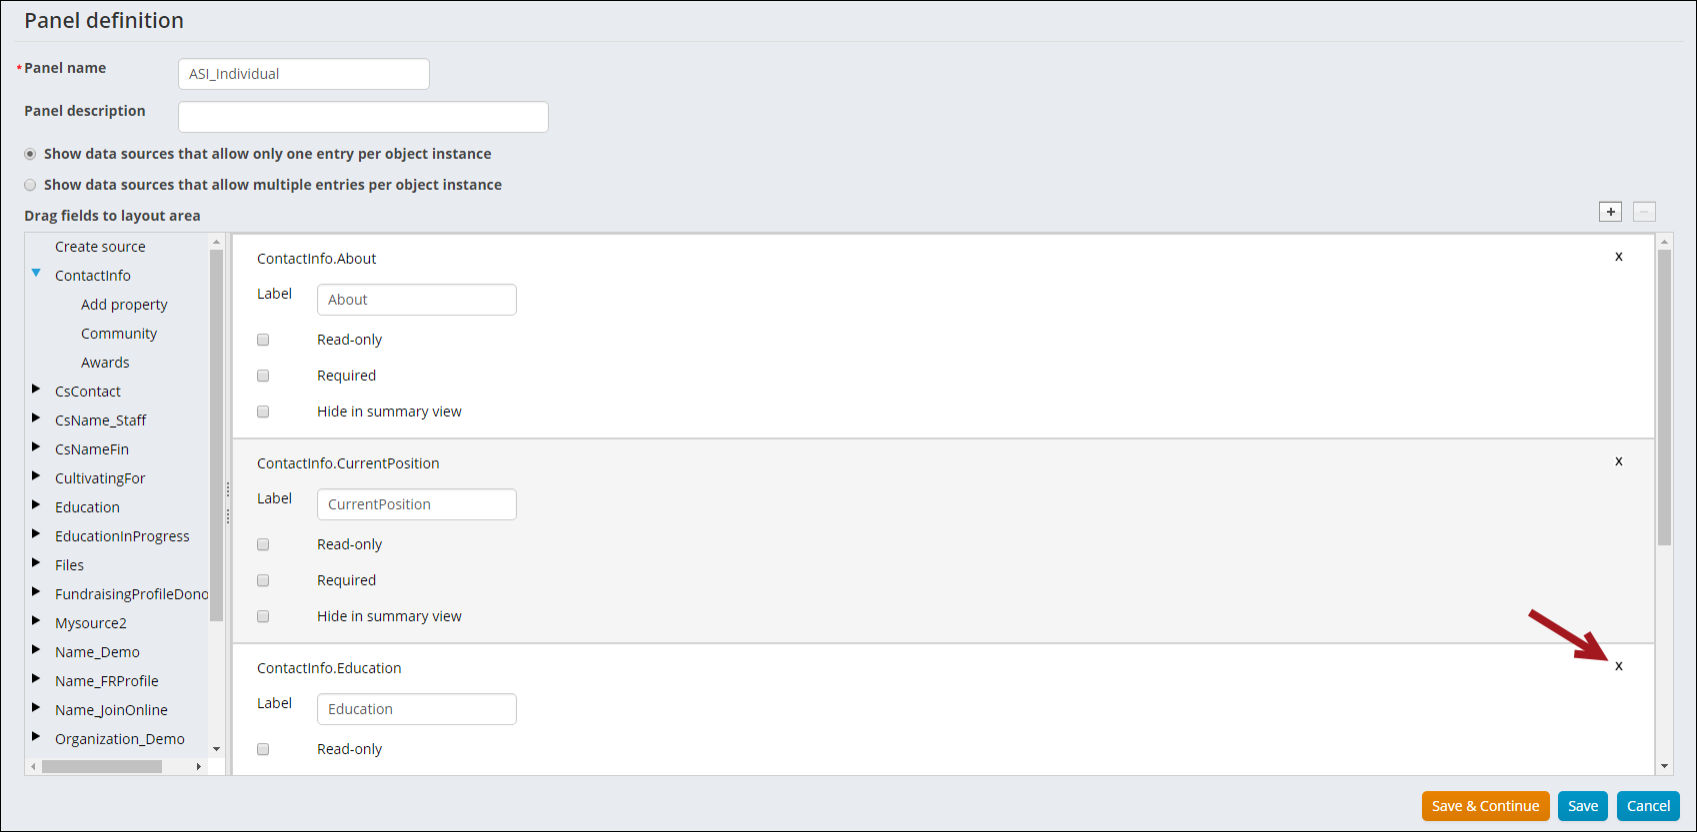
- Multiple columns: Click the + or – icons next to the panel layout to add columns to or remove columns from your panel. For best display results, place multi-column panels into single-column content records.
- Hide in summary view: Select this option if you want to display the property only when users open the full window for viewing, adding or editing.
- Read-only: Check this box to provide information in read-only form while still allowing users to edit other information on the panel.
- Collapsible panel (not configurable): In order to maximize utility and minimize scrolling on the page, users are able to click on the arrow to expand and collapse content items.
Note: To prevent editing of all of the properties, disable Allow users to edit on the content item configuration instead of editing in the Panel definition.
Note: Be sure to add an optional Title to any content item that you make collapsible, so that title bar text guides your users as to what information they will access by clicking Show.
Version2 virtual table model
The version2 virtual table model is a file structure for all virtual tables created in iMIS version 20.2 or later (tables created through the Panel Editor for user-defined data), with improved performance for sites with large amounts of data. The version2 structure applies to any virtual tables created in iMIS version 20.2 or later created through Panel Editor. Existing tables created using the original (version1) structure will remain unchanged and are also fully supported.
All virtual tables created in iMIS version 20.2 or later use the version2 file structure by default. If you have any customizations that directly access the tables that contain user-defined data, you might have to modify those customizations to handle any version2 tables created in the future.
Note: This setting in the web.config file only affects virtual tables created in iMIS version 20.2 or later. Any table created using the version1 model will remain unchanged, and any user-defined tables created through the iMIS Customizer will remain unchanged.
To create your own data source with properties, work within Panel Editor. Each new source you create is available for immediate use in the current panel. When you Save the panel, that new business object is saved to the iMIS database for use throughout the system. After you save it, you cannot rename it.
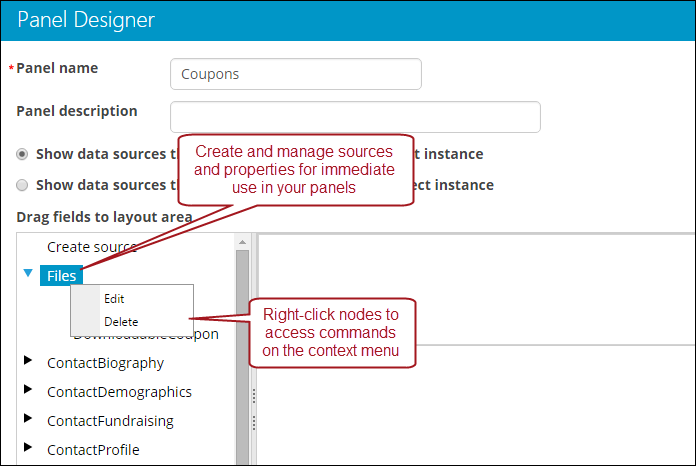
To create a new panel, do the following:
- From the Staff site, go to RiSE > Panel Designer.
- Select Add panel definition.
- Enter a Panel name and Panel description.
- Select Show data sources that allow only one entry per object instance. This option means that members and contacts will only be able to enter or select one option per data source you create. To allow users to be able to enter multiple entries per object, see Panels with multiple entries.
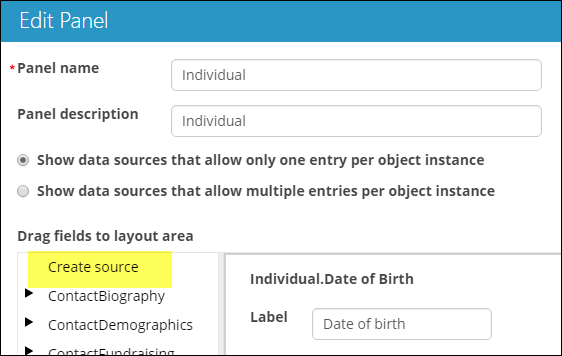
- Select Create source.
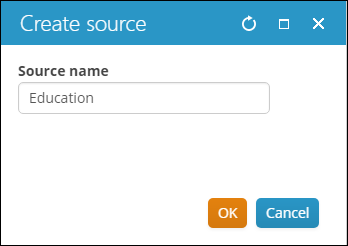
- Enter a Source Name for each new source that meets the following criteria:
- Starts with a letter.
- Contains only letters, numbers, and underscores.
- Is unique across iMIS. The name cannot match any existing iMIS data or SQL Reserved Words.
Note: We recommend that you use an organizational prefix (such as ABC_Name) so that your sources are unique, sort together in the tree view, and are easy to identify as sources that you created.
- Click OK.
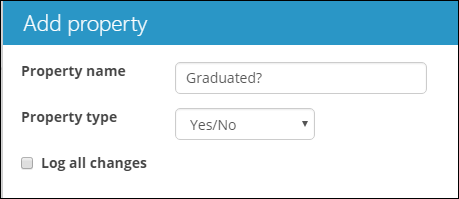
- Click Add property for the new source added.
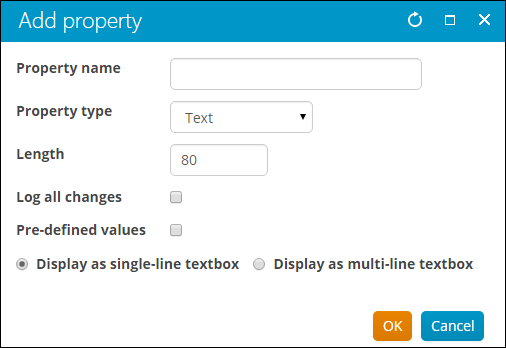
- Enter a Property name that:
- Starts with a letter
- Contains only letters, numbers, and underscores
- Is unique within its source
- Choose a property type that best fits your purpose, within these valid ranges:
- Currency: 19 total digits (precision), with four digits to the right of the decimal point (scale). The default masking displays two decimal places.
- Date, Date and Time, Time: January 1st, 1753, through December 31st, 9999
- Decimal: 28 total digits (precision), with 12 digits to the right of the decimal point (scale). The default masking displays two decimal places.
- Email: Creates a mailto link, which launches the user’s default mail application when selected.
- File upload: Allows contacts to associate a file with their record. After a file is uploaded, it can be downloaded by anyone who can view the panel. By default, all file types are accepted. Enter specific Allowed file types to restrict the type of files that can be uploaded. The maximum file size allowed is 10 MB.
- Integer: –2,147,483,648 to 2,147,483,647 (±2 billion)
- Text: By default:
- The maximum character limit for single and multi-line Text fields depends on when the original table was created. Older tables will have a maximum of 400 and newer tables will have a maximum of 4,000.
- Pre-defined values from a query or explicit list that display as a drop-down at runtime:
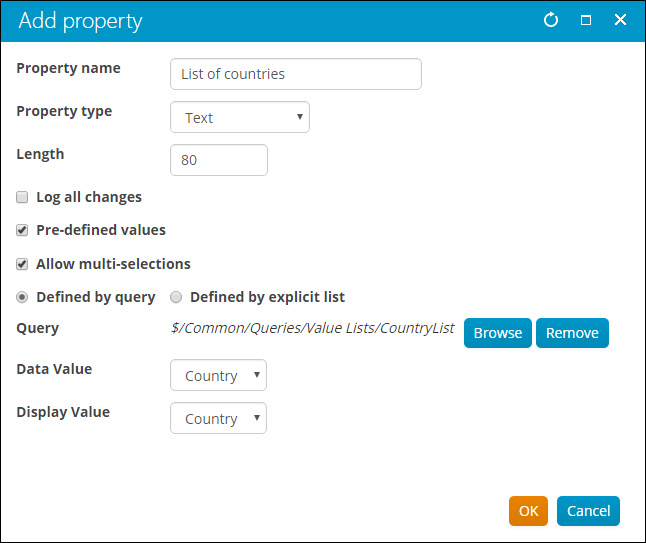
- Query – Lists the results from a query, such as a list of countries.
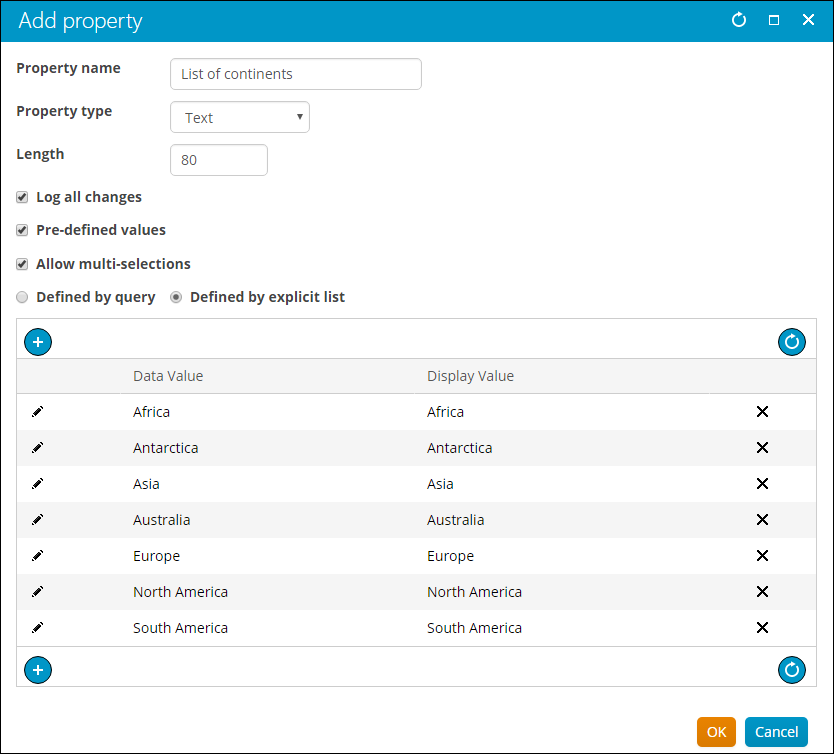
- Explicit List – Lists specific terms that you define, such as industry type or regions.
- URL: Creates a live hyperlink. When selected, a new browser is opened.
- Yes/No: Provides a checkbox for the user to select if Yes, or to leave blank if No.
Note: For security reasons, we recommend that you do not allow .exe files.
- Enable Log all changes if you want to track any data change made to the property.
- (Text Property type only) The Pre-defined values option allows you to present a list from which the user can select:
- Enable the Allow multi-selections option to allow users to select multiple values for a single property.
- The Defined by query option provides validation-type properties based on the query results. For example, instead of typing out a list of countries, you could select a query that displays country values.
- Enable the Pre-defined values checkbox and select the Defined by query option.
- Click Browse, select a query, and click OK.
- Two additional fields are displayed:
- Data Value - The field you want saved in the database.
- Display Value - The field you want displayed in the list presented as a selection on the panel.
Note: If Allow multi-selections is enabled, the Data Value properties cannot contain any commas. If the Data Value contains a comma, the properties will not properly display in the drop-down.
While these values can be same, you may want to choose a different value to display on the panel. For example, the country code may not be as clear as the country name.
- Select the fields from the drop-down in the Data Value and Display Value fields.
- Click OK.
- The Defined by explicit list option allows you to create a list to display on the panel:
- Enable the Pre-defined values checkbox and select the Defined by explicit option. A table grid is displayed.
- Click the plus icon (+) to add a data row. The data row contains two icons: Insert and Cancel, and two fields: Data Value and Display Value. The Data Value is the field saved in the database. The Display Value is the field displayed in the list presented as a selection on the panel. While these values can be same, you may want to choose a different value to display on the panel.
- Enter the appropriate values in the Data Value and Display Value fields.
- Click the Insert icon located to the left of the data row.
- Click the plus icon (+) to add additional data rows.
- Click OK.
Note: To learn how to edit an explicit value list, see Editing explicit value lists.
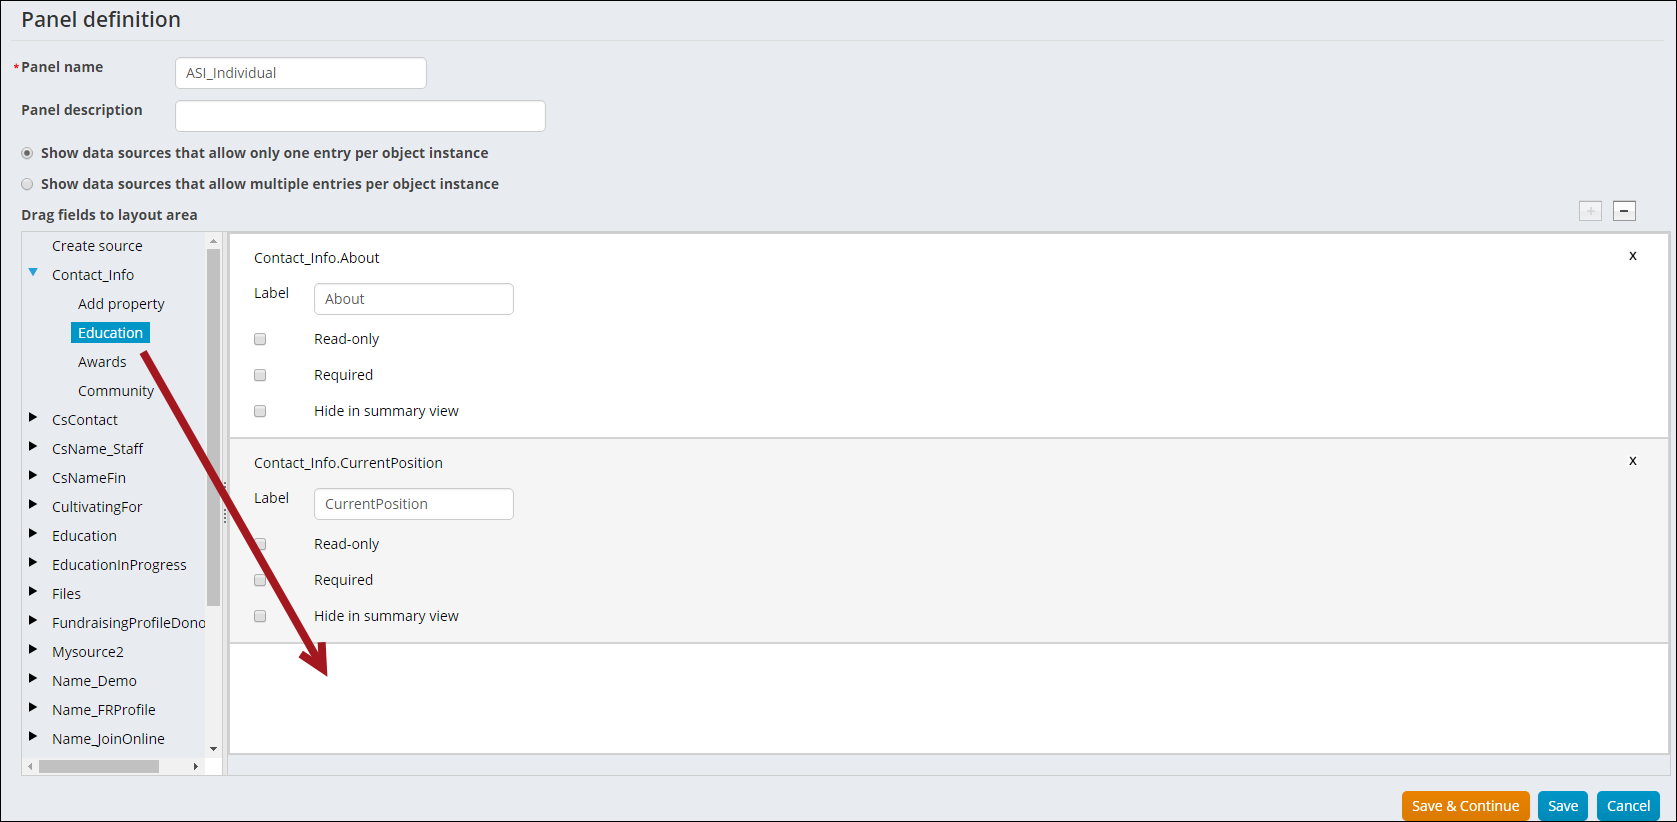
- Drag the fields to the layout area. You can also double-click a property to add it to the next available space in the layout area.
- Click Save and Continue:
- After you save a property, you cannot rename it. Note that the sources will alphabetize properly on reopening.
- Each new property you create is available for immediate use in the current panel, but it is not limited to that panel.
- When you save the panel, the new business object property is saved in the iMIS database for use throughout the system.
- Once you save it, you cannot rename it.
- Do not save until you create all of the properties. This way, you can view them as a set of properties and improve your naming convention before it is finalized.
- Navigate to any content record and add the Panel Editor content item to the page.
- From the Panel drop-down, select the panel you just created.
- Select Allow users to edit and any other content item configuration options you want to enable, then click OK.
- Save & Publish the content.
Note: The Change History Display content item must also be on the content record in order to properly display data changes. See Logging changes to data and displaying the change log for more information about logging changes with panels and business objects.
Warning! If there is a multi-instance panel with a text property in the first position, the panel will prevent the page from loading. Text properties should not be added to the first position in multi-instance panels.
Multi-instance panels allow users to enter multiple items for a single property. For example, you could allow your users to enter more than one degree in an Education panel. Multi-instance panels are also created in order to use Activity types.
Note: The Panel Designer uses the PagedResults.Maxrecords value to determine how many results to display for a multi-instance panel. The PagedResults.Maxrecords option can be found in the C:\Program Files (x86)\ASI\iMIS\Net\web.config file.
If you are not self-hosted, you must contact your host for assistance modifying web.config files.
Note: Multiple entry sources cannot be mixed in a single panel.
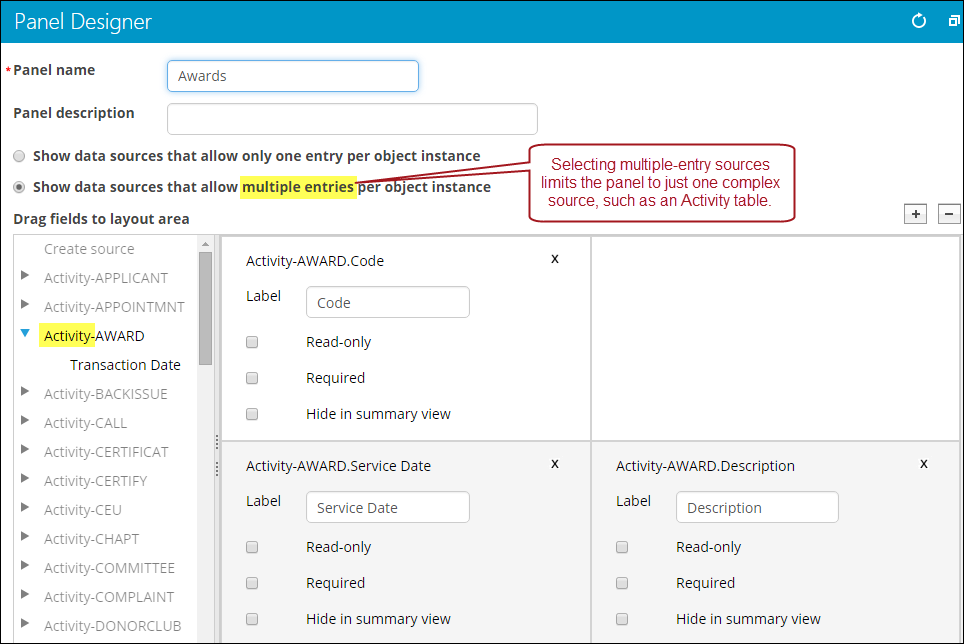
Do the following to create a new panel with an activity type:
- From the Staff site, go to RiSE > Panel Designer.
- Select Add panel definition.
- Enter a Panel name and Panel description.
- Select Show data sources that allow multiple entries per object instance.
- Select the drop-down arrow for the desired activity type from the left column.
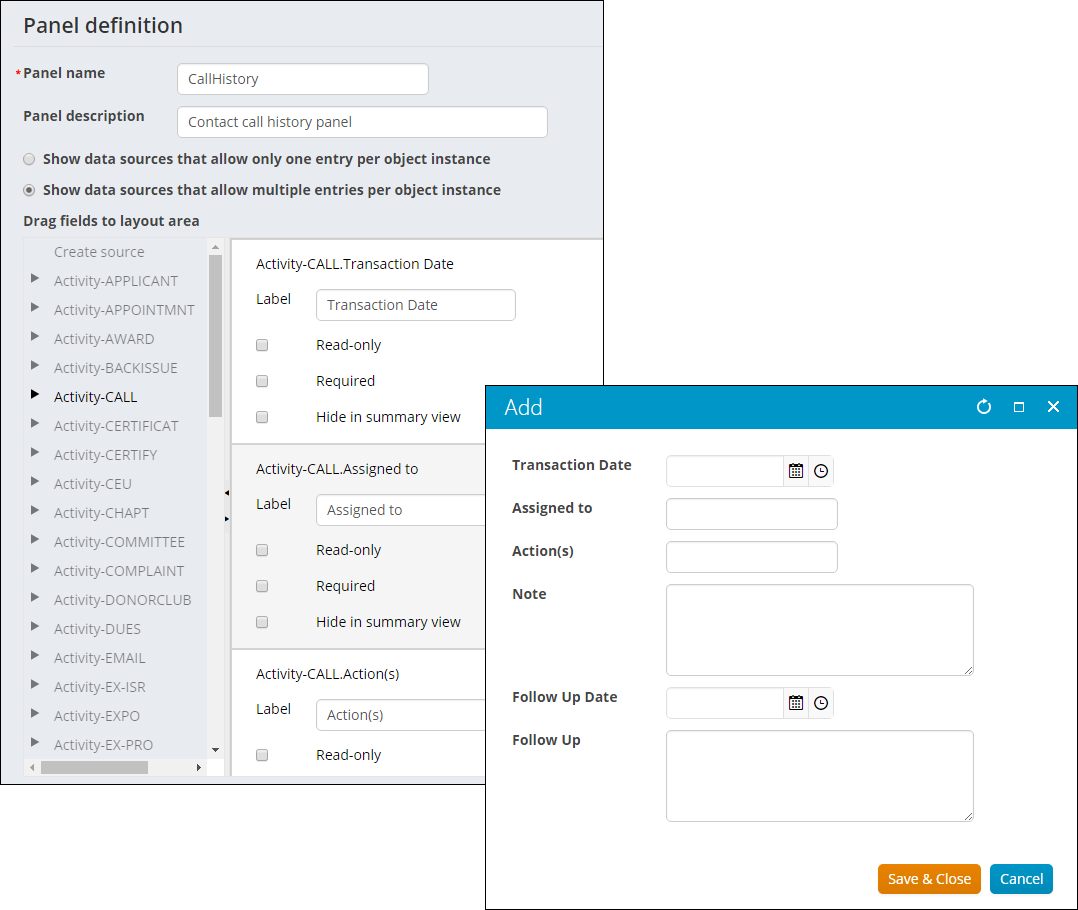
- Drag-and-drop the activity properties to the white space. The properties will appear in the Add window in the order you arrange them in here.
- Click Save & Continue.
- (optional) Continue creating panels for activity types.
- Navigate to the RiSE page you need the activity data to be on.
- Open the content record for edit.
- Select Add content.
- Open the Content folder, then do one of the following:
- If you have one panel you want to add to the content record, select the Panel Editor content item:
- Click OK.
- From the Panel drop-down, select the activity panel you just created.
- If you have two or more panels you want to add in a tabbed format to the content record, select the Panel Collection Editor content item:
- Click OK.
- Choose Select individual panels.
- Select the activity types you want grouped in the panel. The activity types will appear in a tabbed format.
- If you have one panel you want to add to the content record, select the Panel Editor content item:
- (optional) Enable Multi-Instance Panel Options:
- Enable scrolling for panel - Select this checkbox to set a height and width for a multi-instance panel. If the panel exceeds the set dimensions, scrolling is enabled.
- Panel width - Enter the width in pixels.
- Panel height - Enter the height in pixels.
- Enable scrolling for cells - Select this checkbox to enable a vertical scrollbar for cells whose values are greater than 100 characters.
- (Panel Editor only) Allow users to add - When enabled, users are able to manually add data to the panel.
- Allow users to delete - When enabled, users are allowed to delete entire rows of data from the panel.
- Allow users to edit - When enabled, users are able to edit the panel data. For Panel Collection Editor, enabling this option allows users to edit and add data to the panel.
- (PCE only) Open single-instance panels in edit mode by default - Select this checkbox to always display a single-instance panel in edit mode for website users who have permission to edit the panel data.
- (PCE only) Commit sequence - Allows you to explicitly define the execution order of multiple content items in a content record. The number in this field indicates the processing order for this content item, relative to the other content items in the same content record. The value must be 0 or greater. You can leave the default value of 0 if the execution order of content items is not a concern. Content items with a value of 0 are processed after any other content items with a non-zero Commit sequence value that are on the same content record.
- Edit window width - Enter the default width, in pixels, of the pop-up edit window for a multi-instance panel.
- Edit window height - Enter the default height, in pixels, of the pop-up edit window for a multi-instance panel.
Note: When Allow users to add, Allow users to edit, or Allow users to delete are enabled, the content record must be configured so that users must be logged in to access the page.
- Enable scrolling for panel - Select this checkbox to set a height and width for a multi-instance panel. If the panel exceeds the set dimensions, scrolling is enabled.
- Click OK.
- Click Save & Publish.
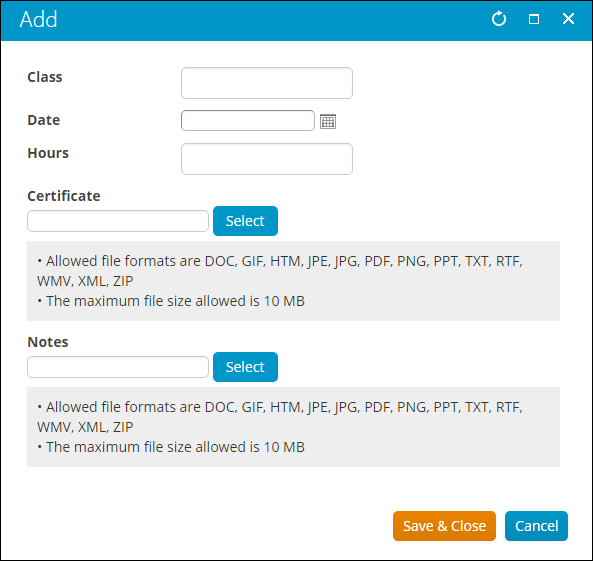
The following is an example of how to build a multi-instance panel when creating a new source (Create source). In this example we will build a Training table, and the end result will look something like this:

- From the Staff site, go to RiSE > Panel Designer.
- Select Add panel definition.
- Enter a Panel name and Panel description. For this example, we will name the panel Training.
- Select Show data sources that allow multiple entries per object instance.
- Select Create source, and enter a unique Source Name.
- For this example, we need to create five properties. These properties will be the Training panel rows: Class, Date, Hours, Certificate, Notes.
- Select Add property:
- In the Property name field, enter Class.
- From the Property type drop-down, select Text.
- Click OK.
- Select Add property:
- In the Property name field, enter Date.
- From the Property type drop-down, select Date.
- Click OK.
- Select Add property:
- In the Property name field, enter Hours.
- From the Property type drop-down, select Text.
- Click OK.
- Select Add property:
- In the Property name field, enter Certificate.
- From the Property type drop-down, select File upload.
- Click OK.
- Select Add property:
- In the Property name field, enter Notes.
- From the Property type drop-down, select File upload.
- Click OK.
- Select Add property:
- Drag the properties you created into the table. The first property will be the first row in the panel.
- Click Save and Continue.
- Navigate to any content record and add the Panel Editor content item to the page.
- From the Panel drop-down, select the panel you just created.
- Select Allow users to add, Allow users to edit, and any other content item configuration options you want to enable, then click OK.
- Click Save & Publish.
When users edit information on the Training panel, the Add window will look like this:
As a Staff user, you are able to edit virtual dynamic business objects that were created with the Panel Designer. You can edit panels directly from the content record using Easy Edit, or from RiSE:
- From the Staff site, go to RiSE > Panel Designer.
- Select the panel.
- The design view of the panel is displayed. Expand the source you want to edit.
- To continue editing, click the X to remove the field from the display grid.
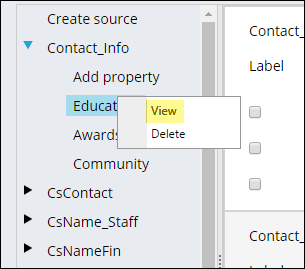
- Right-click on the property in the left pane and select View.
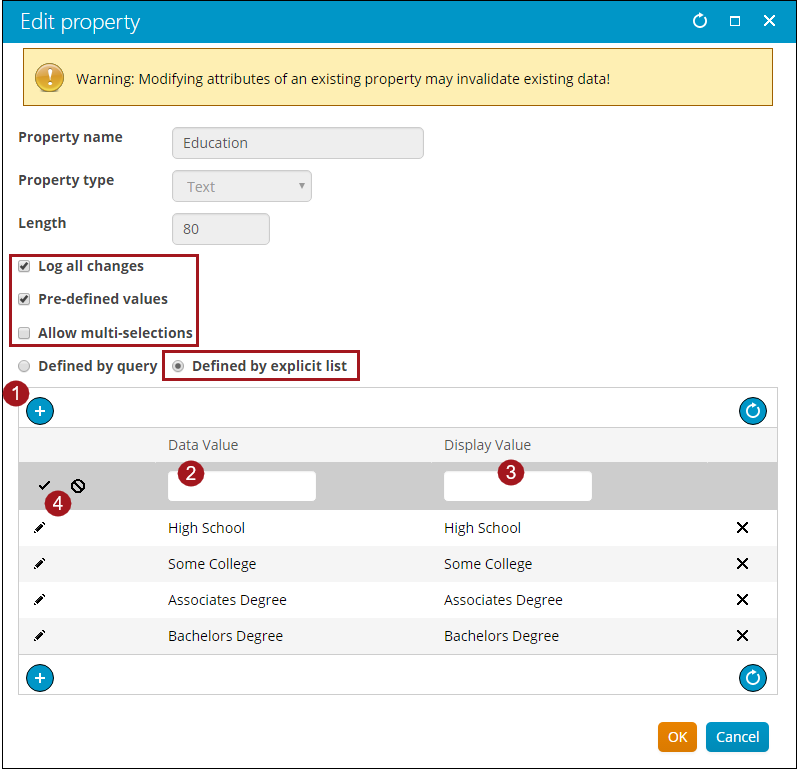
- The Edit property window is displayed:
- Select Log all changes and Pre-defined values.
- Enable Allow multi-selections to allow user to select multiple values for a single property.
- Select the Defined by explicit list radio button.
- Click the + icon to add values:
- Enter the value in the Data Value and Display Value fields.
- Click the check button to save the entry on each line.
- Click OK.
- In the Edit Panel window, click and drag the property back into the display grid.
- Click Save & Continue.
Note: The new values you add will appear at the bottom of the list in the Edit Property window. However, when the list of values is displayed for selection by a user, the new values you added will display in alphabetical order.
With Panel Designer, you can create new data sources from your browser. You can also access all user-defined tables and the Activity table.
Referencing existing business objects
Panel Designer can display existing business objects that have a ContactKey or ID property. When ContactKey or ID is the primary key, Panel Designer treats it as a single-instance table. Otherwise, Panel Designer assumes it to be multi-instance.
Panel Designer cannot display your business objects until they are made visible to the panel editor as a data source. This is done by using the DB Maintenance Tool:
- Launch the DB Maintenance Tool.
- Click the Panels tab.
- Click Manage Panel Editor Sources.
- Click Add Static Source.
When you click Manage Panel Editor Sources, the following window is displayed:
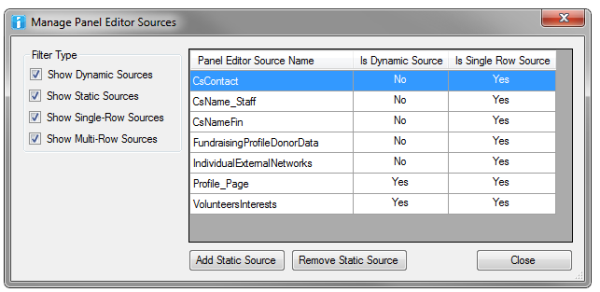
The source name is displayed in the first column. Then in the following columns, other information is displayed:
- Is Dynamic Source – This column indicates whether the source is a dynamic source (for example, created by Panel Editor), or a static source (for example, just a business object that Panel Editor is able to use).
- Is Single Row Source – This column whether the source is a single-row source (for example, there is one row for each contact), or a multi-instance source (for example, there are multiple rows for each contact).
The check-boxes allow you to filter the list down to only what you're interested in.
Click Add Static Source to add another source. For example, if you create a new business object that has an ID and represents data associated with Contacts, you can add the source here. This adds a row to the ObjectMetaData table.
Adding your own Static Source
Before you can add your own Static Source:
- You must have a table created that contains data types supported by Panel Editor, and has the required columns:
- For single-instance - varchar(10)
- For multi-instance - varchar(10) and int
- The table must have an appropriate primary key, covering the required columns.
- The business object is built over the table.
- The business object names the required column:
- Single-instance - ContactKey (the required varchar(10) column)
- Multi-instance - ContactKey (the required varchar(10) column, and Ordinal (the required int column)
Note: Receiving the error message Invalid table name specified, means that the business object does not exist, or the business object name was entered incorrectly.
Click Remove Static Source if you have a business object (non-dynamic source) selected. This allows you to remove business objects to which you don't want Panel Editor have access. If the selection is a dynamic source, the button reads Purge Dynamic Source instead.
If you click Remove Static Source, the following confirmation dialog is displayed:
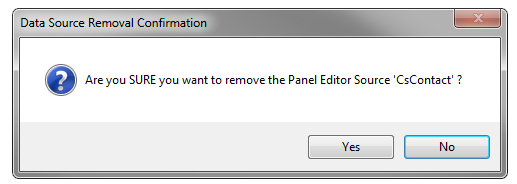
Click Yes to remove the associated row from the ObjectMetaData table. The source is no longer available to Panel Editor. No data is destroyed, and the source can be re-added using the Add Static Source button.
If you click Purge Dynamic Source, the following confirmation dialog is displayed:
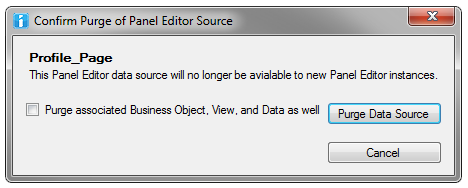
If you click Purge Data Source while the checkbox is unselected, the dynamic data source is removed from the ObjectMetaData table. The dynamic source will no longer be available to Panel Editor to create new panel editor instances. However, the backing Business Object, View, and Data are all untouched. There is currently no way to restore access to a purge dynamic data source in this state, except for re-adding the row manually through SQL. Any panel editors currently using the source should continue to work, but might not be editable.
If the checkbox is selected, then a red warning is displayed:
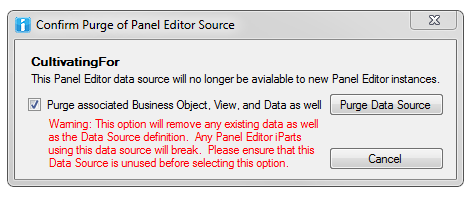
Selecting this option will also delete the backing Business Object documents, drop the View, and delete all associated Data. This is useful when performing testing, and you have a number of test objects you want to remove.
Note: Any Panel Editors using the source will break, and it's the responsibility of the customer to ensure that no Panel Editors are using the source when it is purged.
Do the following to purge orphaned properties from your Panel Editor source:
- Launch DB Maintenance.
- Connect to the database.
- Click the iParts tab.
- Click Manage Panel Editor Data.
- Verify there are orphaned properties in your selected source.
- Select the source that has the orphaned property.
- Click Purge Orphans.
- Click Purge Property and Data. The following message is displayed:
- Click Yes. This will remove all data associated with the orphaned property. This action cannot be reversed. If you return to the Panel Editor content item, and recreate the property, there will be no data available for that property.
- Click Close.
- Select the source that has the orphaned property.
- Click Purge Data. This deletes all the data for the source. The following message is displayed:
- Click Yes. This will remove all data associated with the Panel Editor source. This action cannot be reversed. If you return to the Panel Editor content item, and view the source, there will be no data available.
Are you SURE you want to remove all the data associated with orphaned property '<Property Name>'?
Are you SURE you want to remove all the data associated with Panel Editor Source '<PanelEditorSourceName>'?
Settings for Business Object Designer (BOD)
- From the Staff site, go to RiSE > Business Object Designer.
- Edit the object and open the BOD (Properties tab > Display tab).
- To make a property available to your panels, enable the Available to UI? option.
- To allow the user to select multiple options for a property, select Check box(es) under Display Control so that you can enable the Allow multiple selection option.
- To enable HTML editing, select HTML Editor under Display Control. Be sure to use the property in a single-column panel to allot sufficient width for the display.
Note: To see your BOD changes immediately, restart IIS.
Troubleshooting
If you get an error when creating a new data instance at runtime (either single or multi-instance), check that your business object does not have a Read-only constraint set on the ContactKey or ID property's Definition tab. Also, make sure that a column of column type timestamp is not included as a property in the business object.
There are two different types of data sources that can be logged using the Change History Display content item:
- Data created with Panel Designer - When you create and save a new data source in Panel Designer, a business object is also created and automatically associated with the data source. This allows the Panel Designer data source to easily communicate with the Change History Display since the Change History Display only properly logs data when there is an associated business object .
- User-defined table data - User-defined tables are legacy tables (created using the iMIS Desktop) that you would import into a panel on the Web. These tables must manually be connected to an iMIS business object in order to properly communicate with the Change History Display.
Logging data changes in the change log history
To log changes for a Panel Designer data source, do the following:
- Add the Change History Display content item to your account page.
- Make a change to the fields you wish to log, and then refresh the page to see if your changes are displayed in the Change History panel.
- If your changes are not displayed, then those particular fields are not configured for changes to be logged. Do the following as necessary:
- Check the Panel Designer data source:
- Open the panel in Panel Designer. Click the gear icon.
- If the property is already in the layout area, click the X to remove the property.
- Right-click a property for which you want to log changes, and select View.
- In the Edit Property window, select the Log all changes checkbox.
- Click OK.
- Add the property back to the layout area of the panel.
- Click Save & Close.
- Check the Panel Designer data source:
Note: It is recommended that you make a copy of the out-of-the-box account page and make changes to the copy. See Tailoring account pages for more information.
In order to log changes when using user-defined tables as panel editor data sources, you must use business objects. All legacy user-defined sources must be imported and configured properly. For customizer user-defined tables, you can use the Build All utility to automatically create a business object, or you can manually create the business object.
Do the following to associate a business object with your user-defined table:
- Do one of the following:
- Create a new business object from a legacy user-defined table:
- From the Staff site, go to RiSE > Business Object Designer.
- Select New > Design Business Definition.
- (Definition tab) Enter the business object's information.
- Click Create Object.
- Add properties to the business object, saving after you edit each tab:
- (Database tab) Add the tables that contain the columns you want to use in your business object. In the Available Columns list, select which columns to use.
- Click Add as Properties or Add All as Properties.
- Click Save.
- (Properties tab) Enable the option Log all changes? for all properties you wish to log changes.
- Click Save.
Warning!
Do not include a timestamp or text column as a property. - Click Publish.
Note: When creating a new Business Object, ensure you add the new Business Object in the Design Business Object Definition folder only. Do not create subfolders in the Design Business Object Definition folder.
- From the Staff site, go to Settings > Utilities > User defined tables.
- Click Build All. The Build Results field will display a log of the business objects that were built, compiled, and published.
- Verify that Name_Demo is listed in the Build Results field.
- Go to RiSE > Business Object Designer.
- Select the Name_Demo object.
- Click Edit.
- Make sure Available to screen designer? is enabled.
- (Properties tab) Verify that a Property Name value exists for each column in the Name_Demo table.
- Enable the option Log all changes? for all properties you wish to log changes.
- Click Save, then click Publish. A results window is displayed, listing any messages and errors.
- Click Close.
 Manually create the business object
Warning!
Changes made from the web will not replicate in the Desktop change log. Automatically create the business object
Note: Name_Demo is not an actual iMIS table name, and is used here for example purposes only.
Warning!
Do not include a timestamp or text column as a property.Note: Rerunning the Build All command in the Auto-Generate Business Objects from User-Defined Tables window will cause your changes to be overwritten and lost. The business objects for user-defined tables are recreated by that operation.
- Create a new business object from a legacy user-defined table:
- Run the DB Maintenance Utility (See Running DB Maintenance for more information):
- Click the Panels tab.
- Click Manage Panel Editor Sources.
- Click Add Static Source.
- Enter the exact Source Name. This field is case sensitive.
- Click Add Data Source.
- From the Staff site, go to Settings > About iMIS.
- Click Purge System Cache. This will clear the cache that panel editor uses when loading data sources.
- Reset IIS.
- Add the panel to a content record and add the fields from the newly created business object.
Warning! Use the properties from the business object name, and not the table name. The table name will appear in the list of sources if you imported the tabled directly using Panel Designer.
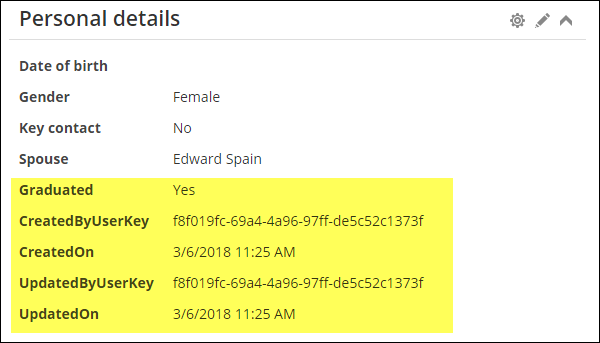
You can configure your panel source to auto-populate the date and time an entry is updated. Do the following to add sources that will automatically populate when an entry is updated:
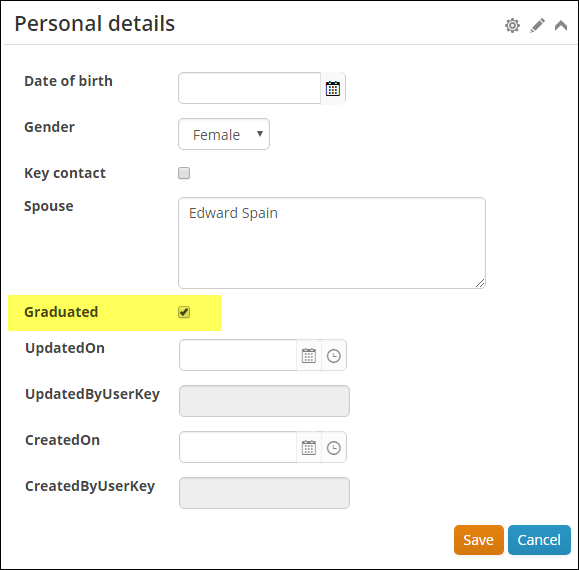
- From the Staff site, open the desired panel for edit. For this example, we are editing the Personal details panel on the out-of-the-box user account page.
- In Panel Designer, select Create source.
- Enter a Source name, then click OK.
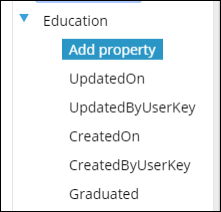
- Under the new source, select Add property, and add the property you want to track.
- Continue to add the following properties:
- Add all of these properties to the panel by double clicking the source.
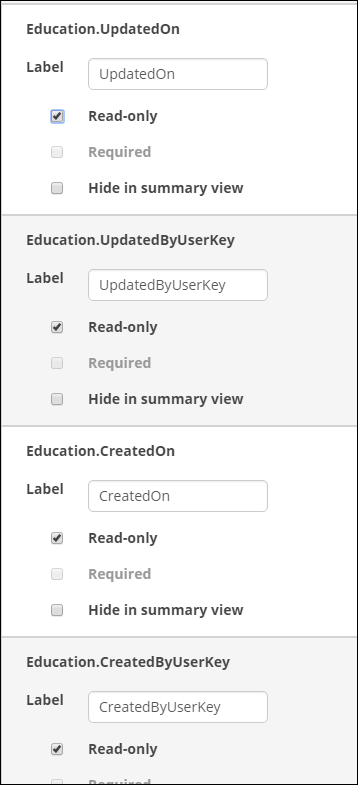
- Mark the CreatedByUserKey, CreatedOn, UpdatedByUserKey, and UpdatedOn properties as Read-only.
- Click Save & Close.
- Edit the panel data and change the value of the field.
- After saving, the four read-only fields are automatically populated with the user key that made the changes.
| Property name | Property type |
|---|---|
| CreatedByUserKey | Text |
| CreatedOn | Date and Time |
| UpdatedByUserKey | Text |
| UpdatedOn | Date and Time |
