Warning! After applying the Service Pack, do not use the Reset/Rebuild functionality located in the DB Maintenance Utility to initiate any rebuilds that modify the structure of your database. Initiating any rebuilds that modify your database structure will overwrite database changes made in a Service Pack.
iMIS Database maintenance (DB Maintenance) is a standalone application that replaced the iMIS 10 Table Analysis utility. This tool lets you rebuild, analyze, and manage all iMIS tables. It also lets you run special scripts that prepare your database to support advanced options, such as PCI, NRDS, and VAT.
Note: The DB Maintenance utility replaces DB Repair.
When first logging in to DB Maintenance, it is recommended that you log in with a user account that has System Administrator privileges.

For most functionality in DB Maintenance, you can log in with an account that has database owner privileges. However, some functionality (such as repairing the publishing queue) requires System Administrator privileges, including the majority of the functionality available through Prepare iMIS Database.
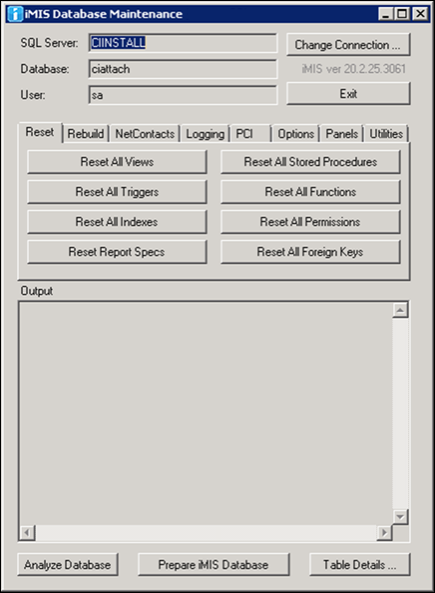
DB Maintenance runs as a separate, local application from the iMIS program group and organizes helpful database commands on a set of tabs.
- Change Connection – Switch to another iMIS database.
- Output – Displays information about the functions performed; this information also writes to a log file in the executable's directory.
- Analyze Database – Run a full analysis on the entire iMIS database. This process performs an extensive database analysis, so allow ample time for it to run.
- missing table
- missing or extra columns
- wrong column order, data type, length, or defaults
- wrong numeric precision, scale, radix
- missing index
- missing PK/unique/clustered index
- missing or disabled triggers
- missing or disabled/distrusted foreign keys
- Prepare iMIS Database – Prepare an iMIS database that has just been restored to a new location or under a new name.
- Table Details – Analyze, examine, reset, or rebuild individual tables.
Table analysis testing:
Note: It is recommended that you log in with a user account that has System Administrator privileges. The majority of the functionality available through Prepare iMIS Database requires System Administrator privileges.
- Verify that you have a valid backup of your iMIS database before running DB Maintenance commands that modify the database.
- Ensure the database is protected from updates before modifying it, to prevent failures and data problems from changes occurring while entities are being reset/rebuilt/removed:
- Have all users log out.
- Stop webservers from updating the database, such as by stopping the AppPool in IIS.
- While users are logged in, you can safely run Analyze Database and Table Details; however, analyzing the database can affect performance.
These functions restore database items to the states they held when last upgraded or installed.
- Reset All Views – Drop and recreate all iMIS System Views to what they were at the last install/upgrade. Custom Views are unaffected.
- Reset All Triggers – Drop and recreate all iMIS System Triggers to what they were at the last install/upgrade. Custom Triggers are unaffected.
- Reset All Indexes – Drop and recreate all iMIS System Indexes to what they were at the last install/upgrade. This preserves custom indexes, as well as primary and alternate key indexes, because of foreign key constraints (relevant only for newer .NET tables).
- Reset Report Specs – Reset all iMIS Standard Report Specifications to what they were at the time of the last install or upgrade. These specifications are found in iMIS Advanced Accounting Console, from the menu Utilities > Report Specs. Custom report specifications are not affected.
- Reset All Stored Procedures – Drop and recreate all iMIS System Stored Procedures to what they were at the last install/upgrade. Custom Procedures are unaffected.
- Reset All Functions – Drop and recreate all iMIS System Functions to what they were at the last install/upgrade. Custom User Defined Functions (UDFs) are unaffected.
- Reset All Permissions – Reset the permissions on all iMIS System database objects to what they were at the last install/upgrade. This grants permissions to all iMIS System database objects to the iMIS group as required.
Note: This function will not complete successfully if your iMIS database contains any full-text indexes. You must first drop all full-text indexes that might exist in your iMIS database, and then manually re-create them after you have finished running this function.
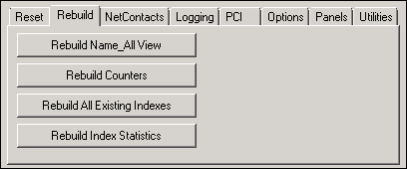
- Rebuild Name_All View – Rebuild the Name_All View, which is not rebuilt by Reset All Views.
- Rebuild Counters – Rebuild all iMIS counters.
- Rebuild All Existing Indexes – Rebuild all iMIS System Indexes. This runs a DBCC REINDEX command against all existing iMIS table indexes.
- Rebuild Index Statistics – Update all iMIS System Index Statistics.
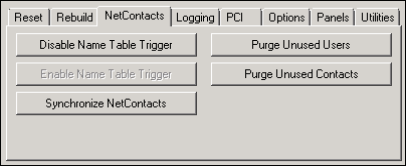
NetContacts commands help you avoid errors when importing contact records into iMIS. NetContacts takes its name from the CsNetContacts business object.
In iMIS, a Name table trigger copies data to numerous .NET tables (such as ContactMain, Individual, Institute); the NetContacts tab helps you achieve the same synchronization when you import contacts into iMIS.
- Disable Name Table Trigger – Disable the trigger on the Name Table that keeps the NetContacts synchronized.
- Enable Name Table Trigger – Enable the trigger on the Name Table that keeps the NetContacts synchronized.
- Synchronize NetContacts – Synchronize the NetContacts after loading the Name table with the trigger disabled.
Purge (see Purging user and contact records) allows you to permanently delete entries from .NET tables.
- Purge Unused Users – Permanently removes user entries from .NET tables that were previously purged from Client/Server tables.
- Purge Unused Contacts – Permanently removes contact entries from .NET tables that were previously purged from Client/Server tables.
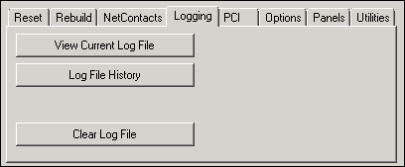
- View Current Log File – View logging information for current log file.
- Log File History – View list of log files, from most recent to oldest and select a file to view.
- Clear Log File – Back up the current log file to a history file, then clear the current log file. This is helpful to keep a shorter, recent list.
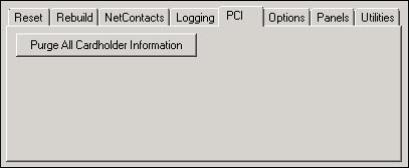
See Using DB Maintenance for PCI compliance.
- Purge All Cardholder Information – Removes all existing cardholder information from your iMIS database (one-time process).
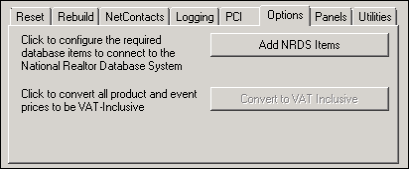
- Add NRDS Items – (NRDS clients only) Click this button to configure the required dataset items to connect to the National Realtor Database System. This creates the items needed for the data synchronization bridge. See NRDS bridge setup and configuration.
- Convert to VAT Inclusive – (VAT organizations only) Click this button to convert all product and event prices to be VAT-Inclusive. If you enable Convert to VAT Inclusive in AR/Cash, lets you convert your existing product/event pricing to include the VAT tax amount. See Converting to VAT Inclusive.
Note: You must reset Redis after converting to VAT-Inclusive. Until a Redis reset occurs, prices for events defined on the web are displayed without VAT. If the events are saved again, the event prices are saved without VAT.
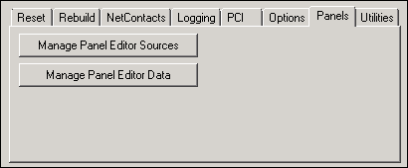
This tab lists Panel Editor content item-specific maintenance tasks.
- Manage Panel Editor Sources – Click this button to manage sources for the Panel Editor content item.
- Manage Panel Editor Data – Click this button to purge orphaned properties from your Panel Editor source.
This tab is reserved for future utilities development.
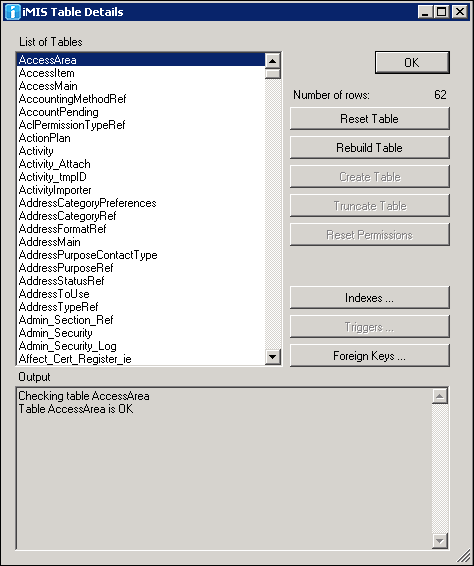
The iMIS Table Details page allows you to do analysis and apply fixes and changes at table level rather than globally. All iMIS tables are listed alphabetically. When you select a table, a mini-analysis runs on it and reports in the Output area.
(Number of rows – The top right shows a row count for the selected table.
- Reset Table – Performs a non-destructive reset of the table, replacing any missing triggers, indexes, permissions, or foreign keys.
- Rebuild Table – Performs a full rebuild of the table (rename the table, re-create the table schema, copy the data back over, re-establish all indexes, triggers, and permissions). It recreates the table from scratch, preserving data. If the table contains large amounts of data, allow ample time for this process to run.
- Create Table – Recreates the table schema, indexes, triggers, and permissions. Enabled only if the table is missing.
- Truncate Table – Deletes all the data in the table, following a prompt for confirmation. Truncating a table with zero rows has no effect, but it runs the command just like any other table, and is useful for testing.
- Reset Permissions – Ensures the table is granted the proper permissions to the iMIS Group.
- Indexes... lets you work with indexes associated with the selected table. Enabled only if there are indexes.
- Create Indexes – Creates any indexes that are missing, ensuring that the table has all of the iMIS indexes it needs.
- Drop Indexes – Drops the indexes associated with the table, except for indexes that are constraints; preserves user-added indexes. This does not affect primary or alternate keys, which may be the target of a foreign key constraint.
- Rebuild Indexes – Rebuilds all indexes associated with the table.
- Triggers... lets you work with triggers associated with the selected table. Enabled only if triggers exist.
- Enable Triggers – Re-enables disabled triggers, which is useful after importing records. Enabled only if there are or should be system triggers on the table (ignores user triggers).
- Disable Triggers – Preserves triggers but disables them, which is useful when importing records. Enabled only if there are or should be system triggers on the table (disables user triggers as well).
- Create Triggers – Creates any triggers that are missing.
- Drop Triggers – Drops the triggers associated with the selected table.
- Foreign Keys... lets you work with foreign keys on the selected table as well as other tables that reference it. Enabled only if such foreign keys exist.
- Enable Table FKs – Re-enables any disabled foreign keys on the table and checks them all. Enabled only if there are or should be foreign keys on the table.
- Disable Table FKs – Disables any foreign keys, which is useful when importing records. Enabled only if there are or should be foreign keys on the table.
- Create Table FKs – Creates the foreign keys on the selected table. Enabled only if there should be foreign keys on the table.
- Drop Table FKs – Drops the foreign keys on the selected table. Enabled only if there are foreign keys on the table.
- Create Referencing FKs – Creates the foreign keys on all tables that reference the selected table.
- Drop Referencing FKs – Drops the foreign keys on all tables that reference the selected table.
- Create ALL FKs – Creates the foreign keys on the selected table and on all tables that reference it.
- Drop ALL FKs – Drops the foreign keys on the selected table and on all tables that reference it.
Warning!
You lose any user-added columns when you rebuild a table. The Rebuild Table button is only enabled for those tables that aren't involved in indexed views. Tables that are referenced by indexed views cannot be rebuilt with this tool, and the button will be grayed out.
Warning!
If the version number of the database is higher than that supported by DB Maintenance, do not use any database commands until you resolve the version conflict.
Do the following to run DB Maintenance:
- From the Start menu, select DB Maintenance Utility in the iMIS program group.
- When prompted, specify your server and database.
- Log in using the sa user. The next time you run DB Maintenance, it remembers the connection and only requires your password.
- Verify that the version number supported by DB Maintenance (which appears at top, in the title bar) is the same or greater than the version number displayed to the right of the Database name (which is that of the database you selected).
- Click on any of the tabs to bring it to the front.
- As needed, run the commands presented by the interface.
- If you receive an error, check whether it's one of these known situations:
- Column ... has the wrong default. Expected ... '', found '': a harmless error that might be triggered by upgraded databases.
- "Wrong Ordinal" error on certain table columns might be triggered by upgraded databases. This message is generally harmless and affects only the ability to load the affected tables with BCP and the format files created by ASI.
Warning!
Never run an older version of DB Maintenance against a newer database.
Warning!
Never run an older version of DB Maintenance against a newer database.
Do the following to rebuild a table:
- Have all users log out of iMIS.
- Schedule downtime for rebuilding tables containing large amounts of data.
- Back up all tables that you plan to rebuild.
- From the Start menu, select DB Maintenance Utility in the iMIS program group.
- Select the table to be rebuilt.
- Click Rebuild Table.
Do the following to rebuild a customized table:
If you have added custom objects (Foreign Key constraints, triggers, indexes) to iMIS tables, you must remove the customizations and then add them back.
- Record all custom database objects that you have added to your iMIS tables, because you must manually recreate them.
- Manually remove your objects; for example, drop all foreign key constraints on the table (both to and from the table, so you must also check other referencing tables and drop the relevant foreign keys there as well).
- Restart DB Maintenance, select the tables, and click Rebuild Table.
- Manually recreate all custom foreign key constraints that you recorded.
The NetContacts tab in DB Maintenance helps you import contact records so that your new Name table data is correctly synchronized with all associated .NET table structures.
Do the following to import contact records:
- Backup your database.
- On your appserver, run the DB Maintenance tool.
- After connecting, select the NetContacts tab.
- Click Disable Name Table Trigger to disable triggers temporarily.
- Import your records in Advanced Accounting Console: select Utilities > Data Transfer Utilities > Import Utility.
- When the import is done, click Enable Name Table Trigger to restore the trigger.
- Click Synchronize NetContacts to update the associated NET tables.
DB Maintenance lets you permanently delete entries from .NET tables that were previously purged from Client/Server tables.
Warning!
Be sure to follow the order here: complete your Client/Server membership purge before proceeding to those in DB Maintenance, and always purge user records before purging contact records.
Note: iMIS contact records will continue to display in search, unless the record is marked for deletion. If you do not want the publishing service to include contact records that were previously deleted, but not marked for deletion, you must delete the Contacts search folder (ASI\iMIS\indexServiceProtected\Search\Lucene), and then delete the row in the SystemConfig table that is used by contacts publishing, for example, DELETE FROM [dbo].[SystemConfig] WHERE [ParameterName] LIKE 'ContactsPublishing-<Publishing Server Code>'. The Contacts search folder and the SystemConfig row will be recreated automatically.
Do the following to purge membership records across iMIS:
- Purge member records in Name-related tables:
- In Advanced Accounting Console, select Utilities > Reports and Queries from the menu.
- Select Purge, Membership Purge for MS SQL and select Run. The Membership Purge is for the Name table and those tables related to it.
- Purge user records in .NET tables.
- In DB Maintenance, select the NetContacts tab.
- Click Purge Unused Users.
- Check the estimate for the number of records eligible for purging reported by the Purge Confirmation window, and troubleshoot if it seems wrong.
- Click Continue with Purge. The purge can take minutes or hours, depending on the number of records involved. Entries from the following .NET tables are deleted:
- aspnet_Profile
- aspnet_Membership
- aspnet_Users
- Users
- UserMain
- UserRole
- UserToken
- When the purge is done, check the history log that displays for the success and number of records that were purged.
- Purge contact records in .NET tables.
- Click Purge Unused Contacts.
- Check the estimate for the number of records eligible for purging reported by the Purge Confirmation window, and troubleshoot if it seems wrong.
- Click Continue with Purge. The purge can take minutes or hours, depending on the number of records involved. Entries from the following .NET tables are deleted:
- GroupMember
- GroupMemberDetail
- RFMMain
- Individual
- Institute
- ContactBiography
- ContactCommunicationReasonPreferences
- ContactLog
- ContactPicture
- ContactSalutation
- ContactMain
- PrimaryInstituteContactKey is set to null for all related institute records
- When the purge is complete, check the history log that displays for the success and number of records that were purged.
Depending on which option you choose in AR/Cash Setup, implementing advanced PCI Compliance support requires changes to your iMIS database. Do the following:
- Remove all existing cardholder information from your iMIS system that predates your new security measures.
DB Maintenance lets you complete this process easily and reliably through the PCI tab.
Note: If you implement PCI Compliance with audit logging and later switch to storing no data, be aware that this purge routine leaves the existing audit log (PciAuditLog table) intact.
Deferred transactions are lost in a purge, so you need to resolve deferred data and disable settings that allow it:
- Find and change any gateway that is configured for Deferred authorization:
- From the Staff site, go to Settings > Finance > Gateway accounts.
- Select the first listed gateway.
- If it is set to Deferred authorization, change it to Immediate or Manual.
- Repeat for all other gateways.
- Submit any deferred transactions that are pending:
- In Advanced Accounting Console, open AR/Cash > Credit card reporting and run Submit Deferred Authorizations.
- Any deferred transaction remaining after the purge has no payment information, so it must be re-entered manually.
- From RiSE, go to Process automation, and open the PCI Data Retention Cleanup task.
- To start the purge, click Run task now.
- Click Close when the task has completed.
Table: [dbo].[ASI_temp_trans] if exists
- [CC_NUMBER] - masked (shows last 4)
- [CC_EXPIRE] - masked
- [CC_NAME] - cleared
Table: [dbo].[Trans]
- [CC_NUMBER] - masked (shows last 4)
- [CC_EXPIRE] - masked
- [CC_NAME] - cleared
- [ENCRYPT_CC_NUMBER] - cleared
- [ENCRYPT_CC_EXPIRE] - cleared
- [ENCRYPT_CSC] - cleared
- [ISSUE_DATE] - cleared
- [ISSUE_NUMBER] - cleared
Table: [dbo].[Orders]
- [PAY_NUMBER] - masked (shows last 4)
- [CREDIT_CARD_EXPIRES] - masked
- [CREDIT_CARD_NAME] - cleared
- [ENCRYPT_PAY_NUMBER] - cleared
- [ENCRYPT_CREDIT_CARD_EXPIRES] - cleared
- [ENCRYPT_CSC] - cleared
- [ISSUE_DATE] - cleared
- [ISSUE_NUMBER] - cleared
Table: [dbo].[Basket_Payment]
- [PAY_NUMBER] - masked (shows last 4)
- [CREDIT_CARD_EXPIRES] - masked
- [CREDIT_CARD_NAME] - cleared
- [ENCRYPT_CREDIT_CARD_EXPIRES] - cleared
- [ENCRYPT_PAY_NUMBER] - cleared
- [ENCRYPT_CSC] - cleared
- [ISSUE_DATE] - cleared
- [ISSUE_NUMBER] - cleared
Table: [dbo].[Order_Payments]
- [PAY_NUMBER] - masked (shows last 4)
- [CREDIT_CARD_EXPIRES] - masked
- [CREDIT_CARD_NAME] - cleared
- [ENCRYPT_CREDIT_CARD_EXPIRES] - cleared
- [ENCRYPT_PAY_NUMBER] - cleared
- [ENCRYPT_CSC] - cleared
- [ISSUE_DATE] - cleared
- [ISSUE_NUMBER] - cleared
Table: [dbo].[OrderCheckout]
- [CreditCardNumber] - masked (shows last 4)
- [CreditCardExpiration] - masked
- [CreditCardName] - cleared
- [CreditCardAddress] - cleared
- [CreditCardAddress2] - cleared
- [CreditCardAddress3] - cleared
- [CreditCardCity] - cleared
- [CreditCardState] - cleared
- [CreditCardPostalCode] - cleared
- [CreditCardCountry] - cleared
- [ISSUE_DATE] - cleared
- [ISSUE_NUMBER] - cleared
(NRDS clients only) The National Association of REALTORS® (NRDS) bridge lets you share information between iMIS and NRDS through an automatic synchronization of changes made in either database. Setting up this data sharing includes a one-time command in DB Maintenance to create the needed items:
- After downloading and installing the WebSphere MQ Client, restart you application server.
- In DB Maintenance, select the NRDS tab and click Add NRDS Items.
- Check the Output section below the button to verify that no errors occurred.
(VAT organizations only) If you entered product and event pricing in iMIS 15.2.5 and earlier, it was exclusive of VAT. If you now enable VAT Inclusive pricing, you need to do a one-time conversion of your existing pricing to include the VAT tax amount.
When you enable the option in AR/Cash, iMIS prompts you to run this conversion.
Warning!
Always back up your database and ensure that you can restore it before running any data conversion.
Upgrade note for VAT: Now that iMIS stores all order and order line amounts as VAT-inclusive, DB Upgrader takes care of updating all of your existing order data to be consistent with your new order data. Flags on the record ensure that the update occurs only once, and your original data is backed up (Orders_BAK and Order_Lines_BAK). Note that this universal change to storing order amounts as VAT-inclusive is unrelated to whether you set AR/Cash VAT Options to be VAT Exclusive.
When you click Manage Panel Editor Sources, the following window is displayed:
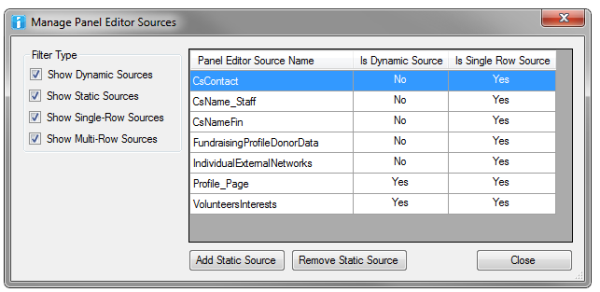
The source name is displayed in the first column. Then in the following columns, other information is displayed:
- Is Dynamic Source – This column indicates whether the source is a dynamic source (for example, created by Panel Editor), or a static source (for example, just a business object that Panel Editor is able to use).
- Is Single Row Source – This column whether the source is a single-row source (for example, there is one row for each contact), or a multi-instance source (for example, there are multiple rows for each contact).
The check-boxes allow you to filter the list down to only what you're interested in.
Click Add Static Source to add another source. For example, if you create a new business object that has an ID and represents data associated with Contacts, you can add the source here. This adds a row to the ObjectMetaData table.
Before you can add your own Static Source:
- You must have a table created that contains data types supported by Panel Editor, and has the required columns:
- For single-instance - varchar(10)
- For multi-instance - varchar(10) and int
- The table must have an appropriate primary key, covering the required columns.
- The business object is built over the table.
- The business object names the required column:
- Single-instance - ContactKey (the required varchar(10) column)
- Multi-instance - ContactKey (the required varchar(10) column, and Ordinal (the required int column)
Note: Receiving the error message Invalid table name specified, means that the business object does not exist, or the business object name was entered incorrectly.
Click Remove Static Source if you have a business object (non-dynamic source) selected. This allows you to remove business objects to which you don't want Panel Editor have access. If the selection is a dynamic source, the button reads Purge Dynamic Source instead.
If you click Remove Static Source, the following confirmation dialog is displayed:
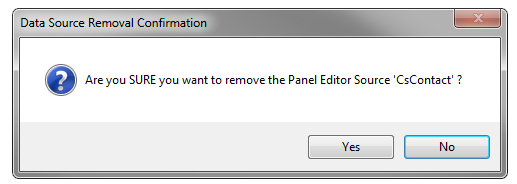
Click Yes to remove the associated row from the ObjectMetaData table. The source is no longer available to Panel Editor. No data is destroyed, and the source can be re-added using the Add Static Source button.
If you click Purge Dynamic Source, the following confirmation dialog is displayed:
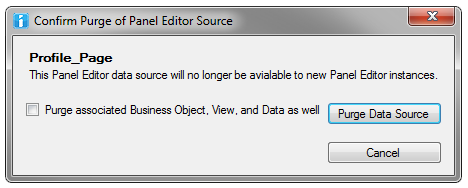
If you click Purge Data Source while the checkbox is unselected, the dynamic data source is removed from the ObjectMetaData table. The dynamic source will no longer be available to Panel Editor to create new panel editor instances. However, the backing Business Object, View, and Data are all untouched. There is currently no way to restore access to a purge dynamic data source in this state, except for re-adding the row manually through SQL. Any panel editors currently using the source should continue to work, but might not be editable.
If the checkbox is selected, then a red warning is displayed:
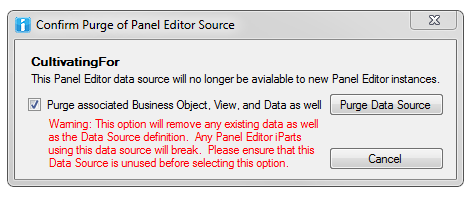
Selecting this option will also delete the backing Business Object documents, drop the View, and delete all associated Data. This is useful when performing testing, and you have a number of test objects you want to remove.
Note: Any Panel Editors using the source will break, and it's the responsibility of the customer to ensure that no Panel Editors are using the source when it is purged.
Do the following to purge orphaned properties from your Panel Editor source:
- Launch DB Maintenance.
- Connect to the database.
- Click the iParts tab.
- Click Manage Panel Editor Data.
- Verify there are orphaned properties in your selected source.
- Select the source that has the orphaned property.
- Click Purge Orphans.
- Click Purge Property and Data. The following message is displayed:
- Click Yes. This will remove all data associated with the orphaned property. This action cannot be reversed. If you return to the Panel Editor content item, and recreate the property, there will be no data available for that property.
- Click Close.
- Select the source that has the orphaned property.
- Click Purge Data. This deletes all the data for the source. The following message is displayed:
- Click Yes. This will remove all data associated with the Panel Editor source. This action cannot be reversed. If you return to the Panel Editor content item, and view the source, there will be no data available.
Are you SURE you want to remove all the data associated with orphaned property '<Property Name>'?
Are you SURE you want to remove all the data associated with Panel Editor Source '<PanelEditorSourceName>'?
