Customizing the Renewal Notice Formats
A variety of standard renewal notice options are available. Although the presentation of most billing-related data is predetermined, many aspects can be customized.
For many of the available formats, the enlarged, bold title that appears at the top of the notice is user-defined within the Billing and Reminder Notices window (from Billing, select Set up module > Billing cycles, select a Cycle Name, and click Bills/Reminders). You can also define a limited size (notice-specific) text area.
In addition to the Billing and Reminder Notice title and text options, you can customize other aspects of the renewal notice by entering instructions on the Report Specifications window (select Utilities > Report Specs).
Note: If changes are made on the Report Specifications window, you must make the changes on a cloned copy of the standard report. This step is required to make the changes permanent.
The types of changes that can be made on the Report Specifications window include the following:
- The entry of larger user-defined text areas
- The addition of merge fields from the customer/subscriber-specific data. Up to five merge fields can be included in the overlay text
Note: There is no provision for merge fields in the Billing and Reminder Notices text.
- The modification or addition of a few available printing options that affect the output
- The modification of top and/or left margins, which may be required to align the printed output with an iMIS-authorized preprinted form.
Note: Crystal Report parameters should not be deleted from a report as the majority of them are necessary to run the report. The preferred method for building reports is to clone your existing report specifications, which automatically copies the report parameters.
To generate a custom Renewal Notice
To enter user-defined overlay text, you may need to customize a renewal format to print merge fields from a customer's demographic data or to modify or add an available printing option. User-defined text that exceeds 255 alphanumeric characters must be specified here.
Follow these steps to generate a custom Renewal Notice for your organization:
- Select Utilities > Report Specs.
- Select the Dues Renewal Notice to customize.
- Click Clone.
- Tab to the Title field and enter a unique name.
- Click Parameters.
- Tab to the Options field and add or remove available options. Available options vary from format to format. The two primary renewal notice options include the following:
- SUPPRESS_ZERO_ITEMS - Suppresses printing line items that have been paid off or that have a zero balance. This option suppresses individual zero balance line items when the grand total of the renewal notice is nonzero.
- PRINT_CHECKBOX - Displays checkboxes on the renewal form stub in which a customer/subscriber can choose items to pay (an optional addition that is not part of the standard option set).
- Tab to the Parameters field and enter the text to be printed on the renewal notices. To print your organization's name and address, enter the name and address in the Parameters field. The organization name and address will not automatically print as they do on some invoices and bills from other iMIS modules.
The Report Specifications window opens.
Note: If you are cloning one of the DUES-Renewal Notices-Std. Form ASI-### reports, you may need to adjust the top and left margins to print the renewal notice correctly on your printer. To change the margins, select Options > Margins.
>The Detail Report Parameters window displays the current parameters for the report you cloned.
The entered text overlays the standard report elements. Therefore, add hard returns (by pressing Enter) to shift text down the page far enough to avoid the preset report elements on the form.
In the following example, three additional merge fields [Temp.Item1], [Temp.Item2], and [Temp.Item3] have been included in the overlay text. Use the following instructions to define merge fields.
Example of parameters changed on customized renewal format
- Click Options and select Additional Fields to open the Additional Fields window.
- Enter a formula or field name that corresponds to the merge fields entered in the Parameters field on the Detail Report Parameters window. Tab to each Field Name row and continue entering the data that will be merged with the overlay text entered in the Parameters field. A field can reference data contained in the Name, Name_Fin, Subscriptions.BILL_DATE, or any user-defined table. You can enter up to five additional fields in the notice by selecting Options > Additional Fields. Field names must be entered in the Filename.FIELDNAME format. For example, Name.INFORMAL brings in the informal nickname from the Name file.
- Click OK to close the Additional Fields window.
- Click Save to close the Detail Report Parameters window.
- Click Save to close the Report Specifications window.
- Select the cloned report title from the Forms drop-down menu on the appropriate billing cycle.
- Test the renewal notice.
Note: The formula or field name entered in the first row must correspond to the [Temp.Item1] overlay text entered in the Parameters field on the Detail Report Parameters window.
Note: All calculations must be prefixed with @# where # represents the number of the field (1-5). Field names do not need to be prefixed.
Note: If you enter an SQL calculation for a field, you might be prompted: Invalid Omnis calculation: proceed anyhow? Click Yes and ignore the warning.


To add user-defined text to the Dues Renewal Notice
The Dues Renewal Notice is a standard laser printer renewal notice format that prints the line items in the upper right corner and at the bottom in the remittance stub area. The middle of the renewal format is reserved for user-defined text.
- Select Utilities > Reports Specs to display the Report Specifications window.
- Clone the format.
- Click Parameters.
The Detail Report Parameters window opens. User-defined text can be entered in the Parameters field.
Note: The title, Renewal Notice, cannot be changed. Billing and reminder notices text, entered in the Set up billing cycles window, is ignored with this renewal notice format.
Note: The standard options set in the Options field of the Detail Report Parameters window includes SUPPRESS_ZERO_ITEMS, but PRINT_CHECKBOX is an optional setting that is not included in the standard options set.
To add user-defined text to the Dues Renewal Notice - List Bill
The Dues Renewal Notice - List Bill is a plain-paper laser printer format designed for printing list bills in which the line items for multiple individuals or branches are all listed and totaled on one continuous bill to the BT_ID (bill to ID) or main company. This format may be used when individual or branch billing is billed to the parent company or for agency subscription billings.
- Select Utilities > Reports Specs to display the Report Specifications window.
- Clone the format.
- Click Parameters.
The Detail Report Parameters window opens so that user-defined text can be entered in the Parameters field.
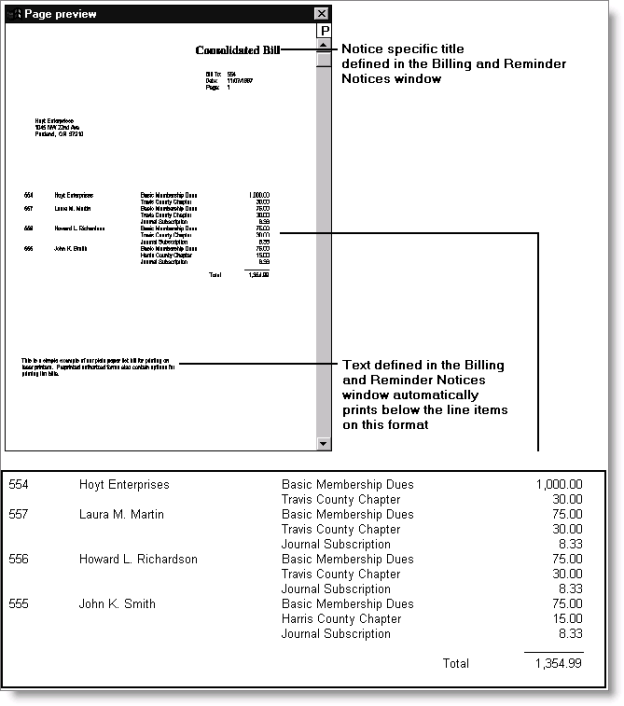
Billing and reminder notices text is formatted to print immediately below the last line item printed. The bolded title prints in the upper right corner.
The following illustration shows a simple list bill example where the billing line items for the main company, as well as for the individual customers who work for that company, appear on a single combined bill addressed to the company. In a combination bill like this, the line items that belong directly to the billed company will sort to the top of the list, as shown in the example.
Note: The standard options set in the Options field of the Detail Report Parameters window are SUPPRESS_ZERO_ITEMS and SUPPRESS_CHECKBOX.

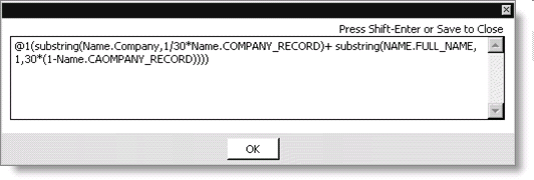
The first Additional Fields area, which can be modified, controls the printing of the individual or branch name. The default is set to print the full name for an individual or the company name for a branch.
Note: You can access the Additional Fields window by selecting Utilities > Reports Specs, cloning the format, clicking Parameters, and selecting Additional Fields from the Options drop-down menu.
This default formula is designed to print the company name if the customer or subscriber is a company. If the customer is an individual, the individual's full name prints.

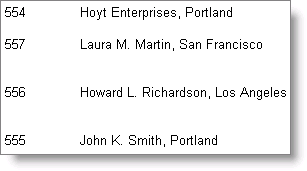
The following is an example of how to modify the above formula to add the city next to the customer's name.

More:
Example of the Dues Renewal Notice with Reminder Text
Example of the Dues Renewal Notice - No Remittance Stub
iMIS-authorized Renewal Notice formats