System Setup (File menu)
The System Setup provides configuration options for a variety of iMIS features. You enter the license information here when you install iMIS for the first time, and you may need to modify the license information if you purchase additional iMIS modules or upgrades.
In addition to modifying the license control, the System Setup window is where you set Organization Names and SQL Security.
System Setup window
From File, select System Setup
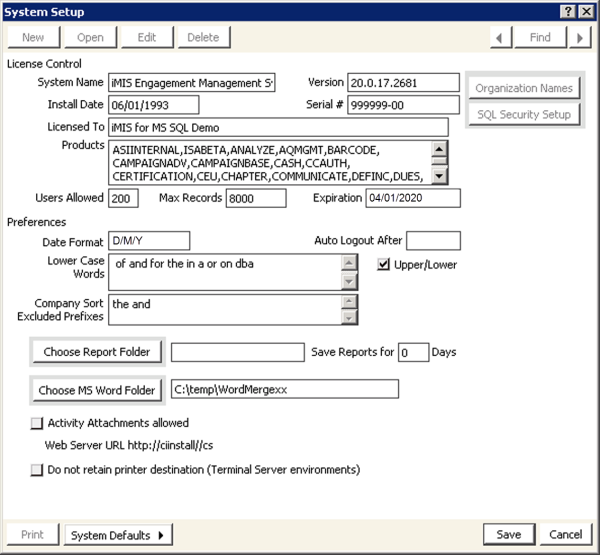
License Control
The following information should be entered from the data on the license sheet that accompanies an order.
- System Name – The title you want displayed on the main iMIS window
- Version – The current version of iMIS installed
- Install Date – The date the current version was installed
- Serial # – The iMIS serial number provided on your System Setup sheet
- Licensed To – Company name in which iMIS is licensed
- Products – The list of current features installed
- Users Allowed – The number of users allowed to access iMIS at one time
- Max Records – The maximum number records allowed for the license
- Expiration – The license expiration date
Organization Names
Opens the Organization Names window where you can enter logos and addresses for each organization. This is also where the taxation method for the organization is selected.
SQL Security Setup
Opens the SQL Security Setup window where you can set database passwords.
Preferences
- Date Format – (defaults to D/M/CY) If needed, override the default date format.
- Auto Logout After – Specifies a time, such as the end of your normal business hours, when you want iMIS to automatically log out any logged-in but inactive users. The logout will not interfere with users in the middle of actions or procedures in iMIS; rather, it waits for a period of inactivity (no keystrokes, mouse movements) before logging off the user. Those wanting to work later that this “auto logout” hour can log back in and work undisturbed.
- Lower Case Words – Specifies a list of words that you do not want capitalized
- Company Sort Excluded Prefixes - The list of prefixes to ignore when sorting company names, which can include prefixes in foreign languages.
- Upper/Lower – Select this option to allow iMIS to automatically apply capitalization rules to name and address fields so that the text appears in Title (upper and lower) case. When you enter text into these fields, iMIS will capitalize the first letter of each word, except for the words listed in the Lower Case Words field. For example, if you entered “the university of texas at austin,” iMIS would format it as The University of Texas at Austin.
- Choose Report Folder – Used to enter the location where stored Crystal reports are saved and accessed through the Print Manager (File > Print Manager).
- Save Reports for __ Days – Specifies the default number of days to store Crystal reports in the Print Manager. If a different period is specified in the Detail Report Parameters window of the report, the days set in the report overrides the System Setup.
- Choose MS Word Folder – Used to enter the location where MS Word templates are stored and accessed.
- Activity Attachments allowed – Select this option to enable the activity attachment feature that enables you to attach a file to an activity record and save it to the iMIS database. For example, you can attach a Microsoft Word document, PowerPoint slide presentation, spreadsheet, graphic, e-mail file, or HTML page. Once the file is saved to the iMIS database, you can open it on your system using the associated application and view, modify, or delete it from within iMIS.
- Web Server URL – Specifies the URL of your iMIS application server.
- Do not retain printer destination (Terminal Server environment) – Select this option if you do not want iMIS to store the path to your default printer in the database (for example, if you access iMIS through a Terminal Server or Citrix connection that may append a network identifier to the path to your default printer, causing iMIS to designate your printer setting as invalid), you can select the Do not retain printer destination (Terminal Server environments) option on the System Setup window (select File > System Setup). When you enable this option, iMIS does not save the path to your default printer destination to the database. You will still be able to print to your default printer when you select the Printer option on the Report Destination window. If when starting a subsequent session iMIS detects a conflict with your printer setting (for example, if you select a different default printer), an error message will display and you will be able to select a valid printer. You can also click the Reset All button to clear any existing report destination values.
- Help bar on – A dynamic, field-specific help line in the status bar at the bottom of the iMIS main window displays. This option must be enabled for the status bar to display. For example, when the cursor is positioned over the Joined Date field of the Name Maintenance window, the status bar displays Date membership began as additional information to help you know what to enter in the field.
- Show help codes – Internal help codes display the associated iMIS table and columns. For example, when the cursor is positioned over the Join Date field in the Name Maintenance window, the status bar displays the Name.JOIN_DATE.
Note: You must have a default printer specified on your workstation to access the Print Setup (select File > Print Setup) and Report Destination window.
System Defaults button
Used to Change Font Tables and access Help Options menu items.
When the Help Options menu item is selected, the Help Options window opens where you can select (enable) or deselect (disable) the following options:
More:
Modifying license configuration
Defining the date/time format for iMIS
Changing the font table
Support for foreign language characters
Organization Names window
SQL Security Setup window
Specifying a folder for Letter System templates
Activity record file attachments