Last updated on: June 23, 2026
The Opportunity Administrator performs module set up tasks:
- Planning the implementation: This critical step can be completed with stakeholders throughout your organization. Thorough planning will result in a shorter startup time and a more effective tool for users.
- Installing Process Manager: The administrator creates the “building blocks”, including action plans, group roles, queries, and reports, for users to apply and modify.
- Tailoring Process Manager: The administrator adds or modifies attributes to meet the unique requirements of your organization.
In This Article
Planning implementation
The success of your Process Manager installation lies in the planning. By planning carefully, you can make sure Process Manager helps your staff work efficiently and effectively. The planning step is the most important part of the implementation, resulting in:
- A smooth startup
- Correct security access to sensitive data
- Appropriate processes for each prospect and situation
- Useful communications and reporting
The planning process:
- Identify the general types of projects your organization encounters and what is unique about each type.
- Determine the specific roles and responsibilities required for each project type.
- Build action plans that embody the best practices of your organization, including communications and reporting needs.
Tips for implementation planning:
- Focus on building relationships, not on data entry.
- Clearly identify your prospect/donor types and the different methods your organization will use to build relationships with each group.
- Draw a map of the players involved. Note the communications and reporting needs of each player.
- Consider how you will process a won opportunity. Build the handoff into your plan and be sure the transactions that are generated (orders, events, donations) will be handled correctly.
- Establish naming conventions to help organize projects, documents, and reports. A unique prefix for each department might be appropriate for your organization.
Identifying process types
By defining one or more process types, the Opportunity Administrator provides templates for Opportunity Managers to create new opportunities quickly. You can create a process type for each action plan, for each type of prospect, for specific reporting requirements, or whatever criteria best meets the needs of your organization.
Process type concepts and terms
- A process type is a category of projects that has a unique set of processes. Process types include information about:
- Default action plan
- The action plan most often used for this process type.
- Default owner
- The most likely owner of this process type.
- Opportunity Class
- A combination of standard data elements and structure that specify what data should be recorded about the opportunity.
- Default Opportunity Classes (Donor, Member, Sales) are provided in iMIS. You can build additional Opportunity Classes that meet the unique needs of your organization.
Tips for planning process types
- Structure process types to optimize the time it takes to set up data entry and reporting for an opportunity. You might create a process type based on geography or type of prospect, for example.
- Create a new process type when you need a new strategy to develop a new prospect group or when data entry and reporting needs are very different for different areas or prospects.
Process types example: Non-profit organization
In this example, our non-profit organization has current members and donors. In addition, non-members purchase conference proceedings and books. The default process types are sufficient for our process.
| Process Type | Default Action Plan | Default Owner |
|---|---|---|
| Donor | Donor Giving | Director of Fundraising |
| Member | Annual Conference | Director of Events |
| Sales | Publications | Director of Publications |
Attaching document templates to a process type
You can attach multiple document templates to a process type. Each new project created from the project type contains its own unique copy of the attached documents, which you can edit as needed for the project.
Note: You can attach only documents that are locally saved on your computer. For this procedure, do not attempt to specify documents that are located in iMIS folders.
Attaching document templates to a project type
Do the following to attach document templates to a project type:
- Go to Marketing > Process Manager > Settings.
- Ensure that the documents to be used as templates for the project type are locally saved on your computer.
- (Process Types tab) Click select to select a project type, or click Create Process Type to create a new project type.
- (Documents tab) Select New, and then select the type of file that you want to upload.
- Click in the Select file field. A file selection window is displayed.
- Browse to the file that you want to upload and click Open.
- (optional) In the Description field, enter a short description of the document template.
- Click Upload. The uploaded document is listed in the project page.
- Repeat this process for every document template that you want to attach to this process type.
- Click Save.
Note: If the file Type that you choose does not match the file extension (for example, .doc for an MS Word Document), the upload will fail.
Determining roles and responsibilities
Identify the participants who will be involved in the life of a project. Understanding the different roles and responsibilities gives you the information you need to set up security, data collection, and reporting for the module.
The roles you will set up for Process Manager are:
- Project security roles, which govern access and control
- Project group roles, which specify responsibilities
Project security roles
Assign each participant to one of the security roles specific to Process Manager:
- Opportunity Administrator: A user who sets up and tailors Process Manager.
- Opportunity Manager: A user who creates projects and specifies owners, action plans, and tasks. A person with this role has full control over projects created by anyone else.
- Opportunity Creator: A user who creates projects and has full control over projects that they create, but has no access to projects created by anyone else.
- Opportunity User: A user who has read-only access to projects.
Project group roles
When creating projects, you assign each participant to one of these general roles provided by the system:
- Primary Contact: The target person to be contacted for the successful outcome of a project.
- Opportunity Owners: The group of users who are eligible to be Opportunity Owners (responsible for a project's success). A user must be a member of this pool in order to be assigned as owner to any individual project.
- Contact: A participant who is associated with the project, but does not necessarily own its ultimate success.
- Competitor: A company or entity that competes with the organization for the project. Typically this role is only used for sales business scenarios and not for fundraising or membership drives.
If you need more specific roles, you can assign each participant in a group to a descriptive role or roles. For example, the Opportunity Owners group might include:
- Sales Directors and Sales Representatives
- VP of Major Gifts and Major Gift Managers
Or they might include other job titles specific to your organization, for which you would need to create project group roles. These roles are custom roles you create using Process Manager.
You can automatically create group owners for projects using relationships. If you set up a SALES or RM (Regional Manager) relationship for a project's primary contact, they are automatically group owners. Owners belong to a security group that can gain access to certain areas based on how you set them up to access the system.
Another relationship creates a project owner, the MB (Managed By) group also creates a Sales Manager group owner. If you need to create more relationships that create group owners automatically, you can update the string parameter "OpportunityDefaultOwnerRoles" in the SystemConfig table. The current string is: 'Salesperson!<solicitor>!SALES,Sales Manager!MB,Regional Manager!RM'. Additional relationships can be added by adding ,[Role Name]![Relationship Name] to that configuration string.
Associating personnel with prospects
Before iMIS can associate personnel with new projects based on the designated prospect, you must set up customer relationships in iMIS, which consists of two steps:
- Set up sales and management relationship types.
- Associate sales persons or managers with prospects.
To set up sales and management relationship types, do the following:
- Go to Settings > Contacts > Relationship types.
- Check the current Relationship Types and ensure that the following codes are defined:
- Relationship Type: SALES
- Description: Salesman
- Relationship Type: RM
- Description: Regional Manager
Tip for planning roles and responsibilities
Make sure all personnel who are eligible to be the owner of a project are included in the Opportunity Owners group. Future additions must be done by the Administrator, not by Opportunity Managers, Opportunity Creators, or Opportunity Owners.
Roles examples
The following examples show how you might set up roles and responsibilities within Process Manager for your organization.
Roles example: A capital campaign drive
After the IT Manager sets up the Process Manager system, the Capital Campaign Director identifies new projects and assigns Development Officer #1 to be the owner of the new project. The Development Officer communicates with prospects and contacts. The Campaign Assistant creates projects when the Campaign Director is out of the office and provides reports to upper management.
Based on this scenario, the following project security roles and project group roles are assigned to the participants:
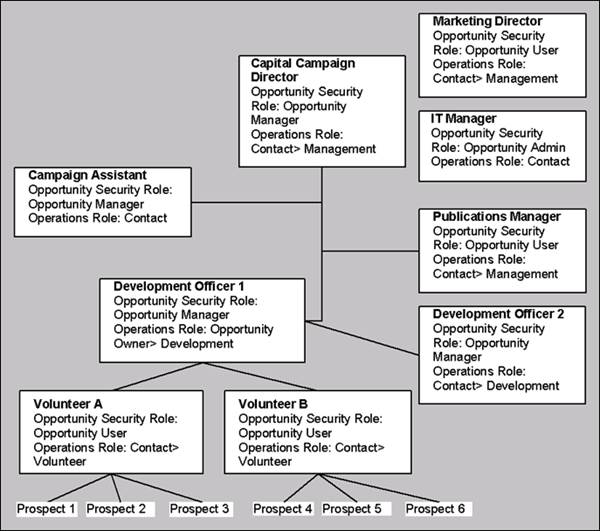
The communications and reporting needs for these roles might include:
| Role | Communication Needs |
|---|---|
| Capital Campaign Director | Opportunity Forecast Donor report |
| Campaign Assistant | (Runs all reports) |
| Publications Manager | Email notification of project status |
| Development Officers |
Opportunity Profile Email notification of project status |
| Volunteers |
Email training materials Task report |
| Prospects |
Mail brochure Email promotion information |
Roles example: A sales department
In this example, the System Administrator sets up the module. The VP Sales assigns projects by region. The Regional Sales Manager #1 and Sales Rep A are both responsible for the success of the project (Opportunity Owners) but play different roles in the process. Contacts are other Sales Managers. There are two Competitors in this example.
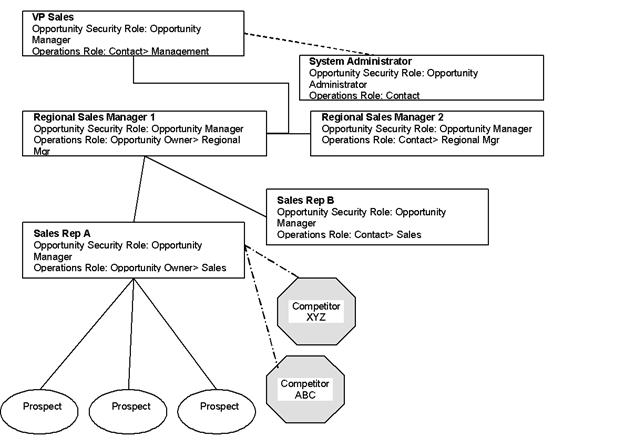
The communications and reporting needs for these roles might include:
| Role | Communication Needs |
|---|---|
| VP Sales | Won or Lost Opportunity Analysis |
| Regional Sales Managers |
Won or Lost Opportunity Analysis Email notification of project status |
| Sales Reps |
Opportunity Profile Task List |
| Prospects |
Mail brochure Email promotion information |
Building action plans
Action plans are a workflow management tool. The Opportunity Administrator defines one or more default action plans that are available to Opportunity Managers. The managers create new projects, choosing from the default action plans and modifying them, if necessary, for the unique situation.
Concepts for action plans
- Action plans - Pre-defined tasks that take place in a certain order and in a specific time frame. Action plans are made up of stages. Stages contain tasks, notes, and email notifications.
- Stage - A major milestone in the project. A stage can include tasks, notes, and email notifications. Project status and win probability can be updated automatically at each stage completion, or manually at any time.
- Task - A minor milestone in the project. Users open tasks, update them with comments, and mark them completed. Completing tasks advances the action plan as long as all notes are completed for the task.
- Notes - Notices to internal staff that are predefined when creating an action plan. Notes have no time line designation and must be marked complete to advance the action plan.
- Email notification - Email messages are sent to the designated owners at the start of a stage, so if you want Process Manager to send an email message when stage 2 is complete, then put the email notification at the beginning of stage 3.
- Stage - A major milestone in the project. A stage can include tasks, notes, and email notifications. Project status and win probability can be updated automatically at each stage completion, or manually at any time.
Action plans advance by:
- The completion of all tasks and notes within a stage.
- Manual intervention to change the action plan or to bypass one or more tasks/stages.
An action plan stage that lacks at least one task or one note does not advance to the next stage. Therefore, you should attach at least one task or one note to each stage so that the action plan continues to advance. This design means that the action plan defines “best practice” and enables users to work within that best practice for the needs of the prospect.
Tips for developing action plans
- Notifications can be sent at the end of each stage, so make your stages large enough that stakeholders are not inundated with minor notifications.
- Make sure each task serves a purpose. Be realistic about task due dates.
- Use notes carefully. They are an excellent instructional tool, but action plans cannot be advanced until the note is marked complete.
- Discuss what events might require an alternate plan: fast track, bypass a stage, stop the action plan.
- Determine industry standards and use those as your guide.
Action plan example: Sales action plan
This example shows a possible action plan for selling a new product to existing customers. First, we define the stages of the plan:
| Stage | Description | Win Probability | Change Status to |
|---|---|---|---|
| Qualification | Process to qualify prospect | 0% | Relationship Building |
| Relationship Building | Calls and customer visit | 0% | IT Briefing |
| IT Briefing | Customer visit | 25% | Custom Demonstration |
| Custom Demonstration | Present a customized demo to staff | 25% | Executive Meeting |
| Executive Meeting | Address executive issues | 25% | Web Strategy Meeting |
| Web Strategy Meeting | Present web strategy | 25% | Competitive Review |
| Competitive Review | Review and discuss product vs. competition | 50% | Proposal Presentation |
| Proposal Presentation | Prepare and present proposal | 75% | Contracting Process |
| Contracting Process | Confirmation of award | 100% | Complete |
Next, we define the tasks for each stage:
| Stage | Task | Description | Owner | Day | Duration |
|---|---|---|---|---|---|
| Qualification | Initial Overview Meeting | Review of Information Process | Sales Manager | 0 | 1 |
| Prospect Profile | Complete profile | Sales Rep | 0 | 1 | |
| Evaluation Plan | Complete and distribute plan | Sales Manager | 1 | 1 | |
| Process Signoff | Letter confirming mutual interest. | Sales Manager | 2 | 1 | |
| Relationship Building | Questionnaire | Call prospect and ask questions about organization needs | Sales Rep | 3 | 1 |
| Pre-demo Survey | Complete survey | Application Engineer | 4 | 1 | |
| Pre-meeting Checklist | Complete checklist | Sales Rep | 4 | 1 | |
| Customer Visit | Local on-site customer visit | Sales Rep | 5 | 1 | |
| IT Briefing | IT Preparation | Prepare for IT briefing | Product Manager | 7 | 2 |
| IT Briefing | IT and Product Management briefing Present Buy or Build concept | Product Manager | 9 | 1 | |
| Custom Demonstration | Prepare Demo | Customize demo to prospect | Sales Rep | 10 | 2 |
| Custom Demo Meeting | Present solution to staff | Sales Rep | 12 | 1 | |
| Executive Meeting | White Paper | Present white paper to execs | Sales Manager | 14 | 1 |
| Executive Briefing | Meet with executives | Sales Manager | 16 | 1 | |
| Web Strategy Meeting | Prepare Web Strategy | Prepare presentation for meeting | Sales Rep | 12 | 2 |
| Web Meeting | Present web strategy to staff + IT | Sales Rep | 14 | 1 | |
| Competitive Review | Competitive Review | Read recent competitive information Prepare for discussion | Sales Rep | 13 | 1 |
| Competitive Meeting | Meet with decision maker to discuss advantages of product | Sales Rep | 14 | 1 | |
| Proposal Presentation | ROI Analysis | Prepare analysis | Sales Rep | 17 | 1 |
|
Proposal Prep |
Prepare proposal | Sales Rep | 15 | 3 | |
| Proposal Presentation Prep | Prepare presentation | Sales Rep | 17 | 1 | |
| Proposal Review | Onsite proposal review meeting | Sales Rep | 18 | 1 | |
| Proposal Follow-up | Answer outstanding questions, contact participants | Sales Rep | 19 | 3 | |
| Contracting Process | Legal Review | Prepare legal documents | Counsel | 17 | 2 |
| Win | Confirmation and signing of documents | Sales Rep | 22 | 1 |
Mapping action plans
Mapping out the action plans for your organization before you implement Process Manager helps you build action plans quickly and correctly.
- Interview stakeholders to determine what processes your organization uses and what are considered “best practices.”
- For each action plan, map out the stages (high-level view) of the process. Specify the win probability for each stage and the change in project status when each stage is complete.
- Plan the detailed tasks within each stage. Assign relative start dates and the duration of each task.
- Determine if notes should be attached to tasks. Be aware that notes are not included in the task list and must be accessed separately.
Process Manager: Set up module
Before implementing Process Manager, make sure you have completed all the planning steps recommended. You must have Process Manager or System Administrator privileges to set up Process Manager.
We highly recommend that you build a prototype first in a test environment and later in a live environment. This gives you the opportunity to check that all test examples (role members, security groups, process engines, and users) have been removed from the system before going live.
To implement Process Manager, you will:
- Assign users to project security roles.
- Create or edit process types, if needed.
- Create default action plans.
- Set up output processes and reports.
Note: If you have configured iMIS for SQL server sessions, the Process Manager module and all of its components are unsupported. If you plan to use this module, disable SQL Server Sessions.
Setting up security for Process Manager
When a new project type is defined, the Grant Project Access list for the project type automatically contains every iMIS user who is a member of the following security groups at the time of creation:
- OpportunityAdmin – Sets up and tailors Process Manager.
- OpportunityMgr – Creates projects and specifies owners, action plans, and tasks. A person with this role has full control over projects created by anyone else.
- OpportunityCreators – Creates projects and has full control over projects that they create, but has no access to projects created by anyone else.
- OpportunityOwners – Edits only assigned projects.
- OpportunityUsers – Has read-only access to projects.
When a new project type is defined, the Grant Project Access list for the project type automatically contains every iMIS user who is a member of the first four Opportunity security groups at the time of creation. Similarly, if you define a new user record and assign the new user to one of these security groups, that user is automatically added to the Grant Project Access list for every existing project type.
Project administrators can restrict each project type to a specific Grant Project Access list of users who have permission to create projects from that type. This allows for one type of process (such as Sales or Major Gift) to be secured from users who manage events or review grant proposals.
Assigning users to project security-related groups
Project security-related groups specify levels of access and control for individual projects.
All users must have an individual contact record, an email address in their contact record, and an up-to-date user record and password in their authentication record.
Do the following to assign users to project security-related groups:
- Go to Marketing > Process manager > Settings.
- (Security Groups tab) Select the security-related group (see Determining roles and responsibilities).
- Select each user to be added to the group. The user's name appears in the Current Members list.
- Click Save.
Creating and editing process types
Use the process types (see Identifying Process types) feature to efficiently set up similar types of projects. You can create a process type for each action plan, for each type of prospect, for specific reporting requirements, or whatever criteria best meets the needs of your organization.
Creating process types
Do the following to create process types:
- Go to Marketing > Process manager > Settings.
- (Process Types tab) Click Create Process Type.
- Define the process type:
- Enter the Name and Description of the process type.
- Select the Process Class and Default Action Plan.
- Browse to select the Default Owner for this process type. The default owner must be a member of the Opportunity Owners group.
- (optional) Enter or select the default Owners Roles and Contacts Roles.
- (optional) Enable the Allow Competitor References option.
- Click the browse icon to Grant Project Access:
- In the Groups Properties window, enter the Name and Description.
- Select or Add members to the group.
- Click Save.
- Click Save.
The Setup Groups page
To edit groups for use in the Owner Roles and Contact Roles assignments, select Process Mgr > Settings > Process Types. Select an existing Process Type, then click the browse button next to Grant Project Access. Groups are created when you create a new Process Type. From the Grant Project Access window, you can add or remove group members.
Creating multiple projects
As an Administrator, you can configure an output process to create multiple projects so that it creates a project for each primary contact identified by a query associated with the project process output. For example, you might want to identify contacts who respond to an initial request and, therefore, warrant additional one-on-one marketing efforts.
A Process Manager Administrator can create multiple projects by defining, editing, or selecting a query and an project process output. If you are licensed for Campaign Management, you can also associate a source code with the projects.
Creating multiple projects from Process Manager
Do the following to create multiple projects from Process Manager:
- Go to Marketing > Process manager > Settings > Project Process Outputs.
- Select New > Project Process Outputs.
- Use Save As... to copy an output process or create a new one:
- (Definition tab) Enter the Name and (optional) Description.
- From the drop-down list, select the Type.
- Browse to select the Query.
- (optional) If you are licensed for Campaign Management, browse to select the Source Code.
- Click Save and select the location or use the default location.
- Click OK.
- Select the new Project Process Outputs.
- Click Run. A message is displayed noting that the process has been submitted or indicating an error.
A new project is automatically generated for each primary or key contact identified by the query. Every time you run the output process, it generates projects. To avoid creating duplicate projects, be careful not to run the same query and the same project process output engine more than once, or, ensure that your query is excluding already opened projects.
About defining action plans
Opportunity Administrators can define one or more default action plans that are available to Opportunity Managers. The managers create new projects, choosing from the available action plans and modifying the plans, if necessary, for the unique situation.
If you want to provide the option of creating projects with no action plan, define an empty action plan named “None.”
Action plans are made up of stages (major milestones) which are made up of tasks (minor milestones), email merges, and notes. Action plans are defined with the following workflow:
- Define the action plan.
- Define stages for the action plan.
- Add tasks to the stages.
- Optionally, add notes to the stages.
- Optionally, add email notification to the stages.
- Save the action plan and use it to mark progress through each stage.
Copying action plans
You can save a copy of an action plan, change its title, and modify the copy.
Note: You must select new assignees if you change the action plan's related process type, because the list of available assignees for tasks and email notices is based on the related process type. Each time you change an action plan's process type and click Save, the assignee lists are cleared and must be reassigned.
Saving a copy of an action plan
Do the following to save a copy of an action plan:
- Go to Marketing > Process manager > Settings.
- (Action Plans tab) Select the action plan that you want to copy.
- Click Save As. A new copy of the action plan is created with the name Copy of original Action Plan.
- Change the name and description of the new action plan.
- Click Save.
- If you changed the action plan's process type, check the Assignee list for every task and email notification in the action plan to ensure that a valid assignee from the new process type is assigned.
- Click Save.
Note: You must click Save to set the related process type before you specify assignees, because the list of available assignees is based on the related process type.
Setting up reports and output processes
iMIS Reports and Output Processes tools give you the power to optimize communications within your organization and with outside contacts. The output processes use the current iMIS database and can be exported to a variety of output formats. Use the Reports and Output Processes tools to:
- Create and manage custom business data
- Use queries and business objects to generate output
- Customize reports
- Assign folder and document security
Your iMIS administrator and users, with the proper security roles, (see Security administration) can create template reports and output processes (see Understanding reports and output processes). After these are built, your staff can use these to generate reports and email messages, send MS Word letters to contacts, and export data to Excel spreadsheets or other analysis tools without detailed knowledge of database structure or report configuration.
Email merge fields for projects
Three read-only reporting business objects allow you to include the current opportunity, prospect, and assignees in an email merge output process (see Understanding reports and output processes):
- OppDonorContact
- OppMemberContact
- OppSalesContact
You can use fields from these objects in an email template and its corresponding selection query. Make sure to use the tablename.fieldname format (OppSalesContact.ProspectName), not the view name format (vBoOppSalesContact.ProspectName).
To allow the user to link directly to the opportunity from the email they receive, include the following link code:
http://{webserver}/iMIS/Admin/iMIS.web.ProcessMgr.Processmanagement/iMIS/ContentManagement/Template.aspx?ContentCode=OM.OpportunityList.?hkey=[OppDonorContact.Project Key]
where {webserver} is the name of the .NET server.
OppDonorContact can be OppDonorContact, OppSalesContact, OppMemberContact
Output process example: email message
The following example is a simple new opportunity email notification to the Opportunity Owner.
Dear [OppSalesContact.Name],
The [OppSalesContact.OpportunityId] opportunity has been assigned to you.
The prospect's name is [OppSalesContact.ProspectName].
Customizing Process Manager
You can customize Process Manager to best meet the needs of your organization and your users:
- Create and edit query results displays
- Modify security settings
Please contact your Authorized iMIS Solution Provider for information on adding and modifying attributes for further customizing of Process Manager.
Editing query result displays
Use IQA to create and edit queries that filter and sort data from the iMIS database. Then, edit the results displays to best meet the needs of your users.
Query results displays are identified by a green background color for headings. The following folders contain queries used by Process Manager that are appropriate for editing. Folders not listed contain system files and we recommend that you do not edit those queries.
| Folder | Path to Display | Possible Additions to Displays |
|---|---|---|
| ActionPlanList | RiSE > Intelligent Query Architect > $/OpportunityManagement/DefaultSystem/Queries | |
| ActivityList | RiSE > Intelligent Query Architect > $/OpportunityManagement/DefaultSystem/Queries | |
| AllOppTaskList | RiSE > Intelligent Query Architect > $/OpportunityManagement/DefaultSystem/Queries |
Overdue tasks Upcoming task due dates Comment field on task display |
| OpportunityTaskList | RiSE > Intelligent Query Architect > $/OpportunityManagement/DefaultSystem/Queries |
Opportunities with upcoming tasks Opportunities with overdue tasks Contains the same queries as AllOppTaskList, but OpportunityTaskList involves tasks for a particular Opportunity rather than all Opportunities |
| HistoryList | RiSE > Intelligent Query Architect > $/OpportunityManagement/DefaultSystem/Queries | |
| OpportunityList | RiSE > Intelligent Query Architect > $/OpportunityManagement/DefaultSystem/Queries |
Projects with overdue tasks Project task due dates |
| OpportunityTypeList | RiSE > Intelligent Query Architect > $/OpportunityManagement/DefaultSystem/Queries | |
| RelatedOpportunityList | RiSE > Intelligent Query Architect > $/OpportunityManagement/DefaultSystem/Queries |
Related opportunities in the primary contact's organization |
Creating a query results display
Do the following to create a query results display:
- Go to RiSE > Intelligent Query Architect > OpportunityManagement > DefaultSystem > Queries.
- Select New > Query.
- Enter a Name and a Description for the new query.
- (Sources tab) Select the sources for the query:
- Select the desired business objects. See the lists below for reference.
- Define the relationships between the business objects.
- (Filters tab) Define the filtering rules.
- (Display tab) Define the columns to be displayed in the output:
- Select the check boxes of the properties to be displayed.
- Click Apply.
- From the Order drop-down list, select the order the properties are to be displayed (left-to-right).
- Save the query in the appropriate folder.
Business objects for Opportunities
- Opportunity.OpportunityDonor by Opportunity.ID
- Opportunity.OpportunityMember by Opportunity.ID
- Opportunity.OpportunitySales by Opportunity.ID
Primary joins for Opportunities
- OpportunityType by Opportunity.OpportunityType = OpportunityType.UniformKey
- Contact by Opportunity.ProspectKey = Contact.UniformKey
- TaskItem.UniformKey = Opportunity.ParentUniformKey
Query example: Upcoming tasks display
This example shows how to define a query to display upcoming tasks for a specific Opportunity Owner on their home page.
- Go to RiSE > Intelligent Query Architect > OpportunityManagement > DefaultSystem > Queries.
- Select New > Query.
- Enter a Name and a Description for the new query.
- (Sources tab) Select the sources for the query:
- Select the desired business objects:
- TaskItem
- GroupMemberSummary
- User
- OpportunitySales
- Opportunity
- Define the relationships between the business objects:
- TaskItem.AssignedToKey = GroupMemberSummary.GroupKey
- GroupMemberSummary.UserKey = User.UniformKey
- GroupMemberSummary.GroupKey = OpportunitySales.OwnerGroupKey
- OpportunitySales.OpportunityId = Opportunity.Opportunity.Id
- Select the desired business objects:
- (Filters tab) Define the filtering rules:
- Select Property: User.Login.
- Select Comparison: Equal.
- Enter “Marc Risse” for the Value.
- Select Property: TaskItem.Completed On.
- Select Comparison: Empty.
- Select Property: Opportunity.Status.
- Select Comparison: Not Equal.
- Select Value: Closed.
- Select Property: User.Login.
- (Display tab) Define the columns to display in the output. Select the following columns and order:
- Opportunity.Uniform_Key
- Alias: key_Uniformkey (Order 1)
- OpportunitySales.Opportunity Id (Order 2)
- OpportunitySales.Description (Order 3)
- TaskItem.StartDate (Order 4)
- TaskItem.Category (Order 5)
- TaskItem.Due Date (Order 6)
- TaskItem.Subject (Order 7)
- TaskItem.Priority (Order 8)
- OpportunitySales.Quality (Order 9)
- OpportunitySales.WinProbability (Order 10)
- Click Save As and save the query in the Task List folder (Tasks > Default System > Queries > TaskList).
Customizing objects for Opportunities
To customize Opportunities, you might need to build new business objects or edit existing ones. These business objects are used to create queries, generate reports, and run processes.
Building new Opportunity Classes
Opportunity Classes combine standard data elements and structure to define data collection and reporting requirements. These are the default Opportunity Classes supplied with Process Manager:
| Opportunity Class | Data to be Collected |
|---|---|
| Common to all | Description, Expiration Date, Status, Created On, Updated On, ID, Current Action Plan Stage, Win Probability |
| Donor | Common plus Decision Date, Distribution, Quality, Response Media, Timing Probability, Actual, Potential |
| Member | Common plus Decision Date, Quality, Response Media, Subscription, Units, Timing Probability, Actual, Potential |
| Sales | Common plus Decision Date, Product, Quality, Response Media, Units, Timing Probability, Actual Sales, Potential Sales |
You can create new Opportunity Classes for the unique requirements of your organization. Each new opportunity class requires a business object and an SQL component:
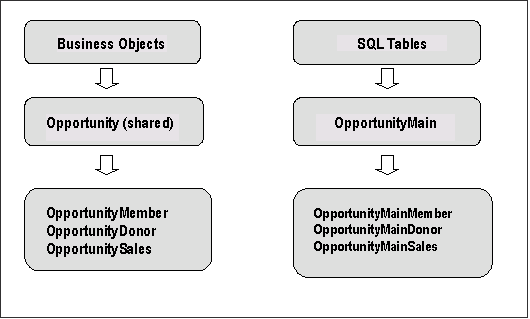
Creating an Opportunity Class
For details on the following procedure, see the Example: Building a Job opportunity class and type.
Do the following to create an Opportunity Class
- Open Microsoft SQL Server and create a new table, granting appropriate permissions.
- Open the Business Object Architect.
- Add the new table to the iMIS .NET framework.
- Specify the new Opportunity Class properties.
- Build a relationship between the new class and existing classes.
- Define lookups for the new business object.
- Edit the Opportunity Type to display the new opportunity class in the Process Manager Set Up Module.
- Build and publish the new business object.
Example: Building a job opportunity class and type
Do the following to build a job opportunity and class:
- Note and verify the following:
- OpportunityKey is a required field.
- Set permissions on the SQL table to select on the iMIS Group.
- Define OpportunityKey as the primary key on the SQL table.
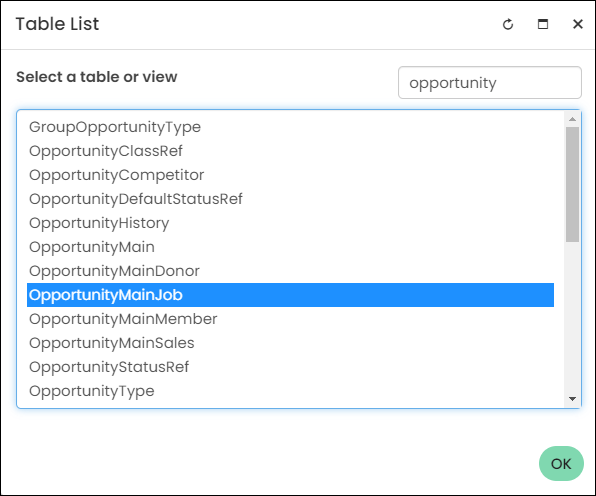
- In Microsoft SQL Server, create a SQL table called OpportunityMainJob that contains the fields to display in the opportunity:
- Create a new OpportunityJob business object by going to RiSE > Business Object Designer.
- Select New > Design Business Definition.
- (Definition tab) Enter OpportunityJob in the Name field.
- Click Browse.
- Select the Opportunity business object as a basis for the OpportunityJob business object.
- Click OK.
- Click Create Object. The business object is created and more tabs are available.
- Make the OpportunityMainJob SQL table part of the .NET framework:
- (Database tab) Click Add.
- Select the new OpportunityMainJob table.
- Click OK.
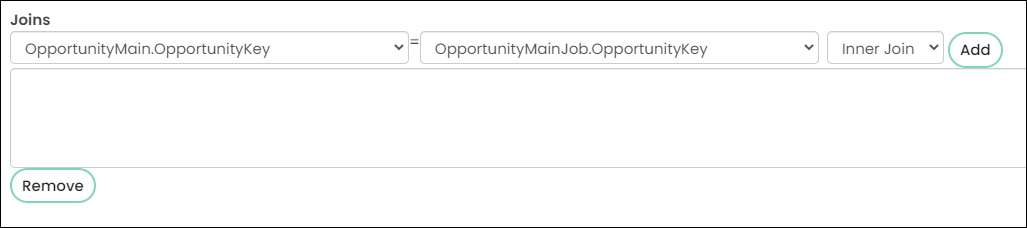
- Join the newly created table to the OpportunityMain table:
- In the Tables field, select OpportunityMainJob.
- In the Joins fields, select OpportunityMain.OpportunityKey and OpportunityMainJob.OpportunityKey.
- Click Add.
- Create a property for the columns you want to display:
- In the Available Columns field, select the item you want to add as properties, such as OpportunityMainJob.JobNumber. You do not have to select OpportunityMainJob.OpportunityKey. It is the required field that already exists in OpportunityMain.
- Click Add as Properties.
- Click Save.
- Customize the OpportunityJob display properties:
- (Properties tab) Refine the field displays and add the desired look-up values:
- The property name is pulled directly from the SQL table. Click the edit icon (small pencil) to modify any values.
- (optional) Convert field names to user-friendly labels, such as changing JobNumber to Job Number.
- Click Save.
- Click Compile. A progress message is displayed, followed by the message: Opportunity:Information: Compiled With No Errors.
- Click Close.
- Click Publish. A progress message is displayed, followed by the message: OppJobs:Information: Published With No Errors.
- Click Close.
- (Properties tab) Refine the field displays and add the desired look-up values:
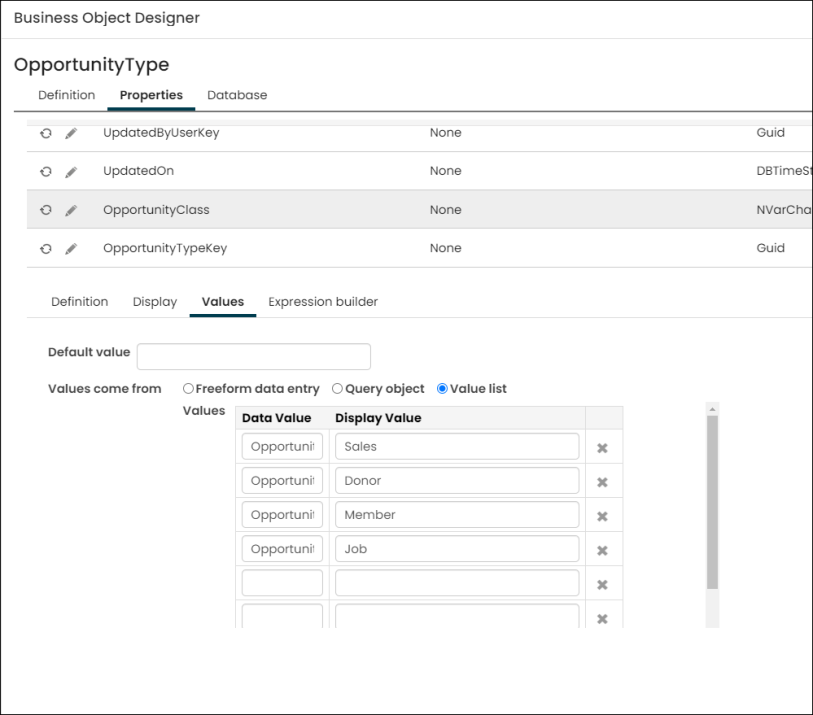
- Modify the OpportunityType business object:
- Open the OpportunityType business object.
- (Properties tab) From the Properties list, select OpportunityClass.
- (Values tab) Select Value List.
- In the Display Value field, enter Job.
- In the Data Value field, enter OpportunityJob.
- Click Save.
- Click Close.
- Click Publish.
- Create a new Process Type for OpportunityJob by going to Marketing > Process manager > Settings.
- Click Create Process Type.
- Enter a Name to define the opportunity type. Job is displayed in the Process Class list.
- Select Job.
- Click Save.
if exists (select * from dbo.sysobjects where id = object_id(N'[dbo].
[OpportunityMainJob]')and OBJECTPROPERTY(id, N'IsUserTable') = 1)
drop table [dbo].[OpportunityMainJob]
GO
CREATE TABLE [dbo].[OpportunityMainJob] (
[OpportunityKey] [uniqueidentifier] NOT NULL ,
[JobNumber] [int] NOT NULL )

Modifying task properties
Tasks in Opportunity Management action plans can be modified in the Business Object Designer.
Do the following to modify task properties:
- Go to RiSE > Business Object Designer.
- Select the task item.
- Click Edit.
- Edit the item.
- Click Save.
Modifying role-based security settings
The default group roles supplied with Process Manager are Prospect, Opportunity Owner, Contact, and Competitor. You can build additional group roles that better describe responsibilities within your organization and can assign those group roles to the appropriate participants.
Creating Opportunity group roles
Do the following to create Opportunity group roles:
- Go to Community > Security > Roles.
- Click Add a Role.
- Enter the information for the new role.
- Click Save.
Assigning Opportunity group roles
Do the following to assign Opportunity group roles
- Go to Community > Security > Users.
- Search for the user record.
- Select the user. The User Definition page displays.
- In the Roles section, in the User Information area, click add role.
- Select the desired role and click OK. The new role displays in the Roles list.
Specifying security settings for queries or reports
Each query or report must have a security setting to determine which users can view or edit the query.
Do the following to specify security settings for queries or reports:
- Go to RiSE > Intelligent Query Architect.
- Select OpportunityManagement > Default System > Queries.
- Select the query or report and click Edit. The Query Summary page is displayed.
- Click Security in the left nav.
- From the Access Mode list, select the mode.
- (optional) To change the permissions for a role:
- From the Access Mode list, select Custom.
- From the Select a Query list, select Roles.
- Click Find to display a list of roles.
- Select a role name to add it to the Current Access List.
- Click Save.