Last updated on: January 27, 2026
To use SSRS reports natively in iMIS, you work with three associated objects:
-
 Query — provides the data needed for the report. Optional and required parameters should be defined in the query (they will not be contained in the Reporting Services Template RDL file). Any IQA filters with no prompt will be added to the Reporting Services Template, with the value fixed to the value in the IQA query at the time the Reporting Services Template is generated.
 -
 Template (Reporting Services Template, the .RDL file) — provides the formatting to display the results, such as a matrix or pie chart. IQA uses a default template that you can generate from any query, either to save in the Document system or to export as an RDL, for editing and re-import. This RDL can also be used as a Standalone SSRS report.
 -
 Report (the runtime report, an iMIS output process) — binds the query and the template, sets the name, parameters, and security, and makes the report usable from a content item or list of reports.
You can generate a default table-based SSRS report just by using the Report command in IQA. Then you can export the report so that you can craft production-quality page layouts or add charting and graphing.
In This Article
- Using IQA to generate a SSRS report
Direct URL calls to run one-off reports
Example: Creating a Custom Report
Making report titles editable at runtime
Customizing headers in SSRS reports
Using IQA to generate a SSRS report
You can take advantage of the dynamic reporting feature of IQA to generate many of the reports you need, without using report editors:
- Go to RiSE > Document system.
- Browse to your query and choose Edit.
- Click Report to generate a report that is dynamically formatted using the settings you control through SystemConfig parameters.
- Under Options, select Save Report Definition to iMIS.
- Browse to the save location you specified and edit the outputs as needed:
- Reporting Services Template:
 , which exports as QueryName.rdl (SSRS)
 - Reporting Services Report:
 , which exports as Query Name and binds template to query (SSRS and IQA)
 - Create a content record with an SSRS Report content item to display your new report:

- In Page Builder > Manage content, open an appropriate folder to house your new report.
- From the toolbar, select New > Website Content.
- For Add content, open the Utility folder and select the SSRS Report content item.
- Configure the content item to point to the report (
 ) you just created.
 - Deploy the content into the site through a new navigation item, tagging, or other method.
For example, you might edit the report’s Parameters tab to hide the report’s parameters at run-time or to preset values (such as to make this report display Texas locations only).
Direct URL calls to run one-off reports
Content Management also supports direct calls to its reports from your web page code, so that you can create one-off reports you might need. This sample code for a Print Detail button on the Batch details page shows the process:
- Call a content item
(@/iMIS/Accounting/BatchDetailReport). - Pass it a parameter
(Batch Number)as a URL parameter.
protected void PrintDetailClick(object sender, EventArgs e)
{
Guid documentKey = DocumentSystem.DocumentKeyByPath("@/iMIS/Accounting/BatchDetailReport");

Document d = DocumentController.Document(documentKey);

Business.ContentManagement.Content content = Business.ContentManagement.Content.GetFromDocument(d);

string url = string.Format(CultureInfo.InvariantCulture, "{0}?&Batch Number={1}", content.GetNavigateUrl(), Batch.BatchNumber);

Response.Redirect(url);
}
Example: Creating a Custom Report
- Create new IQA query by either using Save As on an existing query, or creating a new query.
Note: If there is an existing standard report in iMIS that is similar or contains at least some elements of the report you wish to design, you can save some time by starting with the query that is used by that report. You can find the query associated with an existing report by selecting the report and clicking Edit in the top gray bar. This will open the report definition, where you can click on the Sources tab to see which IQA query the report uses.
Typically, the query will have the same name as the report, and can be found by opening the Queries folder that appears above the list of reports. You can select the query and click Edit in the top gray bar, which will open the query definition, where you can click Save As to create a copy of the query, and save it with a different name.
Note: Do not put slashes (/) in IQA names. Doing so will cause errors when importing. To avoid these errors, update all existing IQA queries with slashes in their name and update any content items or reports associated with the queries.
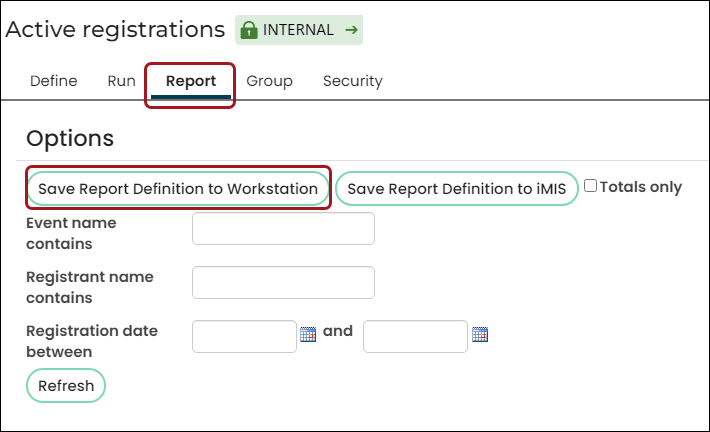
- Once you’ve created your new query and defined your sources, filters, display fields and sorting, save the Report Definition to your workstation. Do this by clicking Report in the left IQA menu and click Save Report Definition to Workstation.
- Launch SQL Server, and create a new project. Select the Report Server Project type, and name your project.
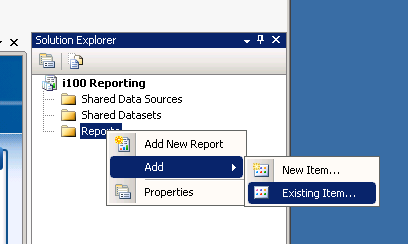
- Under the Solution Explorer, right-click on the Reports folder and select Add > Existing Item.
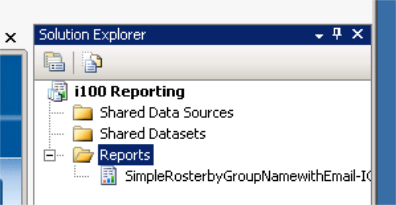
- Select the RDL file that you saved in Step 2 and click Add. Your report should now display in the Solution Explorer under the Reports folder.
- Right-click on your report and select View Designer. From here, you can modify the layout/design of the report.
Note: You will not be able to “preview” the report from here, since you have no connection to the SQL server/database.
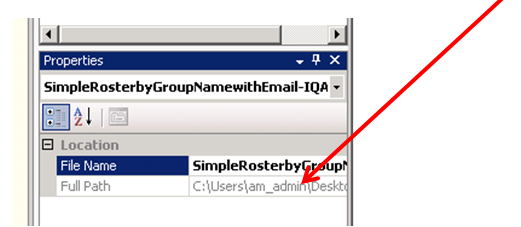
- When you are finished with the report, click File > Save Selected Items. Take note of the location of your revised report. The easiest way to find this is by looking at the Properties area underneath the Solution Explorer. It displays the full path to your revised RDL file.
- In your iMIS site, browse to the folder where you wish to save the RDL file. The simplest way to do this is to go to the Reporting directory you wish to use (for example, for a Contact report, go to Reports > Contact Reports) and open or create a folder there. You can also browse directly to the folder from the document system by going to RiSE > Document system.
- From either location, select New > Reporting Services Template.
- Browse to select your revised RDL file, enter a description, and click Upload. Your new RDL file should now appear in the list of templates.
- Move up a level to the directory that contains the reports (for example, $/ContactManagement/DefaultSystem/Reports). From here, select New > Reporting Services Report. Enter a name and description for your new report in the Summary tab.
- Go to the Sources tab and browse to find the new Reporting Services Template you just created (example: $/ContactManagement/DefaultSystem/Reports/Templates/YourReportTemplate.rdl
- Next, browse to find the query you created in Step 1. Now your Sources tab should have both fields populated.
- If you wish to prompt for parameters at runtime, go to the Parameters tab and enable the Show parameters at runtime option.
- Click Save and browse to the appropriate directory for your new report (for example, $/ContactManagement/DefaultSystem/Reports), then click OK.
- Test your report by clicking Run. You can also test by refreshing your report directory so that your new report appears, and run it from there.
Making report titles editable at runtime
IQA adds a parameter to its SRSS reports to let users modify the report title at run-time, so that the title that displays on the report is changed just for that run. To prevent users from changing report titles at run-time, you just disable the Modify field at runtime checkbox on the reports you save.
If you create any RDL files outside of iMIS, you can give them this functionality by adding the ReportTitle parameter on the XML tab:
Code for the ReportTitle parameter
<ReportParameters>
  <ReportParameter Name="ReportTitle">
    <DataType>String</DataType>
    <AllowBlank>true</AllowBlank>
    <Prompt>Report Title</Prompt>
  </ReportParameter></ReportParameters>is the Drop-down text)
Customizing headers in SSRS reports
By default, Reporting Services reports output with two headers. When these headers are not useful or take up too much space in the page design, you can control it by changing the URL through which the report is run.
Suppressing the Subscription header
When you publish a report, Report Manager generates a URL that includes the Subscription header:
http://localhost/Reports/Pages/Report.aspx?ItemPath=%2fReports+for+the+ProgressCRM+Dashboard%2fDonor+status+chart
To run the report without the Subscription header, call a different command, formed like this:
http://localhost/reportserver?%2fReports+for+the+ProgressCRM+Dashboard%2fDonor+status+chart&rs:Command=Render
Suppressing the Toolbar header
To run the report with the Toolbar header, which includes parameter and export options, add &rc:Toolbar=false to the end:
http://localhost/reportserver?%2fReports+for+the+ProgressCRM+Dashboard%2fDonor+status+chart&rs:Command=Render&rc:Toolbar=false


