iMIS SSO Onboarding Guide
This article provides information regarding the onboarding steps for the iMIS SSO app.
Onboarding Checklist
To get your first SSO connection set up, you'll need to make sure you complete these high-level steps in order.
- A Cloud ID (with a valid Background Account set up)
- An SSO subdomain with correctly configured DNS entry (like login.example.org or sso.example.org)
- Configuration of the SSO System Settings page to connect it to iMIS
- Configuration of a SAML Client App or OIDC Client App to create an SSO connection to a third-party system
Prerequisites
This article assumes that you already have a CSI Cloud ID. If you do not have a Cloud ID, please reach out to CSI and follow the steps in our Environment Setup guide first.
1. Create a Public DNS Entry
The iMIS SSO app is 100% cloud-based, however, for security and consistent user experience, we require a public DNS CNAME Record. This is so that users see URLs consistent with your organization like sso.example.org instead of sso.cloud.csiinc.com.
You'll need to create a CNAME record for the iMIS SSO app. This entry should be the same as your organization's domain, but it is not required to be. For example, if you access iMIS at https://membership.example.org, consider creating an SSO DNS entry like sso.example.org or auth.example.org. The domain does not have to match, for instance, "example.org" and "examplemembers.org" as separate base domains, you can choose either one to add the SSO subdomain onto, even if it doesn't match iMIS.
Note:
The domain name must be unique per Cloud ID. Two or more Cloud IDs cannot share the same domain name. This includes test instances, which should use separate domain names like testauth.example.org or devsso.example.org.
Contact support if you need to deactivate a domain name on a Cloud ID in order to provision/use it on a different Cloud ID. (This process will permanently break any SSO connections/setup on the original Cloud ID account.)
See the table below for the record that needs to be created:
|
DNS Type |
Name / Prefix |
Alias |
|---|---|---|
|
CNAME |
sso (or) |
csicloudsso.trafficmanager.net |
Note:
If you are working in a staging/test environment and your iMIS instance ends in *.imiscloud.com, you can still create a DNS entry like "login.example.org".
Please do not reach out to ASI and ask them to create a DNS entry. The DNS entries are typically managed by your IT department, MSP, or web hosting company.
Important!
If your organization is on a corporate network with separate private DNS (such as a Domain Controller or Windows Server with the DNS role, or a router/network appliance acting as a private DNS server), you will also need to add the same CNAME entry to the domain controller (or other internal DNS server), otherwise any users on the corporate LAN (or using a VPN connection to your corporate office) will not be able to use the SSO.
Consult with your IT department or MSP firm if this requirement applies.
CNAME records typically propagate within 1-15 minutes. You can verify that the record is active by using an online service such as https://www.nslookup.io/ – enter the SSO domain, and click Find DNS records. Look under the "CNAME" header, you should see the value "csicloudsso.trafficmanager.net".
If the DNS entry is live, proceed to the next step.
2. Provision Your SSO Domain
Note: The provisioning process is now fully automated and integrated into the product.
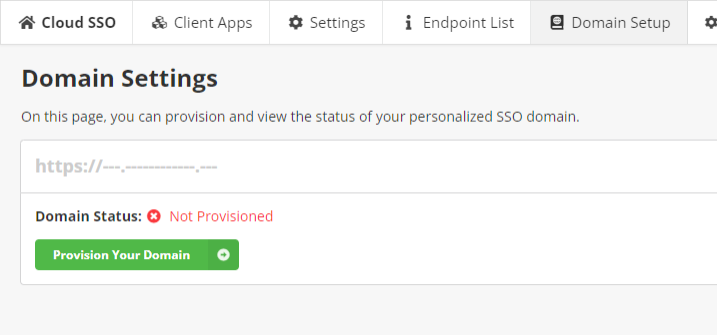
- Navigate to the iMIS SSO app in the CSI Cloud Dashboard, and go to the Domain Setup screen. The domain status should say Not Provisioned.
- Click Provision Your Domain.
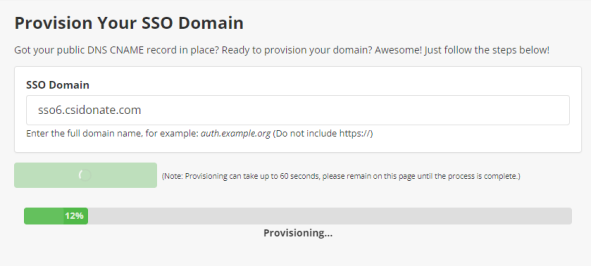
- Enter the domain (do not include https://) into the SSO Domain field.
- Click Start Provisioning.
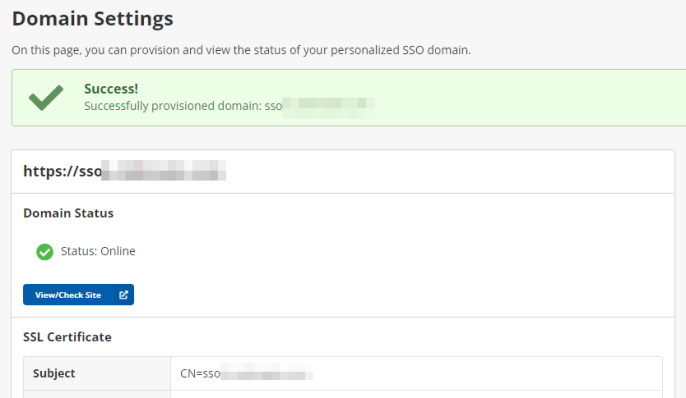
- If the DNS record is set up correctly, you should see a success message, and the domain should report as "Online".

Important! Do not close the browser or navigate away from the page while provisioning is processing.
Important!
If the domain is reporting as "Offline" but it has a valid SSL certificate and there were no errors during provisioning, and you are on a corporate or organizational network that may have internal DNS (such as Windows DNS), then you will also need to add an internal CNAME DNS entry that matches the public one. Your IT department or MSP can assist with this process. It usually involves adding an entry into the Windows Server Domain Controller DNS, or sometimes a firewall or network appliance.
Once this is added, the domain should report as Online.
Staff can test to see if this is the cause of the error by signing in to the Cloud Dashboard and viewing this page outside of the corporate network, such as on an LTE hotspot or personal/home internet connection.
Warning! If you are configuring iMIS SSO Professional or Enterprise (i.e. connecting one or more external IdPs/directories and configuring iMIS to use external identities), do not continue past this point. You can find the configuration documentation for Professional and Enterprise here: Documentation - Professional and Enterprise
3. Configure iMIS SSO System Settings
Refer to the System Settings article for information on the settings fields.
One of the iMIS Identity mode settings is required to be configured. The branding and other settings are optional.
iMIS EMS / 2017
1. Create the RiSE Client Application
Create a registered Client Application in RiSE. Navigate to Settings > Contacts > Client Applications and click "Add Client Application".
Fill out the form:
| Field | Value |
|---|---|
| Client ID | Enter a unique but recognizable value. We recommend CSI-Cloud-SSO. |
| Client Secret | Enter a secret passphrase. This passphrase will be visible in plaintext, so do not use a password used elsewhere for this value. Remember this value for later. If you need to generate a random string, click here to generate a random string from Random.org. |
| Refresh Token Lifetime | Enter "1". (Refresh tokens are only used once within a few seconds of being created.) |
| Login Redirect URL |
OpenID Connect: Enter: https://<Your-SSO-Domain>/imis/callback SAML: Enter: https://<Your-SSO-Domain>/saml/imis/callback |
2. Create the Public RiSE SSO Page
Next, you will need to create a RiSE page with the SSO iPart on it. Follow these instructons:
- Create a RiSE page that is accessible via a public URL in a "shared" or "common" area/site.
- Name the RiSE page and URL something like "SSO", or "SSO Redirect".
- Add only the Contact > Single Sign-On iPart onto the page. (Do not add any other iParts or layouts.)
- Select the correct RiSE Client applicaton that you created in Step 1 above.
- Set the security of the page to Authenticated Users Only.
- Do not add any custom redirect rules to the page.
Publish the page, and make a note of the Publish Location / Full URL (including https://).
3. Add/Update SSO System Settings
Once you have your RiSE Client Application saved, and public RiSE page published in iMIS, back in the iMIS SSO app, go to (or refresh) the Settings page, choose the "iMIS Cloud" or "iMIS EMS" tab, and:
- Select the iMIS Client Application's name that you just created from the dropdown
- Enter in the iMIS Client Secret that you configured in RiSE in Step 1 above
- Enter the Public RiSE Page full URL that you copied from Step 2 above
Finally, click Save at the bottom to save the System Settings page.
Important!
The iMIS Client ID and iMIS Client Secret are not the same as your OpenID Connect Client ID and Client Secret. The values above are only used to connect the iMIS SSO app to iMIS.
Use the OpenID Client ID and Client Secret found in the OIDC Client Apps page when setting up integrations with third parties.
Note:
If you are only using SAML or OpenID Connect (not both), then you only need to follow these instructions once.
If you plan to use both SAML and OpenID Connect at the same time, then please repeat these instructions above a second time. Running SAML and OIDC together requires two RiSE Client Applications and two public RiSE pages. There are separate fields in the iMIS SSO System Settings page for both OpenID and SAML configuration values.
Note: You may also proceed to configure any additional OAuth or Branding settings on this page, as well.
4. Set Up Your Connected Apps
The last step is to set up at least one connected app registration. This step depends highly upon the third party website that you are integrating with the SSO.
For certain off-the-shelf solutions (like WordPress or Drupal integrations, for instance), these can be configured easily using a web interface. These integrations typically expect you to provide the Client ID, Client Secret, (sometimes) JWT Signing Key, and user profile mapping information.
For custom third-party services, such as event or LMS vendors, integrating the iMIS SSO app with these vendors typically requires a conversation with that company to determine if they support this form of SSO. You can provide the third party vendor the link to this page, so that they can learn more about our solution and determine if they can integrate with the iMIS SSO product: SSO Information for Third Party Vendors
Setup and Configuration Assistance
If you need any assistance with configuring your iMIS SSO app settings, or integrating the iMIS SSO with a third party website or vendor, CSI can provide paid consulting services to help you get up and running.