Last updated on: June 18, 2026
See the following on triggers:
- Manual - Allows someone to run the workflow manually from the iDMS iWorkflow dashboard.
- Scheduled - Schedule the workflow to run at regular intervals.
- Webhook - Provides a public, randomized URL which accepts HTTP POST requests to trigger the workflow.
- Change Notification - Listens for a change notification event from iMIS. Optionally filter the trigger by event type.
| Fires | Output |
|---|---|
| When the workflow is run manually | Optional Input (JSON) (Passthrough) |
The Manual trigger will only run a workflow if the Run button is used in the iWorkflow dashboard to run the workflow.
To fire the trigger, do the following:
- Go to iDMS > iWorkflow.
- Select the workflow.
- Click Run.
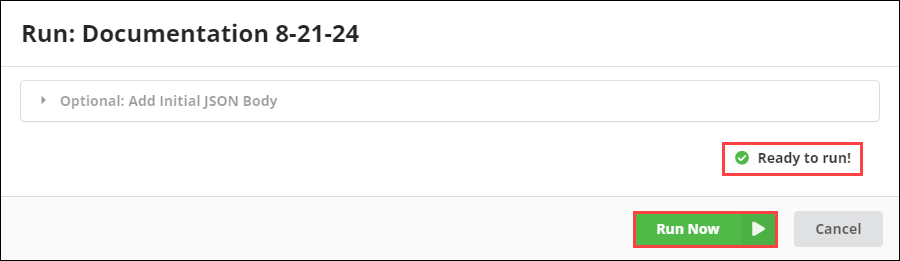
- (optional) Add an initial JSON body.
- Click Run Now.
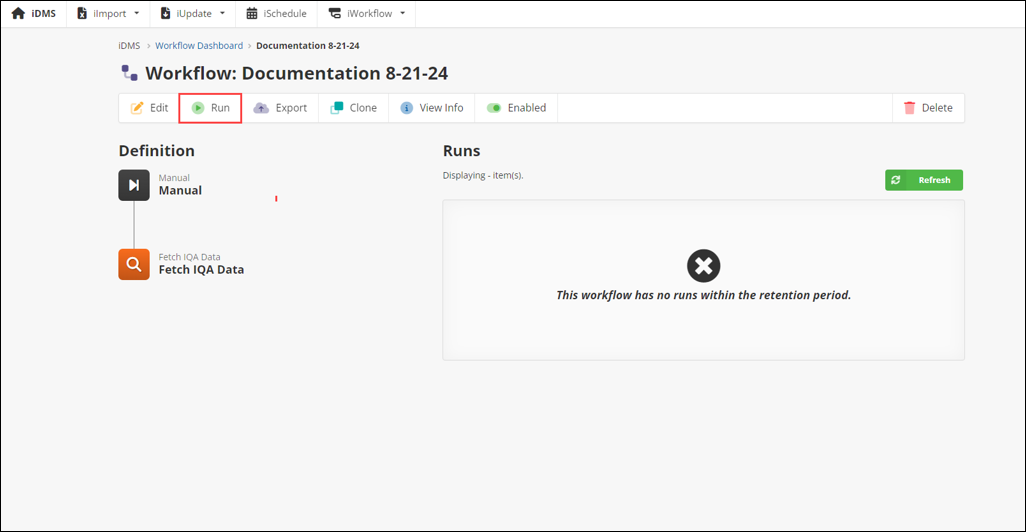
When the trigger finishes the run, the staff user is directed to the Workflow Run page to review its contents. For more information, see Viewing a Run.
Properties
The Manual trigger has no properties.
| Fires | Output |
|---|---|
| On a predefined schedule and when the workflow is run manually | Optional Schedule Data (JSON) |
The Scheduled trigger runs the workflow on a regularly occurring schedule, as defined by a cron expression. It also fires on a predefined schedule and when the workflow is run manually. The output can be optional schedule data in JSON format.
Some examples of schedules that can be used include:
- Every 15 Minutes
- Hourly
- Daily
- 3 times per day, at 9AM, 12PM, and 4PM
- Weekly
- Monthly
- Daily, only on weekdays
- Monthly, on the last day of the month (31st / 30th / 28th)
- Monthly, on the first weekday of the month (if the 1st is Sat / Sun, run on Mon)
- Annually, on the first day in July
Using the Schedule Builder
A convenient Schedule Builder is available in the Scheduled Settings pane to build a cron expression.

Do the following to use the Schedule Builder:
- Select a tab:
- Hourly tab - Schedule an hourly workflow.
- Daily tab - Schedule a daily workflow.
- Weekly tab - Schedule a weekly workflow.
- Monthly tab - Schedule a monthly workflow.
- Use the drop-downs to customize the schedule.
- Click Apply to save the schedule.
Example: To run a workflow on the first weekday of each month at 8:30 AM UTC, select First weekday, 8, and 30 from the drop-downs.

Tip: Be sure to also save the workflow after saving the schedule. Clicking Apply in the schedule builder does not save the workflow definition.
Note: A scheduled workflow can also be run manually. See Manual Trigger for more information.
Schedule data
Optionally include the schedule’s trigger data in the workflow payload. The trigger data follows this format:
{
    "trigger": {
        "scheduledStartTimeUtc": "2024-06-19T19:32:00+00:00",
        "actualStartTimeUtc": "2024-06-19T19:32:00.0000834+00:00",
        "cronExpression": "0 32 19 * * ? *"    }
}
The trigger property contains three sub-properties:
- scheduledStartTimeUtc - The time at which the workflow was scheduled to run, according to the scheduling engine.
- actualStartTimeUtc - The time that the workflow actually began processing.
- cronExpression - A copy of the cron expression from the trigger’s configuration.
Properties
|
Name |
Type |
Templatable |
Notes |
|---|---|---|---|
|
Cron Expression |
Text |
No |
Specify a valid 7-segment Quartz-like cron expression that should be used for the schedule. |
|
Include Schedule Data |
Checkbox |
No |
If checked, the schedule trigger data is included inside the trigger property of the workflow payload. |
Runs the workflow when an HTTP POST request is received.
Optionally, a JSON body can be specified to pass data into the workflow’s first action.
Note: Fires: When an HTTP POST request is received and when the workflow is run manually.
Note: Output: HTTP JSON Body (JSON) and HTTP Metadata (object) (Optional)
Configuring the webhook
When you first add the Webhook trigger to a workflow, you will see the following message in the properties pane:
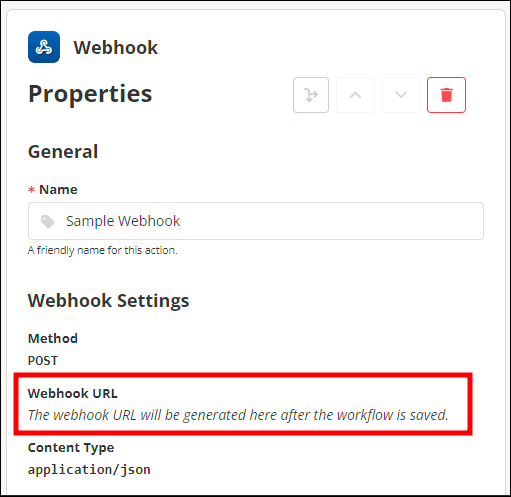
The randomized webhook URL is not generated until the workflow definition is saved. Once saved, if you open the properties pane again, you will see your webhook URL:

Technical details
The webhook currently supports the following HTTP configuration:
|
Protocols |
HTTPS (TLS 1.2+) |
|---|---|
|
Methods |
POST |
|
URLs |
Automatically generated, can be partially regenerated |
|
Content Types |
|
|
Body |
Optional - JSON Object |
|
Response |
|
Response body
If the workflow was queued successfully:
{
    "error": false,
    "id": "0WXB15..................YY5",
    "queueTime": "2024-06-19T20:19:44"}
If there was an error queueing the workflow:
{
    "error": true,
    "message": "Invalid JSON body: After parsing a value an unexpected character was encountered: \". Path 'sample', line 5, position 1."}
You may suppress this response body by enabling the Omit Response Body setting.
Authentication and security
The webhook URL does not require any authentication, API key, or custom HTTP headers to work. The URL is randomized and virtually impossible to guess.
Important! Keep your URL safe and only use it or share it with third parties that you trust.
How secure is it?
- The URL has (roughly) 2.9 × 1037 possible combinations.
- Currently (as of Q4 2023), the strongest supercomputer (about 1 exaFLOP) can run 3.15×1025 operations per year.
That means it would take even the strongest supercomputer on the planet 9.2×10¹¹ years (about 920 billion years) to guess the URL.
Even if you somehow harnessed the entire compute power that humankind has available on the planet today (roughly 1023 FLOPs), it would still take over 9 million years to guess your URL.
If you believe that your URL has been compromised, or you would otherwise like to regenerate your random webhook URL, you can click [ Regenerate URL ] in the properties pane of the webhook trigger.
Warning! Regenerating the URL and saving the workflow will immediately cause any integrations or vendors using the old URL to stop working. Those webhook requests using the old URL will receive an error response.
Limitations
The following limitations exist:
- It is not currently possible to have a webhook wait for the workflow to complete (either synchronously or asynchronously via polling) and return the data that was outputted from the workflow. (This functionality may be added in the future.)
- The only supported HTTP verb is “POST”.
- The only content type accepted is JSON (or no body).
Properties
| Name | Type | Templatable | Notes |
|---|---|---|---|
| Metadata Output Property |
Text |
No |
If specified, the metadata for the HTTP request from the webhook will be stored inside this property and made available in the workflow pipeline. This metadata includes the remote host information and the HTTP headers. |
| Return 202 Accepted |
Checkbox |
No |
If checked, a successful HTTP request will be responded to with Note: Enabling this setting does not activate asynchronous polling on the workflow endpoint for the workflow status, it only changes the response code for compatibility reasons. Asynchronous status polling is not currently available for the webhook trigger, but may be added in a future release. |
| Omit Response Body |
Checkbox |
No |
If checked, the default response body that is returned (see above) will be suppressed, and instead, no body will be returned. |