Last updated on: June 23, 2026
Creating a Twilio account
A Twilio account is required to use iMIS Text Messenger. To create a Twilio account, do the following:
- Sign up for Twilio (as an individual)
- Create your Twilio account and verify/ugprade it
- Configure billing and auto-replenish
- Add ASI Staff as users to your account, in order to support iMIS Text Messenger
- Send ASI your Account SID and Auth Token via Privnote
- Additional tasks for customers new to iMIS Text Messenger
1. Sign up for Twilio
Sign up for Twilio on their website.
The user signing up for Twilio will be the initial administrator of the account and must be able to verify the entered email address and phone number. The phone number must be a valid cellular number.
2. Create a new account
Do the following to create a new account:
- Sign in to the Twilio console.
- Click Create New Account, and enter the requested information.
- From the usage survey, specify the following options:
- What do you plan to build with Twilio? - Other
- Which Twilio product are you here to use? - SMS
- Which best describes you/your organization? - Nonprofit or government entity
- Which best describes how you will use Twilio? - Direct Brand
- How do you want to build with Twilio? - With no code at all
- What is your goal today? - 3rd party integrations
3. Configure billing
Before configuring the billing information, make sure the following details are ready:
- Valid government-issued ID (such as a driver’s license or state ID) for the account administrator
Note: This information is not stored, it is only used one time to verify your identity, which prevents scam and fraud accounts, as well as spam accounts.
- Organization’s legal entity name
- Organization’s EIN / Tax ID
- Organization’s primary address
- Primary credit card used for Twilio account replenishment
Do the following to configure the billing information:
- From the Twilio Console homepage, in the upper-right corner, click Admin then Account billing.
- Click Upgrade Now. Enter the requested details.
- Once complete, proceed to configure or confirm your auto-recharge settings.
- Click Save.
Twilio usage is billed on a consumption basis. Your account starts with a bank of credits, and when that balance drops below a set threshold, your credit card is automatically charged the amount you have configured to refill your account.
The auto-recharge threshold and target balance should be set based on the number of SMS messages you expect to send through iMIS Text Messenger. If you are unsure which settings are appropriate for your organization, contact ASI. We can review your past usage and recommend the optimal configuration.
4. Add support staff to account
Follow the steps outlined in the Twilio help documentation to invite the following users:
- jburgy@advsol.com (Lead Engineer for iMIS Text Messenger)
- jhepler@advsol.com (Application Support)
5. Send account SID and auth token to ASI
ASI will automatically migrate/configure your Twilio account settings in iMIS Text Messenger. You will need to send ASI your Twilio Account SID and Auth Token. On the Twilio Console homepage, under the Account Info section, you will find these values. Visit the Twilio help center for additional assistance in finding these values.
Do the following to send the Account SID and Auth Token to ASI:
- In a new browser tab, open Privnote.com.
- Back in Twilio, press the Copy button next to the Account SID.
- Paste this value into Privnote.
- Back in Twilio, press the Copy button next to the Auth Token.
- Paste this value into Privnote.
- When finished, Privnote should look like this:
- Click Create note.
- Copy this URL and send it to ASI via your open support ticket.
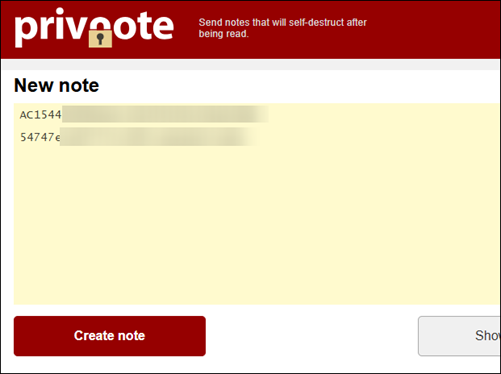
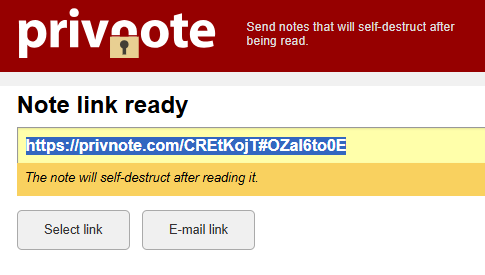
Warning! Do not open the URL to check it. Opening the link will cause the note to be destroyed, and ASI staff will be unable to view it.
6. Customers new to iMIS Text Messenger
If you did not previously have a Twilio subaccount with ASI, you will also need to complete the following steps.
a. Provision a Toll-Free Number
To provision a toll-free number, follow to Twilio help center documentation.
When searching for the toll-free number, be sure the search criteria have at least the following selected:
- Set Number Type: Toll-Free
- Capabilities: SMS
- Country: US (+1) {if US based}
Once the number is selected, proceed to buy the number (and confirm the charge). After the number is purchased, you will need to proceed to the number verification process. You can access the verification process in the Twilio help center.
For additional information on the Opt-in/Opt-out process, see Tracking unsubscribed and re-subscribed members.
B. Create a Message Service
In Twilio, create a messaging service. Name the message service iMIS Text Messenger and select the use-case Notify my users. You will be brought to the Sender Pool configuration.
Add numbers to the sender pool
Do the following to add numbers to the sender pool:
- Click Add Senders.
- Ensure the drop-down says Phone Numbers (the default), then click Continue.
- Check the box next to the toll-free number you just leased, and click Add Phone Numbers.
Add an alphanumeric sender ID for international countries
Do the following to add an alphanumeric sender ID:
- On the Sender Pool page, click Add Senders.
- Select Alpha Sender, and click Continue.
- Enter an appropriate alpha sender. The character limit is 12. This can be anything, but we recommend using your organization name or acronym. To clarify, this is strictly for messages that are sent to certain European and Asia/Pacific numbers, not for North America.
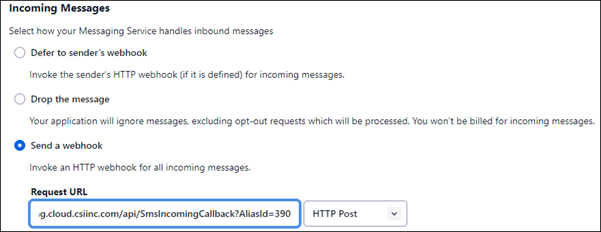
Configure the message service for iMIS Text Messenger
Do the following to configure the message service:
- In the message service properties, select Integration.
- Under Incoming Messages, choose Send a webhook.
- ASI will provide you with the Alias ID for the Request URL in your ticket.
- Enter the following URL with the correct Alias ID instead of "123": https://textmanager-fn.cloud.csiinc.com/api/SmsIncomingCallback?AliasId=123
- Leave the Fallback URL blank.
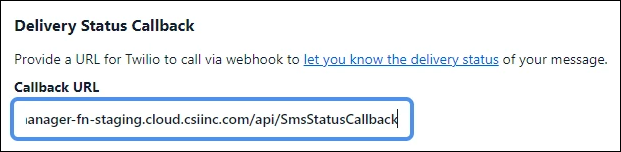
- Under Delivery Status Callback, enter the following URL: https://textmanager-fn.cloud.csiinc.com/api/SmsStatusCallback
- Ensure the Validity Period is set to 14400 (the default).
- Click Save.