Last updated on: June 23, 2026
Learn how to create and manage outbound jobs with IDMS.
Find outbound jobs by clicking on the Outbound Data menu item. The following diagram shows the Outbound Transfers page with highlighted areas:
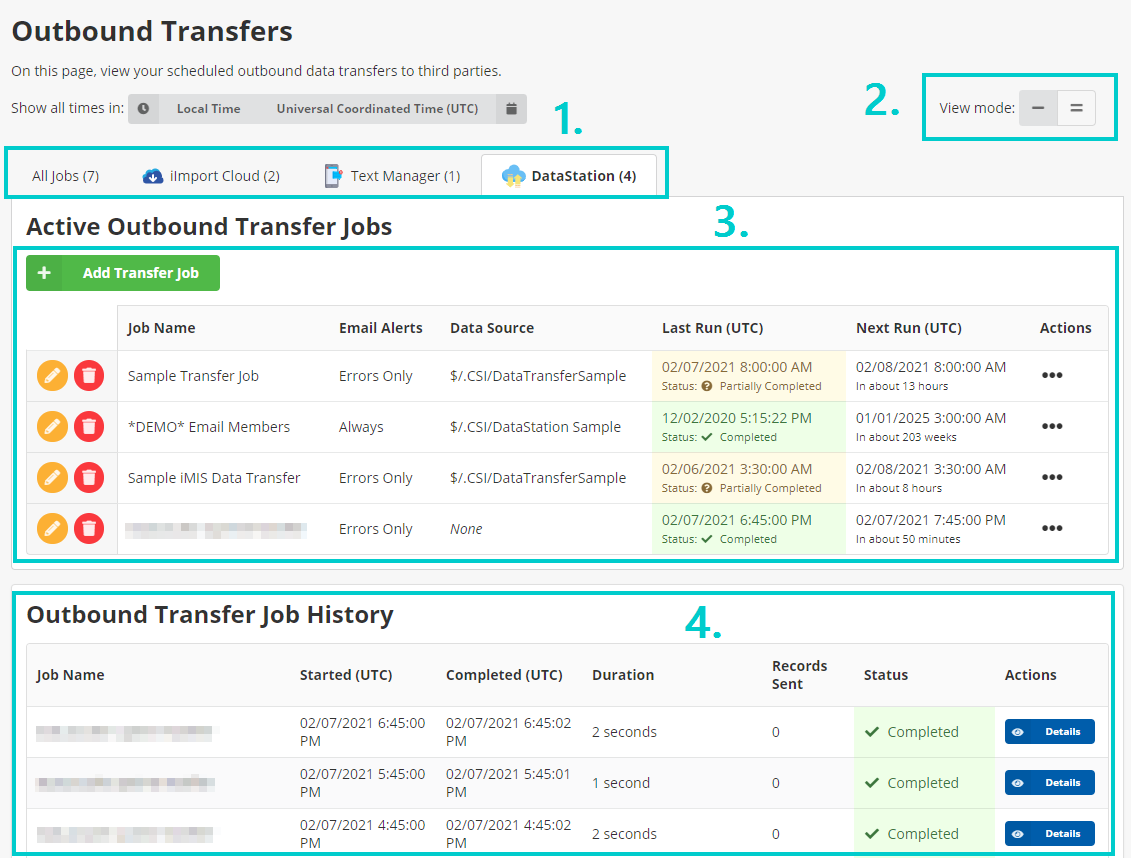
- App Filter – Filter jobs to specific connected apps. For example, click DataStation to only see jobs that were created via the DataStation.
- View Mode – Click the toggle button to change between showing or hiding the steps for each job.
- Job Listing – Displays a list of all active jobs. If the View Mode is set to Expanded, also shows the steps under each job.
- Job History – Displays recent job runs for all jobs.
Job Menu
The list of jobs contains actions that can be used to monitor and manage each job.
If the View Mode is set to expanded, the user can manage each job step. The following diagram shows highlighted areas:
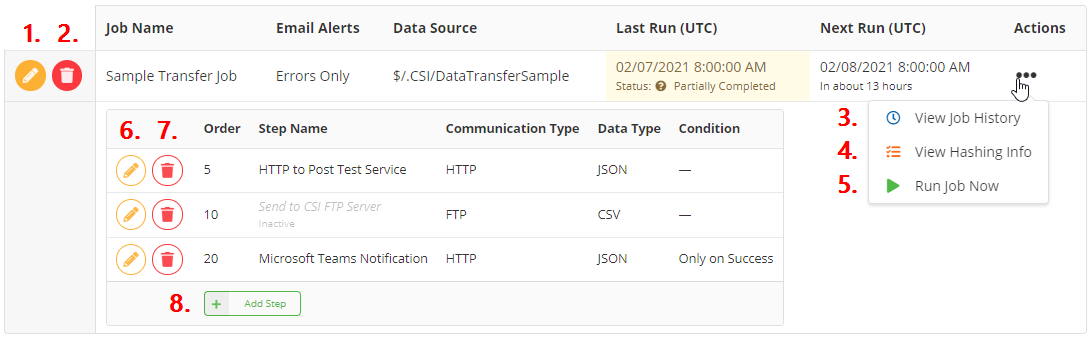
- Edit – Edit the job definition.
- Delete – Delete the job definition, including all of its steps.
- View Job History – Displays all previous runs for the job.
- View Hashing Info – Displays information about the current state of the record hashes for this job, including the ability to check if an ID exists in the hash, delete a single hash, or delete all hashes.
- Run Job Now – Immediately starts an ad-hoc run of the current job.
- Edit Step – Edits the job step.
- Delete Step – Deletes the job step.
- Add Step – Adds a new step to the job. Use the Order field to control when the step is executed in the sequence.
Adding an Outbound Transfer
To add an outbound transfer, do the following:
- Go to iDMS > iTransfer > Scheduled Jobs.
- Click the Add Transfer Job button.
- In the Data Settings pane, select a Job Data Source.
- Configure the General Settings and E-mail Alert Settings.
- Click Save New Job.
If successful, a message shows that the job definition has been created. The Add New Step screen appears afterward to set up the first job step.
See Outbound Job Steps for more information about creating and managing individual job steps.
Troubleshooting and Guidelines
- SELECT DISTINCT (unique results) causes performance issues and should be avoided unless absolutely necessary. iTransfer already performs deduplication of data under certain circumstances.
- NOLOCK should be used for increased iMIS performance while iTransfer jobs are running.
- Limit by should not be used as it is not respected by the REST API.
- There should be no visible prompt filters, only internal (Prompt=None) filters.
- All columns should have aliases. Do not use Item, because Item is a reserved word.
- Hidden columns (starting with underscores) are not hidden in iTransfer. Do not include a column if a column is not desired.
- Using sorting might cause issues, as sorting is not always respected.
- Test the IQA query using the Run tab and the Report tab for good performance. Verify that the number of total records matches the expected total record.
Understanding the Data Settings
Review the following Job Data Source options:
IQA
If IQA is selected, a staff user must provide an IQA query that meets the following criteria:
- Returns at least one row (required initially so the DataStation can read the column names; the IQA may return 0 results afterwards).
- Has no user-facing prompts (required or optional). Filters can be added if Prompt is set to None.
Delta Hashing
If Delta Hashing is enabled, a staff user must specify a Key Column Name that DataStation will use to uniquely identify each record in the dataset.
Good examples of key columns are:
- iMIS ID or Contact Key
- Event Code
- Group ID
- Transaction ID + Line Number
- Batch Number
- Activity Sequence Number
Optionally enable Send Empty Dataset to send an empty payload to the destination endpoint(s), such as an empty JSON array, or an empty or headers-only file.
If this setting is disabled, no payload is built and no requests are made.
None
If None is selected, the job runs without any data source.
Tip: Jobs with no data source are useful to invoke an HTTP endpoint on a regular schedule and if a staff user has a static payload to send (that doesn't depend on any iMIS data).
Understanding the General Settings
Review the following General Settings options:
Crontab Schedule
DataStation uses Quartz-style crontabs to define job schedules.
Use this online tool to generate or validate a Crontab expression, or click the Schedule Builder button to the right of the Crontab field to open the Schedule Builder, where a staff user can fill out a form to define a one-time or recurring schedule. Quartz-style crontabs contain two an extra parameters (Second and Year), compared to a traditional Unix-style crontab expression. Additionally, either the Day-of-Month or Day-of-Week fields must contain a ?.
The Quartz-style crontab is expressed as:
- Second
- Minute
- Hour
- Day-of-Month
- Month
- Day-of-Week
- Year
The following examples correspond to specific times:
0 0 6 * * ? *– 6:00 AM, every day0 0 16 ? * 1 *– 4:00 PM, only on Sundays0 30 2/6 ? * * *– 2:30 AM, 8:30 AM, 2:30 PM, and 8:30 PM (every 6 hours, beginning at 2:30 AM), every day0 15 22 8 6 ? 2021–10:15 PM on June 8, 2021; runs only once
Tip: To create a job, but not have the schedule run, replace the year parameter in the Crontab expression with a year far in the future, such as 2050.
Example: To draft a job that runs at 8AM every day, replace the 0 0 8 * * ? * crontab with 0 0 8 * * ? 2050. The job will not run until the schedule expression is updated again. To undo this change, replace 2050 with *, which instructs the job to run every year.
Number of History Records to Keep
Specify the number of total job history records for the DataStation to retain. After this count has exceeded, DataStation automatically prunes old history records. Specify a value from 1 to 500.
Example: If a staff user has a job that runs nightly, and the staff user wants to keep six months of history logs, enter 180.
Understanding the Email Alert Settings
Review the following Email Alert Settings options:
email Alert Settings
Specify when to receive email alerts after a job has completed:
- None – This option disables all email notifications.
- Errors Only – Receive a summary email if the job fails.
- Always - Receive an email summary each time the job runs. The email will indicate if the job succeeded or failed.
Email address(es)
Specify one or more email addresses to receive the job notifications. Separate multiple email addresses with a comma (,).