Last updated on: June 23, 2026
Working with panel files
Files stored in panels (or other binary-type data) can be accessed and managed using the iMIS Power Automate Connector and Logic Apps. This includes extracting file data from panels and importing files and file metadata into iMIS panels.
Technical summary
Any input panel field of type File or Binary which is exposed by the iMIS Power Automate Connector cannot accept raw binary data. It only accepts a JSON object containing the following fields:
- File – The actual file data - expressed as raw bytes or Base64-encoded file data. (The connector will dynamically detect Base64-encoding and fall back to raw bytes if Base64 data is not detected.)
- FileName – The name of the file. Full file paths (/c/b/a.txt or C:\b\a.txt) are also accepted and the filename (a.txt) will be parsed automatically from the full path.
- MimeType – The MIME type (aka "Content-Type" or "Media Type") for this file - if you are not sure, or the value is dynamic and not able to be determined, use
application/octet-stream.
Use the Compose action in Power Automate to construct a JSON object and use that as the file input instead of the raw file data:
{
  "File": "AAAA+BBBB/CCCC===",
  "FileName": "MySampleFile.csv",
  "MimeType": "text/csv"
}
When outputting file data from iMIS to another source, only the file data is returned, so the File panel field variable should contain only the file data - the data is not wrapped in a wrapper object.
Warning! Power Automate has a tendency to automatically Base64-encode and decode binary data like file contents. Inspect the workflow runs to see if you need to manually encode or decode the data, or if the data may inadvertently be double-encoded.
It is not currently possible to fetch the file name or file type back out of a file field in a panel.
Problem
iMIS stores files inside panels in an encoded XML document. This XML document contains four fields:
- File
- FileType
- UploadedFileName
- FileContentType
This document is incompatible with Power Automate, as shown below:
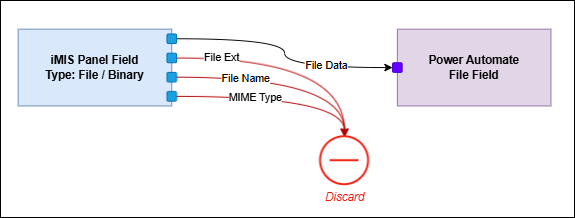
Shown above, when sending a file from iMIS to iMIS Power Automate Connector, we can simply discard the extra information that Power Automate does not have inputs for.
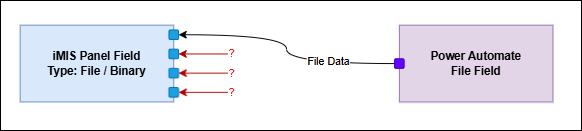
However, when sending a file from iMIS Power Automate Connector to iMIS, we don't have the required fields:
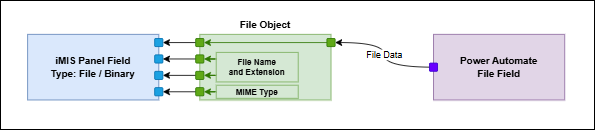
Solution
We must therefore wrap the fields required by iMIS (the file and its metadata) in an object:
Creating a file wrapper
This example will use a OneDrive file as the source file, which is an output of the action OneDrive for Business > Get File Content Using Path. Review the following steps to create a file description wrapper object in your Power Automate flow:
Add the Compose Action
- First, add a step before your iMIS panel step and after you have retrieved your file contents.
- Open a Flow for edit in Microsoft Power Automate or Azure Logic Apps.
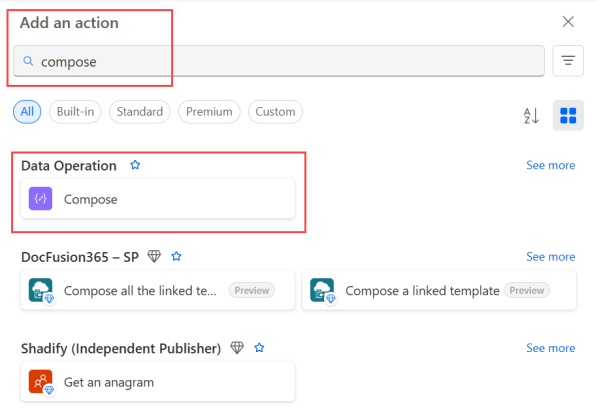
- Choose the Data Operations > Compose built-in action:
- Locate a field called Inputs. In this input field, copy and paste the following JSON template code:

{
  "File": "",
  "FileName": "",
  "MimeType": ""
}
Add File Data
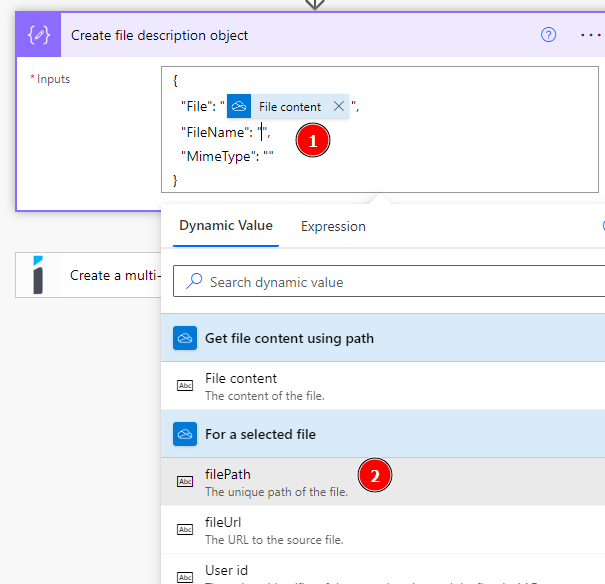
Do the following to add the actual file contents:
- Place the cursor in between the two quotes (
""). - Choose the File contents variable (or whichever variable contains the file data).

Add File Name
Do the following to add the file name:
- Follow the same steps as above, placing the cursor between the two quotes and selecting the variable that contains the file name. You may also supply a file path (a file name which contains some folders before it, delimited by
/or\). The connector will automatically parse out a file path and determine the correct file name. For example, /ABC.pdf becomes ABC.pdf, or /Documents/Scanned Files/Scan-2022-01-01.pdf becomes Scan-2022-01-01.pdf. This allows you to feed in a file path directly from a cloud storage provider such as OneDrive or Google Drive without having to parse out the filename manually.
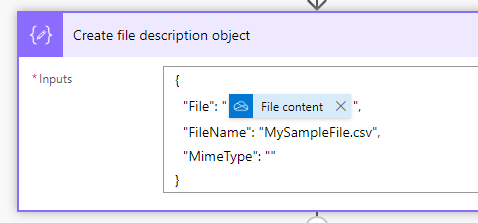
Note: You can also type a filename manually between the quotes. The filename will be the same each time the automation runs.
Add MIME Type
To add a MIME Type, do the following:
- Supply a MIME Type, sometimes referred to as a Media Type or Media Header.Refer to the following table for a list of common MIME Types. For additional MIME types, please refer to MDN:
| MIME Type | Corresponding File Types |
|---|---|
| application/vnd.openxmlformats-officedocument.wordprocessingml.document | DOCX |
| application/vnd.openxmlformats-officedocument.spreadsheetml.sheet | XLSX |
| application/vnd.openxmlformats-officedocument.presentationml.presentation | PPTX |
| application/pdf | |
| application/xml | XML |
| application/zip | ZIP |
| text/plain | TXT, LOG |
| text/csv | CSV |
| text/html | HTM, HTML |
| image/png | PNG, APNG |
| image/jpeg | JPG, JPEG |
| image/gif | GIF |
| image/bmp | BMP |
| video/mp4 | MP4 |
| application/octet-stream | Any (see below) |
It's important to store the correct MIME Type with your file, so that iMIS knows how best to serve your content. (For example, if you specify that you have a PDF document, some browsers and mobile devices will display a preview instead of downloading the file).
However, in some contexts, you may not have the appropriate MIME Type.
If you are unable to provide the MIME Type and you cannot enter a manual value because you'll be handling many different types of files with a particular automation, use the following "catch-all" MIME Type:
application/octet-stream
This instructs most browsers that this file should be downloaded, regardless of its content.
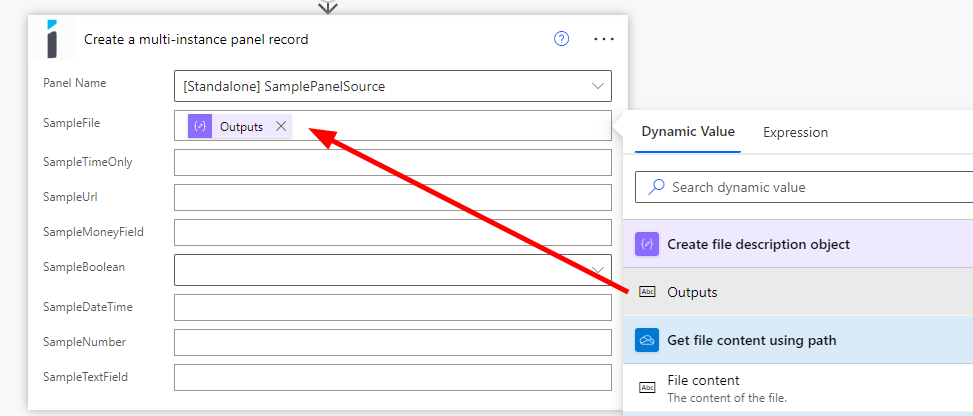
Using the Compose Action's Output
Once you have the three fields (File, File Name, and MIME Type), you can now use this file object inside of a Create Panel or Update Panel action:
- Connect the Output variable from the Compose action into any File or Binary panel field.
Important! Always test the automations. In particular, verify that the file is written to the panel source successfully in iMIS, you are able to successfully download the file from the panel in iMIS, and that the file is not corrupt.