Last updated on: June 19, 2026
QuickStart Template
Approving join applications
This QuickStart feature is designed for membership types that require approval before the member becomes active.
Users are guided through creating an account and submitting a membership application form. If a user is already a member or has previously submitted an application, they are redirected to an informational page explaining why they cannot reapply and how to proceed.
In This Article
- Membership components
Understanding the content used in the approval workflow
Approvals dashboard
Modifying the application statuses
Adding additional fields to the Staff Approvals Form
Updating the Process Automation task and alert
Membership components
The following membership components are used in this workflow:
- Billing cycle - Join Professional Member. This is a join-only billing cycle (anniversary and accrual).
- Customer type - Pending Professional. Bills the Basic Membership Dues product and organization.
Understanding the content used in the approval workflow
There are many content records and forms used throughout the approvals workflow.
Content records
There are several content records that are included in this approvals workflow that must be updated or that can be edited after initial setup.
| Site | Location | Title | Purpose |
|---|---|---|---|
| Public | @/Web/Join/ Professional-with-approvals |
Web - 01 Create Account | Displays the Approvals Join - 01 Create Account form for new users to create an account. If the user is already logged in, the page redirects to Web - 02 Demographics to prevent duplicate accounts. |
| Web - 02 Demographics |
Displays the Approvals Join - 02 Demographics form to collect applicant demographic information. If the applicant is already a member or has a pending application (Application Status = Complete or Pending), the page redirects to one of the following:
This prevents purchase errors and stops applicants from modifying their submission after review. |
||
| Web - 03 Terms and Conditions | Displays the Approvals Join - Terms and Conditions form to collect agreement to your terms. | ||
| Web - 04 Fees | Displays the Join Professional Member billing cycle product, allowing the applicant to purchase their membership. After purchase, the Member Type is updated to Pending Professional. | ||
| Already a Member | Page users are redirected to from Web - 02 Demographics if they are already members. | ||
| Application Pending | Page users are redirected to from Web - 02 Demographics if they have already submitted an application (status = Application Complete or Application Pending). | ||
| Staff
(Membership > Dashboard > Approvals) |
@/MyStaff/Dashboards/
Membership/Approvals/ Approvals-dashboard |
Approvals Dashboard |
See Approval Dashboard. |
Forms
There are many forms used in this workflow to collect data about the contact:
- Go to RiSE > Form Builder > Form library.
- Click the QuickStart tab.
- The following forms are available:
| Name | Purpose | Notes | Location |
|---|---|---|---|
| Approvals Join - 01 Create Account | Allows users to create a new account at the start of the join process. | If the URL includes a Source parameter, it is written to the Source field in Panel source. Additional fields can be added as needed. | Web - 01 Create Account |
| Approvals Join - 02 Demographics | Collects demographic information and sets the ApplicationStatus field to Incomplete. |
Additional fields may be added or removed, except the following required hidden fields:
|
Web - 02 Demographics |
| Approvals Join - 03 Terms and Conditions | Collects agreement to the organization’s terms and conditions and sets the ApplicationStatus field to Complete. |
The following are required hidden fields:
|
Web - 03 Terms and Conditions |
| Approvals - Staff Approvals | Used by staff to review and approve membership applications. Access from the Approval Dashboard > View button in Complete applications area. | View application |
Approvals dashboard
The Approvals Dashboard allows staff to review, manage, and approve membership applications.
Content records
The Approvals dashboard includes a Content Collection Organizer (CCO) content item with the following pages:
- Complete Applications — Displays
$/_MySystem/StaffSite/Dashboards/Membership/Approvals/Complete Applications. - Incomplete Applications — Displays
$/_MySystem/StaffSite/Dashboards/Membership/Approvals/Incomplete Applications. - Pending Applications — Displays
$/_MySystem/StaffSite/Dashboards/Membership/Approvals/Pending Applications. - Rejected Applications — Displays
$/_MySystem/StaffSite/Dashboards/Membership/Approvals/Rejected Applications. - View Application — Displays when View button is clicked. Includes applicant information, invoices, balances, and the Approvals - Staff Approvals form.
Queries
The following queries are used on the Approvals dashboard:
- Application Basic Information - Displays applicant details, start date, and completion date.
- Application Demographics - Displays demographic information collected during approval.
- Complete Applications - Lists completed applications and time since submission.
- Incomplete Applications - Lists incomplete applications.
- Pending Applications - Lists pending applications and time since submission.
- Rejected Applications - Lists rejected applications.
- Tracker - Complete Applications - Counts applications with status Complete in the past year.
- Tracker - Incomplete Applications - Counts all incomplete applications.
- Tracker - Total Applications This Year - Counts applications started in the last year.
- Tracker - Pending Applications - Counts all pending applications.
Note: To update these queries, go to RiSE > Intelligent Query Architect, then navigate through the following folder path: $/_MySystem/StaffSite/Dashboards/Membership/Approvals
Modifying the application statuses
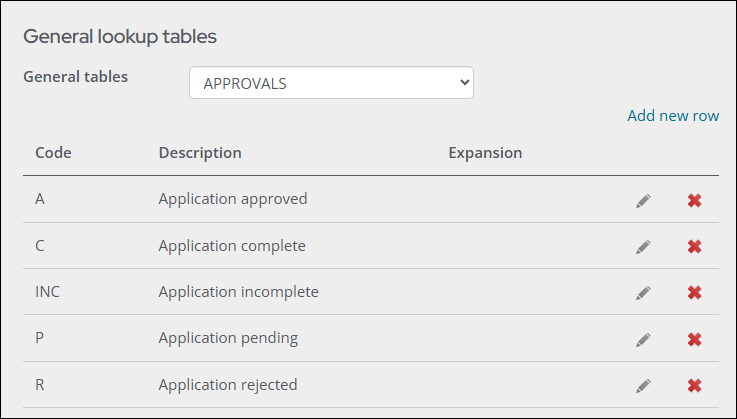
The Approvals general lookup table is where you can update, add, or remove application statuses.
Note: You must be a system administrator to modify general lookup tables.
Do the following to update the application statuses:
- Go to Settings > General lookup tables.
- From the General tables drop-down, select Approvals.
- To add a new application status, select Add new row:
- Enter a Code, then enter a Description. The Description is what displays to the applicant.
- Click Save & Continue.
- Close the window.
- To edit an existing status, click the Edit icon:
- Update the Description value.
- Click Update.
Adding additional fields to the Staff Approvals Form
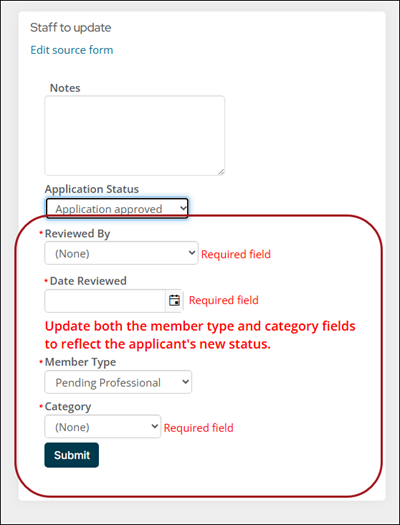
When the application is either approved or rejected, several fields become visible and some of those fields must be filled out before the form can be submitted. You can create new fields to be added to this form, or edit the existing form properties.
Do the following to add new or update existing properties for this Form:
- Go to RiSE > Panel definitions.
- Select the _MyStaff_Approvals panel:
- Update the existing properties, or add a new property by expanding the My_Approvals source.
- Drag the new properties to the layout area.
- Click Save & Exit.
- Go to RiSE > Form Builder > Form library.
- Click the QuickStart tab.
- Select the Approvals - Staff approvals form.
- Expand the Single instance form element.
- Expand the My_approvals source.
- Drag the new property to the form layout area.
- Click the property in the form layout area to open the settings pop-up window.
- Update the Label if required.
- Click Save.
- Go to Membership > Dashboard > Approvals.
- From the Complete applications tab, click View for any of the complete applications.
- From the Application Status drop-down, update the value to Application approved and confirm the new property appears.
Using the My_Approvals panel source
The My_Approvals panel source uses two value lists that are used in the form:
- Application Status VL
$/_MyWebsite/Forms Value Lists/Application status VL
Displays statuses from the Approvals lookup table. - Applied For VL
$/_MyWebsite/Forms Value Lists/Applied for VL
Displays all member types for the AppliedFor field.
Updating the Process Automation task and alert
The join approval process uses Process Automation to automatically send emails to staff and to display alerts:
- Email sent when new members have applied and paid
- Alert displays when a new member has not paid
Updating the new member applied template
To update the communication template that is sent to staff when new members have applied, do the following:
- Go to Marketing > Communication templates.
- Navigate through the following folder path: Communications/_AutomatedEmails/Applications
- Double-click the Staff alert - new member applied template.
- (required) Update the From email address.
- (required) Update the To email address field. Enter the staff email addresses that should receive the email alert when new members submit applications.
- Click the Body tab. Update as necessary. Do not remove the View application link.
- Product Codes: BASIC or PROF
- Balance = 0
- Customer Type = Pending Professional
- Click Save.
Notes: The Recipients tab uses the following query: $/_MySystem/ProcessAutomation/Membership/New member application. This query filters for the following:
Note: The Staff Email - New Member Applied task sends this email when there are newly paid applications submitted. The scheduled task triggers on inserts or updates to the Subscriptions table and sends an email when there balance equals zero, and the membership type and product code match criteria.
Applicant Not Paid - Alert
The Staff Alert - New Member Unpaid alert appears if a contact has a member type of Pending Professional and an unpaid subscription.
The alert uses the following query as the data source: $/_MySystem/ProcessAutomation/Membership/Applicant not paid. The ViewMemberApplication alert set is used to display the alert on the Approvals dashboard (View application page).