Last updated on: January 27, 2026
Quick Tutorial Training course
Staff users have the option to process recurring donation payments manually, or to automate the entire process. Review the details in this article to learn how to automate the recurring donation process for staff users.
Important! It is highly recommended that donors are not billed through the automatic process until staff users have manually generated invoices for several donation cycles and feel comfortable with the invoices being generated.
The Process recurring donations and Retrieve processed payments from Pay Central scheduled tasks must be configured before the recurring donation process is completely automatic.
Do the following to configure the scheduled tasks:
- Go to RiSE > Process automation.
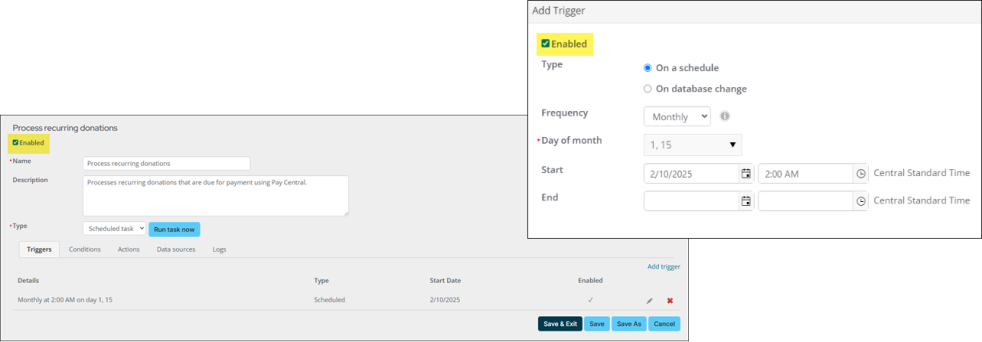
- Locate the Process recurring donations scheduled task and open it for edit:
- From the Triggers tab, select Add trigger.
- Select the Enabled checkbox.
- Leave the Type set to On a schedule.
- From the Frequency drop-down, select Monthly.
- From the Day of month drop-down, select the day(s) the recurring donations are generated, for example, if you generate invoices on the 1st and the 15th, select both days.
- Leave the Start date as today's date, and do not enter an End date.
- Choose a Start time. This is the time the recurring donations are taken each time this task runs.
- Click Save.
- Select the Enabled checkbox.
- Click Save & Exit.
- Locate the Retrieve processed payments from Pay Central scheduled task and open it for edit:
- From the Triggers tab, select Add trigger.
- Select the Enabled checkbox.
- Leave the Type set to On a schedule.
- From the Frequency drop-down, select Monthly.
- From the Day of month drop-down, select the same day(s) that are selected in the Process recurring donations scheduled task.
- Leave the Start date as today's date, and do not enter an End date.
- Choose a Start time. This task must be ran after the Process recurring donations task. Ensure there is enough time between the two triggers.
- Click Save.
- Select the Enabled checkbox.
- Click Save & Exit.

