Last updated on: February 16, 2026
The Stripe gateway is available in all regions upon request. Please contact your AiSP or CPIL to learn how to get started with the Stripe gateway.
In This Article
- Stripe connect account
Before you begin: Important items to perform before configuring the gateway
Configuring the Stripe gateway
Stripe rates
Importing Direct Debit mandates
| Region | Supported payment types |
|---|---|
| United Kingdom |
Note: Direct debit recurring payments take seven business days to confirm the success or failure of a payment for initial recurring payment enrollments, and four business days for subsequent recurring payments. Timing is subject to change. |
| Euro |
Note: SEPA recurring payments take an average of seven to eight business days to confirm the status of a payment for initial recurring payment enrollments. In certain cases, confirmation may take up to 14 days. |
| North America |
Note: ACH recurring payments take four business days to confirm the success or failure of a payment for initial recurring payment enrollments and to settle the funds. Be sure to account for these processing times for testing. |
| Asia Pacific |
Note: BECS recurring payments are supported in Australia and New Zealand. It can take up to three business days to confirm the success or failure of a payment for initial recurring payment enrollments. |
Important! Stripe ACH or direct debits are only available for recurring payment methods. See the AutoPay region and gateway comparison chart for more information.
Stripe Connect account
Part of the Stripe gateway configuration process is creating a Stripe Connect account and completing the onboarding steps. The onboarding process must take place in iMIS. See Configuring the Stripe gateway to get started.
Important! An existing Stripe account cannot be used with the Stripe gateway. A new Stripe account must be set up in iMIS. See Configuring the Stripe gateway for more information.
Before beginning the onboarding process, gather the following important information:
- Email and password dedicated to the Stripe Connect account
- Phone number to use for multi-factor authentication
- Bank details:
- Currency
- Country of bank account
- Sort code
- Account number
- Business details:
- Legal business name – This name must exactly match the name associated with the tax ID
- Companies House Registration Number (CRN) - The 7 or 8-digit Company Number
- Registered business address – If the business does not have an address, choose a home address
- Business phone number
- Business website - If the business does not have a website, use a social media page, LinkedIn, or other relevant link
- Product description - A 1-2 sentence description, including when customers are typically charged (i.e. during checkout or three days later)
Note: Additional details may be required by Stripe.
Before you begin: Important items to perform before configuring the gateway
Perform the below before configuring the Stripe gateway.
Check the financial settings
There are certain financial settings that must be configured before setting up the gateway:
Important! Failing to configure these settings can result in errors and unsuccessful payments.
Do the following to configure financial settings:
- Go to Settings > Contacts > General.
- Set the Default country.
- Click Save.
- Go to Settings > Finance > General.
- Set the Default currency code.
- Click Save.
For more information regarding financial settings, see Finance: Getting Started & Best Practices.
Gather company details & configure the browser settings
- Ensure all required company details are gathered before the Stripe onboarding process begins.
- Ensure browser pop-ups are temporarily disabled. Disable browser pop-ups for the browser you intend to use for the Stripe onboarding process:
Configuring the Stripe gateway
Configuring the Stripe gateway includes creating a Stripe Connect account, completing the Stripe onboarding process, and saving the gateway in iMIS. Payments cannot be taken until the onboarding process is complete.
Once the details are submitted, they must be verified by Stripe. When the details are verified, the onboarding process is complete. Be sure to review the current Stripe limitations.
1. Onboard with Stripe
Do the following to onboard with the Stripe gateway:
- Go to Settings > Finance > Pay Central.
- Click the Gateways tab.
- Select Add new gateway account.
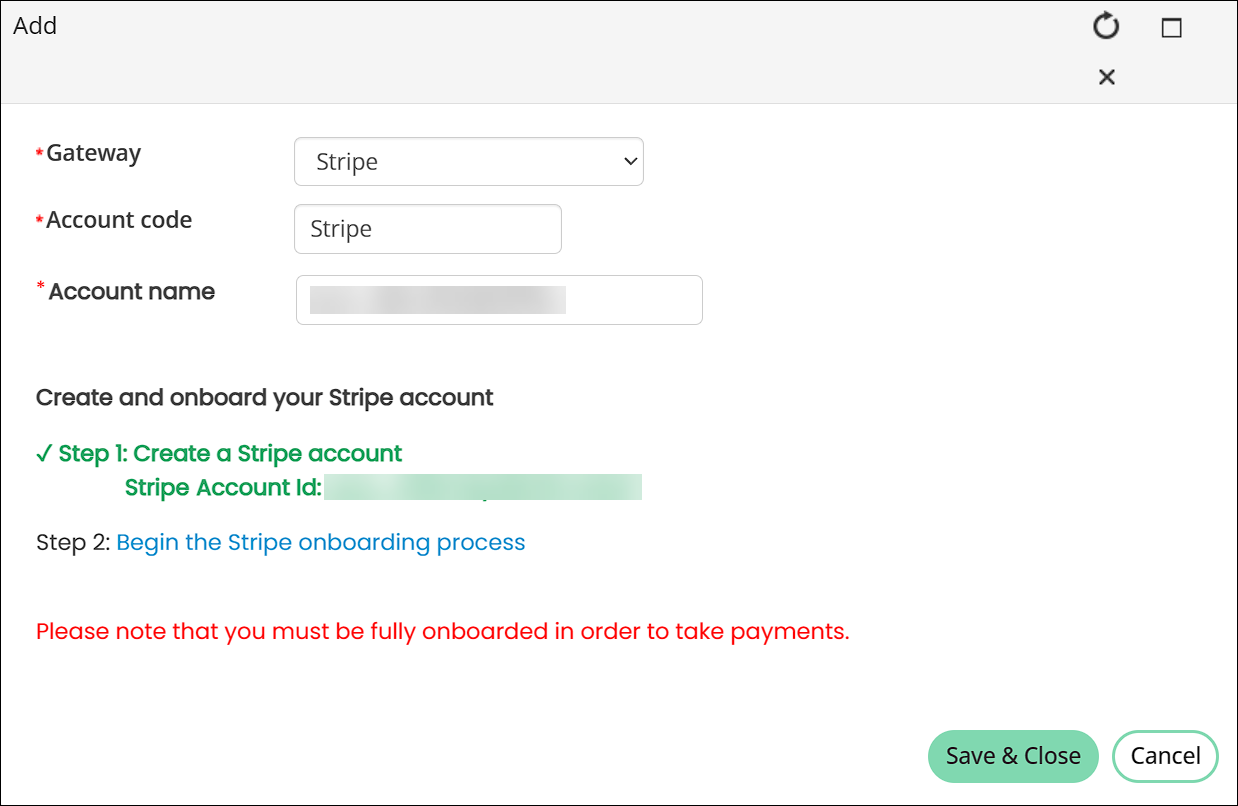
- From the Gateway drop-down, select Stripe.
- Enter an Account name, such as Stripe.
- Select the create a Stripe account link. Once the account is generated, the account Id displays on the screen and step one is marked as complete.
- Select Begin the Stripe onboarding process. Clicking the link saves and closes the gateway in iMIS and opens the Stripe onboarding site in a new browser tab.
- Continue through the Stripe onboarding process.
- When complete, Agree & Submit the Stripe account agreement.
- (Asia Pacific only) Request that BECS be enabled for Stripe Connect accounts. In order to begin taking payments, BECS direct debits require specific verification requirements, mandate collection, and regional regulatory compliance. Staff must submit a support ticket to request that BECS be enabled for each Stripe Connect account. Include the following in the support ticket:
- Organization Name
- Organization contact information
- Stripe Connect account number - Stylized as "acct##########"
- After finishing the stripe onboarding process you can return to iMIS..
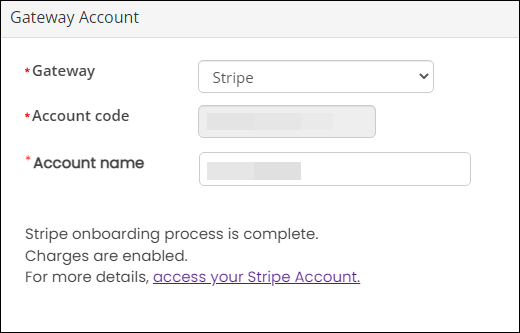
- Stripe will verify the account details. This verification time will vary based on the information provided. Once verified, the gateway window displays a confirmation message that the onboarding process is complete, and charges are enabled. At this point, the onboarding process is complete.
Important! If you attempt to save and close the Stripe gateway before step one is complete, an error occurs. You must use the link to create a Stripe account before saving and closing.

Important! Payments cannot be accepted until the onboarding process is complete. If the onboarding process was stopped too early, navigate to the gateway in iMIS, then select the Begin the Stripe onboarding process link.

2. Configure On Behalf Of & enter gifts payments
Before you can make On Behalf Of payments or Enter Gifts (Fundraising > Enter Gifts), you must have the Mail order/Telephone order (MOTO) functionality turned on in the Stripe account. MOTO functionality must be enabled by the Stripe technical support team:
- Open the Stripe MOTO page.
- Select the Contact Support link located on the right panel.
- Enter a support request to have MOTO enabled. Be sure to include your account number, located in the accounts section of your Stripe profile.
- The Stripe technical support team will turn on MOTO for the account. When confirmed, you can begin entering On Behalf Of payments using Stripe payment methods.
Note: You may have multiple accounts if you have attempted onboarding multiple times. Contact iMIS support for help locating the correct account number.
Important! Staff must enter a valid CVC or CSC when entering credit card details for one-off payments.
3. Create payment methods & add them to payment method sets
Create a payment method using the Stripe gateway, and connect the payment method to the Staff and Public payment methods sets. See Payment methods and payment method sets.
Important! Separate payment methods must be created for direct debit payments and credit card payments.
4. Test the gateway
Be sure to test payments before launching Stripe live. When you are ready, you can refund the test payments. See Refunding payments.
Important! If you are testing Stripe from a live instance of iMIS, you must do a payment and refund using a real credit card.
Stripe rates
| Country | Domestic Cards | International Cards | BECS direct debit | BACS direct debit | ACH | SEPA |
|---|---|---|---|---|---|---|
| Australia | 1.79% + AU$0.30 | 3.5% + AU$0.30 | 1% + AU$0.30 | |||
| Canada | 2.9% + CA$0.30 | 3.5% + CA$0.05 | ||||
| New Zealand | 2.79% + NZ$0.30 | 3.7% + NZ$0.30 | 1% + NZ$0.30 (not yet available) | |||
| Singapore | 3.49% + SG$0.30 | + 0.5% | ||||
| United States | 3.49% + US$0.30 | + 1.5% | 0.8% | |||
| United Kingdom | See Stripe pricing for full details. | |||||
| Euro Countries | See Stripe pricing for full details. |
Importing direct debit mandates
In certain cases, users may have previously agreed to a payment mandate that gave consent to process a recurring payment using the user's bank details. Using the Workbook Converter, staff can import existing gateway mandates in order to take payments using the formerly agreed upon payment method.
See Importing direct debit mandates for full details.