Last updated on: January 27, 2026
Use this document to learn how to establish financial entities and assign GL accounts to ensure the successful creation of GL journal entries. This tutorial also provides an introduction to Finance and outlines best practices for using it effectively.
GL journal entry hierarchical structure
There are not many exceptions in which a needed GL account is not covered by the default account for the relevant entity; however, there is a hierarchical structure that iMIS relies on when generating GL journal entries:
- Override accounts: The generation begins by reviewing the override accounts defined for the specific items included in the transactions, and then analyzing them for a defined financial entity or GL Account.
- Functional level: The generation moves next to review financial entities and GL accounts defined in a functional area (settings).
- Default entity and accounts: The generation’s last stop is at the default financial entity and the default accounts per financial entity.
Hierarchical structure for each iMIS area
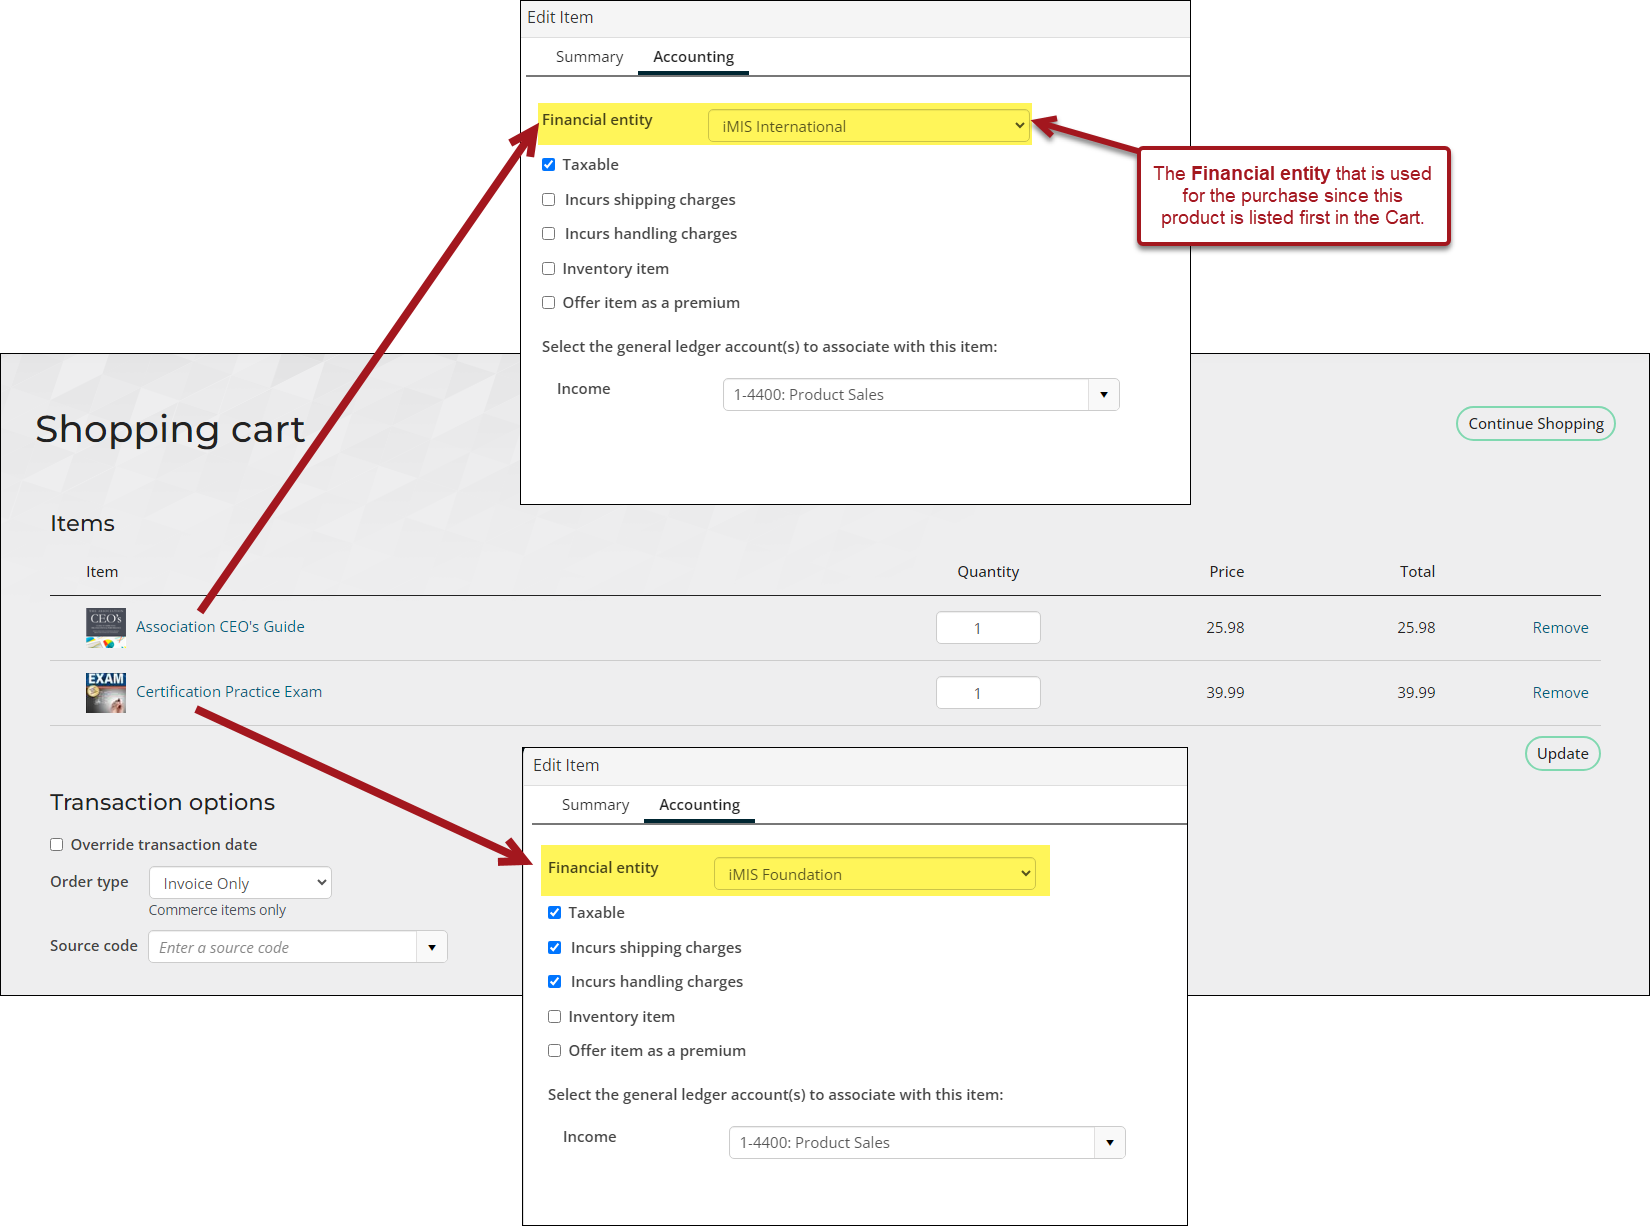
The financial entity directly or indirectly associated with the first commerce product listed in the cart is assigned as the overall financial entity owner of the order and the overall invoice.
If multiple commerce products have been added to the cart and a different financial entity owner is associated with one or more subsequent products within the cart, then a due to/due from scenario will arise. In this situation, a due to/due from scenario arises between the subsequent product’s financial entity as the income entity and the initial product’s financial entity.
When an order transaction is invoiced in this scenario, and the GL Export procedure is subsequently run, the following happens:
- The export creates a due to/due from entry with a due-to liability entry generated for the overall order/invoice financial entity
- Due-from receivable entry is created for each invoiced product with an entity different from the overall order/invoice entity
The financial entity associated with an invoiced commerce product is derived by finding the first place in which the financial entity is assigned using the following hierarchy:
- Product definition: On the Accounting tab, choose the Financial entity for the product. The financial entity is assigned here specifically or left unpopulated, which will display as Default.
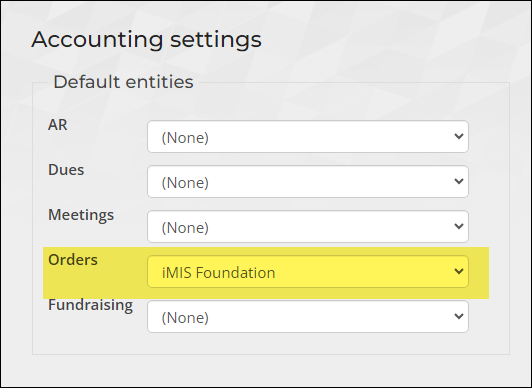
- Default entities - Orders: From Settings > Finance > General, choose the specific financial entity assigned for Orders . A financial entity can be assigned or left unpopulated.
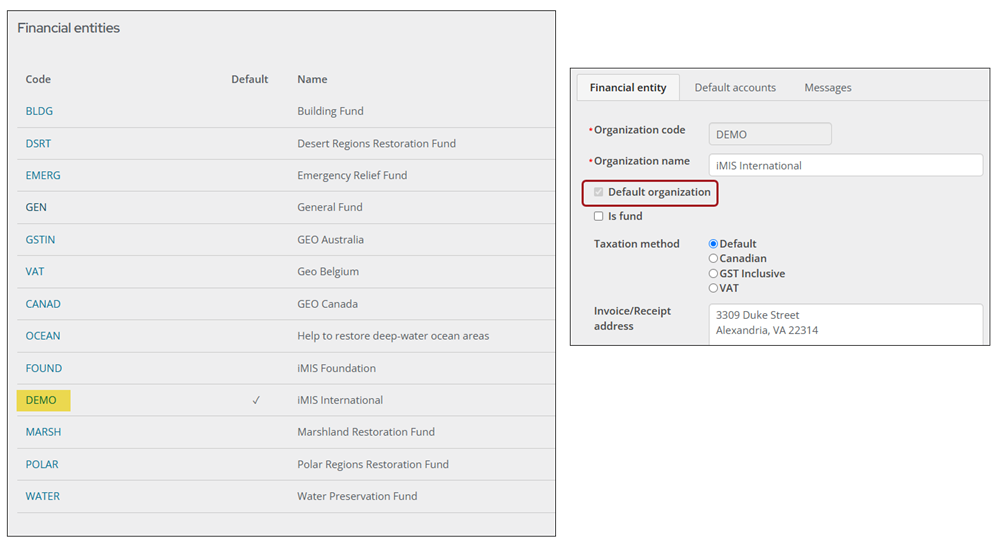
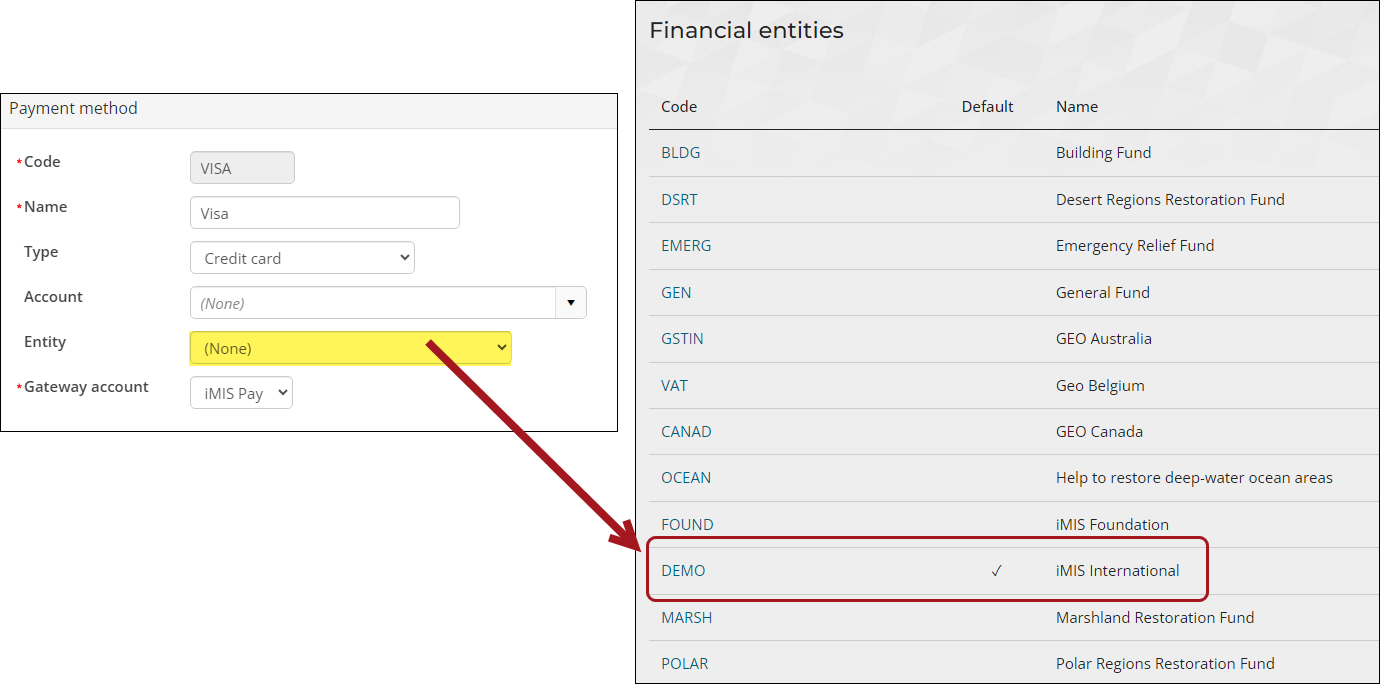
- Default financial entity: If a financial entity is not assigned to either the individual product or to the default Orders financial entity, then the overall system default entity is assigned as the financial entity associated with the commerce item. This is the entity with Default organization enabled at Settings > Finance > Financial Entities.
The financial entity directly or indirectly associated with the event is assigned as the overall financial entity owner of the event registration order and the overall invoice.
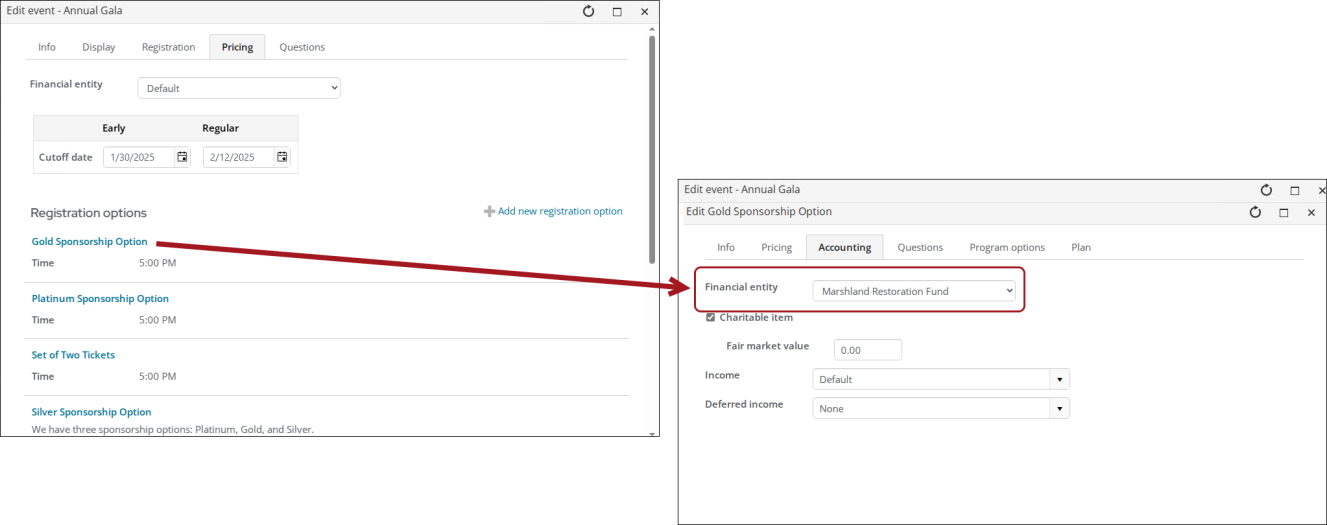
If a different financial entity owner is specifically assigned to an individual registration option or program item, then a due to/due from scenario will arise between the registration option or program item’s financial entity as the income entity and the overall event’s financial entity.
If there are any financial entities associated with an individual registration option or program item within an event registration that are different than the entity associated with the overall event, a due to/due from entry is generated when the GL export procedure runs. It creates a due to/due from entry with a due-to liability entry for the overall event’s financial entity and a due-from receivable entry for each registration option or product item with a different entity.
The financial entity associated with an overall event is derived by finding the first place in which the financial entity is assigned using the following hierarchy:
- Overall event definition: From the event definition's Pricing tab. The financial entity is assigned here specifically or left unpopulated, which displays as Default.
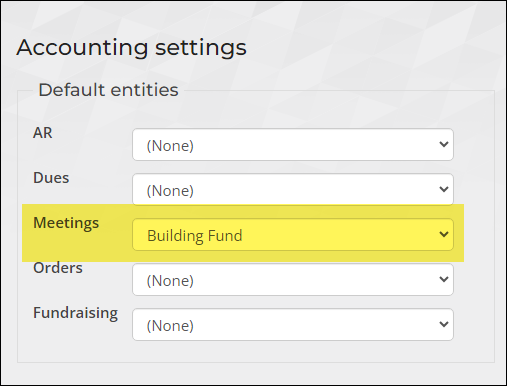
- Default entities - Meetings: Specific financial entity assigned for Meetings under the Default entities section at Settings > Finance > General. A financial entity is assigned here specifically or left unpopulated.
- Default financial entity: If a financial entity is not defined on the overall event definition or to the default Meetings entity, then the overall system default entity is assigned as the financial entity associated with the overall event. This is the entity with Default organization enabled at Settings > Finance > Financial Entities.
The financial entity associated with an individual registration option or program item is derived by this hierarchy:
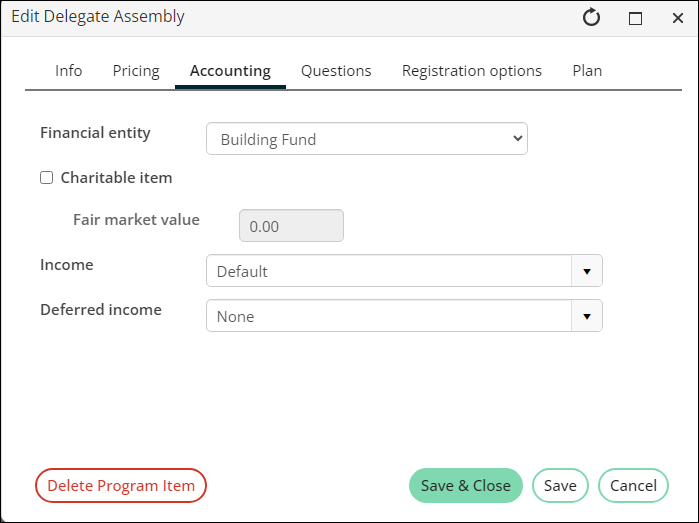
- The Financial entity selected on the Accounting tab of the registration option or program item definition. The financial entity can be assigned here specifically or left unpopulated, which will display as Default.
- Financial entity assigned to or derived for the overall event, according to the hierarchy described above.
The financial entity directly or indirectly associated with the gift or pledge income and any accounts receivable amount is assigned through this hierarchy:
- Gift item definition: Specific financial entity assigned to the Gift Item on the Accounting tab of the gift definition. The financial entity is assigned here specifically or left unpopulated, which displays as Default.
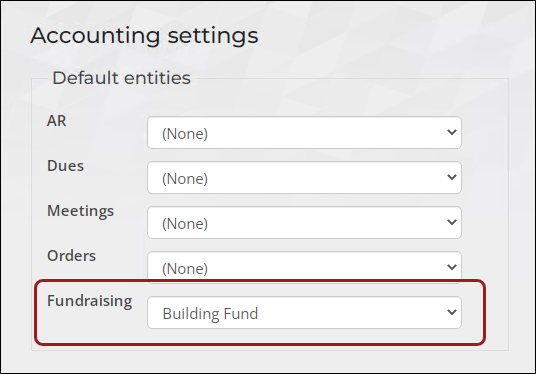
- Default entities - Fundraising: Specific financial entity assigned for Fundraising under the Default entities at Settings > Finance > General. A financial entity is assigned here or left unpopulated.
- Default financial entity: If a financial entity is not assigned to either of the above, then the overall system default entity is assigned as the financial entity associated with the gift item. This is the entity with Default organization enabled at Settings > Finance > Financial Entities.
The financial entity directly or indirectly associated with the membership or subscription income and any accounts receivable amount is assigned through this hierarchy:
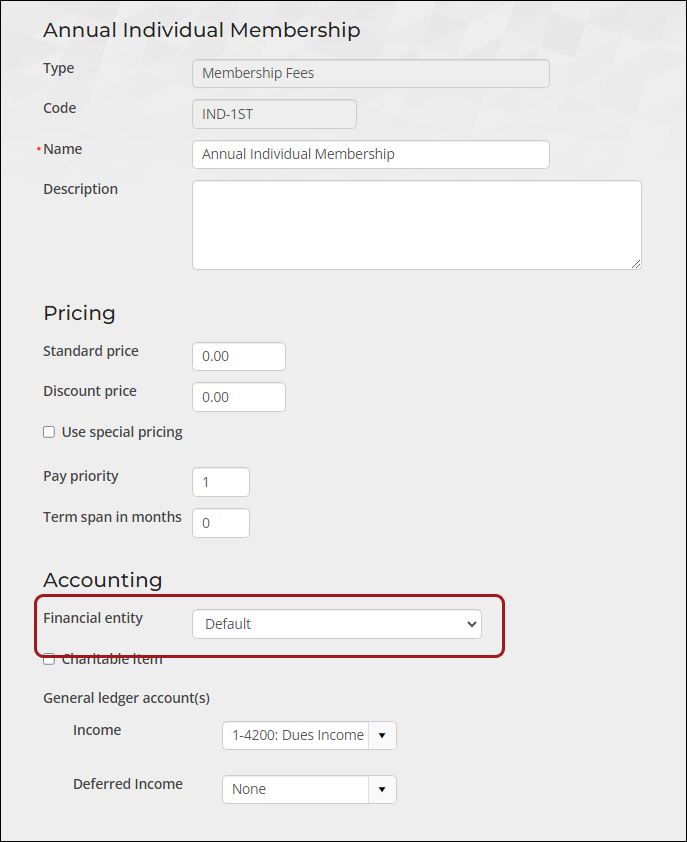
- Overall product definition: Specific financial entity assigned to the billing product in the Accounting section of the product definition. The financial entity is assigned here specifically or left unpopulated, which displays as Default.
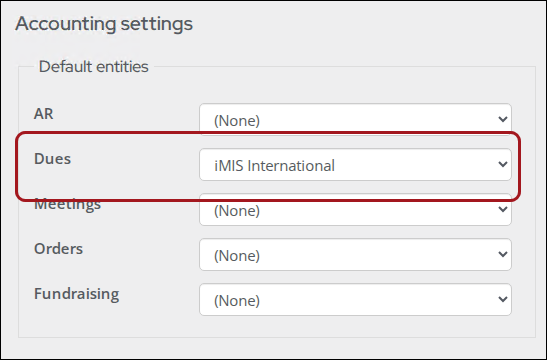
- Default entities - Dues: Specific financial entity assigned for Dues under the Default entities section at Settings > Finance > General. A financial entity is assigned here or left unpopulated.
- Default financial entity: If a financial entity is not assigned to either of the above, then the overall system default entity is assigned as the financial entity associated with the billing product. This is the entity with Default organization enabled at Settings > Finance > Financial Entities.
There are multiple ways in which a GL account and financial entity can be assigned to a transaction:
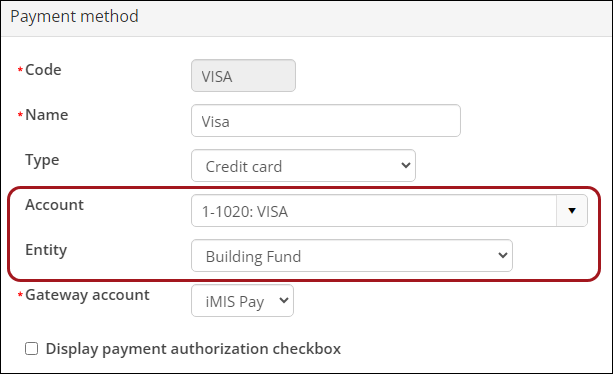
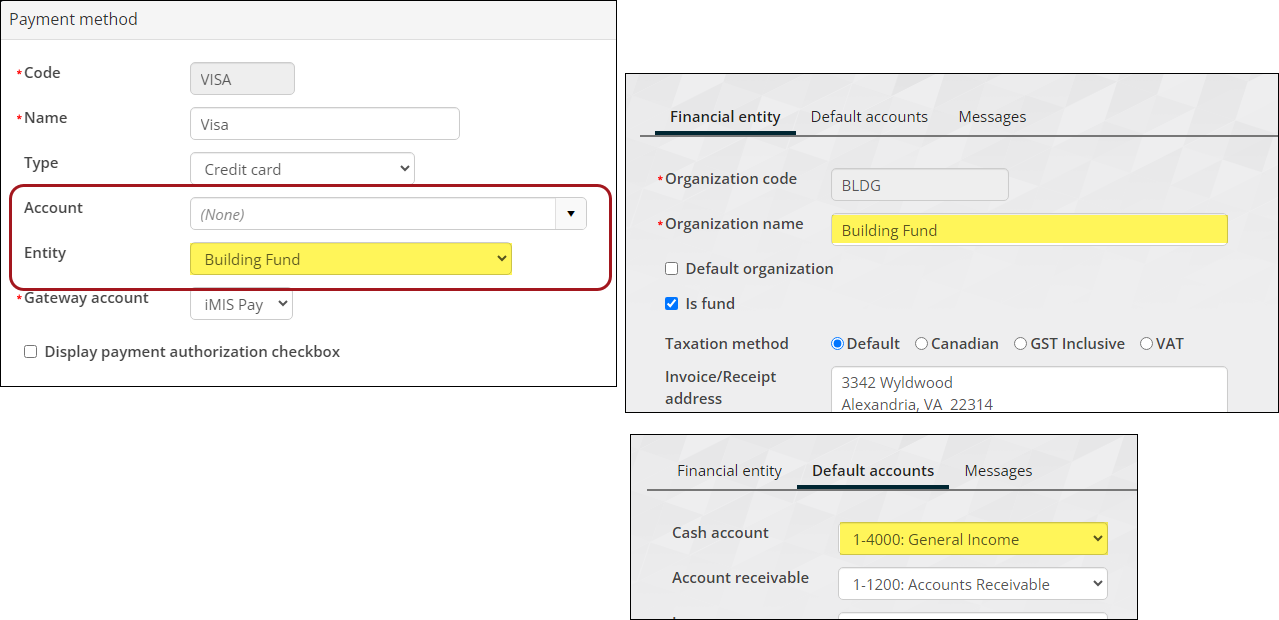
- The GL account, and if multiple entities are in place, the associated financial entity, can optionally be assigned for each payment method.
- If the GL account is not populated for a payment method, then the default cash account assigned to the relevant financial entity is assigned.
- If the entity is not assigned to the payment method, then iMIS assigns the default entity, if it is populated.
Financial entity configuration process
In iMIS Accounting, the financial entity (or entities for some) is the business unit that maintains the financial books, such as the association, organization, or foundation that uses iMIS. All iMIS users must have at least one financial entity configured with a set of default GL accounts.
If there is a need for multiple financial entities that maintain a separate set of financial records, then those financial entities must also be created with a set of default GL accounts.
Do the following to configure a financial entity and important financial settings:
To create a financial entity, go to Settings > Finance > Financial entities. Note that the Taxation method for existing financial entities should not be changed. See Defining an organizational entity for more information.
Important! If you have more than one financial entity, continue creating the entities in this step. A future step details how to continue configuring iMIS to support multiple entities.
Before you can assign default accounts to a financial entity, you must first create the accounts in iMIS.
You will want to define accounts, such as cash, income, accounts receivable, and refund clearing. Each account has a code and description:
- Code – Typically a number, such as 1-1100.
- Description – Typically a short name for the account, such as Cash.
The full account name would be 1-1100: Cash.
Overview of the default accounts
The following are the default accounts that must be added to iMIS:
- Cash account - This account is a bank account used for all incoming and outgoing payments and is used as the default account for all means of payment: Cheque/Check, Transfer, Cash, and Credit Card. Multiple cash accounts can be defined e and used at the payment method level, but there must be only one default cash account.
- Accounts receivable - This account is used whenever full payment is not received for any order (for example, sales item or event registration) and when an invoice is reversed. You can only have one Accounts receivable account per organization.
- Income – This account is used to represent income earned. Multiple income accounts can be defined and used in various items throughout iMIS, such as event registrations, commerce products, or billing products. iMIS uses this default income account only for those transactions where an income account is not specified at the product level.
- Sales tax - Used for the following transactions:
- VAT tax
- Sales, goods, and services
- When a sales tax account is not specified at the tax code level (Settings > Finance > Tax codes).
- Freight – Account used to allocate all shipping charges associated with orders.
- Handling – Account used to allocate all handling charges associated with orders.
- Restock – This account has been deprecated and is no longer used anywhere in iMIS. There are plans to eventually remove this account from iMIS.
- Refund clearing - Used when a refund is processed for a Cash or Check payment method.
- Refund AP - This account has been deprecated and is no longer used anywhere in iMIS. There are plans to eventually remove this account from iMIS.
- Prepaid - iMIS uses this account when a prepaid order is initially entered. The cash account is debited and the prepaid account is credited. When the order is invoiced, iMIS clears the prepaid amount and credits (transfers to) the appropriate income account. This is a required account that is used in conjunction with prepaid order processing. The prepaid account is typically a deferred income balance sheet account.
- Transfer/Clearing - This account is reserved for transaction generation where forced balancing is required. iMIS uses the Transfer/Clearing account for the following system processes:
- Used in conjunction with prepaid order processing (simple and full order entry). It is used as a clearing account in the process to transfer the prepayment offset from prepaid (deferred income) to income.
- Used in the GL interface procedure for certain GL package choices. It is used when GL journal entries are generated and a restricted number of transaction lines are mandated.
- Open credit processing. See Applying an open credit.
- Write-off/Offset - This is the GL account to which the offset credit or debit created by the credit/debit write-off process will be written.
Tip: See Understanding order transactions in batches and reports for more information about the Prepaid and Transfer/Clearing accounts.
Note: When the Transfer/Clearing account is used in a line item within a transaction, there will always be an offsetting line items in an associated transaction to ensure that entries to the transfer account will always balance to zero.
Creating the default GL accounts
Do the following to create a new general ledger account (populate the chart of accounts):
- Go to Settings > Finance > GL accounts.
- Select Add new account:
- Code – Enter the GL account’s Code. This is a unique shorthand number given to each account in the Chart of Accounts. The GL Code is what financial systems use to categorize revenue data, such as invoices, and attach it to an account before it is exported to the financial system.
- Description – Enter the account’s Description, such as Cash, Income, or Debit.
- Do not enter an Expansion value.
Note: Account codes cannot be changed after they are saved. If you need to modify an account code, you must create new codes with the necessary updates. For the existing codes, update their descriptions to include a note such as "(do not use)" or something similar, but do not delete them. Additionally, ensure that all related products and items are updated to reference the new codes to maintain consistency and accuracy.
- Click Save & Continue.
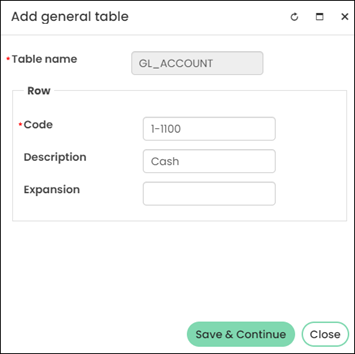
- Continue adding accounts till all accounts that are used are added to iMIS.
Adding the default accounts to the financial entities
Do the following to add default accounts to the financial entities:
- Go to Settings > Finance > Financial entities.
- Select the financial entity Code.
- Click the Default accounts tab.
- From each drop-down, select the appropriate account.
- Click Save & Exit.
iMIS cannot process credit or debit transactions until the payment gateway and methods are configured. See Global Payments Getting Started for a start-to-finish guide.
If configuring multiple entities, make sure the payment method has the correct Entity selected.
If you use one entity's cash account to receive income meant for a different entity, you must set up due to/due from accounts to ensure that your accounting records are correct. iMIS generates due to/due from entries for configured entity relationships when the general ledger export is run. These entries correct balancing problems created by entities receiving cash for which they do not have matching income, and entities receiving income for which they do not have matching cash.
See Due to/due from to set up the account processing.
This is an optional step.
If there are certain items (events, dues, orders, etc.) that are not going to use the default accounts, define those now.
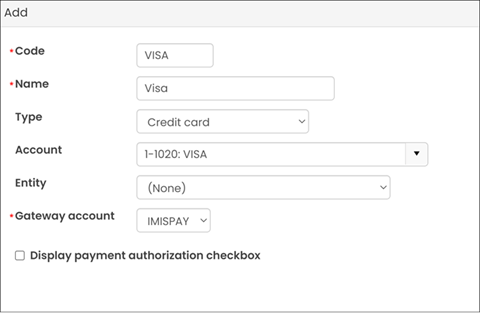
Example: The association has a specific account that all Visa transactions are deposited into. The Visa payment method must be updated to have that account specifically selected.
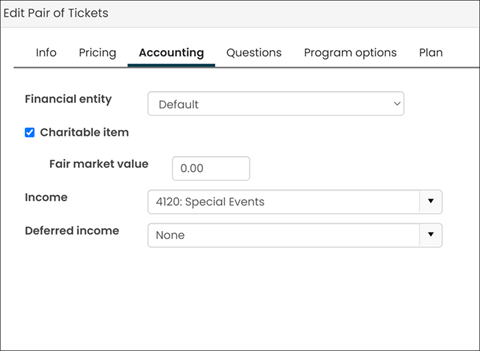
Example: The registration fees for an upcoming Charity Golf Tournament event must be deposited into a specific account. The income account for each registration option has the account selected.
Configure the functional areas to have the correct entity selected, making sure the correct Entity is selected for each product, event, payment method, etc.
See Assigning financial entities to transactions examples and details.
Go to Settings > Finance > General. Change and update the settings based on the needs of the organization. See Finance Settings for a full description of each setting.
Important! For those configuring VAT, be sure to select the correct VAT setup options. These options should be selected before any transactions are processed in iMIS. See VAT setup.
Important settings to note:
- Batch control – It is important to select the batch mode that works best for your organization. See Batch control.
- General ledger interface – It is important to select the general ledger export options that work best for your accounting system. See Selecting a summarization option
Configure iMIS so the correct taxes are collected for purchases:
iMIS Accounting Best Practices
Review the following best practices for important accounting tips.
batches
Out-of-balance and/or incorrect batches should not be posted, and out-of-balance or incorrect transactions should not be exported to GL.
You should contact ASI Technical Support to resolve the issue, to ensure there is no data corruption that could lead to further issues.
You may require an adjustment transaction to have the same date as the original transaction, so that there is a net zero in the GL; however, that may not be possible if the financial period (or month) has already been closed in the accounting system.
If the batch has not yet been posted to the GL and the financial period has not yet closed, the batch could be reopened and the adjustment processed in the same batch as the original transaction.
Although it is possible to reopen a batch after the existing transactions in the batch have been exported to the General Ledger (GL), it is not a recommended practice, because GL exports would then need to be managed.
If transactions are subsequently added to an already exported batch, the batch should be reposted and the staff user that performs the GL exports should be notified. This staff user would need to run a GL export for a date range that has previously been exported. Only the newly added transactions would be exported.
The GL export picks up batches that are posted. It is recommended that batches are posted on a regular basis to control what batches are picked up by the GL export.
If you are not ready to post the batch, you can set the batch to Ready until you are ready to post it.

Posting multiple batches at once triggers a process to work in the background. You should wait and verify that all selected batches were successfully posted before launching the GL export.
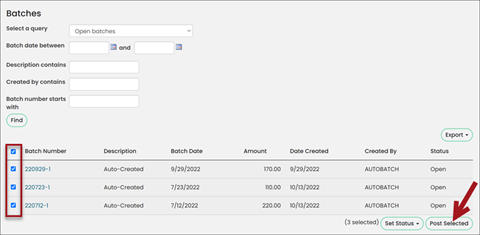
Running batch reports before posting the batch ensures transactions in the batch are balanced before they are posted. It is important to run the batch reports to confirm the debits equal the credits.
Important! Do not attempt to post batches that are not in balance.
You can generate several reports for your batches. Do the following:
- Go to Finance > Batches.
- Search for the batch, then select the Batch Number.
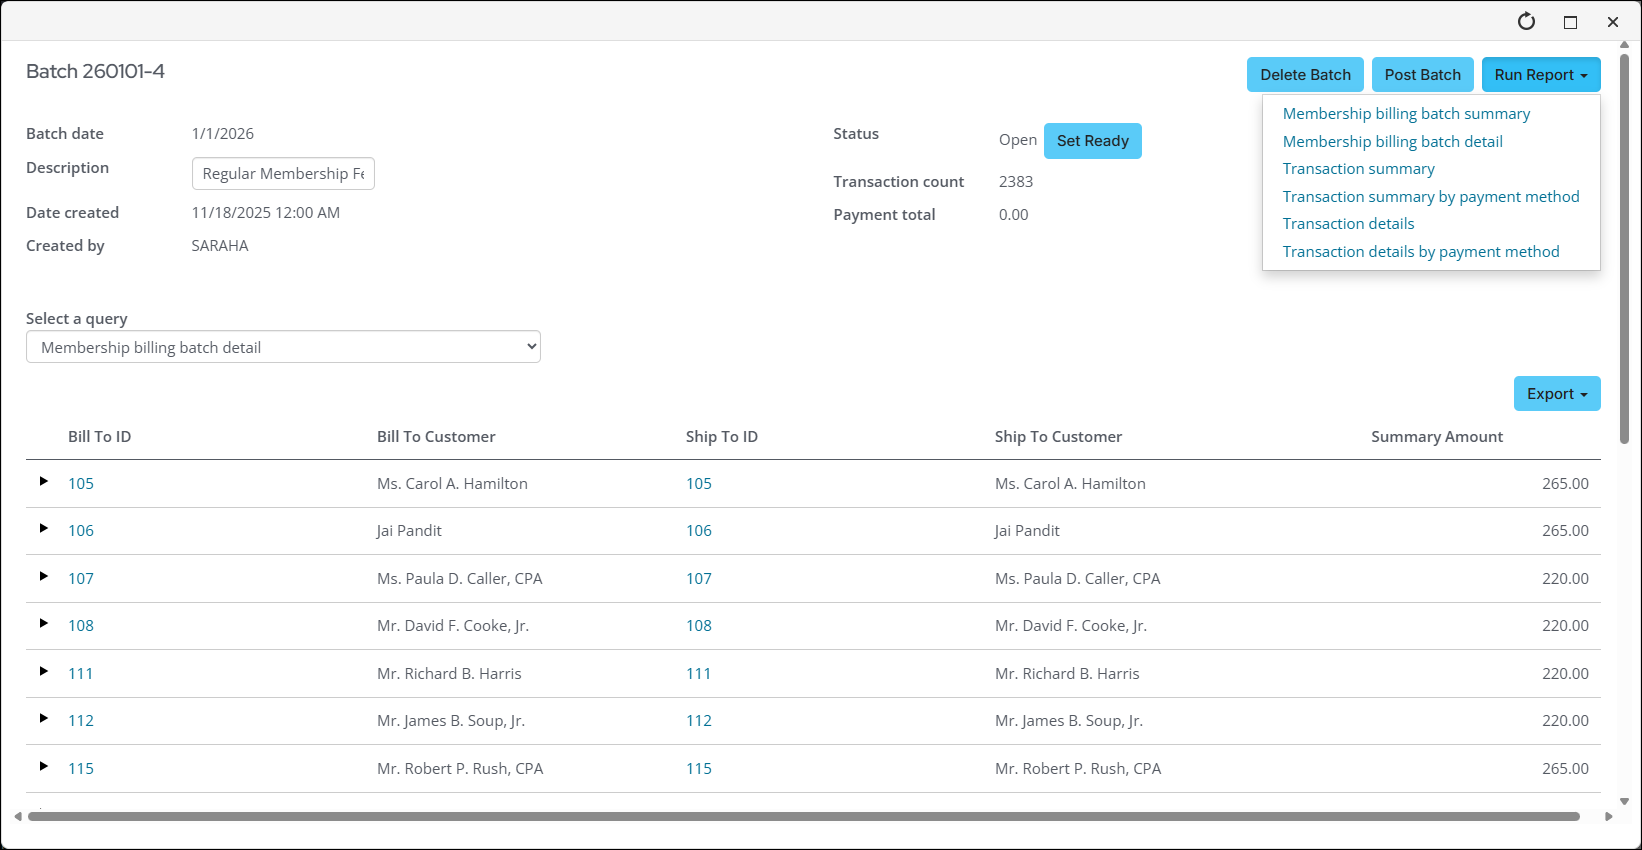
- Click Run Report and select one of the following:
- (Membership billing batches only) Membership billing batch summary (prints the Membership Billing Batch Summary report): Provides a batch summary for accrual membership billing batches. Grouped by Batch Number, Member Type and Product Code, and includes only the following product types: DUES, CHAPT, SEC, SUB, VOL, and MISC.
- (Membership billing batches only) Membership billing batch detail (prints the Membership Billing Batch Detail report): Provides batch details for accrual membership billing batches. Grouped by Batch Number and Bill to ID, and includes only the following product types: DUES, CHAPT, SEC, SUB, VOL, and MISC.
- Transaction summary (prints the Batch Transaction Summary report): A summary batch that lists in sequential order one summary line for each transaction in the batch (similar to the summary that is listed in the view).
- Transaction summary by payment method (prints the Batch Transaction Summary by Payment Method report): This report assists in the reconciliation of bank accounts with sorting and summarizing the transactions by Cash GL Account and the payment method within the GL Account. The transactions in the batch that have no payments are sorted and summarized at the end of the report. The report has the following groupings and subtotals:
- Broad category sorts and subtotals for Payment Transactions, Application of Open Credit, and Non-Payment transactions
- Within the Payment broad category only:
- High level sort and summary by Cash GL Account
- Within Cash GL Account, intermediate sort and summary by payment method
- Sequentially by TRANS_NUMBER within each sort group
- Transaction details (prints the Batch Transaction Details report): Provides a header for each transaction and prints each detail line, showing the applicable debit or credit amount and any adjustment amount.
- Transaction details by payment method (prints the Batch Transaction Details by Payment Method report): A detailed batch report, sorted and subtotaled by each unique combination of Cash GL Account and payment method. It is followed next by a section of application of open credit (if such transactions exist in the batch), and with all non-payment transactions sorted and grouped at the bottom of the report.
Note: Adjustment amounts only apply to cash dues payments.
The report also prints a transaction recap located at the end of the report. The recap lists a GL transaction summary (grouped for each transaction owner financial entity represented in the batch) and summarized by either GL Account or Pseudo Account.
Orders processed in iMIS go through various order stages, such as converting it from a quote to an actual order, printing shipping papers for shipping, and then ultimately generating an invoice for the order.
Since the order goes through these stages, at the time the order is placed and paid, the payment is applied to a prepaid invoice, because the order is not initially invoiced. Once the order is invoiced, iMIS transfers the credit for this prepayment against the order invoice (this invoice is created at the time orders are invoiced).
Review Understanding order transactions in batches and reports before processing order invoices.
Month-end procedures & Exporting to the GL
Use the Credit Card Post Authorization report (Reports > Accounting reports) to reconcile credit card transactions that are not in a deferred status with the gateway.
It is important that the deferred income is reconciled at the end of each month.
Do not do the following if you use deferred income:
- Span multiple months
- Run a future month where another month is not accounted for (there is a gap in the export)
Note: You must be licensed for Deferred Income to use these reports.
It is important to run several financial reports to run before-and-after exporting the GL transactions.
Before each GL export, run the Deferred Income Detail report (Reports > Accounting reports). This report details which entries will be posted to the matrix, so that you may verify the accuracy of the data.
After each GL export, run the following reports (Reports > Accounting reports):
- Deferred Income Matrix Summary – Provides the current status of deferred income grouped by account. Includes the totals that were originally posted to deferred income, how much has been recognized to date, and the amount that remains to be recognized in future months. Use this report to compare the “Amount Remaining” to the GL account balances.
- Deferred Income Audit Trail – Provides an audit trail to simulate the income that was recognized and the deferred income balances that remained for a specific monthly period (any month for which the GL Export has already been run). This report simulates the process that iMIS uses to generate the deferral to income transfer entries with one exception. It depicts the income recognition at the individual detail transaction level, as opposed to the matrix summary level that iMIS uses to generate the actual entries. As a result, the reported income amounts will most likely be different from the actual amounts by small rounding differences. Nonetheless, the report should give a close approximation of the actual transfer amounts per month as well as the residual balance at the end.
Before exporting GL transactions, it is important that all accounts are correctly populated. To quickly review the default accounts defined in financial entities, do the following:
- Go to Finance > Dashboard.
- Click the Data integrity tab.
- Review the Entity default accounts, ensuring the accounts are correctly populated for each financial entity.
- Update the default accounts if they are not correctly populated (Settings > Finance > Financial entities > Default accounts tab).
Run the GL export at the official month end when everything is balanced, and no other transactions will be processed for the month. Exporting GL transactions may be done more than the month-end, but at a minimum it should be done monthly.
It is not recommended to make GL entries outside of iMIS to correct accounts, such as income, accounts receivable, or deferred income.
If there are pre-conversion balances that still need to be maintained outside of iMIS, it is recommended that you create unique GL accounts for those maintained by iMIS, so that the reconciliation product can be completely cleaned.
If the GL is not balanced, review the above to look for missed steps and investigate the variance. If you are unable to find the cause, please contact ASI Technical Support.
Important! Do not attempt to correct with a manual entry. Contact ASI Technical Support.
Review the Finance dashboard's (Finance > Dashboard) Data integrity tab to review the following:
- Unexported transactions before current month
- Unexported transactions by date
Make sure these transactions are exported and imported accordingly.
Transactions
You might frequently receive transactions, such as product orders, through the mail or over the phone. In these cases, the payment is often deposited before a staff member can enter the transaction into iMIS, but the transaction date in iMIS must match the true date of the transaction.
To accomplish this task, Staff users can easily backdate their own and On behalf of cash and check transactions. This would apply to new orders being placed in the cart.
The entered transaction date is used for the following:
- Order date
- Invoice date
- Journal entry date
- Payment date
The transaction is added to an open batch for the entered transaction date. If all batches for that date are closed, a new open batch for the date is automatically created.
Do not backdate a month that has already closed (you have already exported the transactions from iMIS). This can cause issues, because you may forget to export the backdated transaction, since you have already exported/closed out that month.
