Last updated on: June 19, 2026
Assigning financial entities to transactions
Important! Do not change the Taxation method for existing financial entities. Instead, create a new financial entity with the appropriate tax method.
As the self-service functionality of the public website evolved, it was clear that self-service users were not creating batches or assigning cash accounts to the batches. As a result, no batch cash account or batch cash entity has ever been assigned to any online created batch.
Since almost all types of transactions can be processed by either public or staff users, the decision to standardize the processing on one model was necessary. For that reason, in iMIS EMS, the batch cash account is never populated in any online created batch, and the batch cash financial entity is eliminated from the hierarchy for determining the financial entity ownership of transactions.
iMIS Desktop: Understanding the batch cash account's financial entity
In iMIS Desktop, the batch Cash Account’s financial entity was used in two ways regarding accounting and financial entity assignment:
- Payment Processing – When a check or cash payment is processed, the GL account and financial entity (directly or indirectly) associated with the batch's Cash Account was assigned to the payment transaction. If a credit card or debit card payment is entered, the GL account and financial entity (directly or indirectly) associated with the credit or debit card cash account was assigned to the payment transaction (as opposed to the batch Cash Account and financial entity).
- Income and Accounts Receivable Processing – The batch Cash Account’s financial entity also factored into the hierarchy to determine the financial entity ownership of the income or accounts receivable entries. The hierarchy involved in assigning a financial entity to income transactions and any invoices that are generated from those financial entities is:
- Financial entity directly assigned to the product and/or the overall event
- Batch cash financial entity
- Module level default financial entity
- Overall system default entity
iMIS EMS: Comparing how financial entities are assigned
In iMIS EMS, the cash GL account and financial entity assignment is processed according to this approach:
- Payment Processing – In every case, the payment’s GL account and financial entity is derived from the payment method that is selected for the transaction. While there was only one check or cash “cash account” (or payment method) per each Desktop batch, in iMIS EMS, a choice can be made from any number of check/cash payment methods that are maintained in a staff payment method set.
- Income and Accounts Receivable Processing – The batch cash account’s financial entity, since it is never assigned,
is eliminated from the hierarchy to determine the financial entity ownership of the income or accounts receivable entries.
The hierarchy involved in assigning a financial entity to income transactions and the invoices that are generated from those financial entities is:
- Financial entity directly assigned to the product and/or the overall event
- Module level default financial entity
- Overall system default entity
In short, the same functionality that applied to deriving the GL account and financial entity for a credit or debit card payment in Desktop now also applies to check or cash payments. For all forms of payment, the GL account and financial entity (directly or indirectly) associated with the payment method is assigned to each payment transaction.
Alternative batch reports to provide totals by each payment method
In iMIS Desktop, you could more easily create and maintain separate batches for payments. In iMIS EMS, there are more batch reporting options available to sort and subtotal payment transactions by payment method.
Two such options appear in the list of batch reports when viewing a batch in iMIS EMS. The Transaction details by payment method report is illustrated in Section C.
![]()
Assigning financial entities to Income and Accounts Receivable entries
From the income perspective, the financial entity associated with the product or the overall event, in the case of event registration, drives the financial entity for the income transactions. This same financial entity is assigned to accounts receivable entries, if full payment is not initially made. All the steps in deriving the financial entity in iMIS EMS are identical to those taken in Desktop, except that the batch cash account’s entity no longer exists.
Additionally, as it was in Desktop, it is possible for due to/due from entries to arise within the context of an overall order invoice or an overall event registration transaction. This will happen if the financial entity assigned to an individual line item is different from the financial entity assigned to the overall order or registration transaction.
Note: This particular due to/due from scenario is not illustrated in the simple examples in this document.
Order entry invoice
The financial entity directly or indirectly associated with the first commerce product listed in the cart is assigned as the overall financial entity owner of the order and the overall invoice.
![]()
If multiple commerce products have been added to the cart and a different financial entity owner is associated with one or more subsequent products within the
cart, then a due to/due from scenario will arise. In this situation, a due to/due from scenario arises between the subsequent product’s financial entity as the income entity and the initial product’s financial entity.
When an order transaction is invoiced in this scenario, and the GL Export procedure is subsequently run, the following happens:
- The export creates a due to/due from entry with a due-to liability entry generated for the overall order/invoice financial entity
- Due-from receivable entry is created for each invoiced product with an entity different from the overall order/invoice entity
The financial entity associated with an invoiced commerce product is derived by finding the first place in which the financial entity is assigned using the following hierarchy:
- Product definition: On the Accounting tab, choose the Financial entity for the product. The financial entity is assigned here specifically or left unpopulated, which will display as Default.
- Default entities - Orders: From Settings > Finance > General, choose the specific financial entity assigned for Orders . A financial entity can be assigned or left unpopulated.
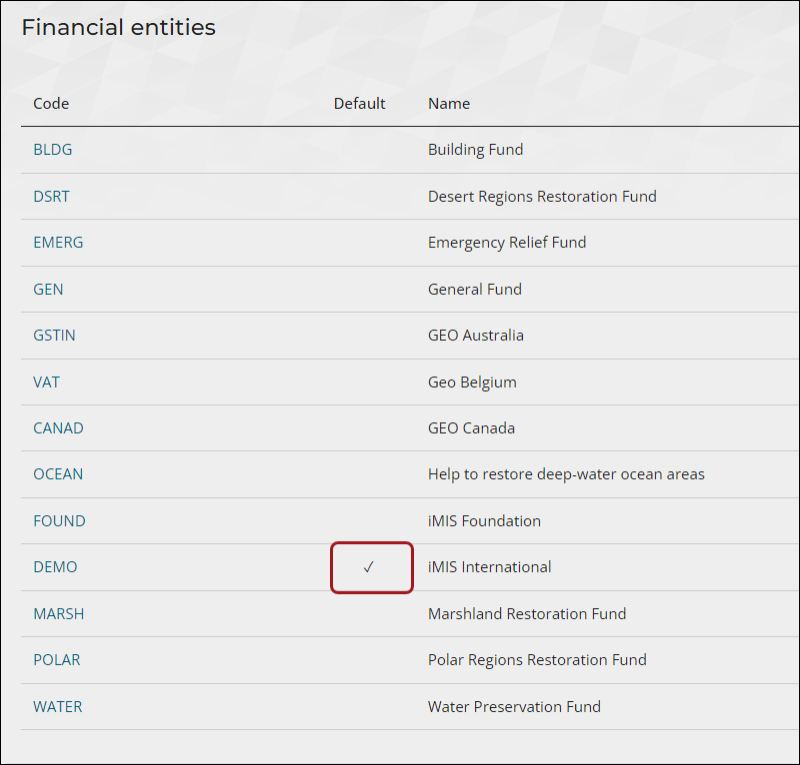
- Default financial entity: If a financial entity is not assigned to either the individual product or to the default Orders financial entity, then the overall system default entity is assigned as the financial entity associated with the commerce item. This is the entity with Default organization enabled at Settings > Finance > Financial Entities.

Event registration
The financial entity directly or indirectly associated with the event is assigned as the overall financial entity owner of the event registration order and the overall invoice.
If a different financial entity owner is specifically assigned to an individual registration option or program item, then a due to/due from scenario will arise between the registration option or program item’s financial entity as the income entity and the overall event’s financial entity.
If there are any financial entities associated with an individual registration option or program item within an event registration that are different than the entity associated with the overall event, a due to/due from entry is generated when the GL export procedure runs. It creates a due to/due from entry with a due-to liability entry for the overall event’s financial entity and a due-from receivable entry for each registration option or product item with a different entity.
The financial entity associated with an overall event is derived by finding the first place in which the financial entity is assigned using the following hierarchy:
- Overall event definition: From the event definition's Pricing tab. The financial entity is assigned here specifically or left unpopulated, which displays as Default.
- Default entities - Meetings: Specific financial entity assigned for Meetings under the Default entities section at Settings > Finance > General. A financial entity is assigned here specifically or left unpopulated.
- Default financial entity: If a financial entity is not defined on the overall event definition or to the default Meetings entity, then the overall system default entity is assigned as the financial entity associated with the overall event. This is the entity with Default organization enabled at Settings > Finance > Financial Entities.
The financial entity associated with an individual registration option or program item is derived by this hierarchy:
- The Financial entity selected on the Accounting tab of the registration option or program item definition. The financial entity can be assigned here specifically or left unpopulated, which will display as Default.
- Financial entity assigned to or derived for the overall event, according to the hierarchy described above.
Fundraising gifts and pledges
The financial entity directly or indirectly associated with the gift or pledge income and any accounts receivable amount is assigned through this hierarchy:
- Gift item definition: Specific financial entity assigned to the Gift Item on the Accounting tab of the gift definition. The financial entity is assigned here specifically or left unpopulated, which displays as Default.
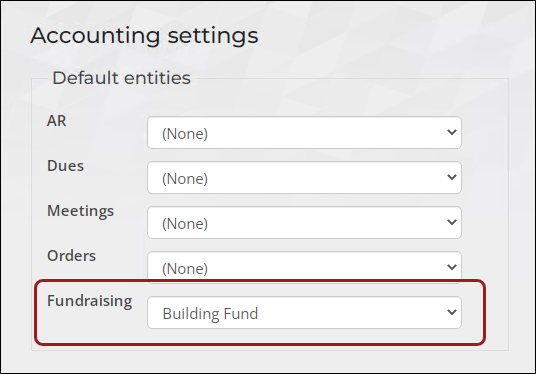
- Default entities - Fundraising: Specific financial entity assigned for Fundraising under the Default entities at Settings > Finance > General. A financial entity is assigned here or left unpopulated.
- Default financial entity: If a financial entity is not assigned to either of the above, then the overall system default entity is assigned as the financial entity associated with the gift item. This is the entity with Default organization enabled at Settings > Finance > Financial Entities.
Billing membership and subscription income
The financial entity directly or indirectly associated with the membership or subscription income and any accounts receivable amount is assigned through this hierarchy:
- Overall product definition: Specific financial entity assigned to the billing product in the Accounting section of the product definition. The financial entity is assigned here specifically or left unpopulated, which displays as Default.
- Default entities - Dues: Specific financial entity assigned for Dues under the Default entities section at Settings > Finance > General. A financial entity is assigned here or left unpopulated.
- Default financial entity: If a financial entity is not assigned to either of the above, then the overall system default entity is assigned as the financial entity associated with the billing product. This is the entity with Default organization enabled at Settings > Finance > Financial Entities.
Assigning GL accounts and financial entities to payment transactions
There are multiple ways in which a GL account and financial entity can be assigned to a transaction:
- The GL account, and if multiple entities are in place, the associated financial entity, can optionally be assigned for each payment method.
- If the GL account is not populated for a payment method, then the default cash account assigned to the relevant financial entity is assigned.
- If the entity is not assigned to the payment method, then iMIS assigns the default entity, if it is populated.
There are several scenarios in which the derived payment financial entity is assigned to payment related transactions. The payment financial entity is assigned to the following types of transaction lines:
- To the entry to record the entry to cash for a new payment that is processed.
- (Indirectly) To the entry to reverse the entry to cash when a payment is reversed. This reversal transaction will be recorded using the financial entity that was originally assigned to the payment.
- To the entry to record a refund. Two possible transaction scenarios can occur when a refund is recorded or processed:
- Entry to record a refund check - If the refund payment method is cash or check, then the default Refund Clearing account for the financial entity associated with (or derived) from the refund payment method will be used.
- Entry to record a PayPal or gateway processed payment - For all gateway processed or recorded refunds, the Cash GL account associated with or derived from the refund payment method will be assigned.
Note: While iMIS will initially default to the payment method that was assigned to the original payment when a refund is being processed or recorded, the user can always choose a different payment method to use for the refund. For example, if the original payment method was a credit card, the user can choose to issue a refund check and therefore has the option to choose the appropriate checking account from which the refund check was issued. All defined payment methods (other than the special purpose Pay Later/Bill Me, Open Credit, and In Kind payment methods) should appear and be available for selection from the refund payment method drop down list.
- To the Accounts Receivable credit entry to record a prepayment or overpayment amount. In this case, the default Accounts Receivable account for the payment method’s derived financial entity will be assigned to the Accounts Receivable transaction line.
Examples
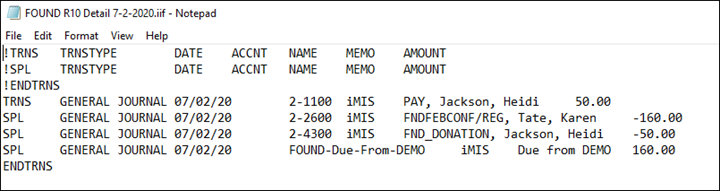
These examples detail various income and payment scenarios for two different financial entities in the iMIS Starter database. The two financial entities used in the examples are iMIS International, the default organization with an entity code of DEMO, and iMIS Foundation, with an entity code of FOUND.
The examples detail how the accounting settings on products, events, and payment methods (and elsewhere in the hierarchy) are used to assign Financial Entities and related GL Accounts to various types of transactions:
- Section A & B: Explore a variety of different settings that could be in place
- Section C: Demonstrates the financial outcome of transactions processed using the products, event, and payment methods whose settings were shown in the earlier two sections.
How the following transactions were processed
The following configuration was used for the examples:
- No batch or transaction override date has been set, which means that iMIS automatically creates a new batch for the current calendar date.
- The Staff payment method set provided all the available payment method options for each transaction.
Batch Control
For simplicity, the default batch control settings remained in place when the simple transactions were processed.
This setting means that iMIS automatically generates a batch for the transaction date if an open batch is not found for that date when the cart is submitted. Whether iMIS auto creates a batch or if a staff user manually creates a batch, the accounting transaction processing related to financial entity and GL account assignment remains the same. This is because the batch cash account is no longer a factor in determining either of these settings (Settings > Finance > General).
Although the default batch setting remain in place, the expectation is that, for most iMIS users, a batch mode choice from the final three options in the drop-down would be selected.
The default current calendar date remains in place for the transaction and batch date
No override of the transaction date was made, so iMIS defaulted all transactions, as well as the batch date, to the current calendar date. The calendar icon can be clicked at any time to either override the transaction date for an automatically generated batch or, if the Manual batches batch mode has been selected, to select or manually create a new batch.
Batch mode that is not the Manual batches option (what is used in these examples):
![]()
Batch mode that is Manual batches (not used in these examples):
![]()
Payment method sets
Because a staff user logged in to process the transactions, the Staff payment method set was automatically used to display the payment method drop down choices (Settings > Finance > Pay Central > Payment method sets > Staff payment method set).
Unlike the iMIS Desktop in which a single check payment method (or cash account) is assigned to a batch that contains check payment transactions, in iMIS EMS, it is common for the Staff payment method set to contain multiple check/cash payment methods. This would be the case if check payments that are recorded through iMIS may be deposited into one of multiple checking accounts. If there are multiple check/cash payment methods available, as in the example displayed below, a staff user can potentially choose any check/cash payment method as well as any other non-check payment method when recording or processing a payment within any given batch.
The screenshot example below shows a demonstration Staff payment method set that contains two different checking accounts among the various payment method choices. These two checking account payment methods play a big role in the simple examples and scenarios in Sections B and C below.
![]()
Example 1: Commerce product where neither the financial entity nor GL accounts are assigned
The income financial entity and GL account that are derived for this commerce product example are shown in this chart:
| Commerce Product Example | Derived Accounting Information | ||
|---|---|---|---|
| Product code | Product name | Financial entity | Income GL account |
| FR002 | Going Mobile Workbook | DEMO | 1-4300 |
The paragraphs below illustrate how those financial settings are derived.
When viewing the user interface used to define or edit a commerce item, the relevant settings related to financial entity and GL account assignment can be found on the Accounting tab.
For the “Going Mobile Workbook” product, neither the financial entity nor any of the GL Accounts are populated. They all remain set to the default choice, which means iMIS will derive what the values should be using the outlined hierarchy rules.
Note: Since this product is not flagged as an Inventory item, only the Income account will be used processing transactions related to the sale or reversal transactions for this product.
Determining the financial entity for the Income and/or Accounts Receivable transactions
Because the financial entity was not assigned to the product, iMIS first checks to see if a default financial entity is assigned for orders (or commerce) products (see Settings > Finance > General). No such default entity is assigned.
Since no financial entity was assigned as the default Orders entity, iMIS settles on the last level of the hierarchy and assigns the overall system default entity of DEMO to the income and, if necessary, accounts receivable transactions (Settings > Finance > Financial entities).
Determining the Income GL account for recording the sales of the product
For a commerce product, when no income GL account has been assigned directly to the product, the first place iMIS looks is to see if an Income account has been assigned for the related product category (Publications in this case; Settings > Commerce > Product categories).
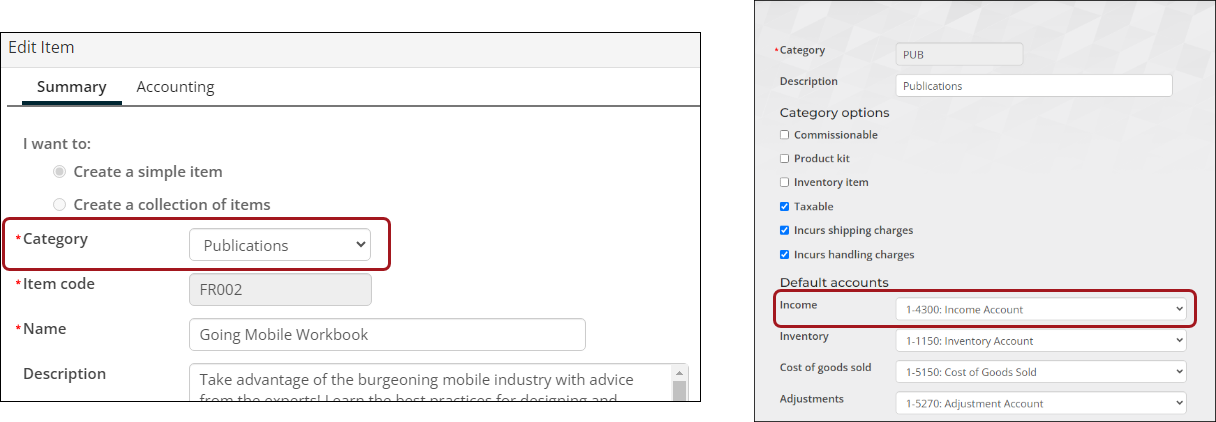
Since the income account is assigned for the category, iMIS will use that GL account to record the sales.
Note: If GL accounts are populated at the category level, it is a best practice to maintain a separate category for different financial entities or to always override the GL accounts at the product level when a different financial entity is assigned to the product.
If the income account was not assigned in the product category definition, the next place that iMIS will look is the default accounts that can be found under the Inventory section of the Commerce System Options (Settings > Commerce > System options).
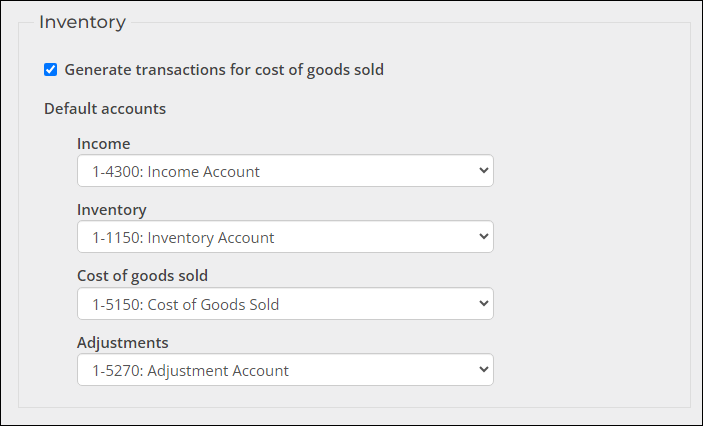
Important! Since these GL Accounts do not vary by financial entity, it is advised to never populate the GL Accounts at this level if support for multiple financial entities is enabled, unless only one financial entity will ever be assigned to commerce products.
If the income account is not assigned at any of the other levels within the GL account hierarchy, then the default Income account assigned for the derived financial entity will be assigned to record the product sales.
If this product is also the first commerce product listed in the cart and if full payment is not applied to the purchase, then the residual balance will be accounted for with this same financial entity’s default Accounts receivable account (Settings > Finance > Financial Entities, select the relevant financial entity Code and click on the Default accounts tab).
Example 2: Fundraising gift item where only the financial entity is assigned
Note: This same example will also apply to Billing items.
The income financial entity and GL account that are derived for this gift item example are shown in this chart:
| Gift Item Example | Derived Accounting Information | ||
|---|---|---|---|
| Gift item code | Gift item name | Financial entity | Income GL account |
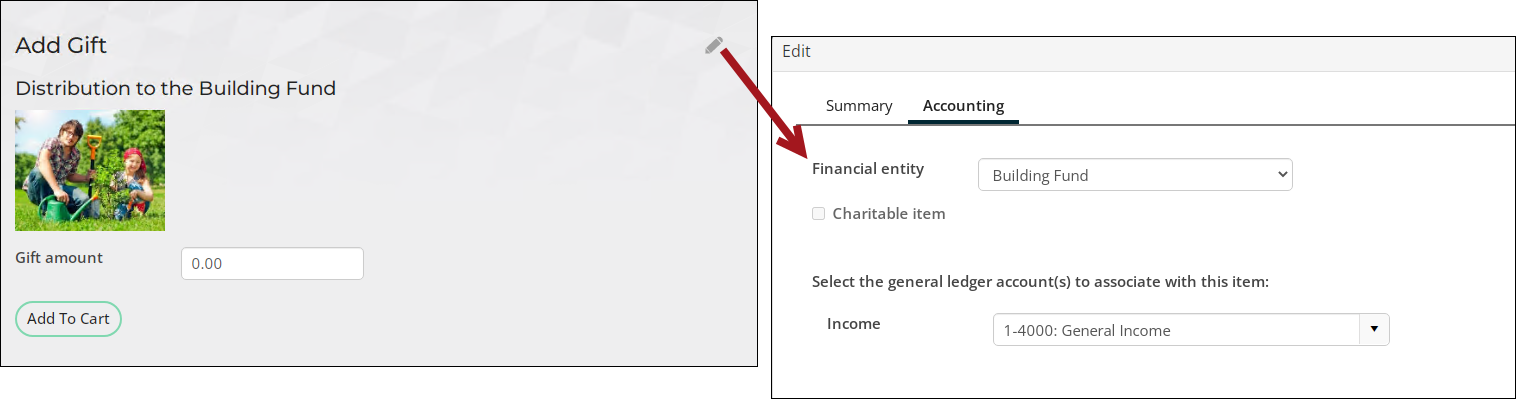
| BLDG | Distribution to the Building Fund | FOUND | 2-4300 |
The paragraphs below illustrate how those financial settings are derived.
As with the commerce product example, when viewing the user interface used in defining or editing a fundraising gift item, the relevant settings related to financial entity and GL account assignment can be found on the Accounting tab. In this example, the Financial entity is assigned, but the Income account is left unpopulated (appearing as Default).
The hierarchy for determining the Income account for gift items (as well as billing products) is quite simple. Once the financial entity is derived, the only path in the hierarchy beyond the specific item/product definition is the default Income account for the derived financial entity.
To see the Income account that will be assigned for the Foundation Contributions, review the default income account for the FOUND financial entity.
Example 3: Event where a financial entity is assigned to the overall event
The income financial entity and GL account that are derived for this event registration example are shown in this chart:
| Event Registration Example | Derived Accounting Information | |||
|---|---|---|---|---|
| Registration Option Code | Event and Registration Option | Financial entity | Income GL account | Deferred Income GL account |
| SPONSOR2 | Annual Gala – Gold Sponsorship Options | FOUND | 2-4500 | 2-2600 |
The paragraphs below illustrate how those financial settings are derived.
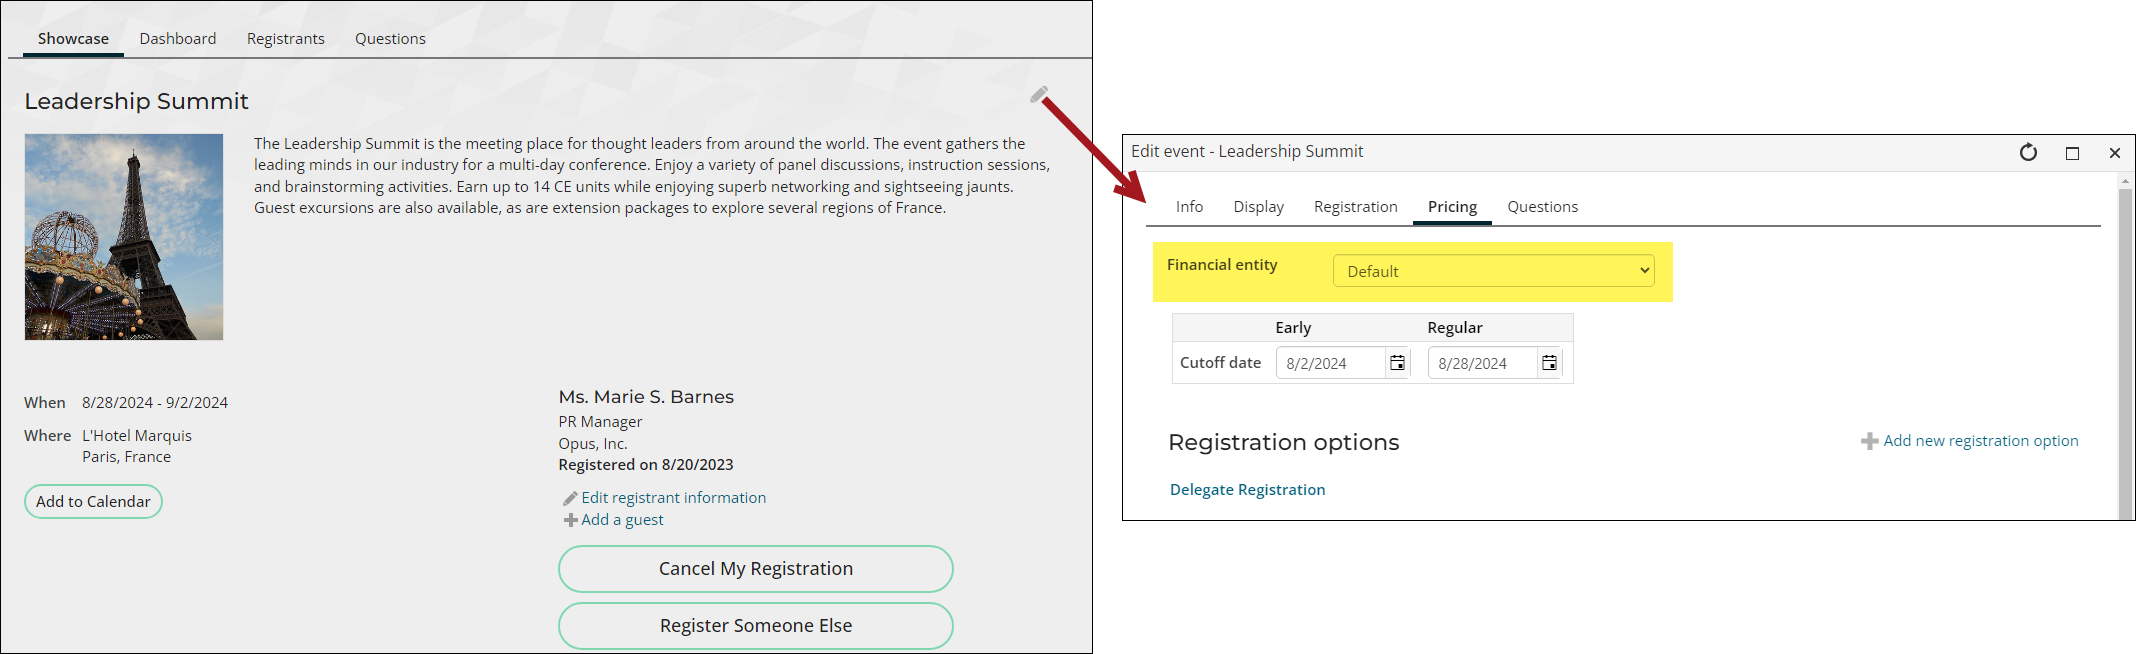
In this example, the iMIS Foundation financial entity is assigned to an overall event, the Annual Gala. When the event is in edit mode, an overall event financial entity can be assigned at the top of the Pricing tab. In this example, the iMIS Foundation financial entity is assigned.
It is possible to assign a different financial entity to an individual registration option (rare) or program item. If needed, this would be done on the Accounting tab when editing the individual registration option or program item. In most cases, it would not make sense to override the financial entity for a registration option, as those represent registration fees for the overall event. No such override is in place for this single registration option for the simple event.
Since the financial entity is left unpopulated for the registration option, the overall event’s financial entity (i.e., iMIS Foundation) will be assigned to the income transactions for the registration fees. If the Income account had not been assigned for this registration option, the default income account for the iMIS Foundation entity would have been assigned.
Note: The Deferred income account will only be made available for population if the system is licensed for Deferred Income processing.
To create and populate payment methods, go to Settings > Finance > Pay Central and click the Payment methods tab. This is where a cash GL account other than the default cash account for the applicable financial entity can be assigned to a specific payment method.
Example 1: Deriving the financial entity and GL account for a payment method when neither are populated
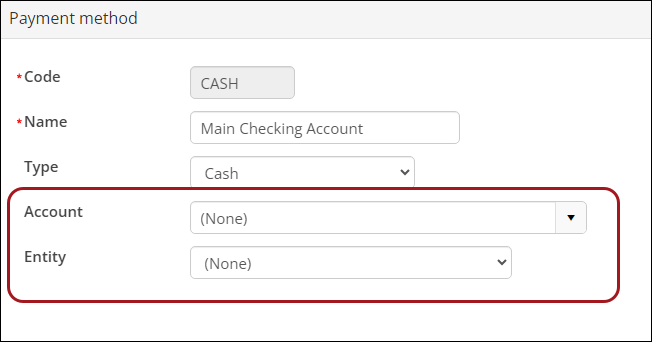
The payment or cash receipts financial entity and GL account that are derived for this payment method example are shown in this chart:
| Payment Method Example | Derived Accounting Information | ||
|---|---|---|---|
| Payment method code | Payment method name | Financial entity | Cash GL account |
| CASH | Main Checking Account | DEMO | 1-1100 |
The paragraphs below illustrate how those financial settings are derived.
For the Main Checking Account payment method, neither the GL account nor financial entity is assigned. iMIS needs to first derive the entity from the hierarchy before the correct Cash GL account can be identified.
If you have multiple financial entities, iMIS first looks to the default entity for AR. If a financial entity had been assigned there, iMIS would have assigned that entity as the payment transaction owner.
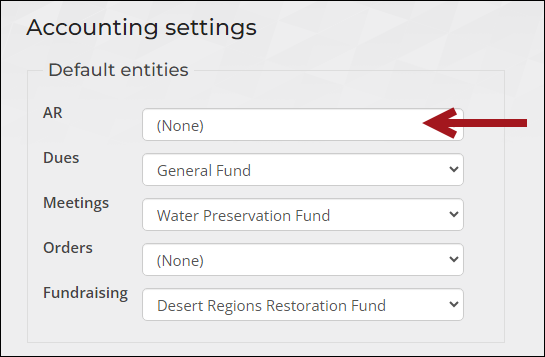
Since no financial entity was assigned as the default AR entity, iMIS settles on the last level of the hierarchy and assigns the overall system default entity of DEMO to the payment transaction (Settings > Finance > Financial Entities)
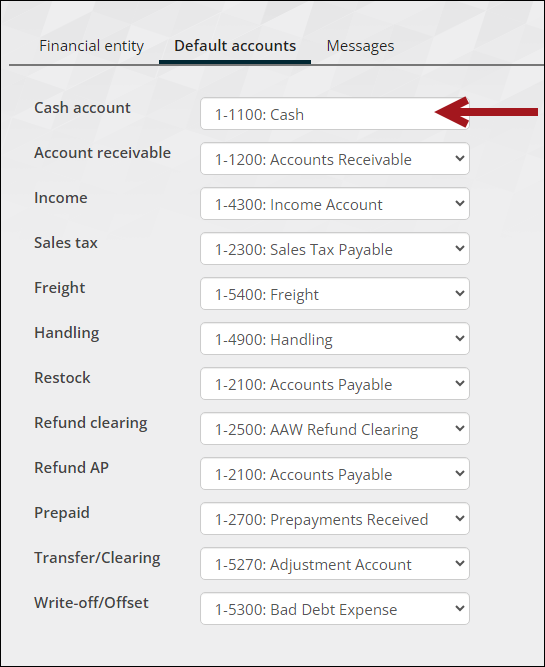
Once the appropriate default financial entity is derived (i.e., DEMO in this case), DEMO’s default Cash account is assigned as the GL account for the payment transaction line.
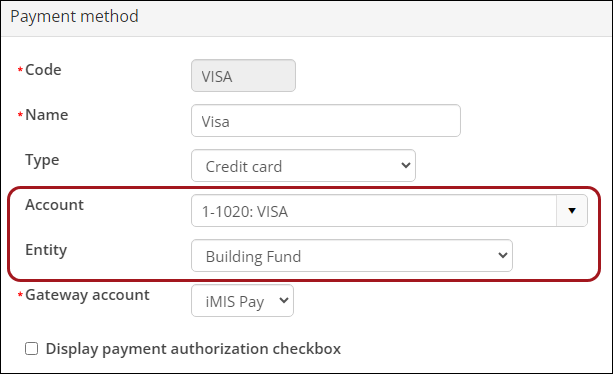
Example 2: Using a payment method while only the GL account is populated
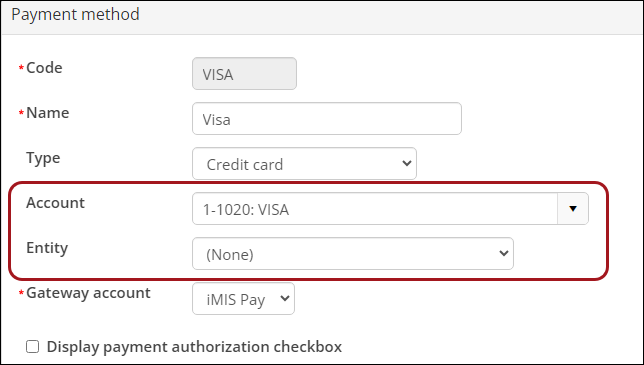
The payment or cash receipts financial entity and GL account that are derived for this payment method example are shown in this chart:
| ayment Method Example | Derived Accounting Information | ||
|---|---|---|---|
| Payment method code | Payment method name | Financial entity | Cash GL account |
| VISA | VISA | DEMO | 1-1020 |
The paragraphs below illustrate how those financial settings are derived.
In this VISA example, only the GL account is populated while the entity remains unpopulated. iMIS will use the same logic outlined in payment method Example 1 to derive the financial entity for all VISA payment transactions, but the GL account used in recording the payments will always be the one assigned directly on the payment method.
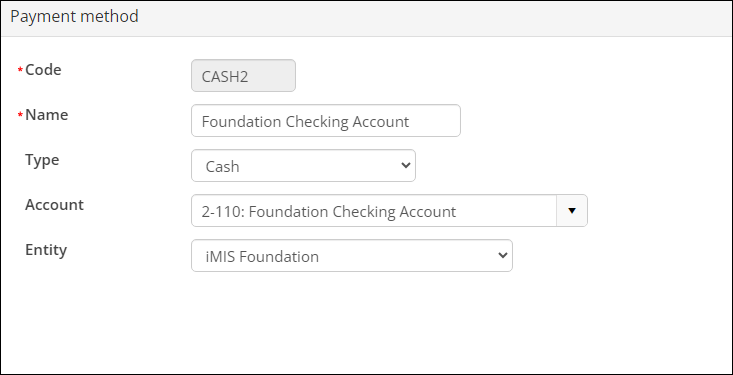
Example 3 – A Payment Method Example in Which Both the GL account and the Entity are Assigned
The payment or cash receipts financial entity and GL account that are derived for this payment method example are shown in this chart:
| Payment Method Example | Derived Accounting Information | ||
|---|---|---|---|
| Payment method code | Payment method name | Financial entity | Cash GL account |
| CASH2 | Foundation Checking Account | FOUND | 2-1100 |
This example is straight forward as both the financial entity and Cash GL account are populated for the Payment Method.
In this final payment method example, both the GL account and the financial entity are assigned for the payment method, so iMIS will use both of these populated values in accounting for payments that are deposited into the Foundation Checking Account.
This section illustrates three scenarios that show the accounting results for each of the three income examples from Section A paired with one of the three payment examples from Section B. Sections A and B described how iMIS will derive the Financial Entities and GL Accounts for each income or payment transaction. Aditionally, this section illustrates the processing of the transactions with the expected accounting results being shown in the batch report and GL Export sub-sections at the end.
This section illustrates the following specific approaches that iMIS EMS uses as compared to iMIS Desktop:
- The batch cash account is no longer assigned; therefore it no longer factors into the financial entity determination for the transaction, and it no longer drives the accounting for check or cash payments.
- Payment methods are chosen from payment method sets that vary by type of user (Staff vs. Public) and can also vary by context. It is quite possible for a staff payment method set to offer multiple check or checking account choices if there are multiple accounts into which checks may be deposited. This section provides illustrations of such staff specific options.
- Because batches frequently contain payment transactions of various types, there are both summary and detail batch reports available that group and summarize the payment transactions by payment method.
Scenario 1: Processing a product purchase and full payment where the GL accounts and entities are derived
This illustration shows the following:
- Purchase of the commerce product whose accounting settings were illustrated in Section A – Example 1
- Using the payment method whose accounting settings were illustrated in Section B – Example 1
In the scenario below, the Going Mobile Workbook (from Section A – Example 1) has been placed in the cart on behalf of a customer. The Main Checking Account payment method (from Section B – Example 1) has been chosen from the list of Payment Method options.
As a reminder, neither the financial entity nor the GL account have been populated for either the product or the “Main Checking Account” payment method.
Note: For reference purposes, you may wish to review the earlier Section A to see how iMIS will assign the financial entity and income GL account in recording the income for the purchase of the Going Mobile Workbook product and Section B to see how iMIS will assign the financial entity and Cash GL account in recording the payment.
Scenario 2: Processing a donation and full payment in which partial financial settings are in place
This illustration shows the processing of a donation with the gift item whose accounting settings were illustrated in Section A – Example 2 with the payment method whose accounting settings were illustrated in Section B – Example 3.
In this simple scenario, a fundraising contribution is made to the Distribution to the Building Fund gift item (whose financial settings were explored in the earlier Section A - Example 2) and the payment method chosen for the full payment is the Foundation Checking Account (whose financial settings were explored in the earlier Section B - Example 3).
Scenario 3 : Processing a fully paid registration for the Foundation entity event and VISA payment
This illustration shows the processing of a registration to the event whose accounting settings were illustrated in Section A – Example 3 with the payment method whose accounting settings were illustrated in Section B – Example 2.
In the final scenario, a registration has been added to the cart for the Foundation February Conference (whose financial settings were explored in the earlier Section A – Example 3) and the payment method assigned to the full payment is the VISA payment method (whose financial settings were explored in the earlier Section B – Example 2).
The chart below provides a recap of the derived financial entity and GL account settings for each of the combined income and payment transaction scenarios.
| Example from Sections A and B | Derived Accounting Information | ||||
|---|---|---|---|---|---|
| Example Reference | Batch Transaction | Item or Payment Method Name | Financial entity | GL Acct | Def Inc GL Acct |
| Section B - Example 1 | Trans # 8496, Line # 2 | Main Checking Account | DEMO | 1-1100 | |
| Section A - Example 1 | Trans # 8498, Line # 1 | Going Mobile Workbook | DEMO | 1-4300 | |
| Section A - Example 2 | Trans # 8499, Line # 1 | Contribution to the Foundation | FOUND | 2-4300 | |
| Section B - Example 3 | Trans # 8499, Line # 2 | Foundation Checking Account | FOUND | 2-1100 | |
| Section A - Example 3 | Trans # 8500, Line # 1 | Annual Gala – Gold Sponsorship Option | FOUND | 2-4500 | 2-2600 |
| Section B - Example 2 | Trans # 8500, Line # 2 | VISA | DEMO | 1-1020 | |
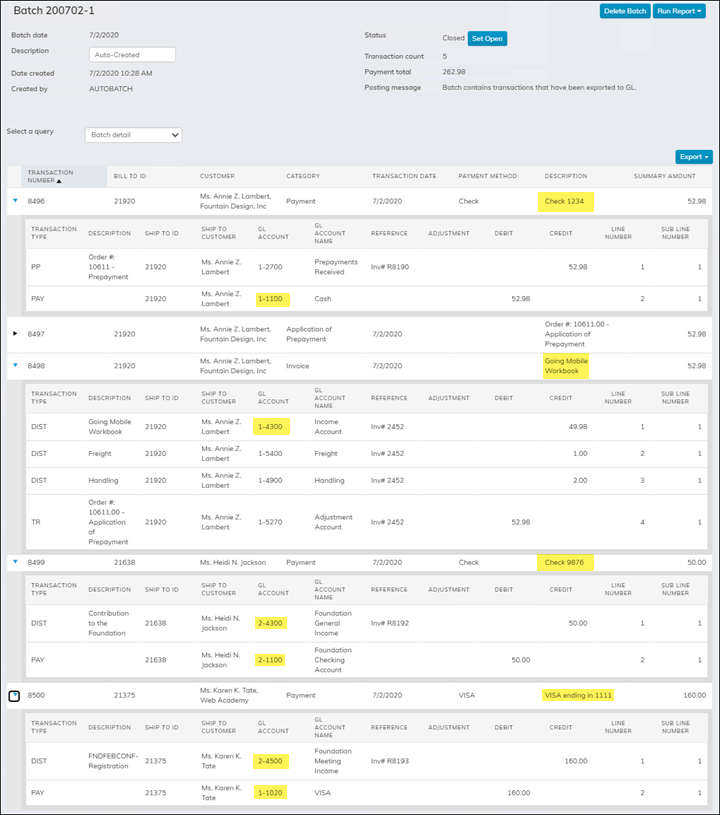
This shows the generated transactions within the batch, with the four relevant transactions expanded so that the accounting details can be seen. While the online view of the batch transactions does not reflect the financial entity or the Deferred Income account, each of the projected GL accounts within the above chart maps exactly to the GL accounts that were assigned to each respective income and/or payment transaction line.
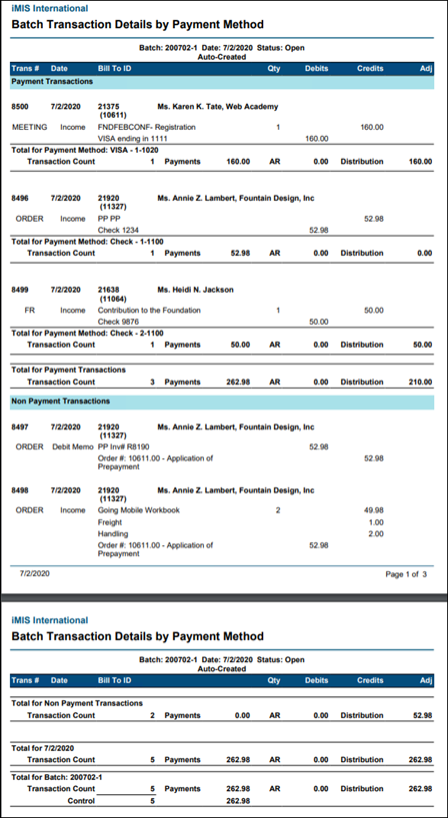
Sorting and summarizing by payment method
If you choose the Transaction Details by Payment Method choice from the Run Report drop-down list, a report like the one shown below will be printed. The Batch Transaction Details by Payment Method report sorts and summarizes the batch payments by payment method. In this report, the transactions containing payments appear at the top of the report and the non-payment transactions are listed in a subsequent section.
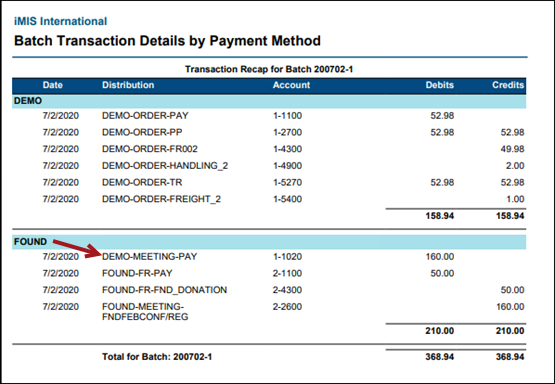
The batch Transaction Recap provides all pertinent accounting information
The Transaction Recap summary, which prints at the end of each batch report, groups and summarizes the transactions by financial entity.
This recap provides the full story of the accounting transactions generated by the three illustrated transaction scenarios. The transactions are grouped by financial entity according to the overall owner of each of the transactions. In each of the three illustrated scenarios, the financial entity associated with the income (i.e., product, gift item, or event registration) is the overall owner of the transaction.
Because the commerce product in Scenario 1 (and reviewed in depth in Section A – Example 1) is the only income item in place for the DEMO (or iMIS International), financial entity, only the transactions associated with the payment and invoicing of that commerce product are represented in the DEMO entity section. That means that the income and payment entries associated with the processing of the fully paid gift item and event registration through the cart are all represented in the FOUND (or iMIS Foundation) grouping.
Because the event registration, which belongs to the overall event financial entity of FOUND, was paid with a VISA credit card whose funds were deposited into an account owned by the DEMO financial entity (as illustrated in Section C – Scenario 3), a due to/due from scenario exists, and a due to/due from transaction will be generated with the GL Export to balance the entries for each entity. This can be spotted because the first component of the PSEUDO_ACCOUNT (DEMO) on the top PAY line in the FOUND section does not match the overall financial entity for the transactions.
For convenience, the initial chart used for Batch GL Acct validation is copied here to help validate the financial entities and GL Accounts in the Recap. The transactions for each of the three transaction scenarios from Section C are: Scenario 1 as represented in Trans #’s 8496 (payment) and 8498 (income), Scenario 2 as represented in Trans # 8499 (both income and payment) and Scenario 3 as represented in Trans # 8500 (both income and payment).
| Example from Sections A and B | Derived Accounting Information | ||||
|---|---|---|---|---|---|
| Example Reference | Batch Transaction | Item or Payment Method Name | Financial Entity | GL Acct | Def Inc GL Acct |
| Section B - Example 1 | Trans # 8496, Line # 2 | Main Checking Account | DEMO | 1-1100 | |
| Section A - Example 1 | Trans # 8498, Line # 1 | Going Mobile Workbook | DEMO | 1-4300 | |
| Section A - Example 2 | Trans # 8499, Line # 1 | Contribution to the Foundation | FOUND | 2-4300 | |
| Section B - Example 3 | Trans # 8499, Line # 2 | Foundation Checking Account | FOUND | 2-1100 | |
| Section A - Example 3 | Trans # 8500, Line # 1 | Annual Gala – Gold Sponsorship | FOUND | 2-4500 | 2-2600 |
| Section B - Example 2 | Trans # 8500, Line # 2 | VISA | DEMO | 1-1020 | |
Processing and reviewing the GL export
The generation of the export/import files through the GL Export procedure (Finance > Closing procedures > General ledger export) is the final step in reviewing the financial entity and GL account assignment to the three transaction scenarios.
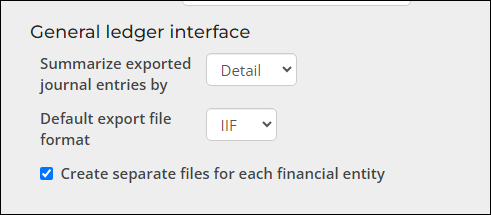
This shows the settings in place for the General ledger interface (Settings > Finance > General). If you have multiple financial entities that you process transactions for, it is important that the option Create separate files for each financial entity is enabled. The Summarize option is set to Detail, so that there can be a one to one match between the transaction lines and the GL Export entry lines. This will help in verifying that all entries are correctly represented in the export files.
To ensure that no other batch transactions were picked up in the test, validation took place before running the GL export that the test batch was the only posted batch for July 2nd and therefore the only batch that would be eligible for the GL export that was run for that single date.
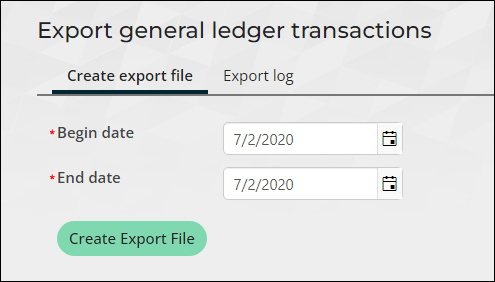
Because the option Create separate files for each financial entity was enabled when the GL export was run, the export process correctly created two export files, one for each financial entity.
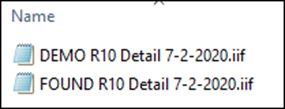
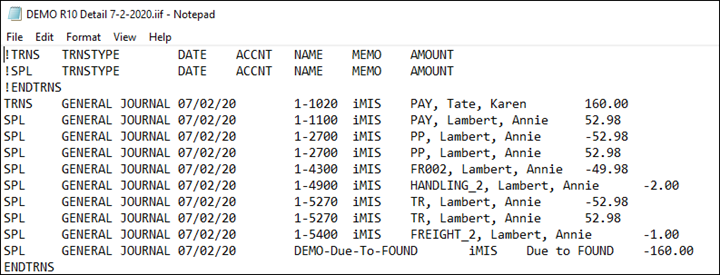
Reviewing the GL Export Files
Correctly, the transaction lines in the DEMO export File matches one-for-one to the entry lines listed on the Batch Report’s Transaction Recap summary, with one exception. The VISA payment, which was applied to the Foundation event registration but was deposited into a DEMO bank/cash account, was properly moved to the DEMO GL Export transaction lines, where it appears on the top line.
For that reason, a Due To liability line was inserted, listed as the bottom line in the export transaction. This Due To the Foundation line item brings the total debit and total credit entries into balance while also recording the proper liability.
The FOUND export file also matches the entry lines shown for the FOUND grouping on the Transaction Recap, with of course the exception of the missing VISA payment, which was properly moved to the DEMO GL export transactions. In its place, the export procedure inserted a Due From receivable transaction to represent the amount that DEMO (or iMIS International) owes the Foundation.