Last updated on: January 27, 2026
When editing a business object, you work in the Business Object Designer window. The buttons described in this section are available for each tab of the interface.
The Business Object Designer is found under RiSE > Business Object Designer.
Tip: Review Building Business Objects: Best Practices & Rules before creating a custom business object.
- To create a new object, select New > Design Business Definition.
- To edit an existing object, click Edit.
Note: You cannot edit a locked business object. You must save a copy of a locked business object and make edits to the saved copy.
Commands:
- Save - Saves changes to the Business Object Designer object. Changes will not go live in iMIS until the object has been published. You must save an object before you can publish it.
- Publish - Publishes serialized metadata for the Business Object Designer object for use by BusinessRuleBase. Once the object is published, it is available to IQA and other controls within iMIS.
The Definition tab includes the name of the object, its status (Active or not), and a field to record a metadata description of the business object’s role. In addition, certain objects inherit properties from parent objects. The definition of which object inherits properties can be viewed on the Definition tab as well as the join between the parent and child objects.
Note: The Object Type defaults to Standard, which is editable. Any object that is not a Standard type is generated outside of Business Object Designer. You can use these non-standard objects in your queries and reports, but they are read-only in Business Object Designer to prevent changes to their required structure.
Definition
- Name – The name of the Business Object Designer object:
- Prefix each business object name using My_, such as My_CustomBOname. See Naming recommendations for more details.
- Never name a business object the same name as a table, as this can cause errors throughout iMIS where the original table that the BO is named after is being used.
- Business Objects cannot begin with an underscore or number.
- Active – Indicates whether the object is Active (being used). If unchecked, the object is archived.
- Inherits from – If the object inherits from another object, the name of that object is displayed here and a red X is displayed next to the name. The red X enables you to remove the inheritance, making this object standalone. If the object does not inherit from another, a Browse button is displayed. Click the Browse button to find an object in the document browser. Select that as the base object from which the current object will inherit.
- Description – A text description of what the object is meant to do. This appears in the tool tip help and also in the summary in the Document browser.
- Available to screen designer? – Recommended to remain enabled. This setting is required to be enabled for Expression Builder business objects used with dues special pricing.
- Default display property – Indicates which property should be returned when the business object is referenced as a foreign-key by another business object.
- Default title property – Unused.
- Default description property – Unused.
Note: When Available to screen designer? is disabled, the Available to UI? setting is always set to No.
Branches
This section displays a tree view of business objects related to the open object. Branched objects inherit properties from the top Root object.
- (Definition tab) Click Browse.
- Select the root object.
- Click OK.
- Click Create Object. Make any required changes to the branched object.
- Click Save, and then click Close.
Note: If you create a Copy of a root object, you must recreate any branched objects that you require. Branch relationships are not saved during the copy. You cannot copy branched objects.
The Properties tab displays each of the fields within the object and the specific attributes associated with those fields. Properties are defined initially from their SQL tables or views. Properties are attributes of the object (such as Contact.LastName). The Properties section lets you search for add, remove, and edit property values and their characteristics. The initial property entries that correspond to database columns are typically generated from the database.
The following property fields are available for a property:
- Property Name – The name of the property.
- Function – Allows the user to find Avg, Count, Min, Max or Sum on a field. The default Function is None.
- Avg - Returns the average of the values in a specified column (numeric fields only).
- Count - Returns the total number of values in the specified field (numeric and non-numeric data types).
- Min - Returns the smallest value in the specified field.
- Max - Returns the largest value from the specified field.
- Sum - Returns the sum of all the values in the specified column (numeric fields only). Null values are excluded from the result set.
- Data Type – Available data types for the property. The choice here yields the data type of the property on the object and in the database if the property is to be stored in the database. The list is only available when creating a new object.
- Length – This value is only shown if Data Type can have a variable length (for example, NVarChar, Numeric). It is the maximum length of the data allowed in the property. It is the length of the data in the column in the database if the property is to be stored in the database. It is also the maximum length of the data input field for properties that display in the UI and have a maximum length as a parameter (for example, Text Box).
- Scale – This value is only shown if Data Type is Numeric. It is the number of digits to the right of the decimal point.
- Key – If selected, the property is part of the Primary Key of the object, and the property is part of the database table if the property is stored in the database.
- Required – If selected, the property must be set before the object can be saved or used. This column also marks the corresponding database column as NOT NULL if the property is stored in the database
- X –Deletes the property from the object. The property remains in the underlying database table.
Note: Business Object Designer does not support object property names that start with a special character or number, or contain special characters.
Functions allow for performing calculations on multiple rows in a single table column, returning a single value.
When the Business Object Designer includes a property with a display function such as Count, the other properties included in the Business Object are used to determine unique results.
If you edit a Property to modify the Function, you might also affect the Data Type as a result. For example, if a property has a Function of None and a Data Type of Boolean and you modify the Function to Count, the Data Type will be modified to Integer.
Note: Use the Function column sparingly. Performance can be affected if functions are used too frequently in select statements and without due caution.
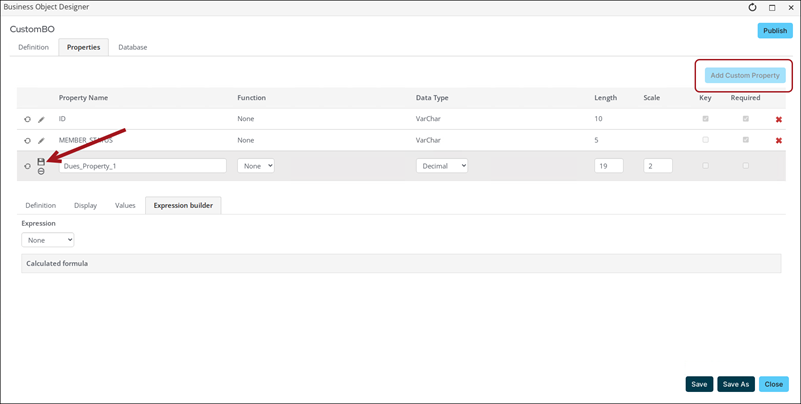
You can add a new custom property on a business object. Do the following:
- Click Add Custom Property. A new, empty row is displayed at the bottom of the Properties grid.
- Enter a Property Name. You cannot save your new property without defining a property name.
- Define additional property fields as necessary for your new custom property.
- Click the Save icon to commit the new property.
This tab stores the physical data definition of the property. Property definitions are initially defined from SQL and can be refreshed from the database at any time.
The following fields are on the Definition tab:
- Stored in database? - This option indicates whether the field is stored in the database. This option is disabled and always set to Yes.
- Database table - This drop-down contains any tables used in defining the object, with the default being the table name that matches the object’s name, if any.
- Database column - This value defaults to the Property Name (from the Property list) if you are creating a new object by adding properties. Property Name defaults to this value if you are reverse-engineering existing tables.
- Allows NULL? - This option allows a null value to be entered for the property when the property is saved. When this option is cleared, data must be entered for the property before the property can be saved. This value is inherited from the database, but this value can be manually changed here.
- References object - This field indicates the business object for which this property is a foreign key.
- Identity column? - This option indicates whether the column auto-increments. If enabled, the following values are used:
- Start Value – This is the initial or seed value (integer) of the identity. The default is 1.
- Increment – This is an integer by which the identity is incremented with each new row. The default is 1.
- Calculated value - Unused.
- Read only? - If checked, the property’s value cannot be modified. This option is automatically checked if there is an expression for Calculated Value and cannot be changed.
- System property? (Internal Use Only) - Identifies a property as system-defined. When selected, the property can only be modified by an administrator.
- This option is not available for user-created business objects,
- Query builder - Enable these options to expose the property for use in queries.
- Available to query builder? – Makes the property available for use in IQA whenever the business object is selected as a source.
- Automatically include in queries? – Automatically includes the property in an IQA query result set whenever the business object is selected as a source.
- Description - A free-form text description for the property. The description is available as a tool tip in the screen designer.
Warning! For Panel Editor data sources, setting a related business object's properties to allow null is not recommended, and could lead to problems with the iMIS software.
This tab contains data about the prompt for the field, as well as the ability to display or hide a property from IQA. Also, specific properties can be identified as default display values within IQA.
Properties used with IQA
The following properties are used with IQA and will affect IQA queries:
- Prompt for field - This prompt is displayed in front of the data display or data entry control in the screen designer.
- Display mask - This field is shown only if Display control is set to a value that allows for display masks. This field determines how the property is formatted in the query results (display properties) but does not affect query filters.
Example: CsEvent.BeginDate is a DateTime property with a Display mask of Short date. An event’s Begin Date is 04/01/2023 at 9:00 a.m., and a query is created on the same day that has CsEvent.BeginDate added as a filter equal to Current Date. This query does not return any results, because iMIS is searching for an event Begin Date equal to 04/01/2023 at 12:00 a.m. Instead, the query filter should be updated to Within Days = 0. This will not affect events that do not have a defined start time.
Note: The Display mask field in the Business Object Designer has been updated, and the Currency option is now deprecated. If an existing business object property is updated and is using Currency as the Display mask, the Display mask will change to Number upon Save. The value will still display as an amount, but without a currency symbol. It is recommended that any property using Currency as the Display mask is updated to Number.
All other properties
The remaining properties were once used with the screen designer; however, these properties are not currently connected to Staff site functionality. The following properties are not used or connected to any functionality in iMIS:
- Available to UI?
- Prompt Resource Key
- Tool tip/verbose prompt
- Tool tip resource key
- Hint
- Hint resource key
- Pop-up help
- Pop-up help resource key
- Keyboard shortcut
- Display control
- Display width
- Display height
- Allow multiple selection?
- Use auto capitalization?
- Format Regular Expression
- Format Specification
- Watermark text
- Watermark resource key
- Display orientation
- Horizontal
- Vertical
- Display columns
- Related property
- Show Surf-to-Edit?
- Path to web service
- Web service method name
- Valid characters
- Show password strength?
- Starting path
- Validation regular expression
- Validation message
- Validation message resource key
- Validation range start/end
- Override overall CSS class
- Override input field CSS class
- Override caption CSS class
- Override validator CSS class
This tab allows users to define lookup values for a property in one of two ways:
- Manually built using codes and values within Business Object Designer.
- Built using a reference IQA query.
Default value
Unused.
Values come from
This option indicates the source, if any, for the allowed values for this property. The choices are:
- Freeform data entry – The default, if it is available. This option requires users to enter the value manually, such as for a Text Field or Text Area. This choice is only available if the data entry field allows for freeform entry.
- Query object – This option indicates that the list of allowed values derives from an IQA query. This choice is available only if the Display control allows for list-oriented data entry, such as Drop Down List or Radio Buttons.
- Value list – This option indicates that the list of allowed values comes from the object’s designer. This choice is available only if the Display control allows for list-oriented data entry, such as Drop Down List or Radio Buttons.
Query
This item is shown only if the Values come from selection is Query object. This item specifies which IQA query to use for the list. If specified, the name of the query object is read-only. In either case a Browse button is available to enable you to locate the query to use through the Document browser. There is no delete or clear button. A Query object is required for Query object types and is not available to other types.
Data value
This item is shown only if the Values come from selection is Query object. This option indicates which property or field of the Query object is stored in the Property when you make a selection.
Display value
This item is shown only if the Values come from selection is Query object. This option indicates which property or field of the Query object appears on-screen.
Values
This item is shown only if the Values come from selection is Value list. This item allows the object’s designer to enter the allowed values for the field.
- The Data Value fields contain the value to be stored in the property when you select the row.
- The Display Value fields contain the value to be shown to the end user when entering data into this property.
- Select More to append five additional rows for value entries.
This tab allows you to build custom expressions for custom properties.
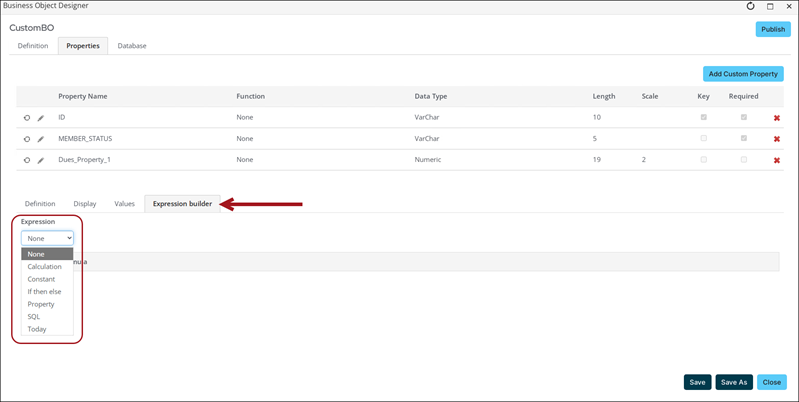
Select the type of expression you want to build. Options include:
- Calculation
- Constant
- If then else
- Property
- Today
Calculation expressions are used to combine values of two expressions (left and right expression) using an operator.
Note: Available operators can vary depending on the type of left and right expression.
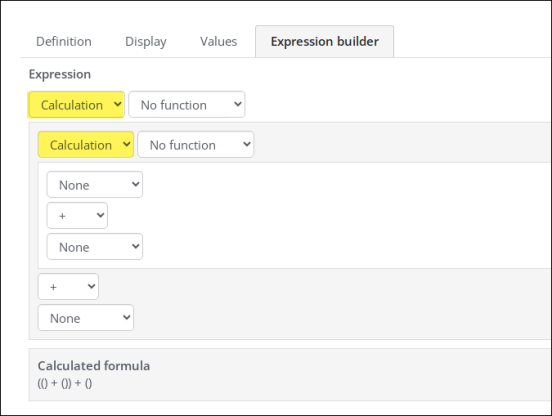
You can combine any expression types. If you need to create more complex calculations, you can nest multiple calculations.
Do the following to build a Calculation expression:
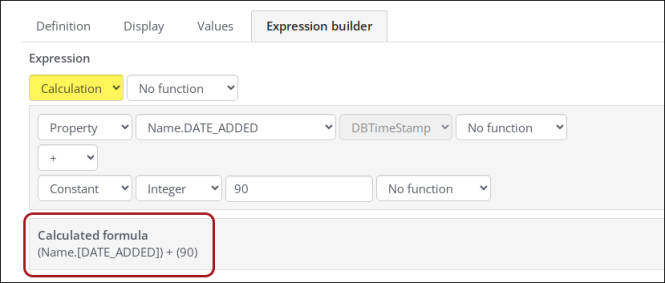
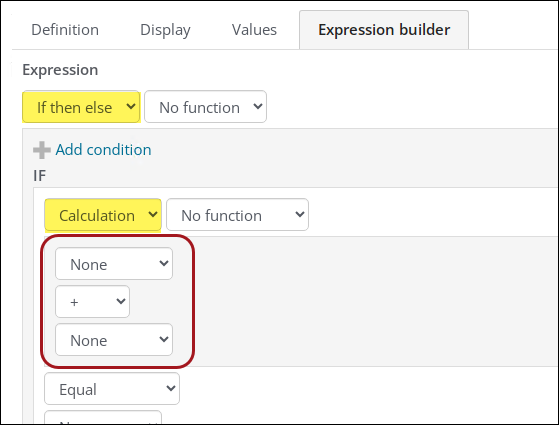
- Select Calculation from the Expression drop-down:
- Select a Function for the Calculation.
- Select the initial expression on which you want to perform a calculation. You can select a Calculation, Constant, If then else, Property, or Today. For example, select Property, and then select the property you want to insert into the calculation.
- Select an operator to apply to your calculation. Options include:
- + (Add)
- - (Subtract)
- * (Multiply)
- / (Divide)
- % (Modulus)
You can choose from other properties included in the business object.
Note: All properties in a Calculation will have numeric or string Data Types. Properties selected outside a Calculation expression can access all Data Types for a source.
Note: If you want to create a Calculation expression to work with dates, use the DateTime constant.
You can then add additional expressions to your Calculation. For example, you can compare a Property against a Constant, or you can compare a Calculation against a Property.
If you select a Calculation as an expression inside a Calculation, the new Calculation is nested.
You can define your own Constant to be used in a business object. Do the following:
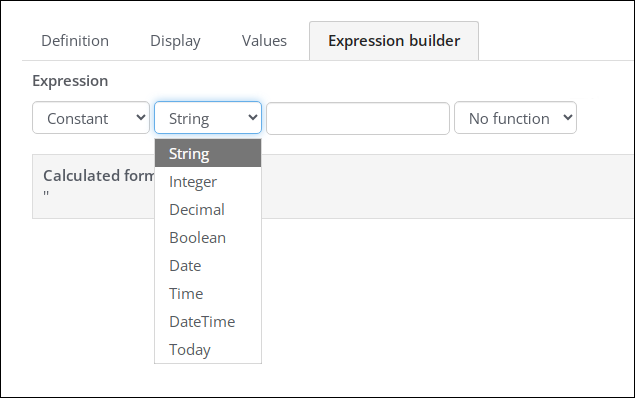
- Select Constant from the Expression drop-down.
- Select a data type. Select from the following types:
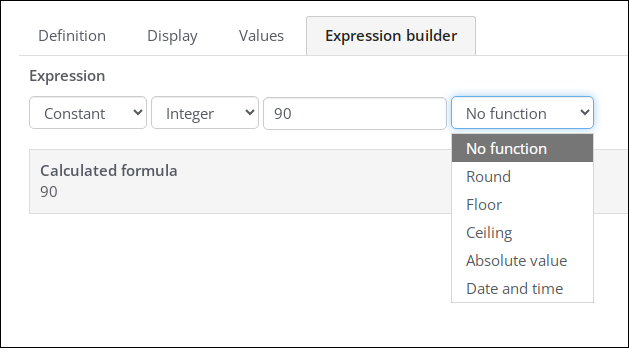
- Select a Function for your Constant expression:
Note: The text input field is available only when the Constant expression type is selected.
The If then else expression is used to return different values according to some set of defined conditions:
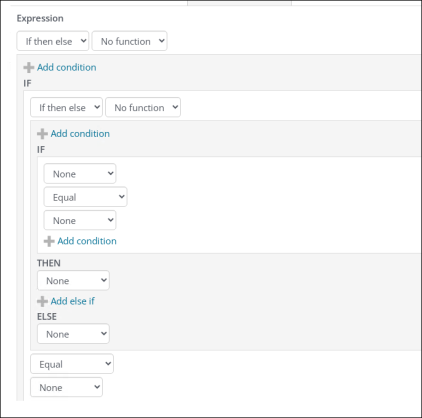
- If then else can be nested: Click + Add condition to wrap the current If then else expression into the THEN statement of the new If then else expression.
- Multiple conditions: You can click + Add else if to add additional ELSE IF conditions.
- IF condition can be nested: Click + Add condition in the IF condition to allow combining multiple conditions using And and Or operators.
- Click the red X in a condition to remove that condition.
- Click the red X next to ELSE IF to remove the ELSE IF condition.
Do the following to build an If then else expression:
- Select If then else from the Expression drop-down. For the If then else expression, the Function options are filtered according to the type to which the THEN or ELSE expression resolves. For example, the THEN expression with Today selected provides functions for the Today expression.
- Begin building the If then else expression:
- In the IF area, select the initial expression in your IF statement:
- If you select Calculation, you can build a Calculation expression inside the If then else expression:
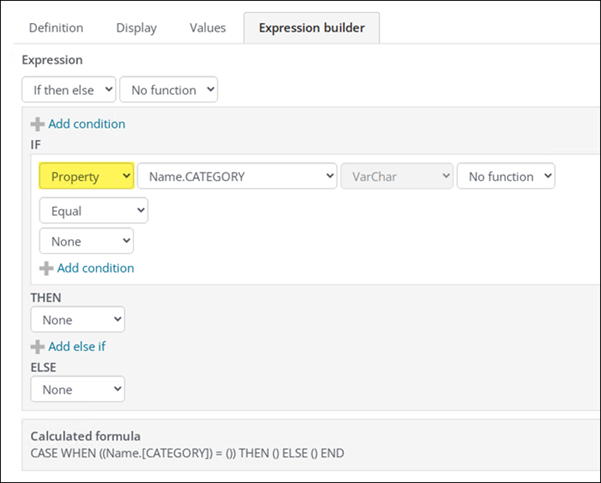
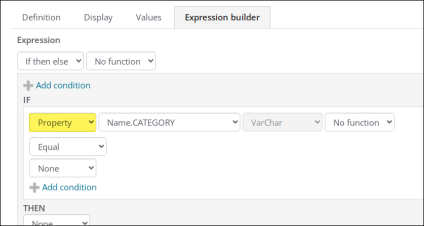
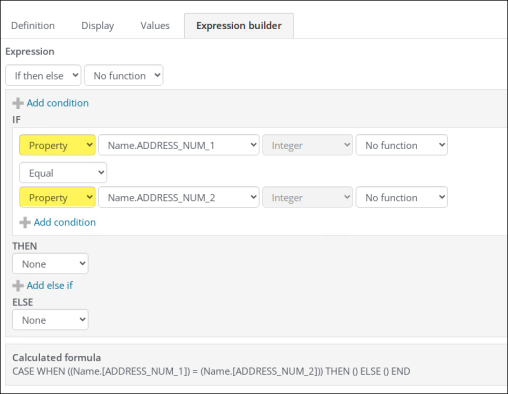
- If you select Property, you can build a Property expression inside the If then else expression:
- If you select If then else, you can nest additional If then else expressions inside the initial If then else expression:
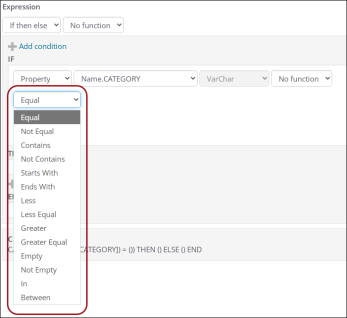
- Select a comparison operator:
- Equal – Enables you to compare two expressions:
- The left operand is equal to the right operand (result is TRUE).
- The left operand and the right operand are not equal (result is FALSE).
- Not Equal – Enables you to compare two expressions:
- The left operand is not equal to the right operand (result is TRUE).
- The left operand and the right operand are equal (result is FALSE).
- Contains – Enables you to search for matches.
- Not Contains – Enables you to specify items to exclude in a search.
- Starts With
- Ends With
- Less – Enables you to compare two expressions:
- The left operand has a lesser value than the right operand (result is TRUE).
- The left operand does not have a lesser value than the right operand (result is FALSE).
- Less Equal – Enables you to compare two expressions:
- The left operand has a lesser value than the right operand or is equal to the right operand (result is TRUE).
- The left operand does not have a lesser value than the right operand and is not equal to the right operand (result is FALSE).
- Greater – Enables you to compare two expressions:
- The left operand has a higher value than the right operand (result is TRUE).
- The left operand does not have a higher value than the right operand (result is FALSE).
- Greater Equal – Enables you to compare two expressions:
- The left operand has a higher value than the right operand or is equal to the right operand (result is TRUE).
- The left operand does not have a higher value than the right operand and is not equal to the right operand (result is FALSE).
- Empty (IS NULL)
- Not Empty (IS NOT NULL)
- In – Enables you to determine whether a specified value matches any value in a list of expressions. Click the red X to remove an expression. Click Add value to add an expression. You can add and remove as many expressions as you like, but the In operator requires at least one input expression.
- Between – Enables you to specify a range to test.
- Select a second expression that will be compared to the first expression:
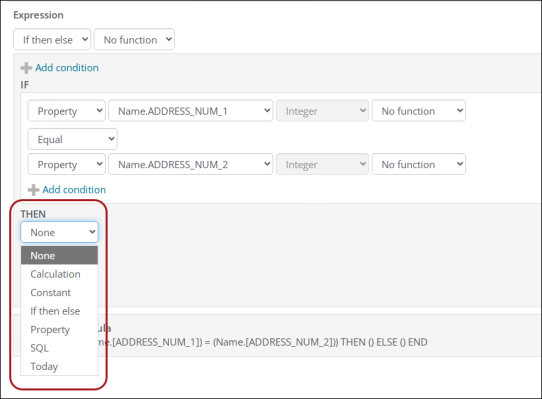
- In the THEN area, select the initial expression in your THEN statement:
- If you select Calculation, you can build a Calculation expression inside the THEN statement.
- If you select If then else, you can nest additional If then else expressions inside the THEN statement.
- Click Add else if to add an ELSE IF statement.
- In the ELSE area, select the initial expression in your THEN statement.
- If you select Calculation, you can build a Calculation expression inside the THEN statement.
- If you select If then else, you can nest additional If then else expressions inside the THEN statement.
As you select an initial expression for the IF statement, the If then else expression responds:
See Building a Calculation expression.
See Building a Property expression.
For more information, refer to Microsoft’s SQL documentation.
Note: As you add expressions, you can also click +Add condition to add additional conditions within your expression. You can delete your added expressions if necessary.
Again, as you select an initial expression for the THEN statement, the If then else expression will respond accordingly:
Again, as you select an initial expression for the ELSE statement, the If then else expression will respond accordingly:
As you add elements, the Expression builder displays a Calculated Formula.
The Property expression is used to select a property. Properties from all sources that are added to the business object are available.
Do the following to build a Property expression:
- Select Property from the Expression drop-down:
- Select the correct property from the drop-down. You can choose from other properties included in the business object.
- Select a Function for your Property expression. Options are filtered based on the selected expression type and the data type assigned to the selected property.
Note: When you select a Property expression, the property drop-down is auto-populated with the first property listed in the Used Columns field on the Database tab.
The Today expression is used to get the current system date and time.
Select a Function for your Today expression.
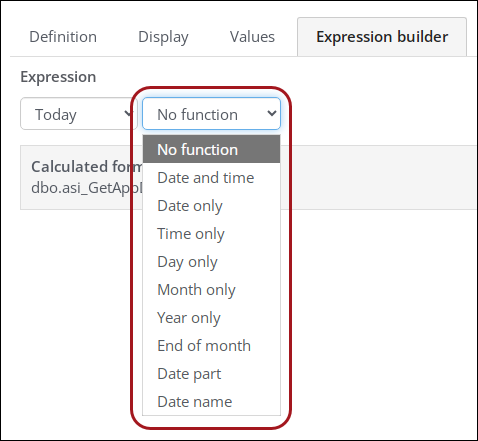
The following table identifies the functions included in the Expression builder and the data types for which those functions are available:
| Functions | Data types | ||||||
|---|---|---|---|---|---|---|---|
| String | Integer | Decimal | Boolean | Date | Time | DateTime | |
|
Round: Rounds a number to a specified number of decimal places. Note: If you choose Round, you can select from a drop-down the number of decimal places to which the number is rounded. |
x | x | |||||
| Floor: Returns the largest integer value that is less than or equal to a number. | x | x | |||||
| Ceiling: Returns the smallest integer value that is greater than or equal to a number. | x | x | |||||
| Absolute value: Returns the absolute value of a number. | x | x | |||||
| Date and time: Returns the current date and the current time. | x | x | x | ||||
| Date only: Returns the date component only (attempts to convert). | x | x | |||||
| Time only: Returns the time component only (attempts to convert). | x | x | |||||
| Day only: Returns the day (integer) for a supplied date. | x | x | x | ||||
| Month only: Returns the month (integer) for a supplied date. | x | x | x | ||||
| Year only: Returns the year (integer) for a supplied date. | x | x | x | ||||
| End of month: Returns the last day of the month of a specified date with an optional offset. | x | ||||||
| Date part: Returns a specified part of a date as an integer value. | x | ||||||
| Date name: Returns a specified part of a date as a string value. | x | ||||||
| Trim: Removes leading and trailing blanks from a string. | x | x | |||||
| Lower: Converts all characters in a string into lower-case capitalization. | x | ||||||
| Upper: Converts all characters in a string into upper-case capitalization. | x | ||||||
| Left trim: Removes leading and trailing blanks from the left side of a string. | x | ||||||
| Right trim: Removes leading and trailing blanks from the right side of a string. | x | ||||||
| Reverse: Returns the reverse order of a string. | x | ||||||
| Replicate: Repeats a string a given number of times. | x | ||||||
| Char index: Searches for a substring in a string and returns the position. | x | ||||||
| Length: Returns the length of the selected string property. | x | ||||||
| Left: Returns the specified number of characters from the left side of a string. | x | ||||||
| Right: Returns the specified number of characters from the right side of a string. | x | ||||||
| Replace: Searches for instances of the first Field and replaces all instances with the value set for the second Field. | x | ||||||
| Substring: Returns a subset of the string property's value from the starting character index indicated until the number of characters specified is reached. | x | ||||||
For more information, refer to Microsoft’s SQL documentation.
Notes:
- The Boolean data type displays an extra selector for True or False.
- The Date data type displays a date selector.
- The Time data type exposes a time selector.
- The DateTime data type displays both a date selector and a time selector.
The Database tab defines the connection between physical tables and views within the iMIS database and the properties of the business object. The properties of a business object can comprise single or multiple tables and views. Where multiple tables and views are defined, an appropriate set of inner joins must be defined.
This field specifies which tables from the iMIS database are used as the object’s data source, similar to the FROM clause of an SQL SELECT statement. To specify the tables in this list, use the Add and Remove buttons. The first table that you add is automatically designated as (Primary), which has no system effect and is meant only to indicate which table was added first to the object.
This field specifies which columns from the tables specified in the Tables field are used as the object's properties, similar to specifying column names in the SELECT clause of a SELECT statement. The columns that you select here are listed on the Properties tab. To specify the columns in this list, select one or more columns from the Available Columns list, and then click Add as Properties. Press Ctrl or Shift to select multiple columns.
Note: Business Object Designer does not support column names that start with a special character or number, or contain special characters.
This field specifies all of the columns that are available for use as properties for this object. The list comprises all columns from all tables specified in the Tables field, minus the columns that have already been added to the Used Columns list.
Note: Business Object Designer does not support column names that start with a special character or number, or contain special characters.
(optional) This field specifies a filter expression that further limits the table rows that are acted upon by this business object, similar to the WHERE clause of a SQL SELECT statement. The filter expression is applied after the result set of any Joins specified for this object. You must omit the WHERE keyword itself. If there is more than one table listed in the Tables field, you must use qualified column names to prevent ambiguity, as shown in the following example using the ACTIVITY_TYPE column from the Activity table:
Activity.ACTIVITY_TYPE=‘F’
You must specify only a single WHERE clause, because multiple tables listed in the Tables field are joined with a join.
This field is required if more than one table is specified in the Tables field.
This field specifies joins between the tables specified in the Tables field, which limits the table rows on which this business object acts to the result set created by the joins.
Tip: Not every table will contain data for every contact. If this is the case for the tables you are joining, be sure to use the Left Join or Right Join option.
INNER JOIN
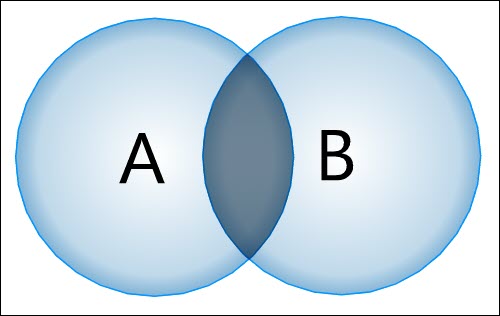
SELECT *
FROM TableA
INNER JOIN TableB
ON TableA.Column1 = TableB.Column1
LEFT JOIN
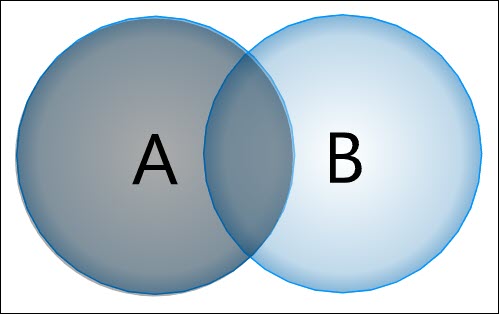
SELECT *
FROM TableA
LEFT JOIN TableB
ON TableA.Column1 = TableB.Column1
RIGHT JOIN
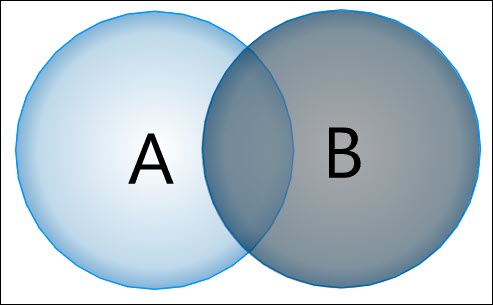
SELECT *
FROM TableA
RIGHT JOIN TableB
ON TableA.Column1 = TableB.Column1
The drop-down lists enable you to choose the columns for each join. Click Add to add the join to the list of joins for this object.
Multiple joins between the same two tables are expressed with a boolean AND operator in the same JOIN clause. Every join between a different pair of tables is expressed as a separate JOIN clause.
For example, assume that you have added TableA, TableB, and TableC to the Tables field, and you have added all of the Available Columns to the Used Columns field. Add the following three joins to the Joins list:
TableA.Column1 = TableB.Column1
TableA.Column2 = TableB.Column2
TableB.Column3 = TableC.Column3
In this case, an analogous SELECT statement would be:
SELECT *
	FROM TableA
	{join type} TableB
		ON TableA.Column1 = TableBColumn.1
		AND TableA.Column2 = TableB.Column2
	{join type} TableC
		ON = TableB.Column3 = TableC.Column3
The joins that you define here are available as default joins when using the object in an Intelligent Query Architect (IQA) query, but IQA also gives the option to create different, custom joins for the tables underlying the business objects used in the query.
The following table identifies the functions included in the Expression builder, and the data types for which those functions are available:
| Functions | Data Types | ||||||
|---|---|---|---|---|---|---|---|
| String | Integer | Decimal | Boolean | Date | Time | DateTime | |
|
Round: Rounds a number to a specified number of decimal places. Note: If you choose Round, you can select from a drop-down the number of decimal places to which the number is rounded. |
x | x | x | ||||
| Floor: Returns the largest integer value that is less than or equal to a number. | x | x | x | ||||
| Ceiling: Returns the smallest integer value that is greater than or equal to a number. | x | x | x | ||||
| Absolute value: Returns the absolute value of a number. | x | x | x | ||||
| Date and time: Returns the current date and the current time. | x | x | x | x | x | x | |
| Date only: Returns the date component only (attempts to convert). | x | x | |||||
| Time only: Returns the time component only (attempts to convert). | x | x | |||||
| Day only: Returns the day (integer) for a supplied date. | x | x | x | ||||
| Month only: Returns the month (integer) for a supplied date. | x | x | x | ||||
| Year only: Returns the year (integer) for a supplied date. | x | x | x | ||||
| Trim: Removes leading and trailing blanks from a string. | x | ||||||
| Length: Returns the length of the selected string property. | x | ||||||
| Left: Returns the specified number of characters from the left side of the string. | x | ||||||
| Right: Returns the specified number of characters from the right side of the string. | x | ||||||
Notes:
- The Boolean data type displays an extra selector for True or False.
- The Date data type displays a date selector.
- The Time data type exposes a time selector.
- The DateTime data type displays both a date selector and a time selector.
The Preview tab shows the first 100 rows as they would appear if the business object were used as the source in an IQA query with all display columns selected and no filters applied.
Select Create an IQA query using this BO to create a new IQA query with the business object added as the source.
Note: The business object must have a source table, at least one property, and be saved and published to view the data.
