Last updated on: January 27, 2026
The Expression Builder enables you to create SQL expressions on a custom business object property, such as calculations, constants, and if/then/else statements. Use this feature to define complex special pricing formulas, event data calculations, and more.
Tip: Review Building Business Objects: Best Practices & Rules before creating a custom business object.
Overview of the Expression Builder
The Expression builder tab is a sub-tab of Properties. The Expression builder sub-tab only appears for custom properties (Add Custom Property).
Use the Expression Builder to create any of the following types of expressions:
Calculation expressions are used to combine values of two expressions (left and right expression) using an operator.
Note: Available operators can vary depending on the type of left and right expression.
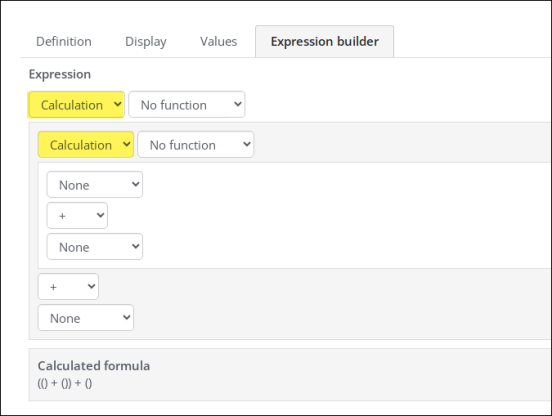
You can combine any expression types. If you need to create more complex calculations, you can nest multiple calculations.
Do the following to build a Calculation expression:
- Select Calculation from the Expression drop-down:
- Select a Function for the Calculation.
- Select the initial expression on which you want to perform a calculation. You can select a Calculation, Constant, If then else, Property, or Today. For example, select Property, and then select the property you want to insert into the calculation.
- Select an operator to apply to your calculation. Options include:
- + (Add)
- - (Subtract)
- * (Multiply)
- / (Divide)
- % (Modulus)
You can choose from other properties included in the business object.
Note: All properties in a Calculation will have numeric or string Data Types. Properties selected outside a Calculation expression can access all Data Types for a source.
Note: If you want to create a Calculation expression to work with dates, use the DateTime constant.
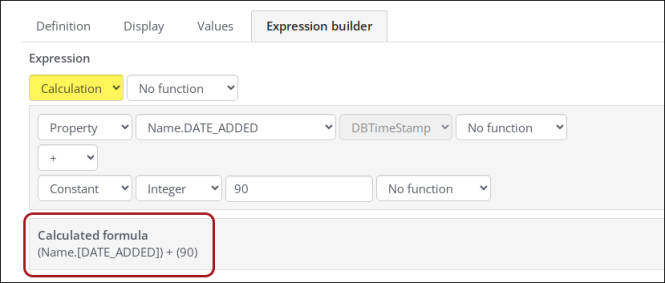
You can then add additional expressions to your Calculation. For example, you can compare a Property against a Constant, or you can compare a Calculation against a Property.
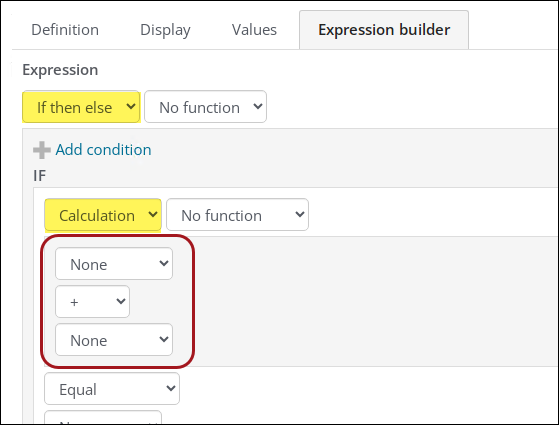
If you select a Calculation as an expression inside a Calculation, the new Calculation is nested.
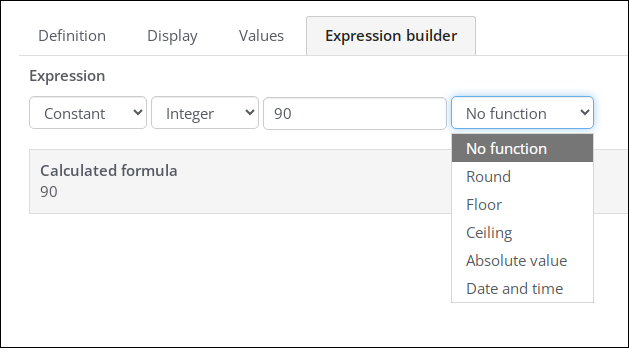
You can define your own Constant to be used in a business object. Do the following:
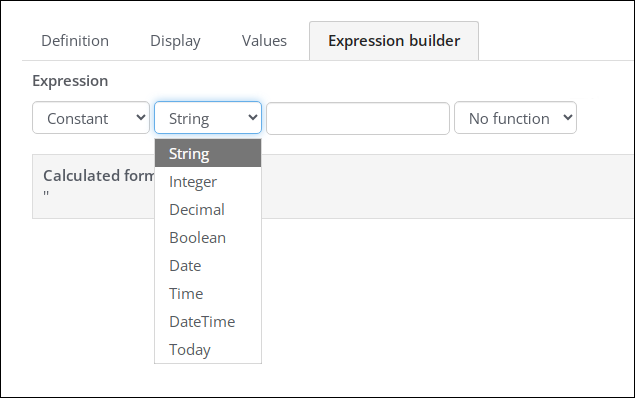
- Select Constant from the Expression drop-down.
- Select a data type. Select from the following types:
- Select a Function for your Constant expression:
Note: The text input field is available only when the Constant expression type is selected.
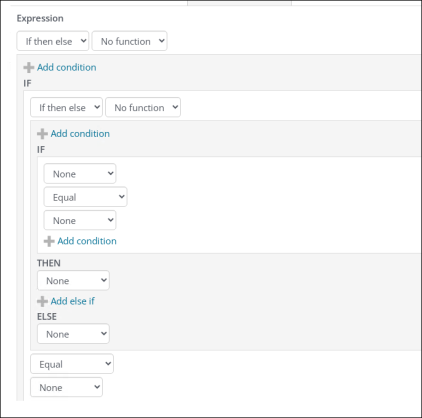
The If then else expression is used to return different values according to some set of defined conditions:
- If then else can be nested: Click + Add condition to wrap the current If then else expression into the THEN statement of the new If then else expression.
- Multiple conditions: You can click + Add else if to add additional ELSE IF conditions.
- IF condition can be nested: Click + Add condition in the IF condition to allow combining multiple conditions using And and Or operators.
- Click the red X in a condition to remove that condition.
- Click the red X next to ELSE IF to remove the ELSE IF condition.
Do the following to build an If then else expression:
- Select If then else from the Expression drop-down. For the If then else expression, the Function options are filtered according to the type to which the THEN or ELSE expression resolves. For example, the THEN expression with Today selected provides functions for the Today expression.
- Begin building the If then else expression:
- In the IF area, select the initial expression in your IF statement:
- If you select Calculation, you can build a Calculation expression inside the If then else expression:
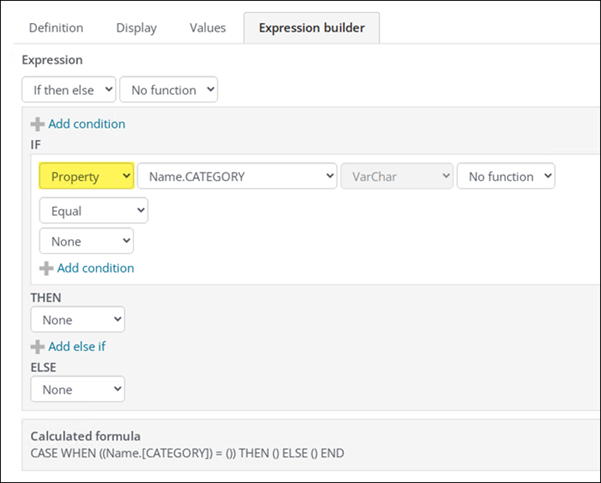
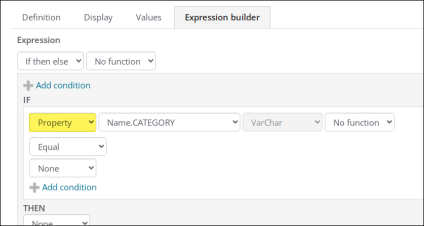
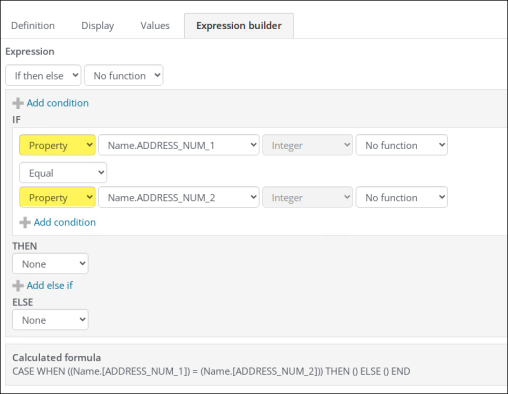
- If you select Property, you can build a Property expression inside the If then else expression:
- If you select If then else, you can nest additional If then else expressions inside the initial If then else expression:
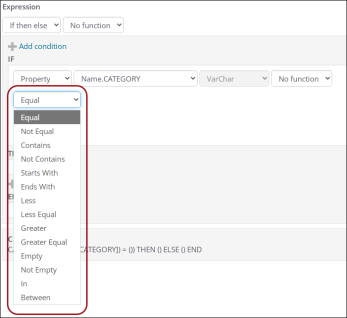
- Select a comparison operator:
- Equal – Enables you to compare two expressions:
- The left operand is equal to the right operand (result is TRUE).
- The left operand and the right operand are not equal (result is FALSE).
- Not Equal – Enables you to compare two expressions:
- The left operand is not equal to the right operand (result is TRUE).
- The left operand and the right operand are equal (result is FALSE).
- Contains – Enables you to search for matches.
- Not Contains – Enables you to specify items to exclude in a search.
- Starts With
- Ends With
- Less – Enables you to compare two expressions:
- The left operand has a lesser value than the right operand (result is TRUE).
- The left operand does not have a lesser value than the right operand (result is FALSE).
- Less Equal – Enables you to compare two expressions:
- The left operand has a lesser value than the right operand or is equal to the right operand (result is TRUE).
- The left operand does not have a lesser value than the right operand and is not equal to the right operand (result is FALSE).
- Greater – Enables you to compare two expressions:
- The left operand has a higher value than the right operand (result is TRUE).
- The left operand does not have a higher value than the right operand (result is FALSE).
- Greater Equal – Enables you to compare two expressions:
- The left operand has a higher value than the right operand or is equal to the right operand (result is TRUE).
- The left operand does not have a higher value than the right operand and is not equal to the right operand (result is FALSE).
- Empty (IS NULL)
- Not Empty (IS NOT NULL)
- In – Enables you to determine whether a specified value matches any value in a list of expressions. Click the red X to remove an expression. Click Add value to add an expression. You can add and remove as many expressions as you like, but the In operator requires at least one input expression.
- Between – Enables you to specify a range to test.
- Select a second expression that will be compared to the first expression:
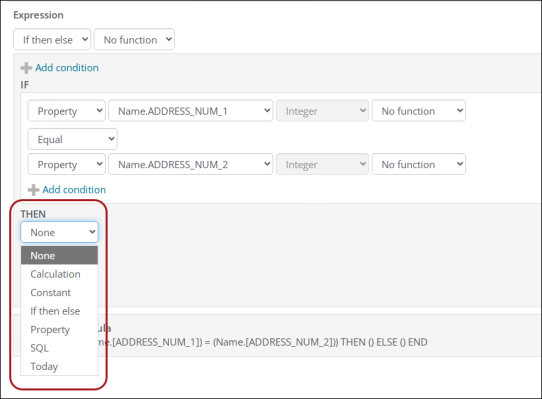
- In the THEN area, select the initial expression in your THEN statement:
- If you select Calculation, you can build a Calculation expression inside the THEN statement.
- If you select If then else, you can nest additional If then else expressions inside the THEN statement.
- Click Add else if to add an ELSE IF statement.
- In the ELSE area, select the initial expression in your THEN statement.
- If you select Calculation, you can build a Calculation expression inside the THEN statement.
- If you select If then else, you can nest additional If then else expressions inside the THEN statement.
As you select an initial expression for the IF statement, the If then else expression responds:
See Building a Calculation expression.
See Building a Property expression.
For more information, refer to Microsoft’s SQL documentation.
Note: As you add expressions, you can also click +Add condition to add additional conditions within your expression. You can delete your added expressions if necessary.
Again, as you select an initial expression for the THEN statement, the If then else expression will respond accordingly:
Again, as you select an initial expression for the ELSE statement, the If then else expression will respond accordingly:
As you add elements, the Expression builder displays a Calculated Formula.
The Property expression is used to select a property. Properties from all sources that are added to the business object are available.
Do the following to build a Property expression:
- Select Property from the Expression drop-down:
- Select the correct property from the drop-down. You can choose from other properties included in the business object.
- Select a Function for your Property expression. Options are filtered based on the selected expression type and the data type assigned to the selected property.
Note: When you select a Property expression, the property drop-down is auto-populated with the first property listed in the Used Columns field on the Database tab.
The Today expression is used to get the current system date and time.
Select a Function for your Today expression.
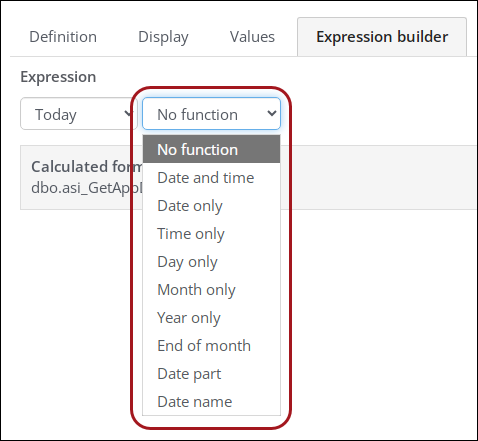
The following table identifies the functions included in the Expression builder and the data types for which those functions are available:
| Functions | Data types | ||||||
|---|---|---|---|---|---|---|---|
| String | Integer | Decimal | Boolean | Date | Time | DateTime | |
|
Round: Rounds a number to a specified number of decimal places. Note: If you choose Round, you can select from a drop-down the number of decimal places to which the number is rounded. |
x | x | |||||
| Floor: Returns the largest integer value that is less than or equal to a number. | x | x | |||||
| Ceiling: Returns the smallest integer value that is greater than or equal to a number. | x | x | |||||
| Absolute value: Returns the absolute value of a number. | x | x | |||||
| Date and time: Returns the current date and the current time. | x | x | x | ||||
| Date only: Returns the date component only (attempts to convert). | x | x | |||||
| Time only: Returns the time component only (attempts to convert). | x | x | |||||
| Day only: Returns the day (integer) for a supplied date. | x | x | x | ||||
| Month only: Returns the month (integer) for a supplied date. | x | x | x | ||||
| Year only: Returns the year (integer) for a supplied date. | x | x | x | ||||
| End of month: Returns the last day of the month of a specified date with an optional offset. | x | ||||||
| Date part: Returns a specified part of a date as an integer value. | x | ||||||
| Date name: Returns a specified part of a date as a string value. | x | ||||||
| Trim: Removes leading and trailing blanks from a string. | x | x | |||||
| Lower: Converts all characters in a string into lower-case capitalization. | x | ||||||
| Upper: Converts all characters in a string into upper-case capitalization. | x | ||||||
| Left trim: Removes leading and trailing blanks from the left side of a string. | x | ||||||
| Right trim: Removes leading and trailing blanks from the right side of a string. | x | ||||||
| Reverse: Returns the reverse order of a string. | x | ||||||
| Replicate: Repeats a string a given number of times. | x | ||||||
| Char index: Searches for a substring in a string and returns the position. | x | ||||||
| Length: Returns the length of the selected string property. | x | ||||||
| Left: Returns the specified number of characters from the left side of a string. | x | ||||||
| Right: Returns the specified number of characters from the right side of a string. | x | ||||||
| Replace: Searches for instances of the first Field and replaces all instances with the value set for the second Field. | x | ||||||
| Substring: Returns a subset of the string property's value from the starting character index indicated until the number of characters specified is reached. | x | ||||||
For more information, refer to Microsoft’s SQL documentation.
Notes:
- The Boolean data type displays an extra selector for True or False.
- The Date data type displays a date selector.
- The Time data type exposes a time selector.
- The DateTime data type displays both a date selector and a time selector.
Expression Builder Examples
Use the following examples as a guide to help you create your own expressions.
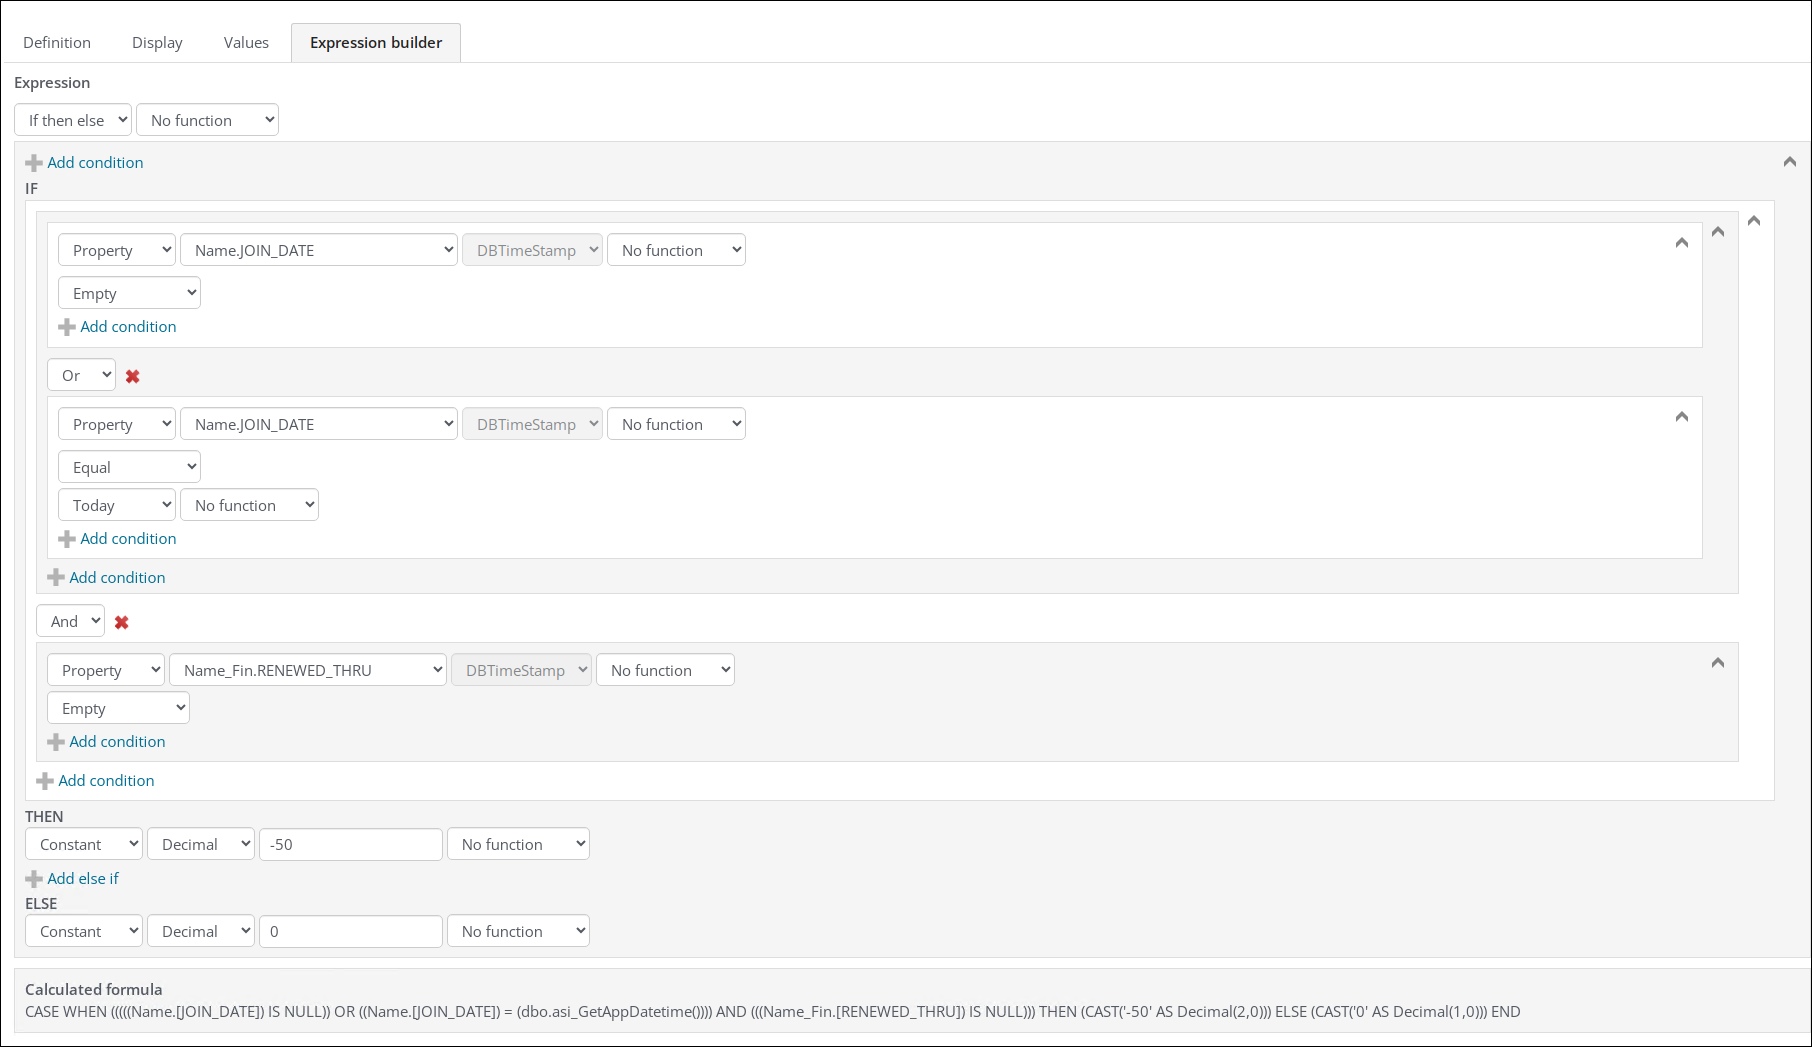
Example: The association offers a $50 discount on your first year of membership. Use the if/then/else expression to create the special pricing rule for first-year member discounts.
Building the discount through Expression Builder
Do the following:
- Go to RiSE > Business Object Designer.
- Click New > Design Business Definition.
- Name the Business Object, then click Create Object.
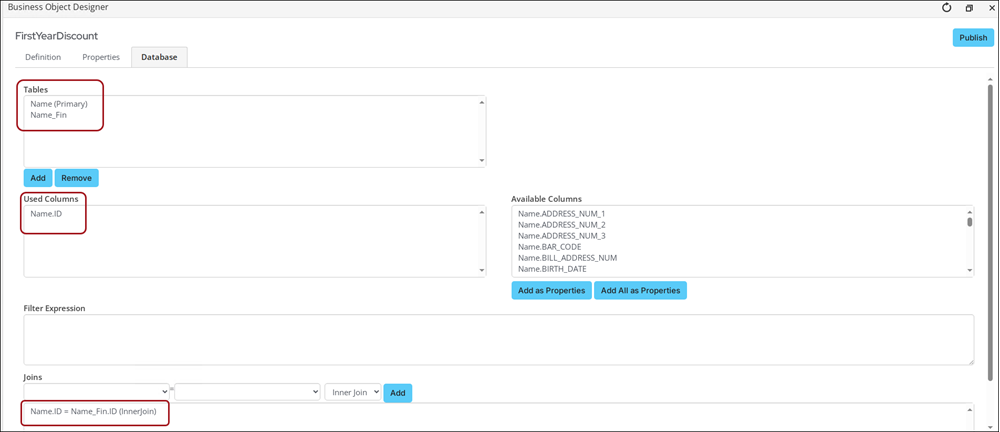
- (Database tab) Do the following from the Database tab:
- Add the Name and Name_Fin tables.
- Add the Name.ID column to the Used Columns.
- Create the following Join: Name.ID = Name_Fin.ID (InnerJoin)
- Click Save.
- (Properties tab) Click Add Custom Property:
- Property Name: FirstYearDiscount
- Data Type: Decimal
- Length: 19
- Scale: 2
- Click the Expression builder tab, then choose If then else from the Expression drop-down.
- Build the following If then else expression:
- Click Save, then click Publish.
Adding the custom property to a billing product
Important! The only billing products that will allow discount (negative) amounts are Miscellaneous Items (MISC).
Do the following to create the billing product:
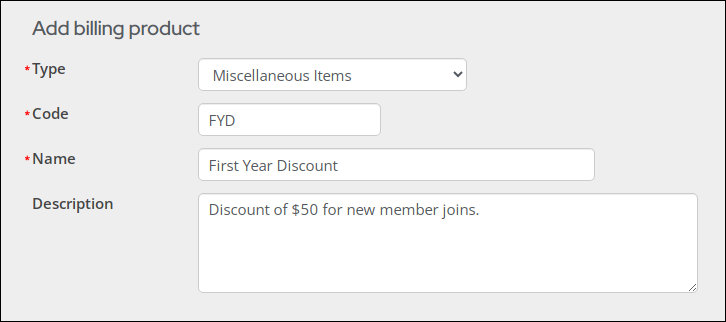
- Go to Membership > Billing products and select Add new billing product.
- From the Type drop-down, select Miscellaneous Items.
- Enter a Code and Name for the product.
- Click Save.
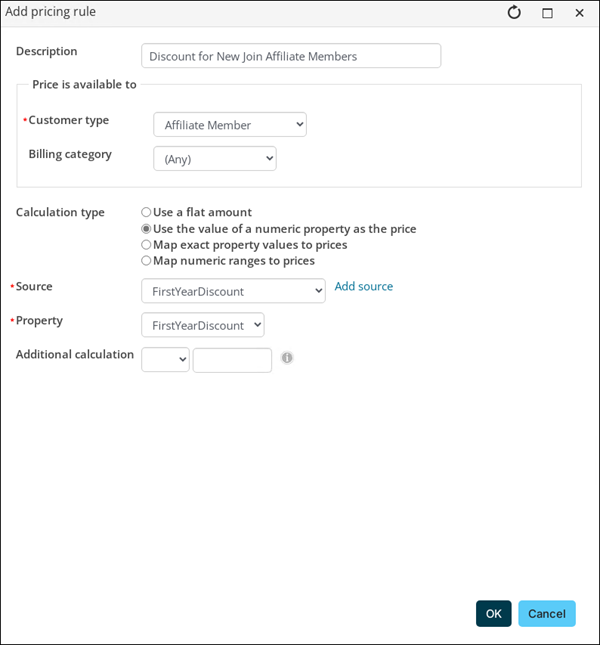
- Enable Use special pricing.
- Select Add new price rule.
- Customer type: Any
- Calculation type: Use the value of a numeric property as the price
- Source: Business Object you created (FirstYearDiscount)
- Property: Expression Builder property you created (FirstYearDiscount)
Example: Each Canadian province has different tax rates that you must accommodate. Use the if/then/else expression to create the special pricing rules for the different tax rates.
Create the rule in Expression Builder
Do the following:
- Go to RiSE > Business Object Designer > New > Design Business Definition.
- Enter a Name (ProvinceTax), then click Create Object.
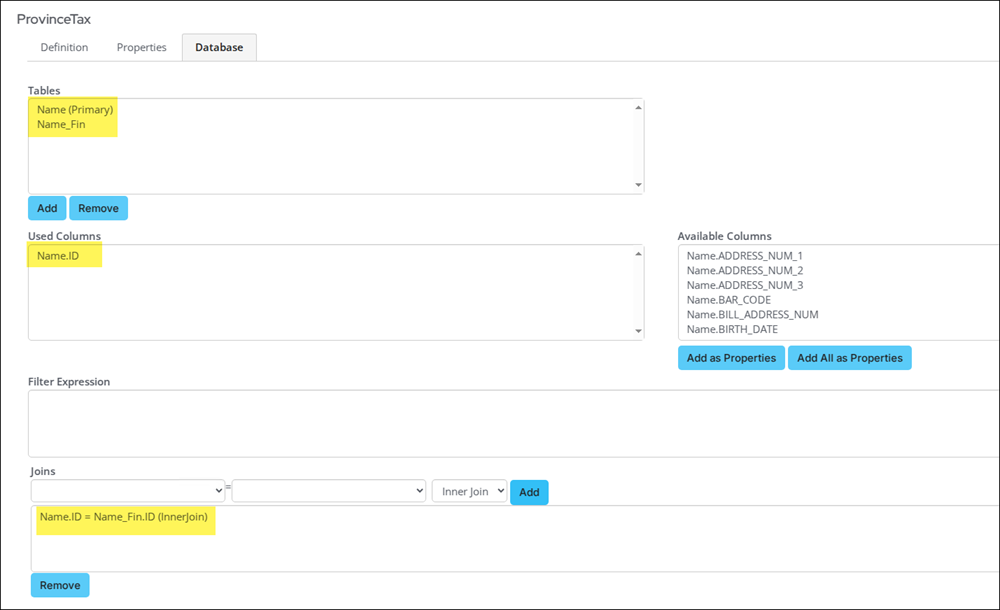
- (Database tab) Click the Database tab, then add the following:
- Tables: Name and Name_Fin
- Used Columns: Name.ID
- Joins: Name.ID = Name_Fin.ID (InnerJoin)
- (Properties tab) Click the Properties tab, then click Add Custom Property:
- Name: TaxRates
- Data Type: Decimal
- Length: 19
- Scale: 2
- Click the Save icon.
- (Values tab) Click the Values tab, then choose Value list. Create the value list that will be used to define the taxable options. This step makes it easier to create the special pricing rules later.
- (Expression builder tab) Create the following in Expression builder:
- Click Save, then Publish.
Create the following value list:
| Data Value | Display Value |
|---|---|
| 1 | Tax Exempt |
| 2 | Not in Taxable Country |
| 3 | Ontario |
| 4 | Nova Scotia, Newfoundland and Labrador, New Brunswick, Prince Edward Island |
| 5 | Quebec |
| 6 | Default Rate |
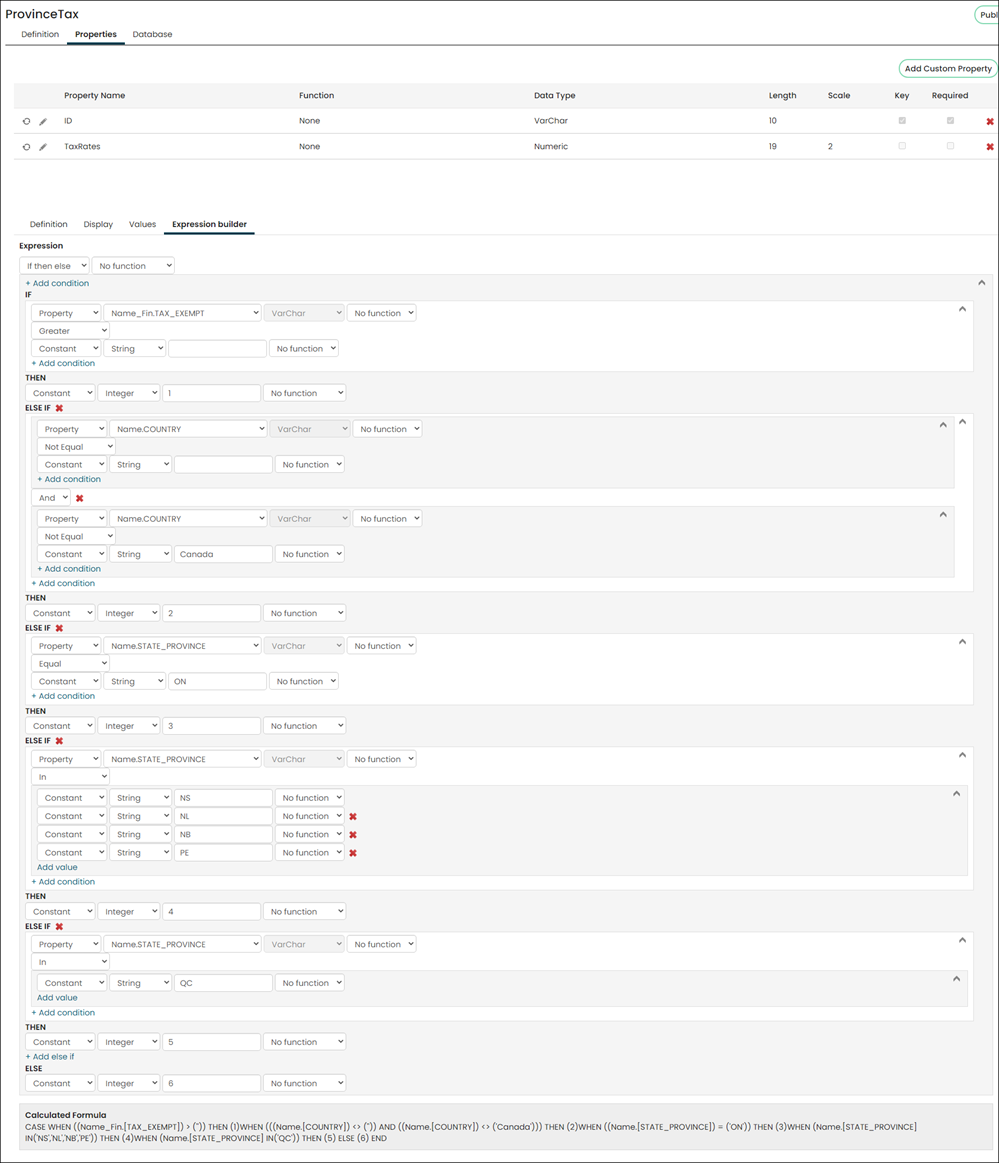
Create the billing special pricing rule
Do the following to use the ProvinceTax business object in a special pricing rule:
- Go to Membership > Billing products.
- Edit or add a billing product.
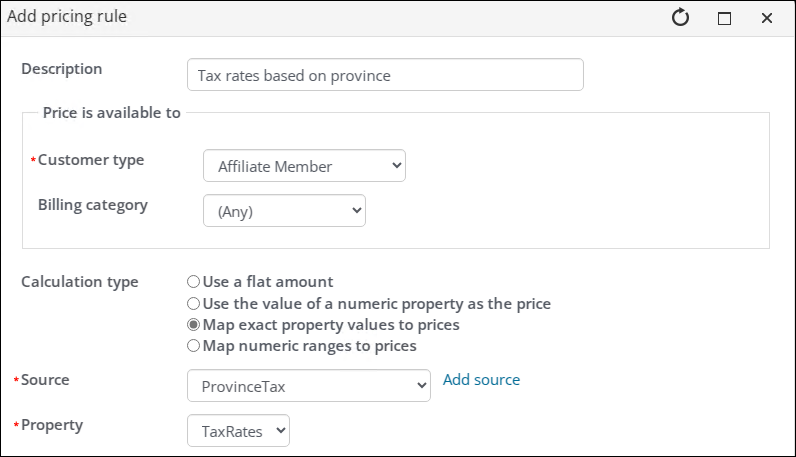
- Enable Use special pricing, then select Add new price rule:
- Customer type: Any
- Calculation type: Map exact property values to prices
- Source: ProvinceTax
- Property: TaxRates
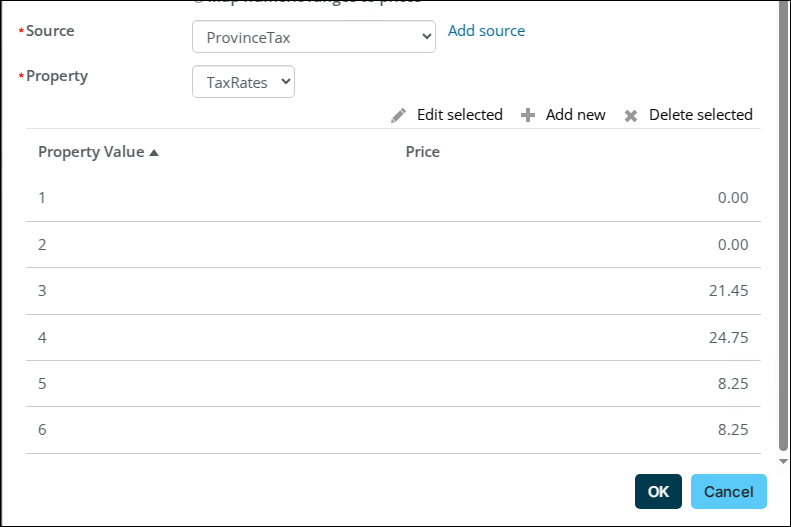
- Map the values you created in the Value list to the desired tax rates. For example:
- Continue adding rules that you need, then Save & Exit.
Example: Members in specific states qualify for discounted membership dues. Use a standalone panel to define the states and the correlating prices, then connect the standalone panel to a custom business object property.
Creating the standalone panel
Do the following to create the standalone panel:
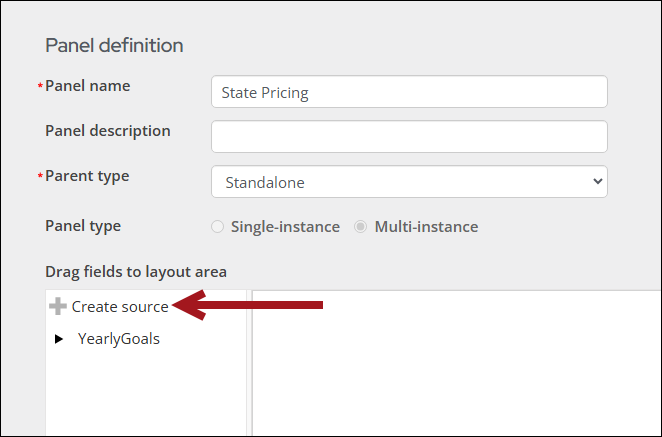
- Go to RiSE > Panel Designer > Panel definitions and select Add panel definition:
- Panel name: State Pricing
- Parent type: Standalone
- Click Create source and enter StatePricing as the Source name.
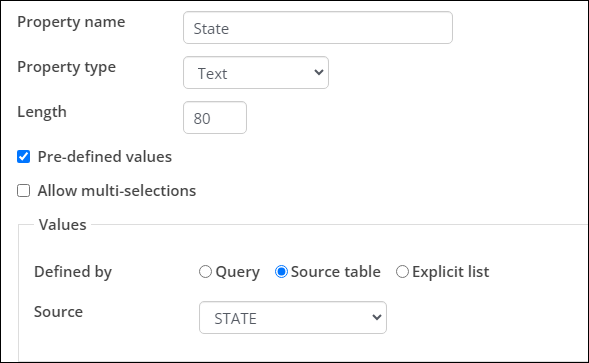
- Add two properties to the new source:
- Property type: Text
- Pre-defined values: Enabled
- Defined by: Source table
- Source: State
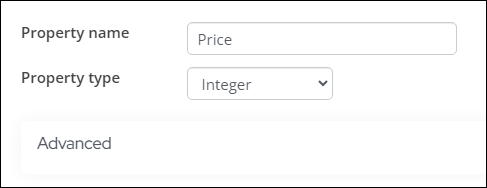
- Property type: Integer
- Drag the properties to the grid, then Save & Exit.
| Property | Configurations |
|---|---|
| State |
|
| Price |
|
Adding countries and pricing to the panel
Do the following to add the panel to a content record and populate the table:
- Go to RiSE > Page Builder > Manage content and create a new content record (New > Website Content).
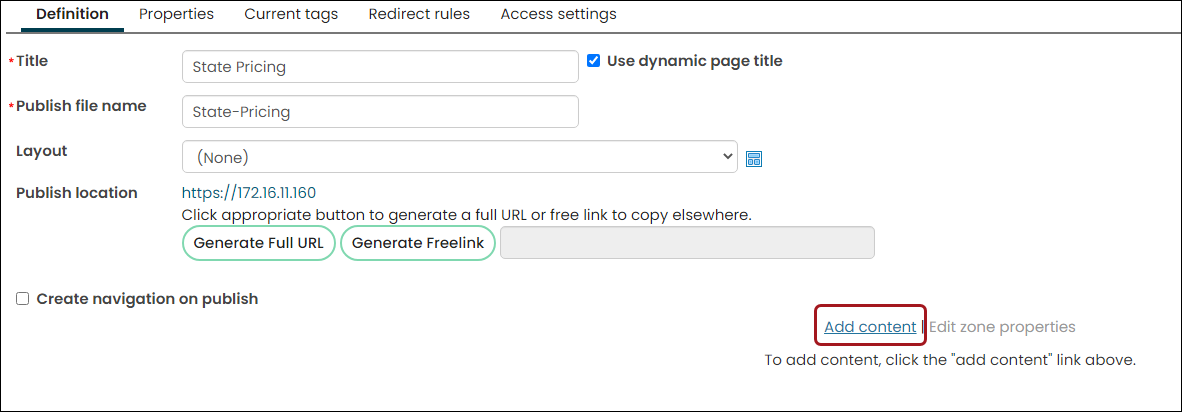
- Give the page a Title the content, then select Add content.
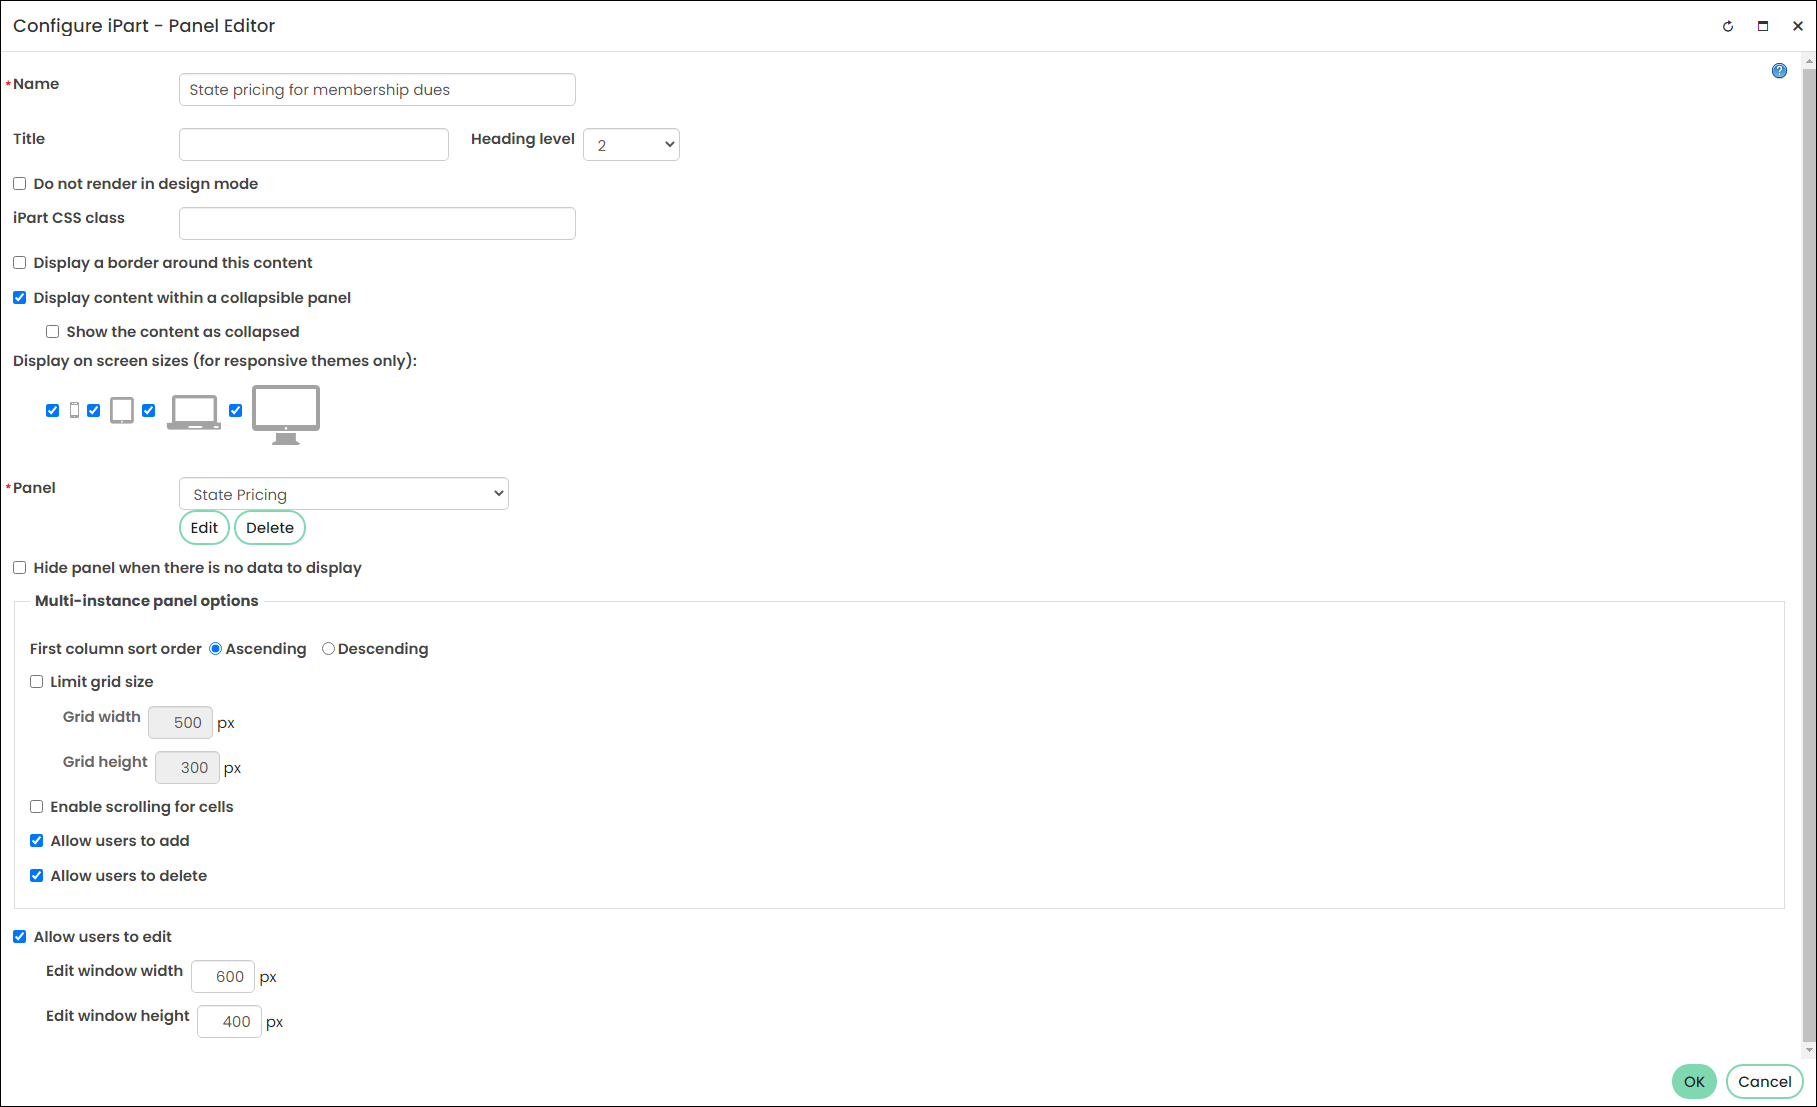
- Open the Content folder, then choose the Panel Editor content item:
- Title: State pricing for membership dues
- Panel: State Pricing
- Allow users to add, Allow users to delete, Allow users to edit: Enabled
- Click OK, then click Save & Publish.
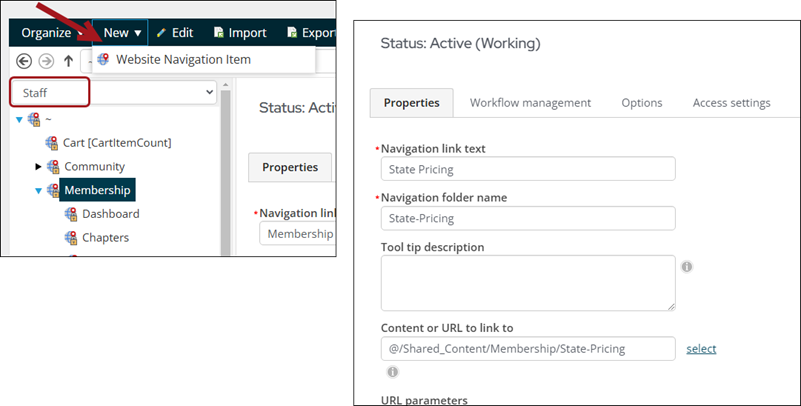
- Go to RiSE > Site Builder > Manage sitemaps and choose the Staff site from the drop-down.
- Click Membership, then click New > Website Navigation Item:
- Navigation link text: State Pricing
- Content or URL to link to: Content record you created in step 1.
- Click Save then Publish.
- Go to Membership > State Pricing and populate the table with the appropriate state pricing rules.
Adding the standalone panel property to a Business Object
Do the following to add the standalone panel as a property in Expression Builder:
- Go to RiSE > Business Object Designer and click New > Design Business Definition.
- Enter a Name, then click Create Object.
- Click the Database tab.
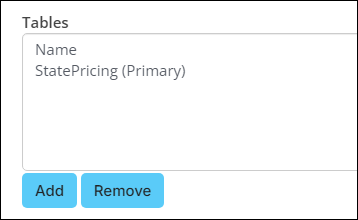
- From the Tables section, click Add.
- Add the Name and StatePricing tables.
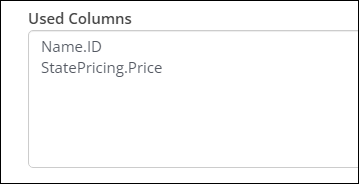
- From the Available Columns section, add the Name.ID and StatePricing.Price properties to the Used Columns section.
- From the Joins section, add the following join: Name.STATE_PROVINCE = StatePricing.State
- Click Save, then click Publish.

Adding the custom property to a billing product
Do the following to add the expression builder property to a billing product to be used for price evaluation:
- Go to Membership > Billing products.
- Open the billing product for edit, or create a new billing product.
- Enable Use special pricing.
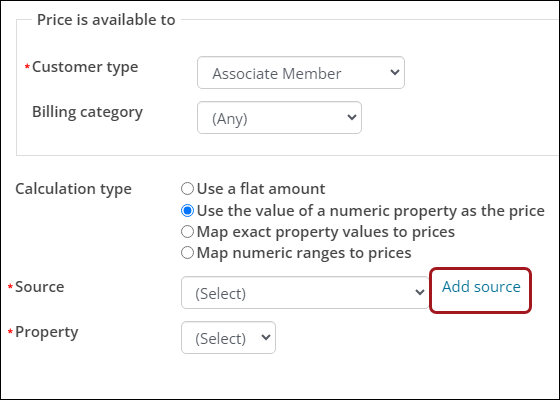
- Select Add new price rule:
- Choose a Customer type.
- (optional) Choose a Billing category.
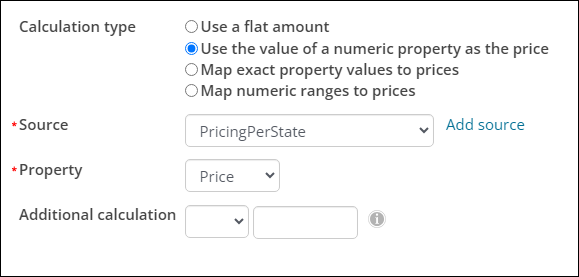
- From Calculation type, choose Use the value of a numeric property as the price.
- Select Add source.
- Choose the Business Object you created in the previous section (PricingPerState).
- From the Property drop-down, select Price.
- Click OK, then click Save.
