Last updated on: June 23, 2026
Opening and signing into Outlook
Get started with iMIS Outlook Integration inside of the Outlook desktop and web interfaces.
In This Article
- Using new Outlook on desktop or Outlook from the web
Signing in
Configuring Single Sign-On for the iMIS Outlook integration
Using new Outlook on desktop or Outlook from the web
If you are reading an email, click the iMIS Outlook Integration link next to the Reply button.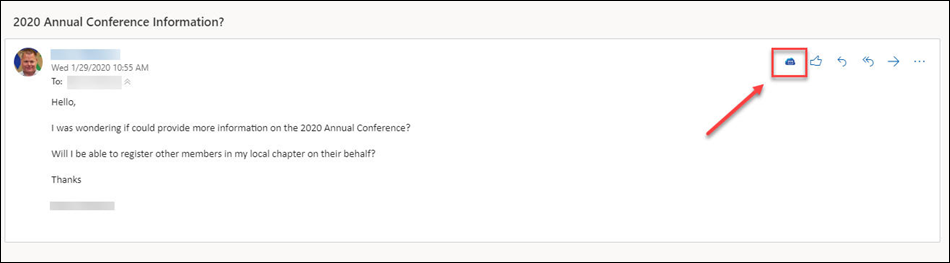
Signing in
The first time you start the iMIS Outlook Integration, you will be presented with the welcome screen. Simply scroll down, and click Sign In Now.
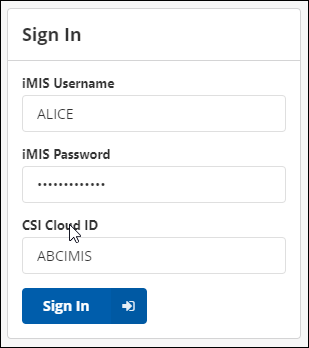
To sign in, enter your iMIS username, iMIS password, and your Cloud ID, then click Sign In.
Note: If you receive an error that says This user is not authorized to access this application, contact your IT or Network Admin and ask them to assign your user account to the iMIS Outlook Integration app through the Cloud Dashboard.
Configuring Single Sign-On for the iMIS Outlook Integration
Single sign-on (SSO) authentication between iMIS and the iMIS Outlook Integration relies on OpenID Connect (OIDC) to authenticate users through iMIS or an external identity provider. When configured, users can sign in using their existing credentials, with support for multi-factor authentication (MFA) enforced by the identity provider.
The authentication flow includes automatic redirection to the appropriate identity provider, respects existing MFA sessions, and grants access based on configured security policies. Administrators can also test the SSO configuration and review authentication results to confirm successful sign-in or troubleshoot failures.
Creating a new client application in iMIS
To get started, you must first create a new SSO client application in iMIS, then add the application to a content record.
Complete the following required steps:
- Setting up the application in iMIS.
- Adding the client-application redirect to a page.
Note: The Login redirect URL is the following: https://iemail.cloud.csiinc.com/ClientApplication/Token/[CloudID]. Be sure to replace [CloudID] with your Cloud ID.
Important! Do not skip this step. The generated URL is required to complete the Outlook Integration configuration.
Connecting the Outlook Integration with iMIS SSO
Do the following to configure iMIS SSO with the Outlook Integration:
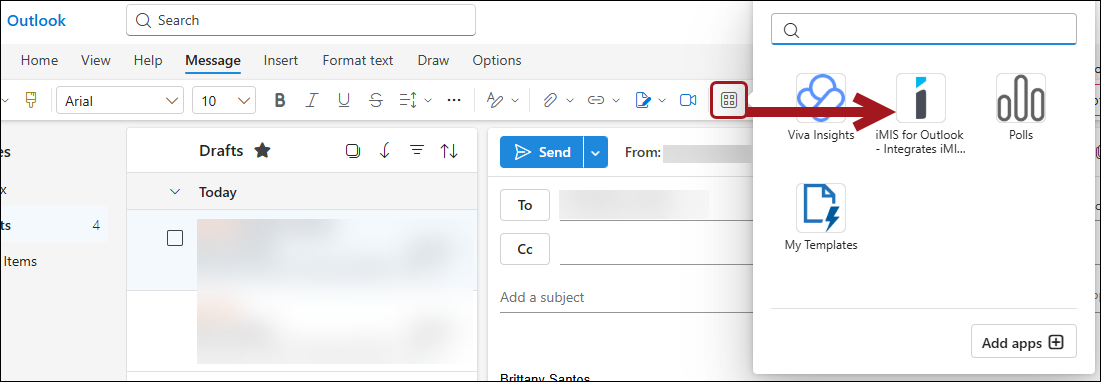
- Open Outlook.
- From the Home menu bar, click More apps.
- Choose iMIS for Outlook.
- Click Sign In Now.
- Enter your iMIS Username, iMIS Password, and Cloud ID.
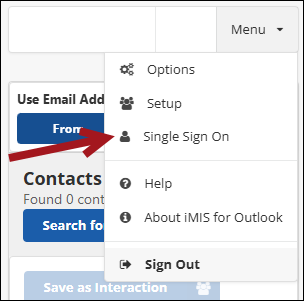
- Click Menu > Single Sign On.
- Enter the same Client ID and Client Secret that was entered into iMIS.
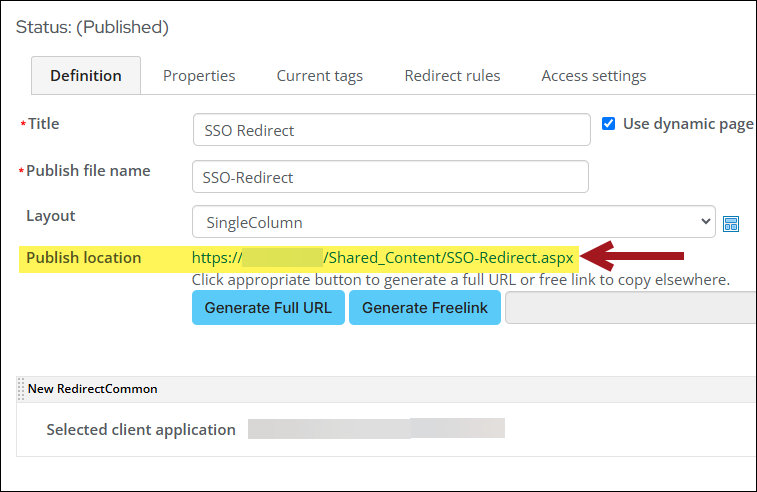
- The Login Redirect URL will be the Publish location URL on the corresponding iMIS content record. Do the following to locate the URL:
- Open the content record that has the client application redirect content item on it.
- Copy the Publish location URL.
- Paste the URL into the Login Redirect URL field.
- Click Save.

Testing the new SSO connection
To validate and test that the new SSO connection is working, do the following:
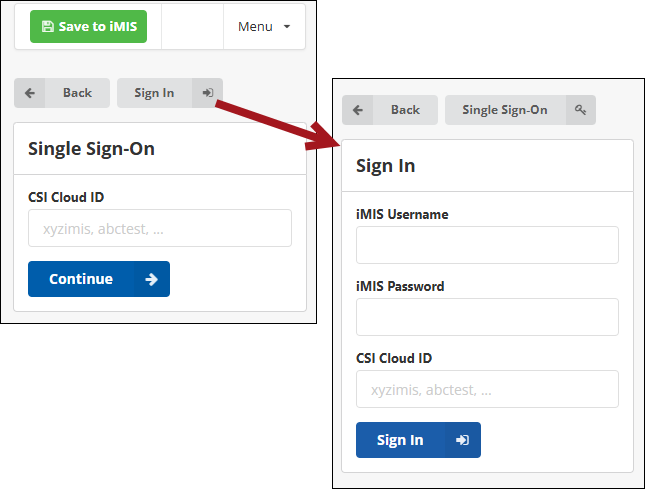
- Sign out from the Outlook Integration. The Single Sign-On authentication method displays.
- You can use the Single Sign-On authentication method or click Sign In to use your iMIS credentials instead. Click Single Sign-On to bring back the SSO authentication method.
- Enter the Cloud ID and click Continue. A pop-up window will appear and redirect you to the iMIS site for authentication.
- Sign in using the authentication method. The pop-up window will close, and you will automatically be logged in with the Outlook Integration.
Troubleshooting
Review the following if you are experiencing any issues.
| Error message | Potential cause and fix |
|---|---|
| Missing authentication data from login window. |
Certain browser extensions may be interfering with the SSO. Try disabling all browser extensions. Certain extensions, such as MetaMask, have been known to cause login issues when the SSO is enabled. |