Last updated on: June 18, 2026
Measuring the success of your campaign helps you improve your next marketing effort. Each time the cycle repeats itself, you become more efficient at honing your message and delivering the right message to the right person at the right time. As a result, you are able to set ever higher goals for your organization, such as acquiring more members, logging more donations, selling more products, or getting your message to a larger audience.
iMIS Marketing provides progress and performance feedback at many levels of the campaign. You can view a real-time summary of the campaign's performance, including:
- The progress of each solicitation, source codes that have been generated, and source codes that have been dropped
- The number and type of responses resulting from each solicitation
- The progress, response, and accumulated revenues/costs for each source code
- The actual revenues and costs compared to the target figures for each source code and appeal
- Performance information to guide future actions and campaigns
These powerful performance monitoring features are usually sufficiently rigorous for basic campaigns. For more complex campaigns, use RFM analytics.
In This Article
- Tracking campaign responses
Tracking event responses for your campaign
Tracking dues responses linked to your campaign
Tracking campaign revenue by source code
Synchronizing campaign responses
Creating projects from Campaign Management
Acting on prospect responses
Tracking campaign responses
Campaign Management gives you the power to track different types of responses to a campaign. This allows your organization to:
- Maintain a history of all customer responses to marketing efforts and every message that was sent
- Define specific tasks that execute automatically when prospects respond or do not respond to solicitations
- Generate personalized emails, faxes, and letters based on user-defined settings
Responses to solicitations are captured automatically. All tracking areas are synchronized, upon command, to consolidate responses. This tracking information includes:
- Contacts associated with the source code
- Non-responses and opt-outs
- (optional) Financial transactions associated with the campaign (orders, events, gifts, pledges, billings)
To track the responses to your campaign, you will:
- Enter orders and associate them with a source code.
- Synchronize responses.
- View the results file or the summary pie chart of each level of the campaign.
- (optional) Use communications tools to generate messages automatically when a response is received.
- (optional) Use Process Manager to kick off projects or processes associated with each type of response or target group.
Tracking event responses for your campaign
You can associate events with your campaign and track responses:
- Event responses are tracked through registration data, not through payment data.
- Registration for multiple event functions that have the same source code are counted as one response. Registrations for multiple event functions that have different source codes are counted as multiple responses.
Adding an event function to an event registration is counted as a response and affects all revenue and response attributes, such as response dates, response amounts, and response count.
Removing an event function from an event registration affects total revenue but does not affect other revenue and response attributes such as response dates, response amounts, and response count. Removing an entire event registration decreases response count and revenue.
Tracking dues responses linked to your campaign
You can associate payments with your campaign and track responses:
- Payments for multiple products that have the same source code are counted as one response. Payments for multiple products that have different source codes are counted as multiple responses.
- Cancelling a billing fundraising item decrements total revenue, but does not affect other campaign statistics.
If you change the source code for a payment after running response synchronization, the response is not updated.
Tracking campaign revenue by source code
You can associate payments with your campaign and track responses:
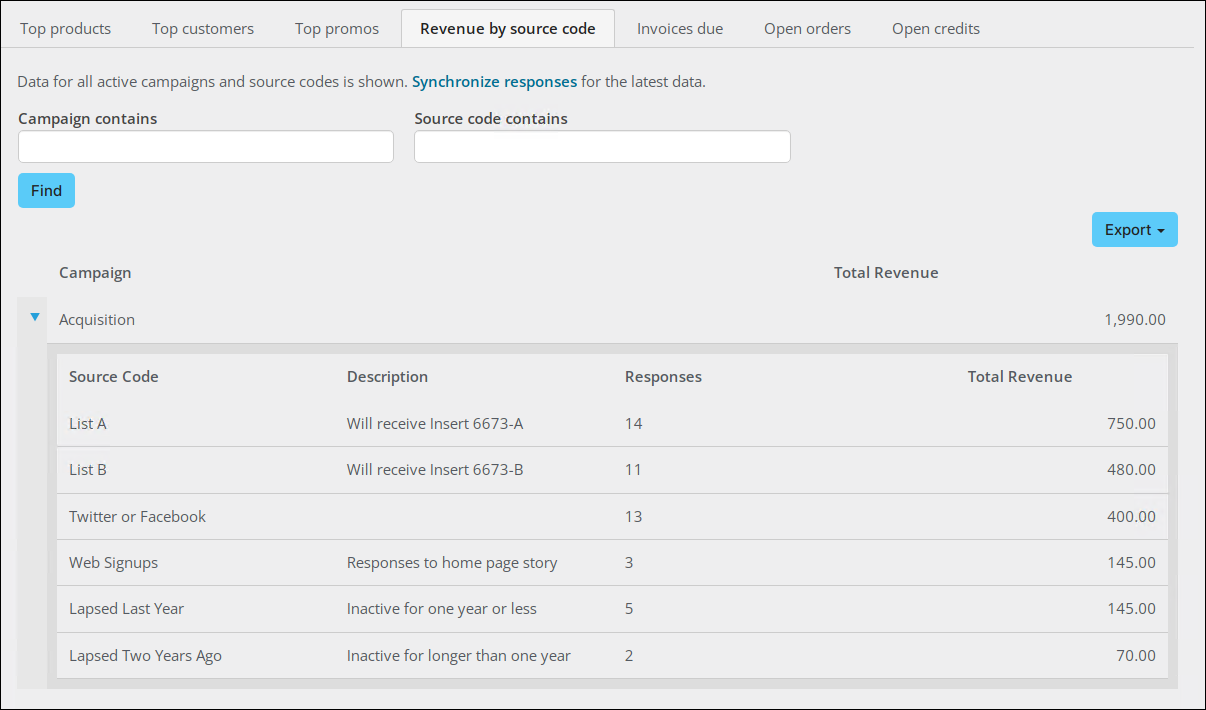
The Revenue by source code query (@/Samples/Dashboards/Commerce /Revenue_by_source_code) tracks campaign revenue and responses by source code. This query is available on the out-of-the-box Commerce dashboard:
- Go to Commerce > Dashboard.
- Select the Revenue by source code tab.
- Selecting Synchronize responses takes you to Marketing > Campaigns > Define campaigns. There you can sync the campaign responses.
- Search by campaign or source code.
- Expand the campaign to view the number of responses and the total revenue by source code.
- Choose to Export the query to Word, Excel, PDF, CSV, or XML.
Synchronizing campaign responses
Each time you synchronize responses, only those product sales that have occurred since the last time the process was run are processed.
If you synchronize responses for an inactive campaign, no responses are generated. If you change a campaign status to Active and then synchronize responses, only those responses entered after activating the campaign are recorded. iMIS ignores the responses entered when the campaign was inactive.
To synchronize campaign responses, do the following:
- Select Marketing > Campaigns > Define campaigns.
- Open a campaign.
- Click Sync. Responses.
- A status message displays noting that the responses are being synchronized.
- Go to RiSE > Workflow > Monitor processes to observe the synchronization's status.

Note: Do not edit a campaign source code after processing responses for the source code.
Creating projects from Campaign Management
You can easily create projects that correspond to your campaign. Create these projects by defining, editing, or selecting the following information for the new projects:
- A query
- A project process output
- A source code
To create projects from a campaign, do the following:
- Go to Marketing > Campaigns > Define campaigns and open a campaign.
- From the Appeals tab, open an appeal.
- From the Solicitations tab, open a solicitation.
- From the Source Code tab, open a source code.
- Go to the Inserts tab.
- Either select an existing insert, or click New Insert.
- Click the browse icon to select the Output Process or click the Processes tab and select New Insert to define a new process.
- For a new process, click the Sources tab and browse for the Source Data Query and Template Name.
- Click Save.
- Click Save.
- Click Generate Output.
- The system displays the status on the Summary tab.
Note: The Update campaign data type can be used to create an automated task which can be set to run overnight, or fired manually, to update all related Campaigns, Appeals, Solicitations, and Source Codes after the Output is generated. See Understanding scheduled tasks for more information.

Note: When output is generated from Campaign Management using a project process output, the query and source code specified in the campaign automatically override the query and source code specified in the project process output definition.
Acting on prospect responses
You can easily set up your campaign so that specific tasks are generated when a prospect responds or fails to respond to a solicitation. This helps you to:
- Acknowledge positive responses
- Send a cross-promotional solicitation to positive responders
- Initiate reminders to prospects who do not respond to initial solicitations
- Make sure that prospects who opt out of the campaign do not receive further solicitations
To create a response stage, do the following:
- Go to Marketing > Campaigns > Define campaigns and open a campaign.
- From the Appeals tab, open an appeal.
- From the Solicitations tab, open a solicitation.
- From the Source Codes tab, select a source code.
- Click the Source Lists tab.
- From the Add Source List area, select Solicitation Response.
- Select a campaign.
- For each campaign response stage:
- Select an Appeal.
- Select a Solicitation.
- Select a Source Code.
- Select a Comparison value (Equal or Not Equal).
- Select a response State:
- Solicited – Contact has been solicited but has not responded.
- SolicitedResponse – Contact has responded to a solicitation.
- UnsolicitedResponse – Contact has responded but was never solicited.
- OptOut – Contact has opted out of the solicitation and will be excluded from any future lists for this campaign, appeal, and source code.
Note: If a source code is provided with the response, the system assumes the contact was solicited.
- Click add.
- Select a Global Operator that applies to all solicitation state expressions (AND or OR).
- Click Save. The solicitation response displays in the Source Lists.
To view a solicitation response, do the following:
- Go to Marketing > Campaigns > Record responses.
- Locate the desired contact. The system displays a list of responses for that contact by source, appeal, and campaign.