Last updated on: June 08, 2026
On premise post-upgrade tasks
After the on-premise upgrade is complete, review the post-upgrade tasks.
In This Article
- iMIS Service Logs
Upgrade Logs
Tenant subfolder
Images, App Themes, KEK, & PDFs
Gateway
Website URLs
Additional post-upgrade tasks
iMIS Service Logs
Review the iMisService logs to make sure there are no errors, all business objects published, all content published, and the customer tables, if any, were migrated without error.
This a very important step to ensure everything upgraded and published successfully. The iMisService logs can be found at C:\AsiPlatform. Confirm that the Tenant Domain initialized has completed for the tenant by searching for initialization in the logs.

Upgrade Logs
Review the Upgrade logs to ensure all steps were completed after upgrade. To review the upgrade logs, launch the iMIS service page and click on the Tenant ID. Click Database Information and then click Get Logs. Review the Summary Log to ensure all steps were completed after upgrade and there were no errors.
Tenant subfolder
Review the Tenant subfolder to ensure there are no images, app themes, or PDFs. These now live in the database. The only subfolder that should be under the Tenant folder after the upgrade is the KEK file. To review those files, navigate to C:\ProgramFiles (x86)\ASI\iMIS\TenantData\Tenants\iMIS instance.
Images, App Themes, KEK, & PDFs
Review the following table to understand where the new location is for images, app themes, the KEK file, and PDFs.
| Old location | New location | Notes | |
|---|---|---|---|
| Images | C:\Program Files (X86)\ASI\ iMIS_Instance\net\images |
C:\Program Files (X86)\ASI\ iMIS_Instance\TenantData\Tenants\ iMIS\Content\images |
For the new location, you must create a folder called Content, then create the images folder. Upload all images in the same structure as they appear in the net folder to the new images folder. When ready, recycle the app pool and the images will migrate to the new iMIS. |
|
App Themes |
C:\Program Files (x86)\ASI\ iMIS_Instance\net\App_Themes |
C:\Program Files (x86)\ASI\ iMIS_Instance\TenantData\Tenants\ iMIS \Content\Assets\App_Themes |
For the new location, you must create the Content, Assets, and App_Themes folders (three total). Upload all app themes in the same structure as they appear in the net folder to the new App_Themes folder. When ready, recycle the app pool and the app themes will migrate to the new iMIS. |
| KEK | C:\AsiPlatform\ Asi.Scheduler_iMISClient\App_Data |
C:\Program Files (x86)\ASI\ iMIS_Instance\TenantData\ Tenants\iMIS\SystemData |
Rename the existing file from kek to kek1, then move over the desired KEK. |
| PDFs | C:\Program Files (x86)\ASI\iMIS_Instance\net\pdfs | C:\Program Files (x86)\ASI\iMIS_Instance\TenantData\Tenants\iMIS\Content\pdfs | For the new location, you must create a folder called Content, then create the PDFs folder. Upload all PDFs in the same structure as they appear in the net folder to the new PDFs folder. When ready, recycle the app pool and the PDFs will migrate to the new iMIS. |
Gateway
Important! The following information only pertains to those who are upgrading a test site or upgrading a client's live/current iMIS site. This does not apply to brand new installs for a self-hosted EMS client.
Once an iMIS database is tied to a Pay Central Service, the only way to point it to a new Pay Central Service is to clear out the Key; however, if the Key is cleared out, then that iMIS database where the key is cleared can no longer process payments using the old DataVault and the tokenized data is lost. This process works for backup databases, but is not desired for live databases.
To clear out the DataVault key, run the following SQL:
UPDATE SystemConfig
SET ParameterValue = ''
WHERE ParameterName IN ('DataVault.CustomerId','DataVault.Password')
Website URLs
Ensure that the URLs are set up how they were defined in the web.config file of the system that was upgraded. All URLs you plan to use should be set up in the following areas:
- iMIS Staff site
- Hosts file
- JSON file (or through the iMISService)
- Bindings in IIS
Staff site
Do the following to ensure the Staff site URLs are correctly configured:
- Go to RiSE > Site Builder > Manage websites.
- Open the Core Sites folder, then click the Staff site.
- In the Website base URL(s) field, make sure the website is correctly populated. The website URL should have both www and non-www.
- Continue the process for all active websites. The website URL should be the same for all websites.
Example: https://members.imiscloud.com/, https://www.members.imiscloud.com/
Hosts file
Do the following to ensure the hosts file is correctly configured:
- Open the local file explorer, then navigate through the following folder path: C:\Windows\System32\drivers\etc
- Open the hosts file with a text editor, such as Notepad.
- For all active RiSE websites, add the URLs.
Note: The IP address should be the same for all URLs. Each entry should be kept on an individual line. The IP address should be placed in the first column followed by the corresponding host name. The IP address and the host name should be separated by at least one space.
Example:
127.0.0.1 members.imiscloud.com
127.0.0.1 donors.imiscloud.com
127.0.0.1 annualconference.imiscloud.com
JSON file
Do the following to ensure the JSONfile is correctly configured:
- Open the local file explorer, then navigate through the following folder path: C:\Program Files (x86)\ASI\iMIS_Instance\
- Open the TenantConfiguration.json file with a text editor, such as Notepad.
- From the HostNames section, add all URLs, separated by commas with no spaces.
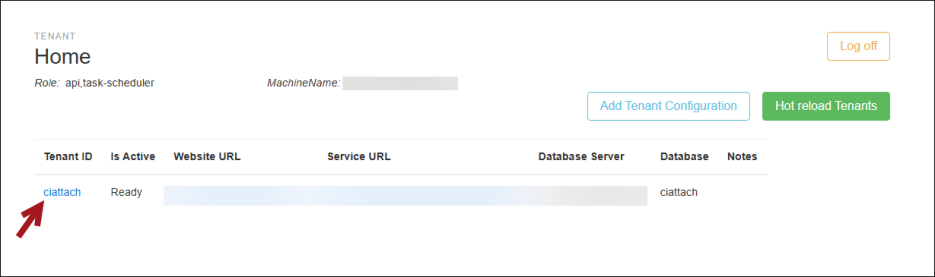
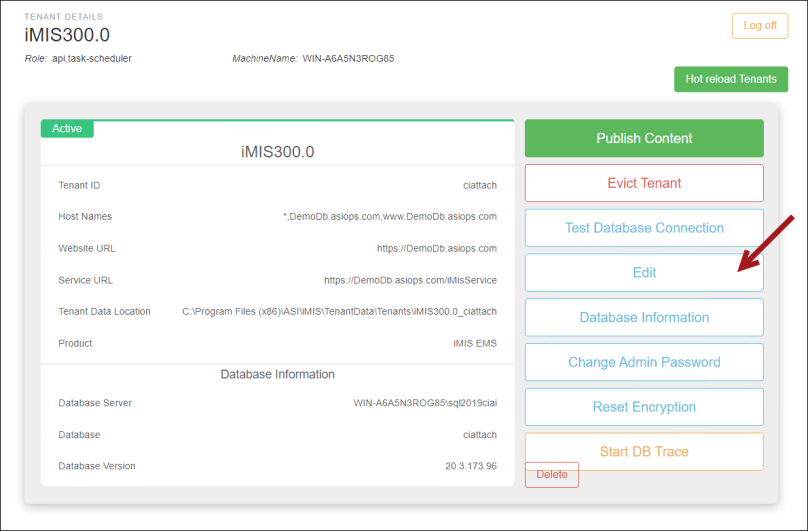
Alternatively, update the URLs through the iMISService page:
- From a browser, enter the website URL, followed by /imisservice.
- Click the Tenant ID
- Click Edit.
- In the Host Names field, add the website URLs, separated by commas with no spaces.
Example: website.imiscloud.com/imisservice
Important! The Website URL and Service URL fields must only contain a single website. If you must define more than one website, add them to the Host Names field.

Bindings
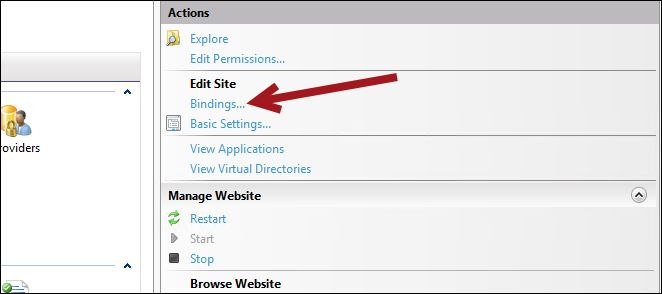
Do the following to ensure the bindings are correctly configured:
- Open IIS.
- Select the website from the left-side menu.
- From the right-side menu, select Bindings.
- Click Add, then populate the site binding fields.
Important!
Additional post-upgrade tasks
Make sure the Post-upgrade checklist tasks are reviewed and completed.