Last updated on: June 23, 2026
The following procedure shows how to define a new query. To edit an existing query, you can follow the same procedure. In some cases, a system administrator can navigate to the web page where the results are displayed and click Edit Source Query.
If you have been granted access to an IQA folder, you can edit or create queries in that folder. Do the following to create or edit a query:
- Go to RiSE > Intelligent Query Architect.
- Edit a query, or select New > Query.
- Enter a Name and an optional Description for the query. Do not use apostrophes.
- Enter descriptive Caption text. This text will be read by assistant technology to describe the results of your query.
- (Sources tab) Choose a common source or query under Add source, or select All Sources to view a full list of sources. Find a business object or query to use as a source for the query (most business objects are located in the Common folder).
- (optional) Select an additional source and click OK. Use the up and down arrows to reorder the data sources as needed.
- (optional) (Filters tab) Define the filtering rules:
- Select the Property to be compared.
- Select the type of Comparison, for example, Equal, Not Equal or Less.
- Enter the Value or select a date for comparison.
- Constant – Enter a value or select from a value list.
- Property – Compare one database field to another in the same source. The drop-down displays the fields from the IQA source that are of the same type as the property you want to compare.
- Dynamic – You can dynamically filter your query results. The following values are available:
- LoggedIn User Key
- Selected Contact
- Selected ID
Note: If you have a Dynamic filter named Me, that filter refers to the currently logged-in user. The Me filter is no longer supported.
- URL param – Filters by a specified URL parameter. Specify the name of the URL parameter. These filter options are not available if your Comparison operator is Between, Starts With, Ends With, Contains, Not Contain, Empty or Not Empty.
- You can add additional filters to your query. Additional filters can be reordered using the up/down arrows.
- When you select Between as the Comparison operator, the Value column changes to display two fields with the word and between the fields. The specified values are inclusive.
- The pattern comparisons (Contains, Not Contains, Starts With, Ends With, and so forth) use a simple text field even for a Property that normally contains a discrete drop-down list of values.
- The Contains comparison type performs a string comparison to find one string within another string. A partial match (for example, only a portion of a word) is required.
- Enter multiple values for a pattern comparison (Contains, Not Contains, Starts With, and Ends With) by separating each value with a comma and in quotes. For example, "D","R".
- Click the calendar icon next to any Date field to select a date. If you need to specify a specific time on the selected date, first enter the time in the Date field, using 24-hour format (for example, enter 23:00 for 11:00 pm), then click the calendar icon to select the date.
- When entering numbers for a comparison on a date field (Within Days, Within Months, Within Years), be aware that such comparisons are zero-based. For example, if you select the Last Updated column and select Within Days, you must enter zero (0) in the Value field to get all records that were updated within one day, or enter 1 to get records that were updated within two days.
Depending on the Comparison operator you selected, you can select the type of filter in the Value column:

Note: You cannot move filters between filter sets.
- (Display tab) Define how results columns are displayed.
- Select the Only display unique results option to prevent duplicate results from displaying. When the query includes a property with a display function such as Count, that property is used to determine unique results. If the query includes more than one display function, only the first function property displayed (defined by the display order) is used. If this option is enabled, do not use the Subtotal option on the display properties.
- Select the results columns to display to users.
Click Apply to add the properties to the query.
- Select the order in which you want the columns to display to users (from left to right). The order is based on the Order column, not the order in which they were chosen. Subsequent sorting selections go at the end of the sort order list (per session) by order listed within each session.
Note: If you are defining a query for a merge output process, make sure you select all columns needed for the merge.
- (Sorting tab) Specify the sort order for each column
- Select the Property to sort by.
- The Random order sorting property is available for each query. When added as a sort property to a query, the results are returned in a random order, and the order is different each time the query is refreshed. See Creating a query that returns the results in a random order for more information.
- Select the sort Priority for each property.
- Select the Direction of data in each column: Ascending or Descending.

The user can sort columns in the output by clicking on a column header. A carat symbol (^ ) is displayed in the column header, indicating that the column is now a sort column. The user’s sort selection will override all prior definitions on the Sorting page. This user-selected change will adjust the definition in the query to reflect the current column sort.
Note: If you choose not to define any parameters in the Sorting tab, then the results returned using SOA might be inconsistent within a single page. If you choose to define one or more properties in the sorting tab, then the resulting set of returned pages should be consistent and return the same results within a page.
- Select Run to test the query. If edits to the query are necessary, select Define.
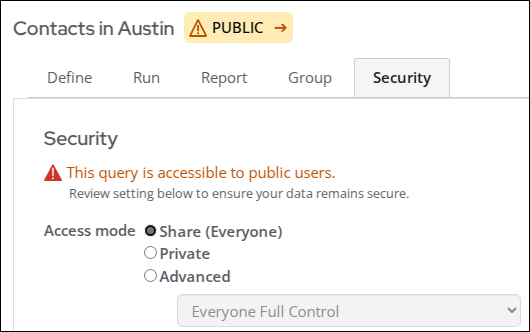
- (Security tab) The default setting for a new query is All Staff Full Control. If the query needs to be available to public users, this setting must be changed accordingly. The following options are available:
- Access mode: Assigns access and privileges to the query and its results:
- Share (Everyone) - Configures the access list to Everyone Full Control, allowing unrestricted access to all users, including the public, provided they can access the query location. An alert appears reminding you that this query is accessible to public users and a PUBLIC label appears next to the query name.
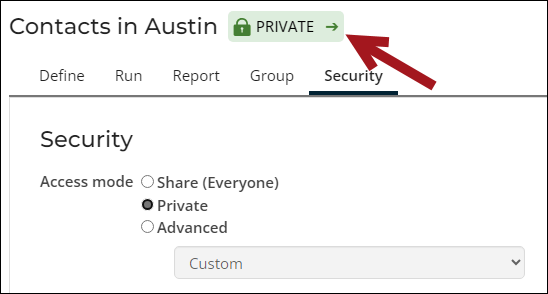
- Private – The access list is configured to include only System Administrators and the user creating the query. This ensures that only system administrators and the person who created the query have access to it. A PRIVATE label also appears next to the query name as a reminder.
- Advanced – Select a security group from the drop-down. The selected users included in the group are listed under the Current Access List. Depending on which security group you choose, a security alert may appear and the label next to the query name will change accordingly.
- Current Access List – Displays the names of the authorized users. The lists changes based on the selected Access mode.
- Available via the REST API - This setting will grant API access to individual queries; however, the user trying to access the query via the API must still possess the relevant permissions as specified in the query itself. It is important that Available via the REST API is only enabled for queries that meet at least one of the following criteria:
- The query does not contain any personally identifiable information, or
- The query is properly filtered to only show information the requesting party is asking for, or
- The query is secured so that only staff users have access to it
- Access mode: Assigns access and privileges to the query and its results:
- Click Save. Select the folder in which to save the query.
- (optional) Select the Report tab to save this query as a report definition. You can customize these reports and export them to PDF or XLS format. See Reporting in IQA for more information.
Note: Use a naming convention that ensures that the query has a unique name. iMIS does not require a unique name.
Note: Any business object source can be given an Alias to make it easily identifiable when defining the query.
If you select more than one source, you must define the relationships among the sources. Most sources have a common relationship as a default. Use the default, choose the desired relation from the list, or select Custom from the drop-down list to define a new one.