Last updated on: February 13, 2026
Media orders are where you can manage the following:
- New orders for an advertiser
- An advertiser's order history
- Existing orders for an advertiser
Any advertiser who has purchased advertisement space is recorded as an organization contact record in iMIS.
Tip: Create a new media order to add a new advertiser to iMIS.
In This Article
- Finding advertisers
Creating the billing details
Creating the media schedule
Adjusting the media order
Defining production details
Finding advertisers
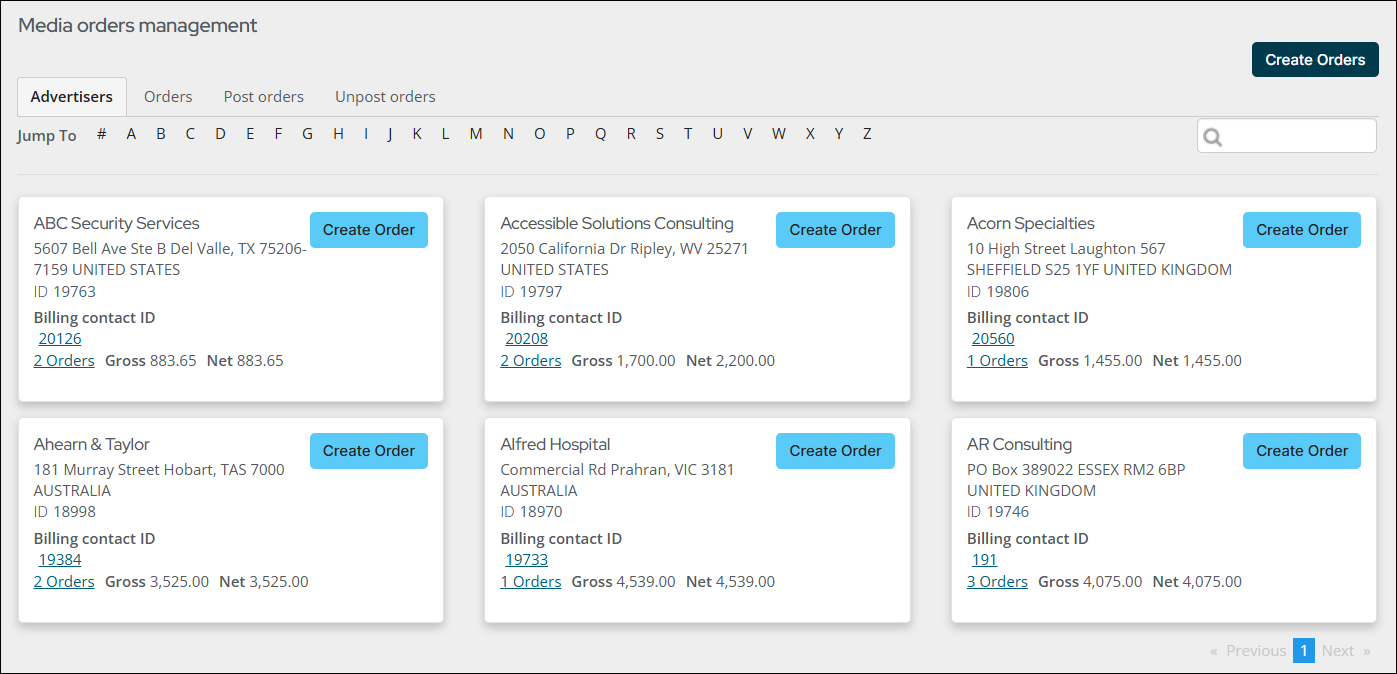
Find advertisers who have placed media orders from the Advertisers tab (Advertising > Media orders). The Advertisers tab is alphabetically arranged. Use the Jump To links to find an advertiser.
The following information displays for each advertiser:
- Address – The address defined for the advertiser.
- ID – The iMIS ID associated with the advertiser.
- Billing contact ID - The billing contact ID associated with the advertiser. Select the ID to view the contact person's full name.
- Number of orders - Number of orders with total gross and net cost of those orders. Select the orders link to view the orders for the advertiser from the Orders tab.
Creating the billing details
Do the following to create the billing details for a new media order:
- Go to Advertising > Media orders.
- Locate the advertiser using the Jump To links, then click Create Order next to their name. If the advertiser does not exist, click Create Orders.
- Enter a Campaign name if the placement is part of an advertising campaign.
- Enter the Proposal expiration date. The expiration date applies to all orders within the buy and should be used in reports by staff to determine which advertisers need to be contacted. Use the Proposal Expiration Pipeline Report query ($/Advertising/Queries) to report on this field.
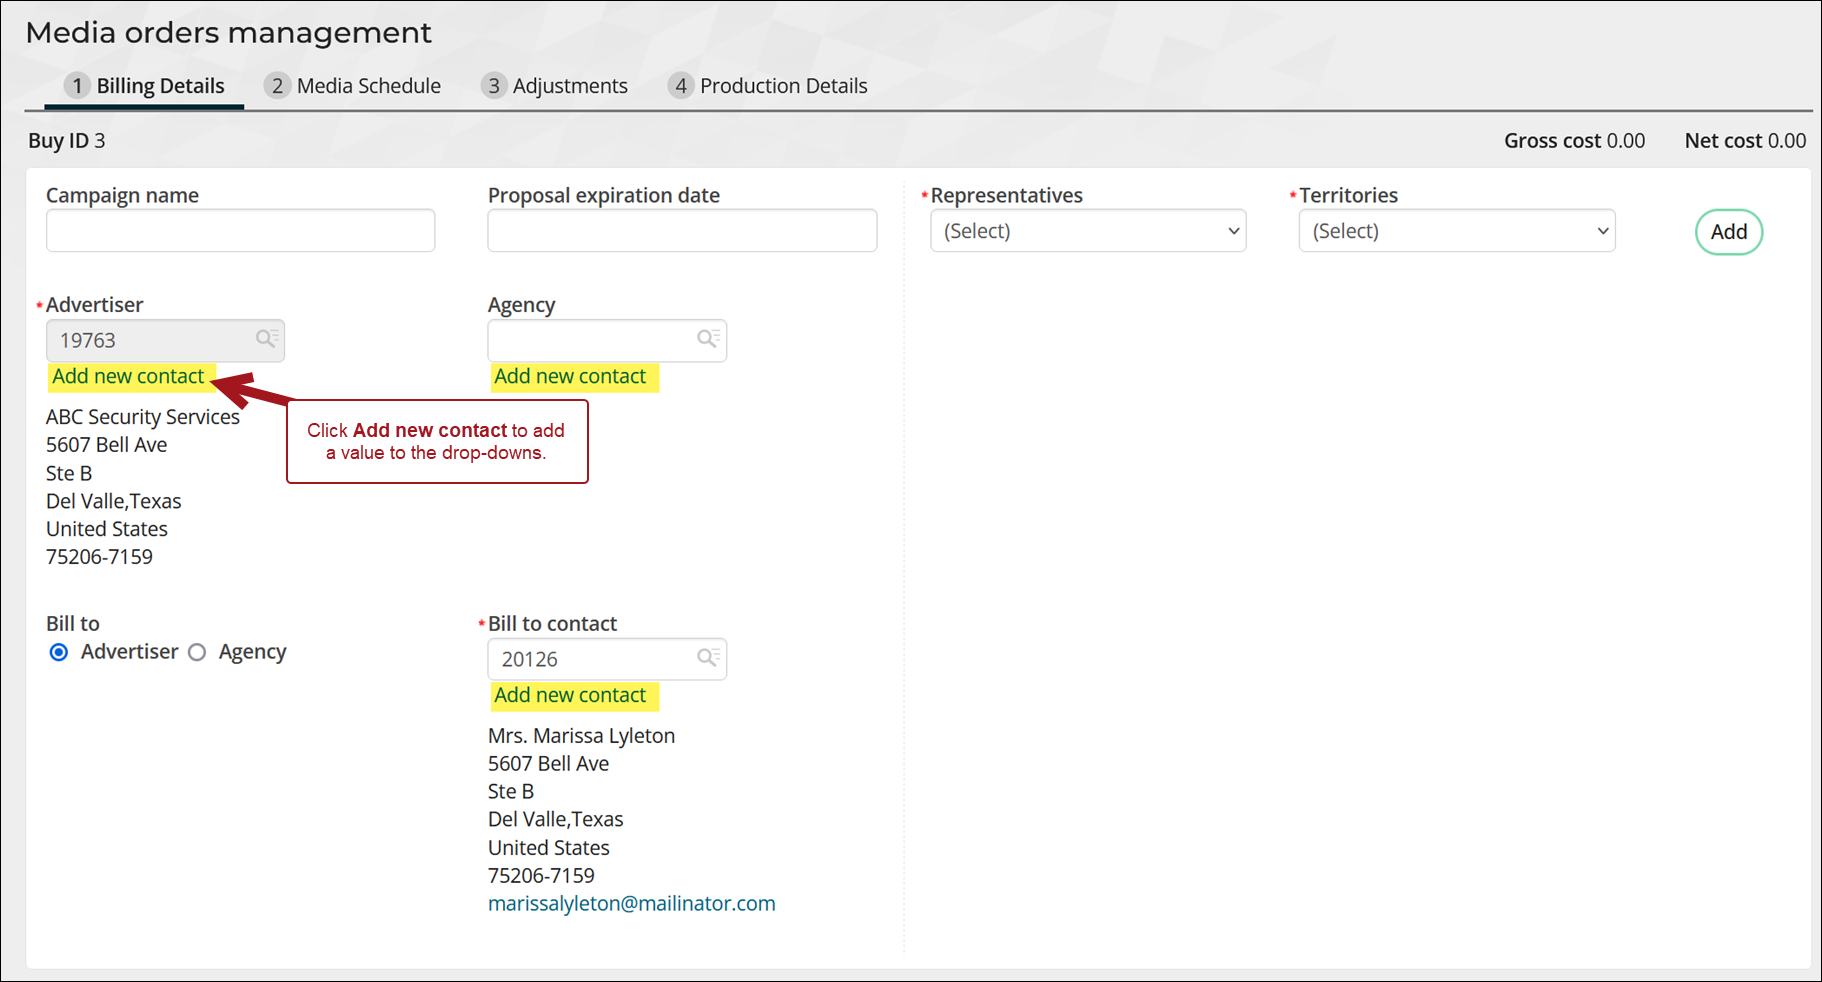
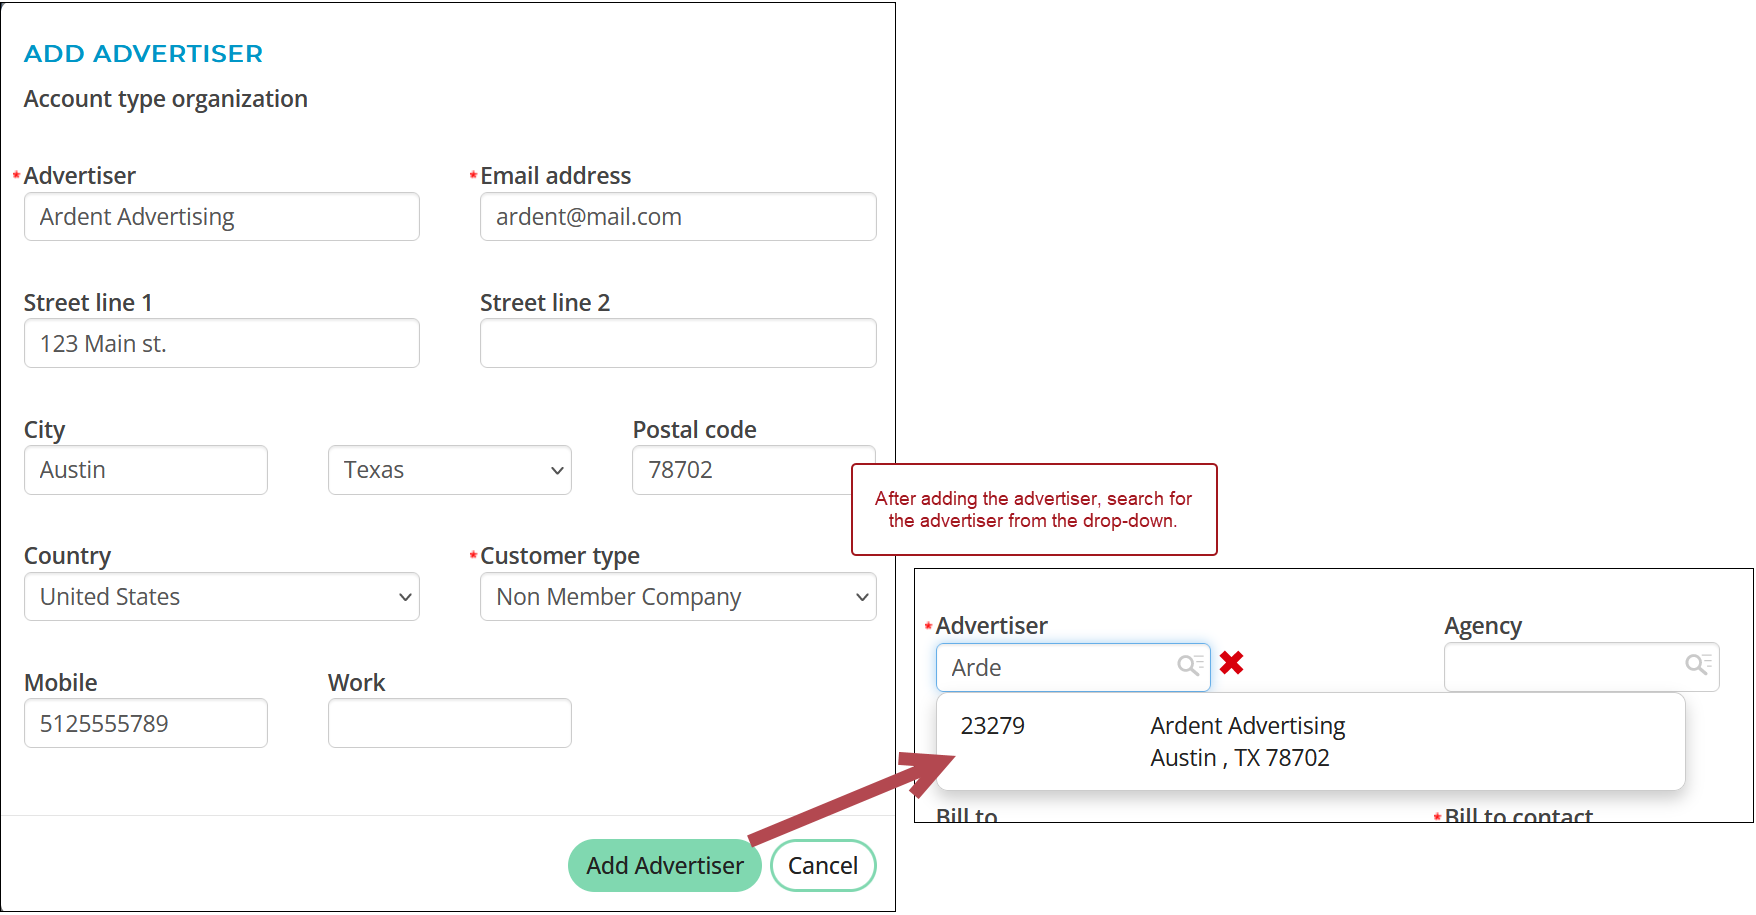
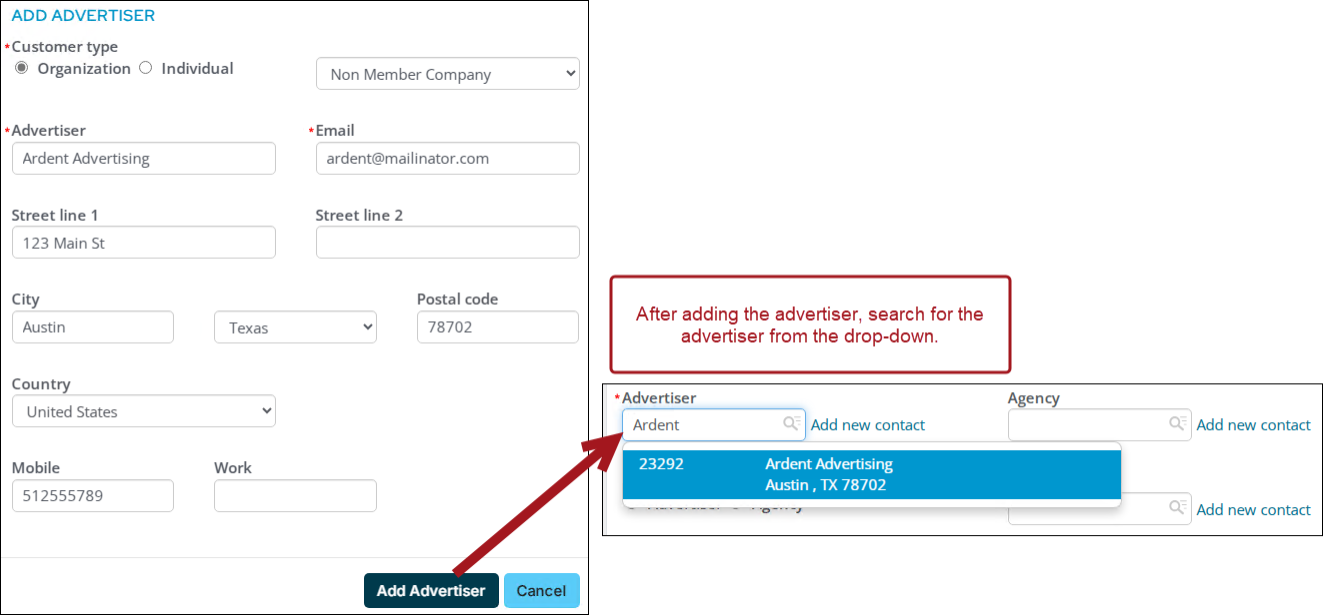
- If the advertiser has not yet been added to iMIS, select Add new contact to open the Add advertiser window:
- Select the Customer type: Individual or Organization, then specify the exact customer type, such as Company Member or Associate member from the drop-down. All customer types defined as Is an organization or Is an individual appear as available options.
- Enter the name of the Advertiser if it is an organization or enter a first and last name if the customer type is an individual. Be sure not to enter a duplicate entry.
- Enter the advertiser's Email address.
- Enter the remaining address and phone number information for the advertiser.
- Click Add Advertiser.
- From the Advertiser field, begin typing to select the advertiser you just created.
- From the Agency field, perform one of the following:
- The Agency field is automatically populated if there is already an Advertiser/Agency mapping. If the Agency field is correct, continue to the next steps.
If no agency is defined, begin typing in the agency field. The field functions as a drop-down, and matching agencies will appear as you type. Select the appropriate agency from the list.
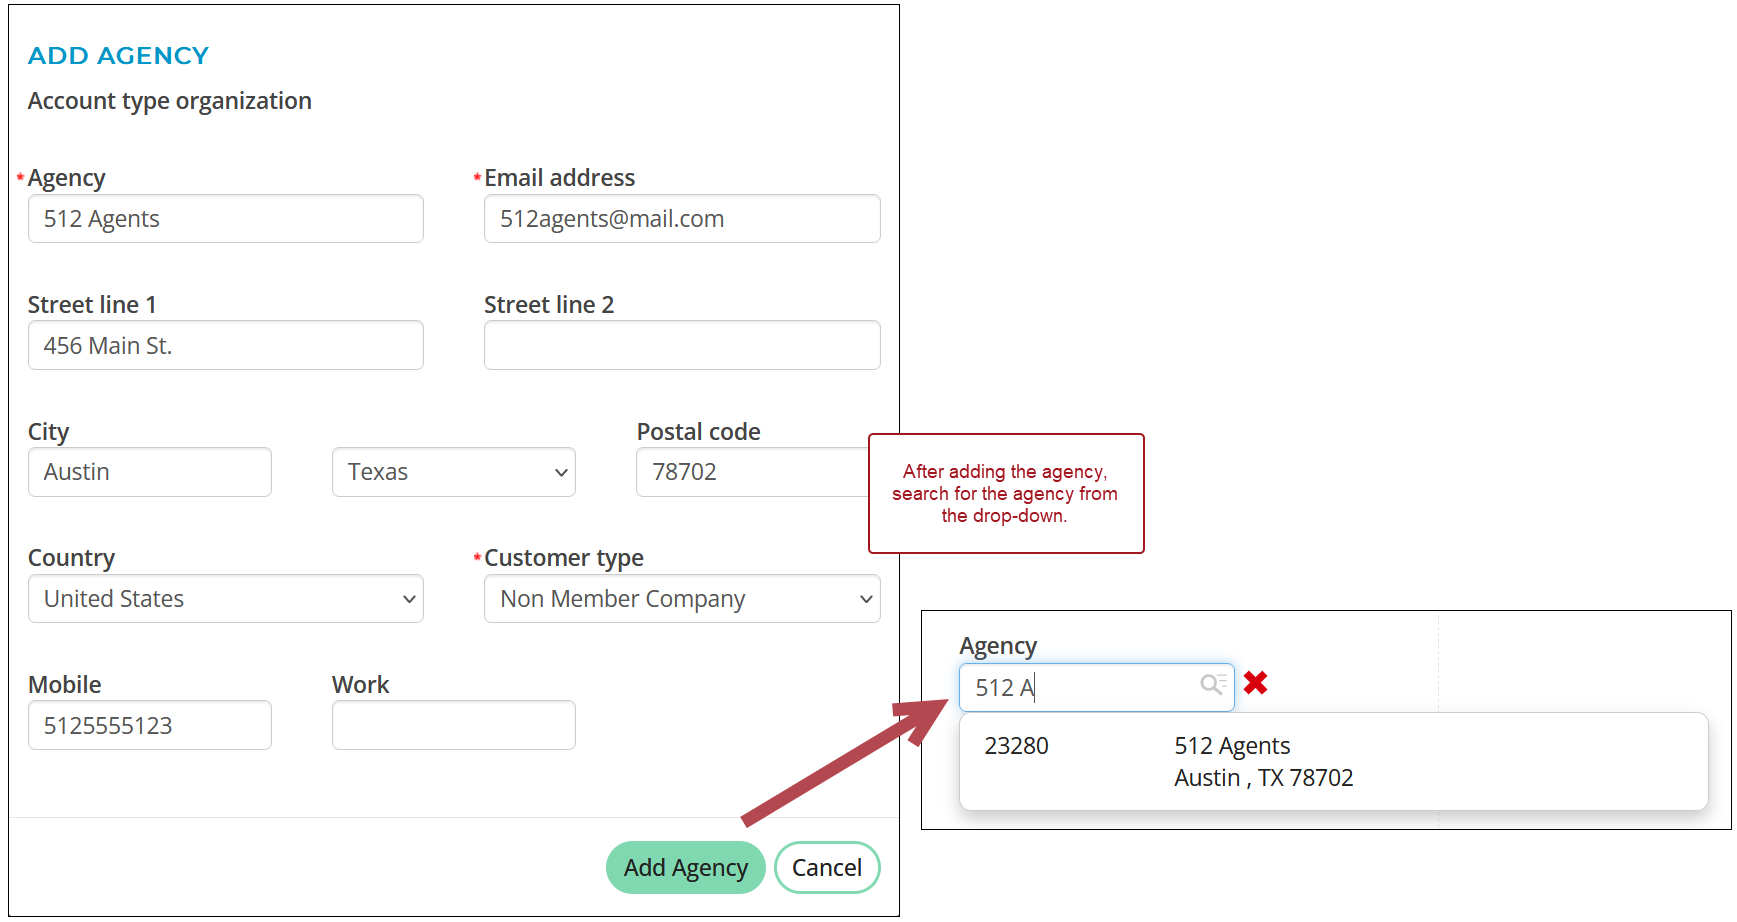
- Create a new agency account by selecting Add new contact to open the Add agency window:
- Select the Customer type: Individual or Organization, then specify the exact customer type, such as Company Member or Associate member from the drop-down. All customer types defined as Is an organization or Is an individual appear as available options.
- Enter the name of the Agency of the contact type if it is an organization or enter a first and last name if the customer type is an individual. Be sure not to enter a duplicate entry.
- Enter the agency's Email address.
- Enter the remaining address and phone number information for the agency.
- Click Add Agency to save.
- From the Agency field, begin typing to select the agency you just created.
- Choose to either Bill to the Advertiser or Agency. This is the name that appears as the Bill to contact on the media order invoice.
- From the Bill to contact field, begin typing to select the contact who will receive the invoices. As you begin typing, a drop-down lists all contacts associated with the Advertiser or Agency, depending which Bill to option is selected. If the contact is new or not entered yet, select Add new contact to open the Add billing contact window:
- If the Bill to contact is an organization, the organization’s Advertiser or agency's name and the address are displayed, which will be set as the new contact's primary organization.
- Select a Customer type from the drop-down.
- Enter First name, Last name, and Email of the billing contact.
- Click Add Contact to save.
- From the Bill to contact field, begin typing to select the contact you just created.
- Configure the Representatives and Territories:
- From the Representatives drop-down, select a representative for the new media order.
- From the Territories drop-down, select a territory. Only the territories associated with the selected representative are displayed.
- Click Add.
- Repeat these steps to add more representative-territory combinations if the media order is split among more than one sales representative. The commission defaults to an even split, but staff users can change the individual percentages. The total will always equal 100%.

Note: Go to Advertising > Settings > Representative - Territory to configure representatives, territories, and commission combinations or to set a default combination for all new media orders..
- Click Next and continue to the Media Schedule tab.
Tip: What is the difference between an Advertiser and an Agency? Advertising agencies help companies create, plan, and distribute their advertising campaigns. Agencies are hired to help companies determine the voice, language, and style of their ads.
Creating the media schedule
Staff users can place a single media order, a schedule (multiple media orders), or use the Quantity field to create multiple identical media orders. Do the following:
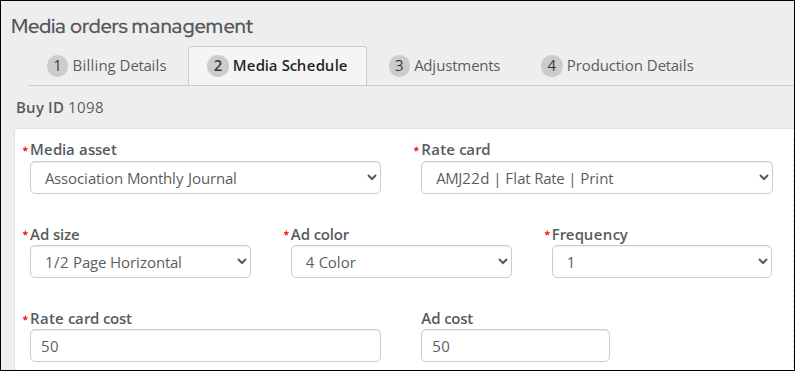
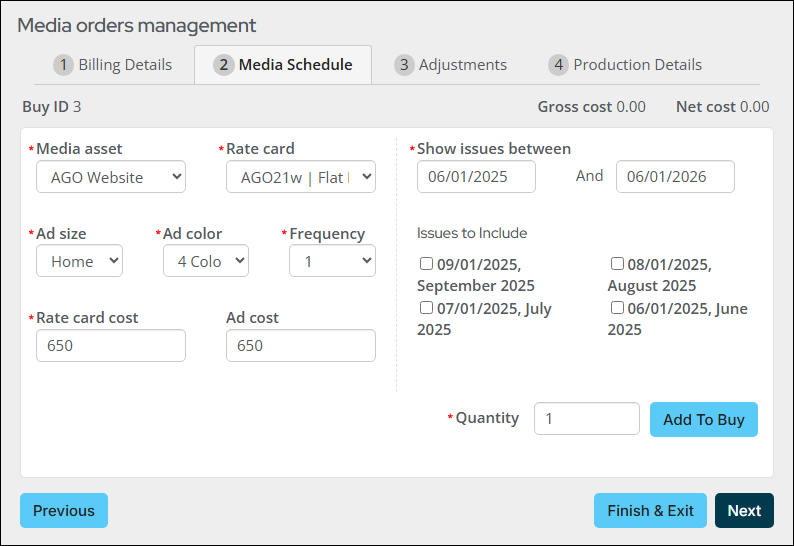
- Select the Media asset in which the advertisement will run. The Issues to Include are displayed after the Media asset is selected.
- Select the Rate card. The drop-down displays the rate card name, media billing method, and the ad type. Based on the Media billing method of the selected rate card, the drop-downs and text areas display:
- Booth:
- Select the Booth from the drop-down.
- Enter a Booth location.
- The Rate card cost and Ad cost are automatically populated based on the Rate card detail.
- CPM:
- Select an Ad size.
- Select an Ad color.
- Select a Frequency.
- Enter the number of inserts (No of inserts).
- The Rate card cost and Ad cost are automatically populated based on the selected Frequency. The cost in the rate card detail is for every 1,000 inserts entered in the No of inserts field.
- Flat Rate:
- Select an Ad size.
- Select an Ad color .
- Select a Frequency.
- The Rate card cost and Ad cost are automatically populated based on the selected Frequency, which is defined in the Rate card details.
- Per Word:
- Enter the Classified text. Total number of words are counted and displayed. Rate card cost and Ad cost total are displayed below the Classified text field for reference.
- PCI:
- Select an Ad color.
- Select a Frequency.
- Enter the number of Columns.
- Enter the number of Inches.
- Ad size is automatically calculated as number of Columns * number of Inches.
- Rate card cost is determined by selected Frequency defined in the Rate card details.
- Ad cost formula: Ad size * Rate card cost.
- Sponsorship:
- Select an Ad size.
- Select an Ad color.
- Select the Frequency.
- Web CPM:
- Select an Ad size.
- Select an Ad color.
- Select the Frequency.
- Enter the number of Impressions. The cost in the rate card detail is for every 1,000 impressions entered.
- Rate card cost is determined by selected Frequency defined in the Rate card details.
- Ad cost: The cost in the rate card detail is for every 1,000 impressions entered.
Example: A Frequency of 1 in the Rate card detail has a cost value of 100. Entering 2000 Impressions calculates an Ad cost of 200.
- Booth:
-
Enter a Purchase Order Number. You can create multiple ads using the same purchase order number without re-entering it each time. You can also use different purchase order numbers within the same Buy.
- Enter the Show issues between date range. All the issue dates between the date range for the selected media asset are displayed.
- Choose at least one Issues to include date . If there is more than one date in the schedule, select all applicable dates.
- Enter a Quantity. The default value is 1.
- Click Add to Buy to add this media order to the buy. The following happens when Add to Buy is clicked:
- All fields all cleared.
- A media order is created for every issue date selected in proposal order status with likelihood of 10%. Gross cost and Net cost are updated as totals of all the media orders in the buy.
- Inventory check happens for every Issue date selected and Ad size. A message is displayed when there is not enough inventory to handle a particular ad size for an issue date and a media order is not created.
- Continue creating media schedules to add more media orders to this buy.
- Click Next to continue to 3 Adjustments tab.
Note: Go to Advertising > Settings > Media assets to create new media assets.
Note: The purchase order number of an ad also appears on a posted order’s invoice description line when viewing the invoice from Finance > Invoices.
Adjusting the media order
Use the Adjustments tab to make adjustments to the media orders. Adjustments are performed for a single media order or multiple media orders at a time in a buy.
Note: Certain adjustments are not available for media orders that have already been posted. If an order has already been posted, you can only generate insertion orders or proposals. To make further adjustments, unpost the order.
Adjusting a single media order
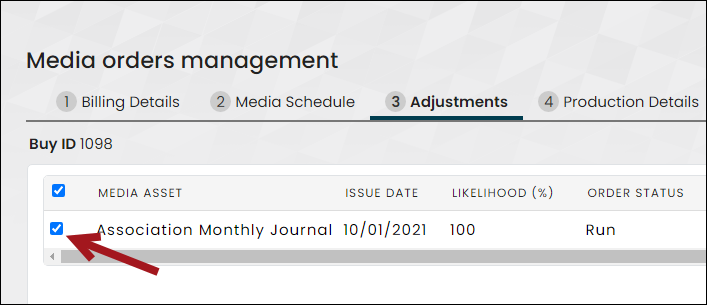
Do the following to adjust a single media order from the Adjustments tab:
- Select the checkbox next to the Media Asset name.
- Adjustments are applied by selecting a value from the Gross cost adjustment or Net cost adjustment drop-down. These adjustments are applied on a running total. The default adjustment Value displays but can be overwritten.
- Click Add. The adjustment displays in the list below and the gross cost and/or net cost boxes in the above list are updated the new values.
- To change the order of how the adjustments are applied, select the checkbox next to the adjustment then use the up-and-down arrows.
- To delete an adjustment, select the checkbox next to the adjustment then use the delete icon.

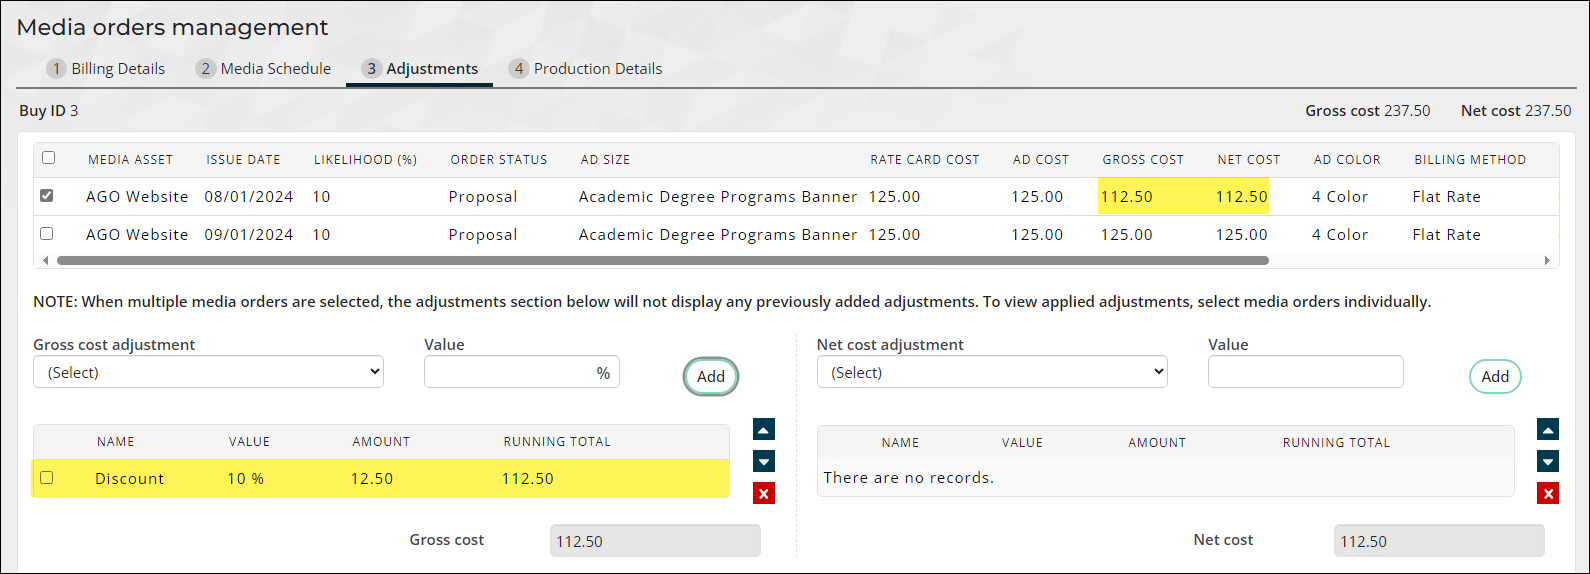
Adjusting multiple media orders
You can only adjust multiple media orders if they all share the same Media Asset. Additionally, if an adjustment has already been applied to one of the selected media orders, you cannot apply the same adjustment to any other selected media orders.
Do the following to adjust multiple media orders from the Adjustments tab:
- Select the checkboxes next to the Media asset names for which the same adjustments are being applied.
-
Adjust the Gross cost adjustment and/or Net cost adjustment. These adjustments are applied on running total. The Value is displayed for the selected adjustment but can be updated to a different value.
- Click Add.
- Select the individual media asset from the list to see the adjustment.
- To change the order of how the adjustments are applied, select the checkbox next to the adjustment then use the up-and-down arrows.
- To delete an adjustment, select the checkbox next to the adjustment then use the delete icon.


Changing the likelihood and order status
All media orders are created with a Likelihood of 10% and an Order Status of Proposal. Likelihood is the percentage of probability that the media schedule will run and is only applicable to the Proposal order status. When the media asset is updated with an order status of Run, the likelihood automatically changes to 100%. When the media asset is updated with an order status of Cancel, the likelihood automatically changes to 0%.
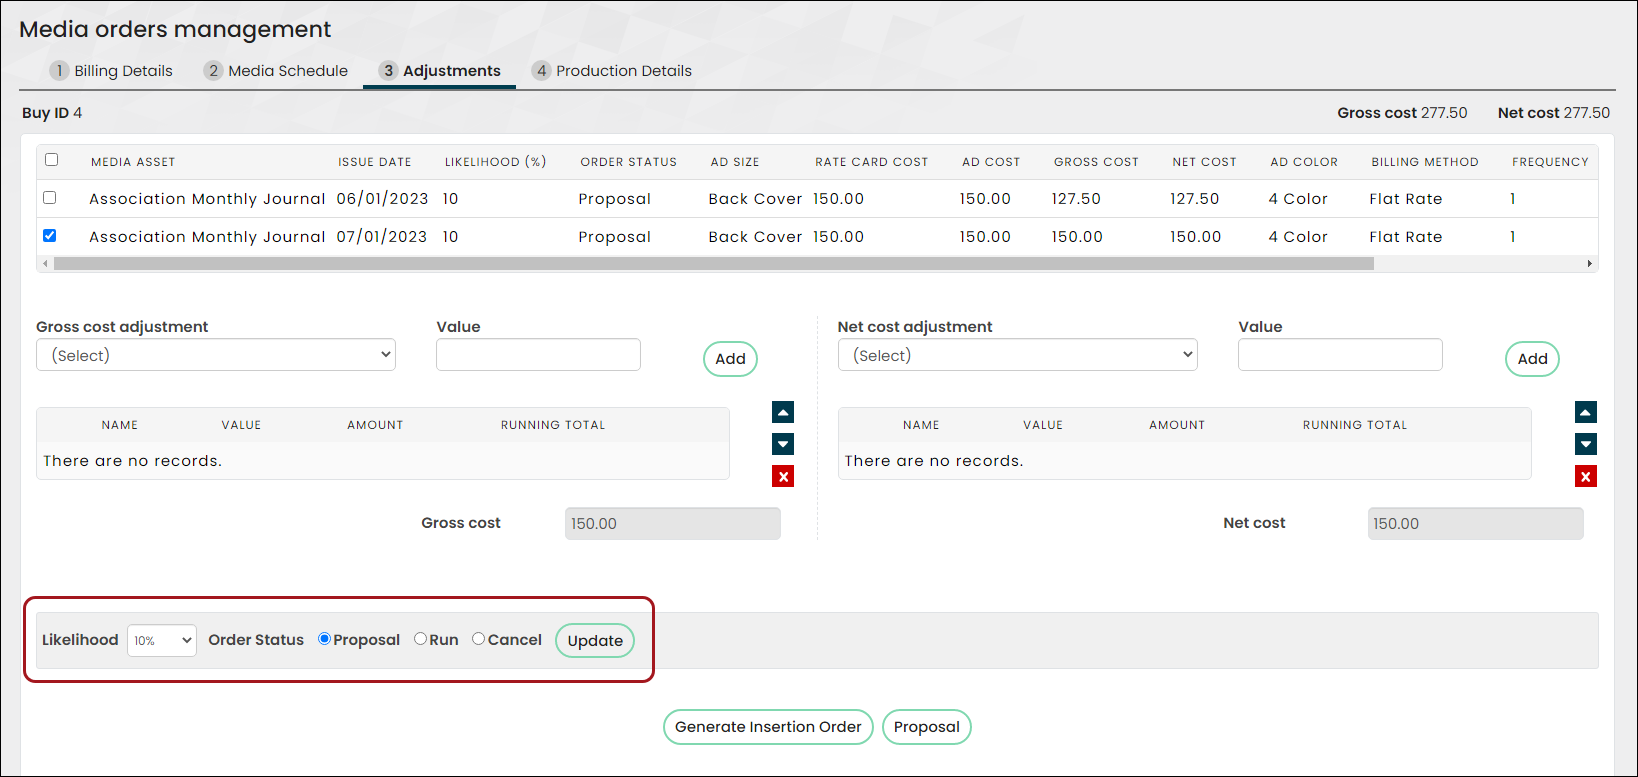
The Order Status can be changed by selecting one of the following values:
- Proposal: The customer is still discussing the advertisement placement in the media asset. All media orders are created in Proposal order status. Proposal orders do not appear in advertiser lists, most reports, and queries except for the Order Status and Likelihood reports.
- Run: Converted to Run when the customer wants to run the advertisement in the media asset. Media orders marked as Run appear in all reports, queries, and advertiser lists. When the order status is Run, the media order is available for posting.
- Cancel: Converted to Cancel when the customer decides not to place the advertisement in the media asset. This cancels the media order. Canceled orders don’t appear in any reports, queries, and advertiser lists.
After selecting the new Order Status, click Update.
Adding documents and generating insertion orders or proposals
The bottom section of the Adjustments tab allows staff users to upload signed contracts, proposals, or insertion orders. The Insertion Orders are generated and sent to the advertisers or agencies to sign and are for their reference.
Note: Insertion orders are not official invoices. See Posting orders to learn how to post official invoices.
To add a new document, do the following:
- From the Select document field under Documents, select the ... icon.
- Choose the document.
- Click Add.

To generate a proposal, do the following:
- Click Proposal.
- Click one of the export options. The proposal is downloaded locally in the desired format.
To generate an insertion order, do the following:
- Click Generate Insertion Order.
- Click one of the export options. The proposal is downloaded locally in the desired format.
When you are ready, click Next to navigate to the Production Details tab.
Defining production details
Note: Go to Advertising > Settings > Production settings to define the production detail values.
The last tab of the media order is the Production Details. The Production Details tab allows you to define the advertisement headline, tear sheet, page numbers, cover position, and much more.
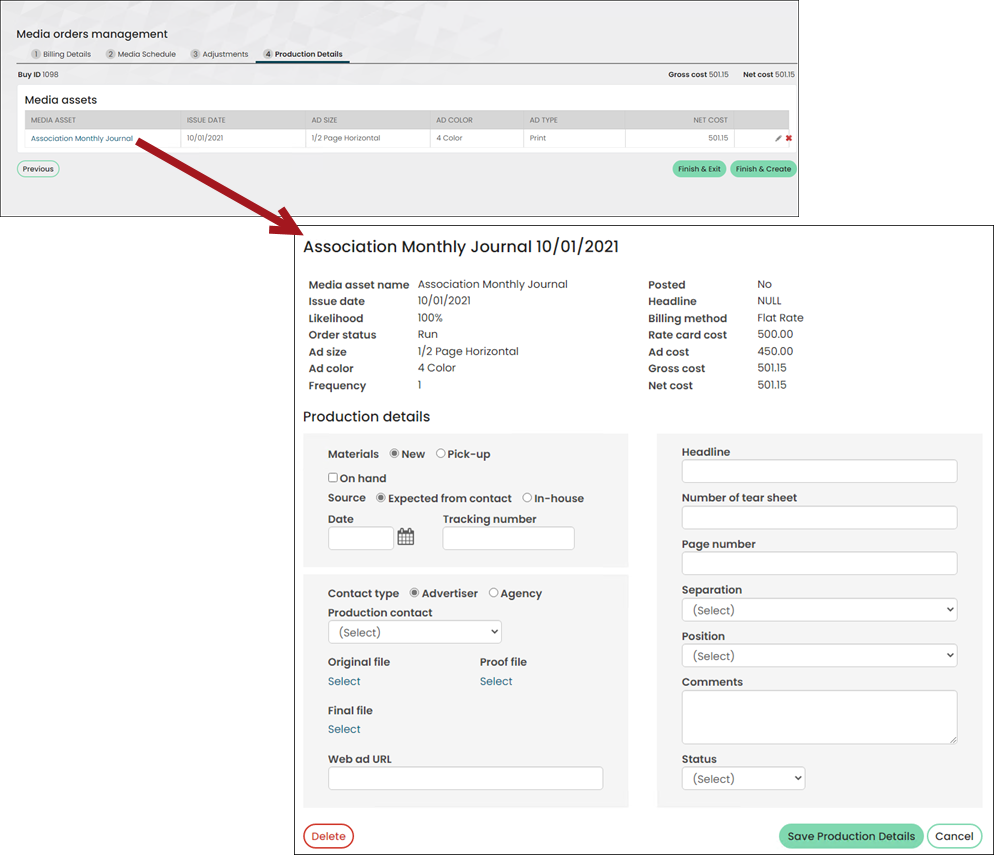
Do the following to define the production details:
- From the Media assets grid, select the media asset.
- Select whether the materials are New with this media order or a Pick-up from a previously run media order:
- New - The materials being added are new materials associated with this media order. The following options are available with New materials:
- On hand - Enable when the materials are ready and available.
- Source - Select if the materials are Expected from contact or In-house.
- Date - Select the date the materials are expected to be on hand.
- Tracking number - Enter the tracking number associated with the shipment of materials.
- Pick-up - Designates that the materials are associated with a previous media order. The following options are available with Pick-up material:
- Pick-up from - Select the previous media order that contains the associated materials. The media asset, issue date, and page number display in the Pick-up From drop-down.
- Requires changes - Enable if there are changes associated with the previous media order, as they related to this media order.
- New - The materials being added are new materials associated with this media order. The following options are available with New materials:
- Select the Contact type associated with the materials. This is either the Advertiser or the Agency. From the available Production contact drop-down, choose the specific contact.
- If there is a digital file for original materials, select it under Original file.
- If there is proof that the page exists, select it under Proof file.
- If the file has been changed, select it under Final file.
- If there is a Web ad URL for web ad materials, enter it.
- Enter the Headline.
- Enter the number of the tear sheet in the Number of tear sheet field.
- Enter the Page number where the advertisement will appear in the media asset.
- Select the number of pages of Separation between this advertisement and any competitive advertisement in the same category.
- Select the Position of the asset.
- Add any Comments.
- Select the Status of the asset.
- Click Save Production Details.
- Click one of the following:
- Finish & Exit - Saves the media order and exits to the Advertisers tab.
- Finish & Create - Creates the media order and exits to the Advertisers tab.
Note: Supported file types are .PDF, .PNG., and .JPEG.