Last updated on: January 27, 2026
Events can be planned down to the smallest detail, including information on room arrangements, equipment, speakers, and support staff. This information is important for internal usage and for communicating your plans to hotels and conference centers. Detailed plans can be printed and sent to hotel staff or other personnel in charge of planning and arranging event registration options and program items.
In This Article
- Defining resources for functions
Viewing the function plan information
Reporting on the event resources
Defining event resource types
Defining resources for functions
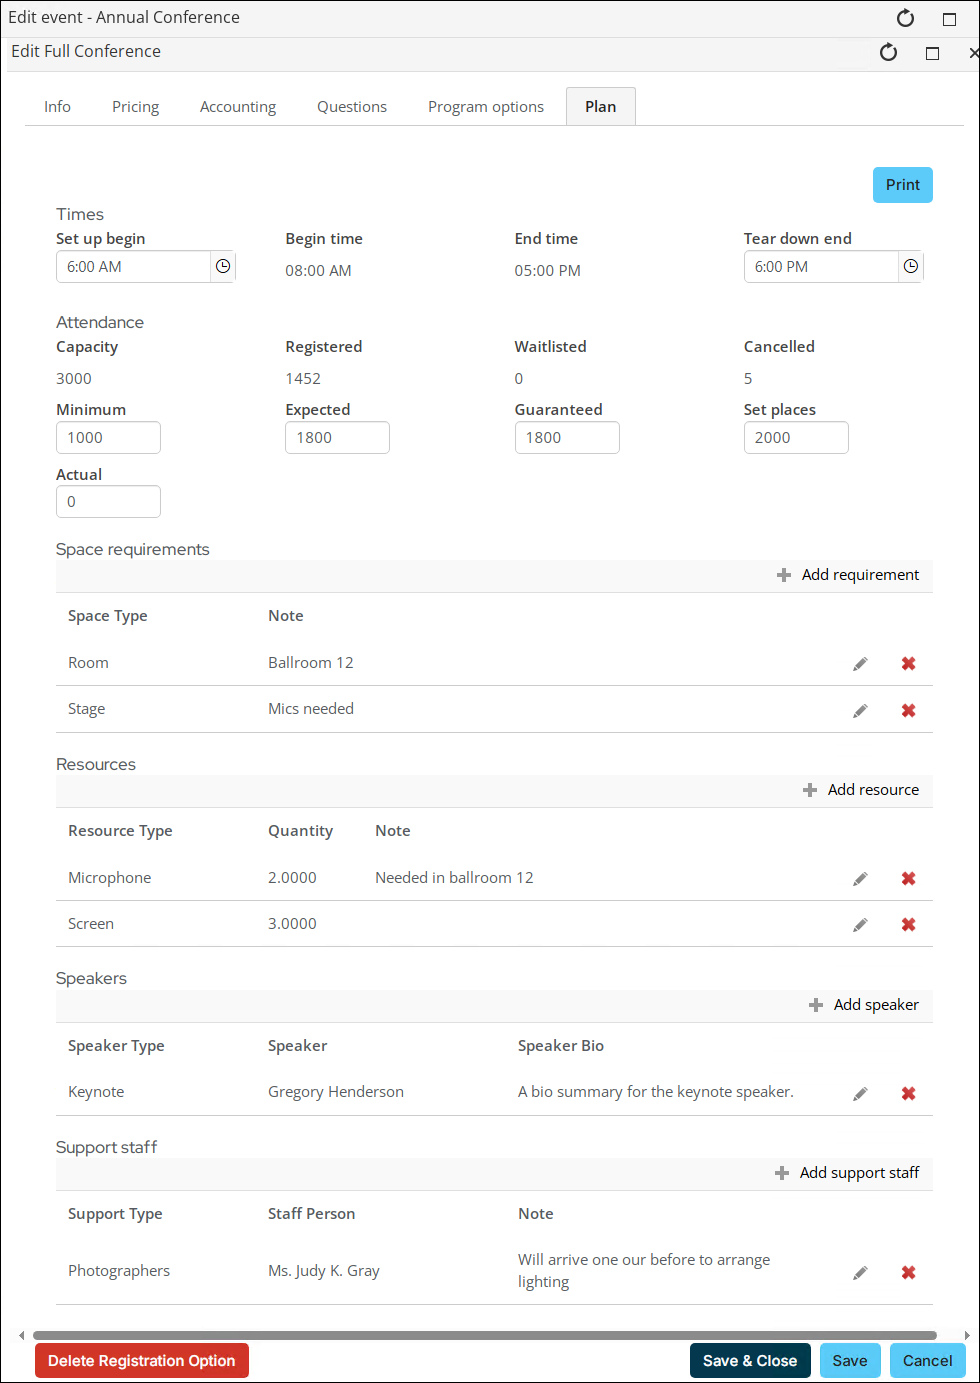
Plan and resource details are defined for individual program items and registration options. Plan details consist of the following items:
- Times
- Attendance
- Space requirements
- Resources
- Speakers
- Support staff
Note: The Note and Speaker Bio fields accept HTML. If inserting a link, be sure to add the target="_blank" attribute. For example: <a href="https://www.advsol.com/" target="_blank">Linked text</a>
To define plan and resource details, do the following:
- From the Staff site, navigate to the event.
- Open a registration option or program item for edit.
- Click the Plan tab.
- Define the Times:
- Set up begin – Specify the time for room set up to begin.
- Begin time - (read only) Displays the event function begin time from the Info tab.
- End time - (read only) Displays the event function end time from the Info tab.
- Teardown end – Specify the time for room teardown to end.
- Define Attendance:
- Capacity - (read only) Displays the capacity for the function from the Info tab.
- Registered - (read only) Displays the number of function registrants.
- Waitlisted - (read only) Displays the number of registrants on the waitlist for the function.
- Cancelled - (read only) Displays the number of cancelled registrations for the function.
- Minimum – Specify the minimum number of registrants expected to attend the function.
- Expected – Specify the number of registrants expected to attend the function.
- Guaranteed – Specify the number of attendees guaranteed to attend the function.
- Set places – Specify the number of attendees for which the room should be set or arranged.
- Actual - After the function has ended, specify the actual number of attendees.
- Define the Space requirements:
- Select Add requirement.
- Select a Space Type.
- Enter a Note that details the space further, for example, if you choose Room as the Space Type, enter the specific room number or name.
- Click the Save icon.
- Define the Resources:
- Select Add resource.
- Select a Resource Type.
- Enter a Quantity associated with the resource.
- Enter an associated Note, for example, if you choose Microphone as the Resource Type, enter the name of the person in charge of the microphones.
- Click the Save icon.
- Define the Speakers:
- Select Add speaker.
- Select a Speaker Type.
- Select the contact record for the Speaker.
- Enter associated notes about the speaker in the Speaker Bio field.
- Click the Save icon.
Note: If the speaker does not have a contact record in your database, select Add new and create a contact record for the speaker. Adding a new contact from the Plan tab does not add the contact to your recent contacts. To continue updating the contact's account, you must search for them using the universal search or Community > Find contacts.
- Define the Support staff:
- Select Add support staff.
- Select a Support Type.
- Select the contact record for the Staff Person.
- Enter any associated Notes.
- Click the Save icon.
Note: If the staff person does not have a contact record in your database, select Add new and create a contact record for the staff person.

Note: Space, resource, speaker, and support types are defined at Settings > Events > Event resources. You must be a system administrator with an Events: 8 – System Setup module authorization level to define new resource types.
- Save the plan.
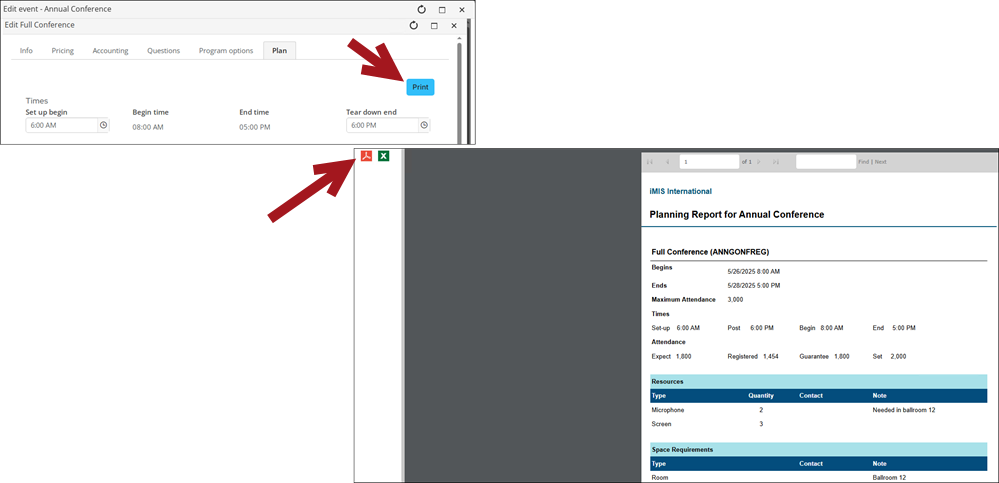
- To print an individual report of the plan, click Print.
Viewing the function plan information
To view the information defined in the Plan tab of a program item, select the program item from the event. The Plan details appear at the bottom of the program item display window.
To customize the window that appears when a program item is opened, tailor the FunctionDetail or FunctionDetailStaff shortcuts. See Tailoring default navigation and content for more information.
To view the information defined in the Plan tab of a registration option, open the registration option for edit and click the Plan tab.
To view the planned speakers for the event, go to the Speakers tab of the event Dashboard. For more information, see Managing speakers.
Reporting on the event resources
Detailed plans can be printed and sent to hotel staff or other personnel in charge of planning and arranging event registration options and program items. A plan for an individual function is printed directly from the Plan tab for that function, and all plans defined for an event are printed in a single report from the event Dashboard.
To print a report of an individual function's plan, do the following:
- From the Staff site, navigate to the event.
- Open the event function for edit.
- Click the Plan tab.
- Click the Print button.
- Export the report to PDF or Excel.
- Print from the report viewer.

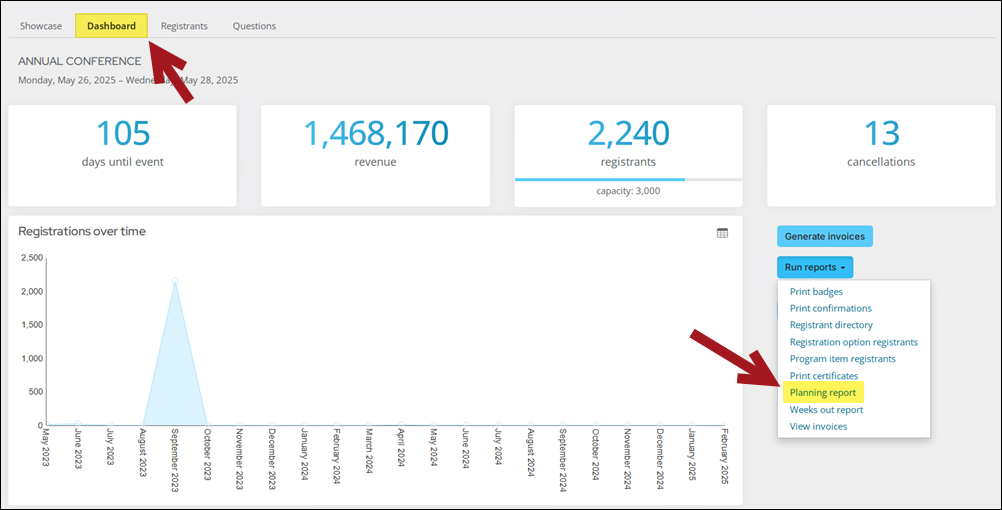
To print a report of all the plan details defined for an event, do the following:
- From the Staff site, navigate to the event.
- Click the Dashboard tab.
- Click the Run reports button, then select the Planning report.
- Export the report to PDF or Excel.
- Print from the report viewer.

To create a custom planning report, use the following business objects and related query:
- EventFunctionResourceData
- EventResourceType
- CsFunction
- $/EventManagement/DefaultSystem/Queries/Functions/Function resources
Defining event resource types
You can define custom resource types for the following categories:
- Space – Type of meeting space the event function is held, such as a building lobby, room, or webinar.
- Resource – Additional resources for the event function, such as food, table, chairs, or microphone.
- Speaker – Type of speakers for the event function, such as keynote, moderator, presenter, or panelist.
- Staff – Additional staff for the event function, such as photographers, security, or volunteers.
To define a custom resource type for an event, do the following:
- Go to Settings > Events > Resource types.
- Select Add resource type.
- Choose a Category.
- Enter a Data Value. This value cannot be edited once it is saved.
- Enter a Display Value.
- Click the Save icon.
- To edit the resource type, select the edit icon.