Last updated on: June 23, 2026
iMIS Events allows staff users to easily manage event planning, logistics, communication, and registration for events of all types and sizes. Members, donors, and other constituents can register for conferences, meetings, or training classes, access agendas and locations, read speaker biographies, and discover what events their peers are also attending. iMIS Events even includes a responsive event microsite that an organization can use for any event to promote and capture registrations. The level of control and access drives attendee satisfaction, increases product purchases, generates positive referrals, and ensures retention.
The following tutorial outlines how to get started with Events and best practices for using it effectively
Creating an event
Configuring and managing an event is simple and easy to do. From the Staff site, staff users can manage program items, registration options, accounting, pricing, and more!
For more information about other event configuration options, see the Event Display content item.
Note: While creating the event, use the Show in search fields to hide the unfinished event from public users.
Do the following to create an event:
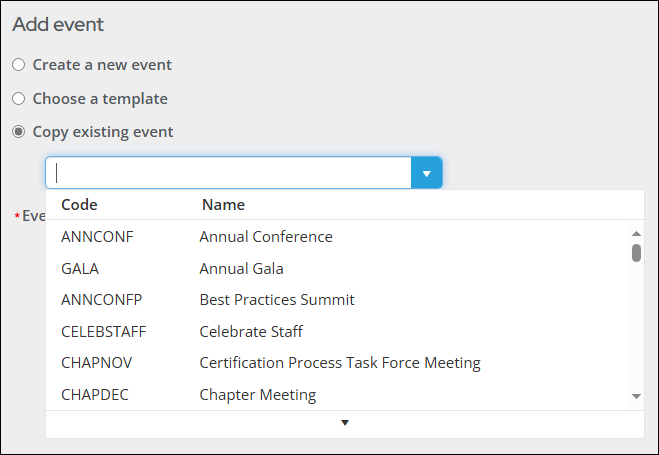
- Go to Events > Add event.
- Select one of the following options:
- Create a new event
- Choose a template - From the Template drop-down, select an event template. Fields defined in the event template will automatically populate for the new event. To learn more about event templates, see Managing event templates.
- Copy existing event - Select an event to copy and use as the basis for the new event. All information including registration options, program items, and questions are copied into the new event. Begin typing the event name, or select an event from the drop-down. Clicking the down arrow will load more results that can be scrolled through. Copied events will have a status of Pending.
- Click Next.
Next, edit settings in the Info, Display, Registration, Pricing, and Questions tabs. See Creating an event for a full description of each tab's settings.
- Info tab - contains basic event information, such as the event code, event name, status, category, time, address, and virtual meeting links.
- Display tab - contains visual and display information, such as the event image, the event showcase layout, and program sorting.
- Registration tab - contains registration options and toggles, such as event capacity and registration opening and closing times.
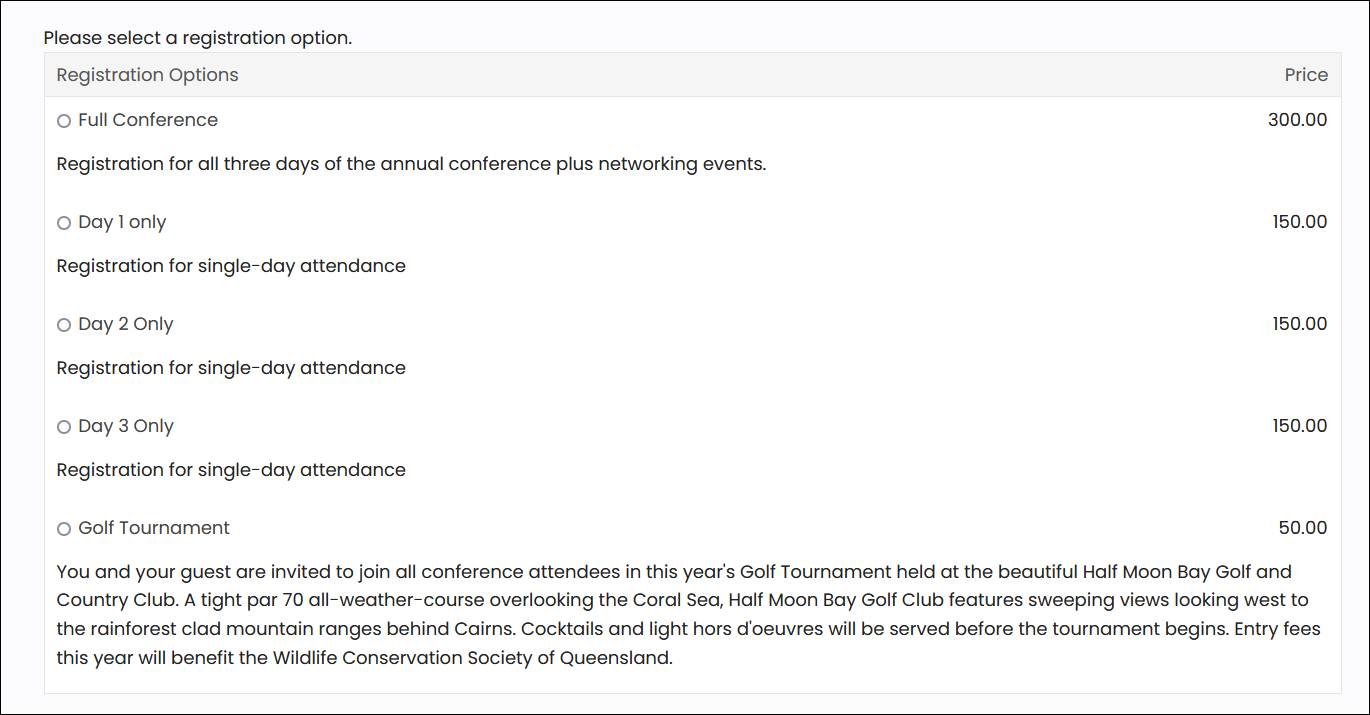
- Pricing tab - contains event pricing and registration options. See Adding registration options to an event for more information
- Questions tab - contains options to add questions for attendees to answer during registration.
Staff users must define at least one registration option or program item for users to be able to register for the event. For example, a staff user might choose to create several registrations to include different options for members, students, vendors, staff members, guests, and presenters. Each registration option allows the staff user to set a price and registration cut-off date.
To learn more about adding registration options to an event, review Defining event pricing and registration options.
Example: Adding a T-Shirt size registration option
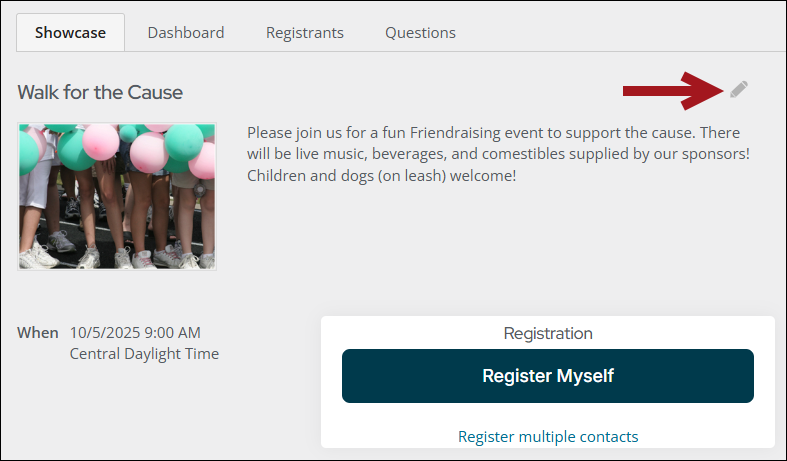
In this example, we are adding a T-shirt registration size option to an upcoming event, Walk for the Cause.
- From the event's Showcase tab, select the Edit icon.
- From the Edit event dialog, select Pricing.
- Select Add new registration option.
- Select Questions, then select Add new.
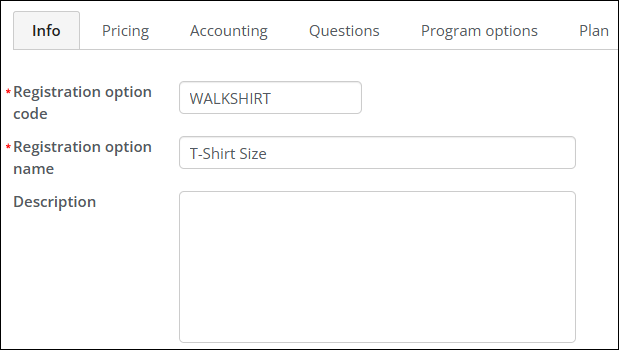
- Fill in the Registration option code field with WALKSHIRT and the Registration option name field with T-Shirt Size.
- Add the question What is your T-shirt size?
- Select the Required toggle.
- Select Dropdown list from the Answer Type drop-down, then select Defined by explicit list.
- In the Display Value and Data Value fields, enter S – Small. Select Add to add the list entry.
- Repeat step with M – Medium, L – Large, and XL – Extra Large.
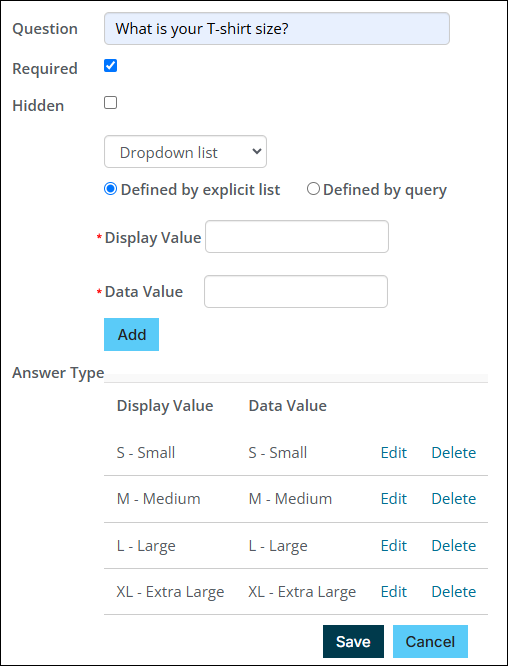
- Select Save.
- Select Save & Close.
- Select Save & Exit.
Now users see the question on the event page when they register for the event.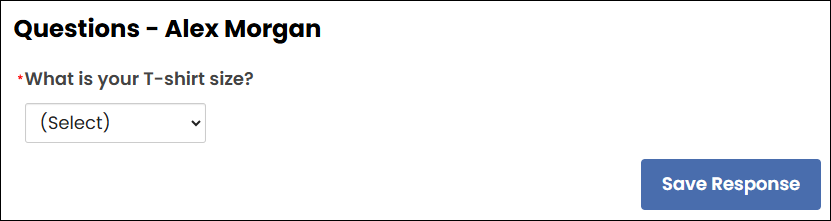
Program items are specific itinerary options that registrants can choose from once they have selected a registration option. These itinerary options can be configured to only appear once specific registration options are selected, or for all registration options. They can also be configured to be automatically selected once a registration option is selected.
To learn more, review Adding program items to an event.
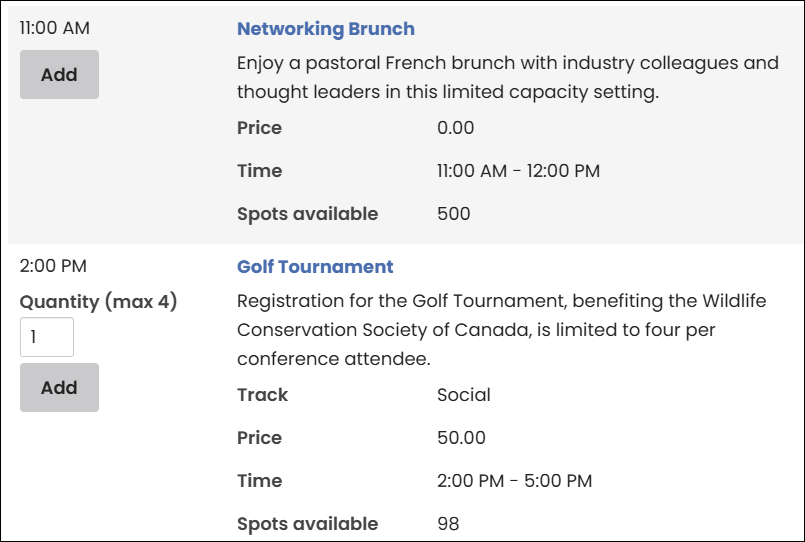
Example: Adding a Networking Brunch program item
In this example, we are adding a Networking Brunch program item to the upcoming Annual Conference event.
- From the event’s Showcase tab, select Add new program item.
- Fill in the Program item code field with NTWKBRUNCH and the Program item name field with Networking Brunch.
- Select May 28, 2025 and 11:00 AM for the Start date and time, then select 12:00 PM for the End date and time. The day automatically populates the End date. Keep the selected toggle for Enable time-based itinerary conflicts.
- In the Capacity field, enter 500.
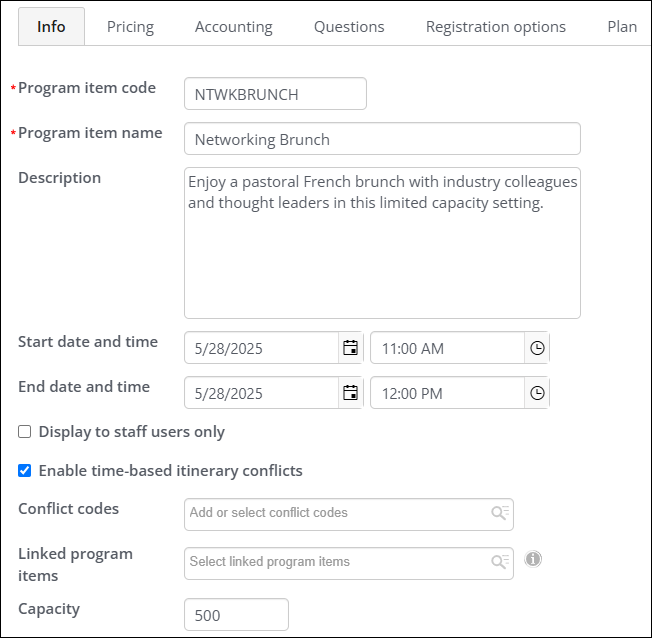
- Select the Pricing tab, then enter 0 in the Regular Price column for the Default pricing group.
- Select Save & Close.
Now users see the Networking Brunch program item in the Annual Conference's program items.
Some optional pricing capabilities are available to allow staff users to personalize pricing for specific members and non-members or groups.
Creating pricing groups for an event
With pricing groups, staff users can restrict a specific group of users from registering for events.
To create a pricing group, first:
- Create an IQA query group that identifies members according to the desired criteria.
- Create a new registration option that uses the pricing group.
To learn more, review Restricting event registration using pricing groups.
Overriding event pricing
Staff users can manually override event pricing to give members (and non-members) one-time discounts on event registration options and related program items. Registrations and program items can then be added to the cart with the price override included. This can also be done working On behalf of a user.
- Go to Events > Find events and search for the event.
- Click the event to register the user for.
- On the resulting event display, click to register the user.
- Select a Registration Option.
- Manually edit the price in the editable Price field. Click Revert to original price to return to the original price.
- Click Update.
- (optional) Repeat this step for any program items that have been added to the user’s itinerary and would like to override. Click Update for each overridden program item.
- Click Check Out & Confirm Registration to check out with the new prices.
- Once in the cart, the new price is under Items. Proceed through checkout as normal.
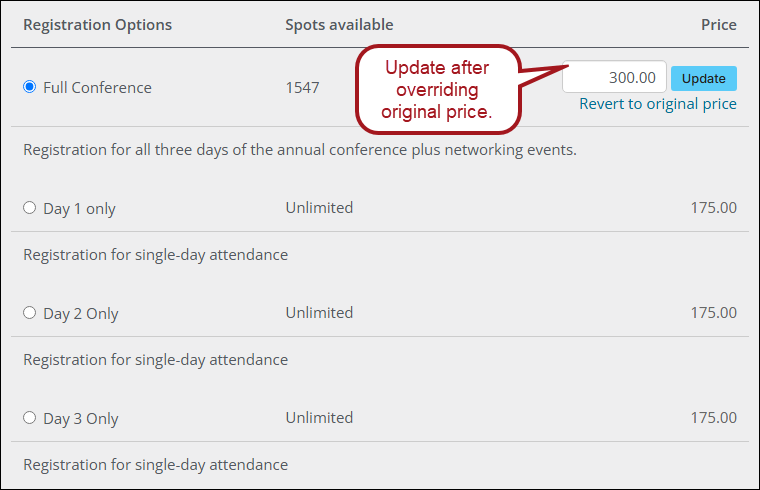
Note: After a price is overridden, no further discounts or promotions can be applied.
Some optional event creation features allow staff users to customize and enhance events with additional functionality, such as adding Zoom links and speaker details to itineraries and changing registrations after an event’s registration period closes.
Adding Zoom links
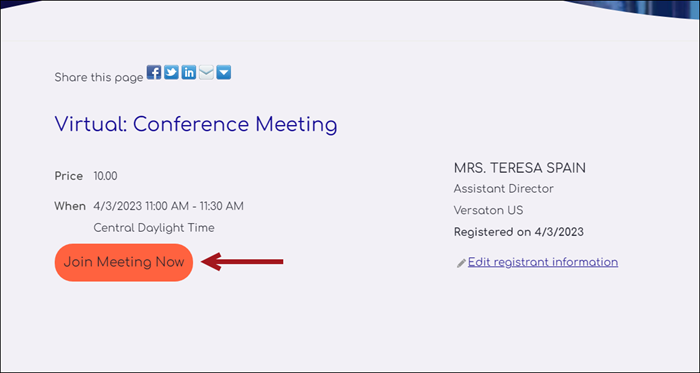
The iMIS and Zoom integration allows event creators to display a Zoom meeting link in a user-friendly way.
Important! Although the Zoom meeting link displays in iMIS, the integration does not sync users between iMIS and Zoom. The meeting takes place in Zoom and is not hosted in iMIS.
The Join Meeting Now button will display on the iMIS event page 30-minutes prior to the event start time. Only those who are registered for the event will have access to the button. When the event registrant clicks the button, the Zoom app opens and navigates to the meeting link.
To learn more, review Adding a Zoom meeting link to an event.
Adding resources
Events can be planned down to the smallest detail, including information on room arrangements, equipment, speakers, and support staff. This information is important for internal usage and for communicating plans to hotels and conference centers. Detailed plans can be printed and sent to hotel staff or other personnel in charge of planning and arranging event registration options and program items.
For more information about event resources, see Specifying resources for an event.
Plan and resource details are defined for individual program items and registration options. Plan details consist of the following items:
- Times
- Attendance
- Space requirements
- Resources
- Speakers
- Support staff
For more information, see Defining resources for events.
Defining Resource type settings
Go to Settings > Events > Resource types.
Plan and resource details are defined for individual program items and registration options. In the Plan details, staff users have the option to define resources for the following categories:
- Space – Type of meeting space the event function is held, such as a building lobby, room, or webinar.
- Resource – Additional resources for the event function, such as food, table, chairs, or microphone.
- Speaker – Type of speakers for the event function, such as keynote, moderator, presenter, or panelist.
- Staff – Additional staff for the event function, such as photographers, security, or volunteers.
To define a custom resource type for an event, do the following:
- Go to Settings > Events > Resource types.
- Select Add resource type.
- Choose a Category.
- Enter a Data Value. This value cannot be edited once it is saved.
- Enter a Display Value.
- Click the Save icon.
- To edit the resource type, select the edit icon.
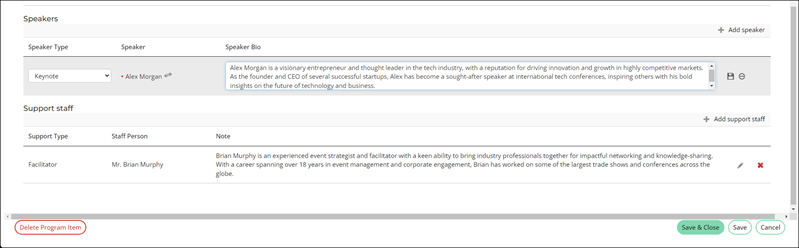
Defining speaker details
An event may have a few speakers or many. Staff users may want to define the speaker details for each registration option and program item, to ensure event attendees know who is presenting at the event.
Before defining speaker details, ensure the event already has the necessary registration options and program items defined. See Defining event pricing and registration options.
To edit speaker details for registration options and program items, follow the same steps outlined in Adding speaker details to an event. Alternatively, staff users have the option to edit program items directly from the event-specific dashboard. The Program items query on the Speakers tab includes links to the program items, where staff users can edit the planned speakers.
See Setting up speaker details to learn more about setting up speakers.
Registrations for program items and registration options can be modified after registration is complete.
Program items
If Allow itinerary changes after checkout is enabled for the event (and the Cutoff for itinerary changes date has not passed), users can change their program item registrations after completion of the registration process:
- In the program area of an event a user has already registered for, add, remove, or update the quantity for any program item.
- After completing all desired changes to program items, click Proceed to Checkout or view the Cart.
- The Cart will contain a line for the adjusted event with the total charge or credit for all adjustments.
- An Order Confirmation page will appear, reflecting all of the selected registration and program item details.
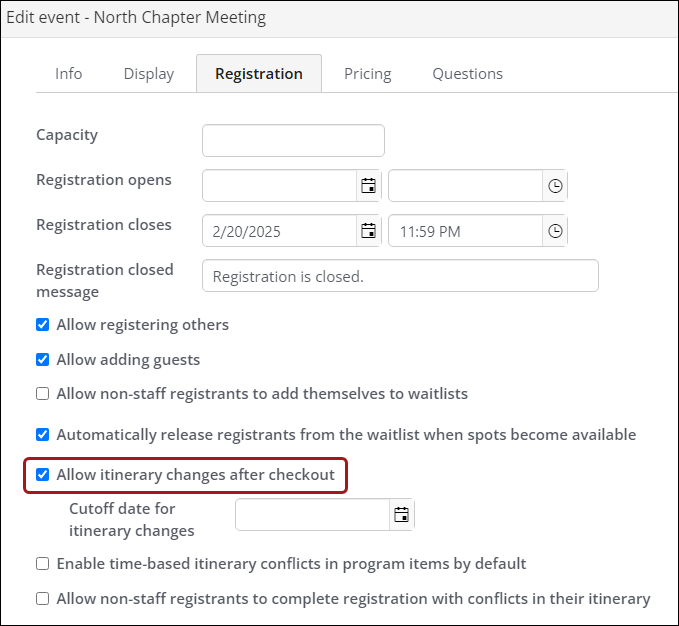
If Allow itinerary changes after checkout is not enabled, staff users will still have the ability to add or remove program items for an existing registration:
- Go On Behalf of the registrant.
- In the program area of an event that the registrant has already registered for, add, remove, or update the quantity for any program item.
- After completing all desired changes, click Proceed to Checkout.
- The Cart should reflect any changes in price of the selected option.
- An Order Confirmation page will appear, reflecting all of the selected registration and program item details.
Registration options
Staff users can change their registration option after they have completed their registration:
- In the registration area of an event a staff user has already registered for, add the desired new registration options.
- Any program items that are marked Register by default for the new registration option should be added to the itinerary if they are not already.
- After completing all desired changes, click Proceed to Checkout.
- The Cart should reflect any price changes for the selected option.
- An Order Confirmation page will appear, reflecting all of the selected registration and program item details.
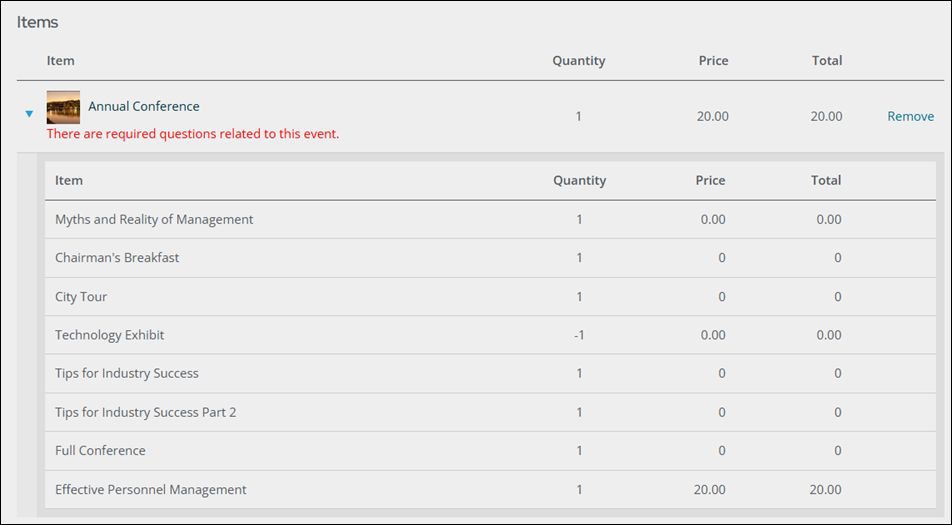
Note: If a program item is in the current itinerary and is not available for the new registration option, the program item will be removed.
Taking an event live
Review the following checklist before sharing the event with your members:
- Ensure invoice settings are configured
- Sending event registration confirmations
- Ensure no one can create duplicate contact accounts
- Configure waitlisting
- Configure cancellation fees
- Taking the event live by adding it to the public website
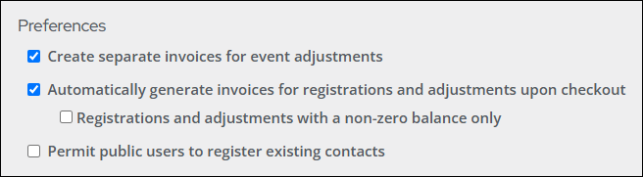
Ensure the following invoice settings (Settings > Events > General) are configured:
- Create separate invoices for event adjustments – When enabled, a new invoice is created for event registration adjustments (credit note or positive adjustment). The new invoice uses the date of the adjustment, lists any credits or debits, and references the original invoice. Every time an invoice is generated, either the original invoice or an adjustment invoice, new adjustments will go into a new invoice. Once the original invoice is generated, line items, quantities, and amounts will not change.
- Automatically generate invoices for registrations and adjustments upon checkout – When enabled, event registrations and adjustments (including cancellations) are invoiced (assigned an invoice number) upon checkout. To only automatically generate invoices that are not paid in full, enable Registrations and adjustments with a non-zero balance only. See Event invoices for more information.
Note: All event adjustments will result in new invoice lines, regardless of whether this option is enabled. If a program item is added and then removed, there will be one positive invoice line and one negative invoice line.
Note: When disabled, the event invoices are assigned a temporary invoice number upon checkout, such as R1234, and the invoices must be manually generated.

See Event invoices for more information.
Event registration confirmations can either be sent automatically, or manually issued. Decide which method best fits your event's needs.
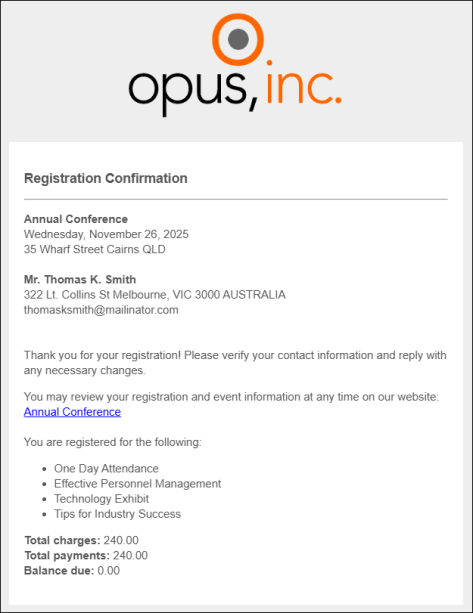
To automatically send event registration confirmations, modify the following components:
- Update the event registration confirmation communication template - It is important to modify the event registration confirmation communication template to be unique to your organization, as the out-of-the-box communication templates contain ASI and iMIS branding.
- Modify the Event confirmation automated task - Add the modified communication template to the automated task and enable the automated task.
To manually issue event registration confirmations, do the following:
- Updating the event confirmation communication templates
- Issuing event registration confirmations
- Viewing the time and date for sent confirmations
- Refining the 'Event confirmations to send' query results
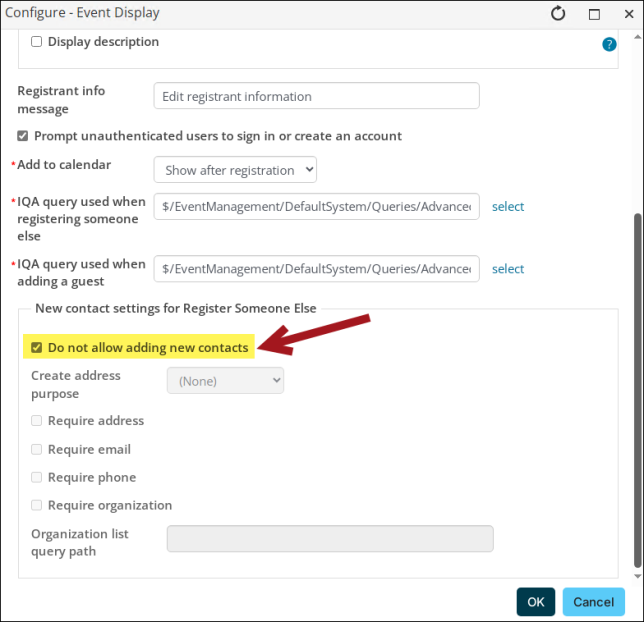
When registering someone else for an event, users have the option to create new contacts, which may result in creating duplicate contact records. To prevent duplicate contact creation during event registrations, there are two recommended settings to enable.
- The Permit public users to register existing contacts option (Settings > Events > General) allows public users to register existing contacts they do not have read access to. When the setting is disabled, public users may encounter errors if they attempt to register contacts not included in the Authenticated users security query.
- The Do not allow adding new contacts setting on the Event Display content item prevents users from creating new contacts altogether when registering someone else, reducing the likelihood of duplicate entries.
Staff users can add contacts to event waitlists for registration options and program items, when either reaches maximum capacity. When Allow non-staff registrants to add themselves to waitlist is enabled, public users can add themselves to the waitlist for an event. Staff users can add guests to the waitlist for a registration once they have been registered, if the option is available. Staff users can also register guests on the waitlist.
The waitlist option is triggered only when event program items or registration options are full. A message is displayed when capacity is reached, allowing staff users to either add registrants to a waitlist, or continue to register users for the event.

See Waitlisting for an event for full configuration details.
Staff users can create a cancellation fee and work on behalf of a registrant to cancel their registration, charging them a cancellation fee. The registration record is retained until the event is closed, which enables you to reactivate it later during the registration process.
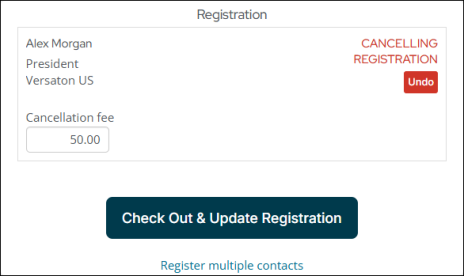
See Charging a cancellation fee for full details.
After the event is created, you may want to add it to the public website's sitemap, so that the event is easily accessible from the site's navigation.
See Adding an event to the public website's navigation for more.
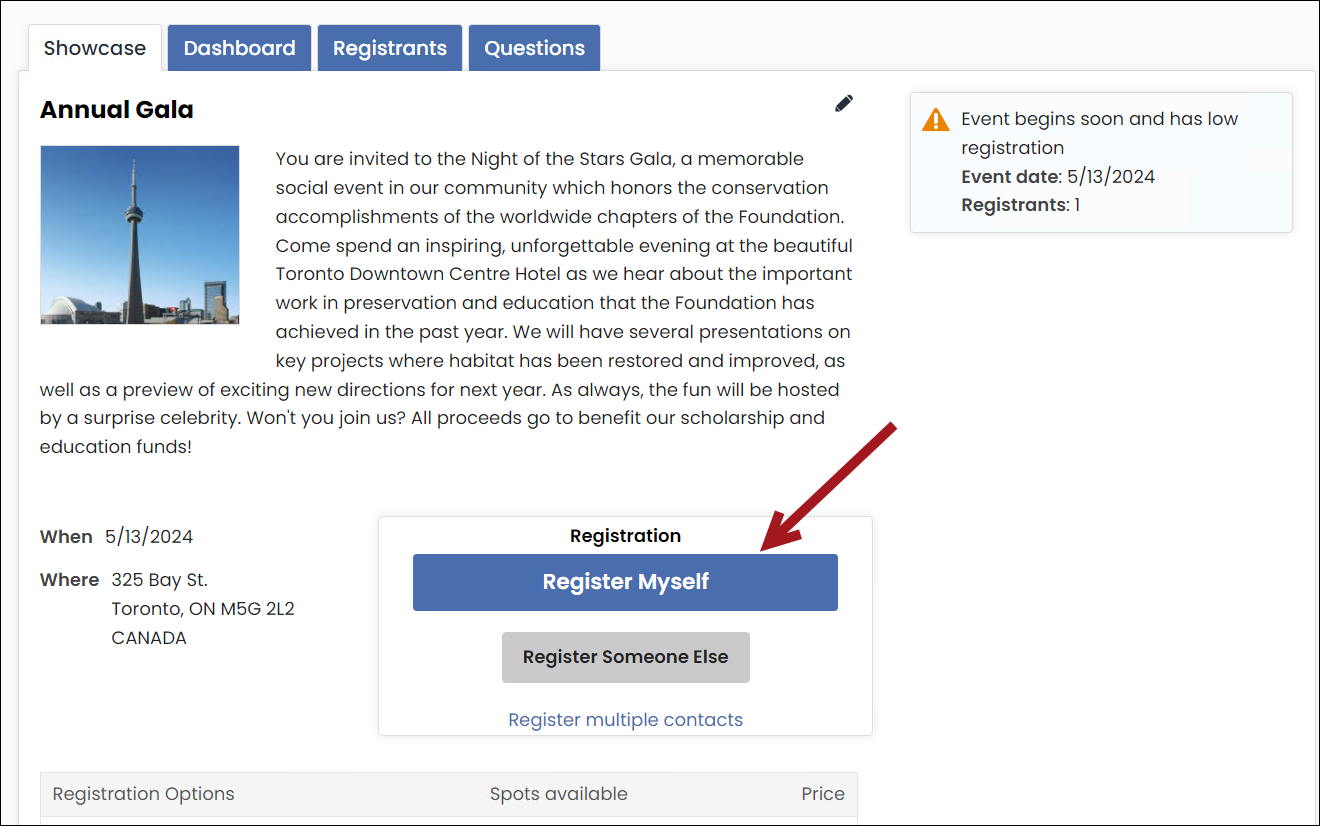
Registering for the event
Once an event has been created, users can start registering for the event. Staff users can register themselves or On behalf of other users, and public users can register themselves. Review the following to learn how to register for events as different user types:
For self-registration or On behalf of another contact, staff users can view contacts' events and register them for events. Users can register other contacts from the same company. Staff users can also register guests for their own registration or other contacts if the event permits it.
If a staff user has specified a time range that the event is open for registration, potential event attendees can only register for the event if the current date falls within the date range. Staff users and System administrators can always register themselves and other contacts for the event at any time.
Event registration is only available for events with an Active status. Registrations appear in the cart along with any other items added, such as products and donations.

For more information, see Registering for events.
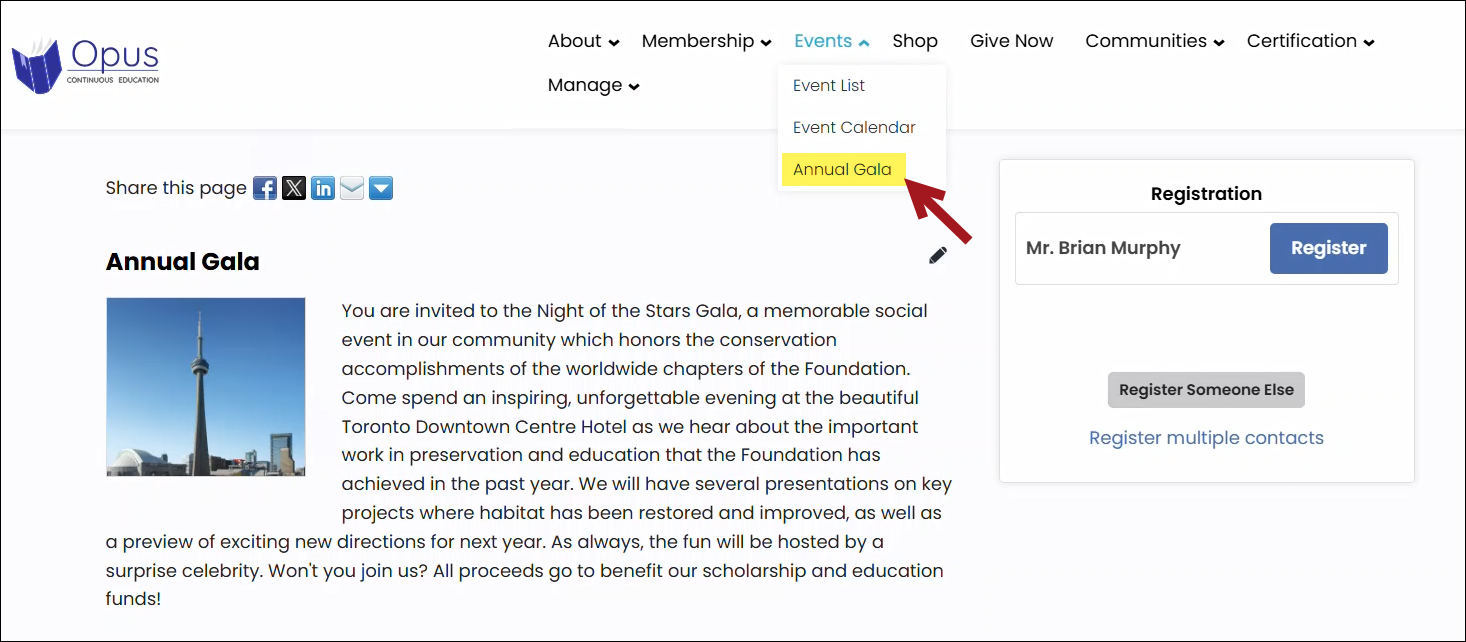
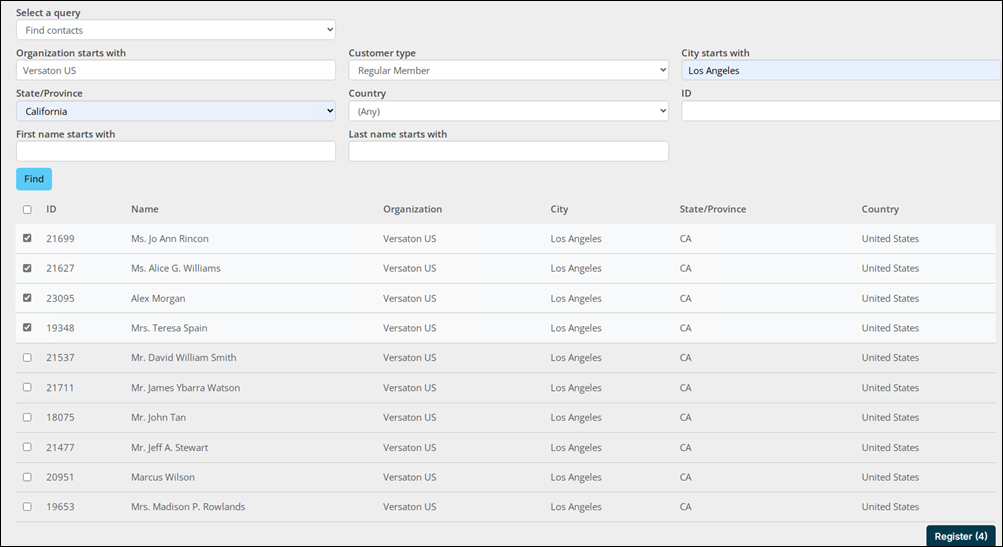
Multiple contacts can be registered for an event using the Register multiple contacts link on the event Showcase tab. This allows groups like committees and chapters to be registered all at once, instead of on an individual basis, saving time.
Clicking the Register multiple contacts link opens the Register multiple contacts window for the specific event. From this window, a staff user can select a Registration option from the drop-down (if the event has more than one registration option available) and select a Bill to. The Bill to can be the event registrant or a Specific contact.
In the Registrants section, select contacts from the following queries:
- Find contacts
- Committee members
- Chapter members
- Speakers
These queries can then be filtered using the associated parameters. The Registrants queries are located at $/EventManagement/DefaultSystem/Queries/Register multiple.
For more information, see Registering multiple contacts.
A public user can register for an event through the organization’s public website by doing the following:
- Navigate to the public website.
- Sign into the website using the user’s username and password. If the user does not have an account, create an account by selecting Create account.
- Click the Events navigation item.
- Locate the event, then select the event to open it.
- Click Register Myself.
- Select an admission option. If there is only one admission option defined for the event, then there are no registration options to choose from.
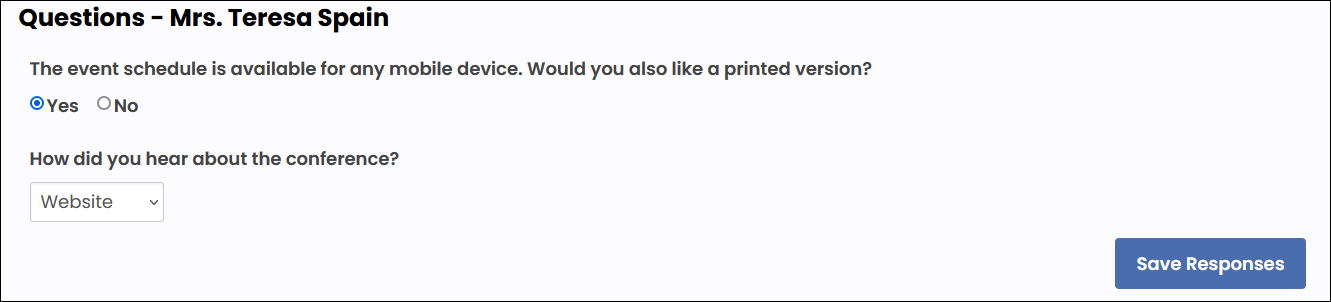
- If there are questions associated with the event, answer those and be sure to click Save Responses.
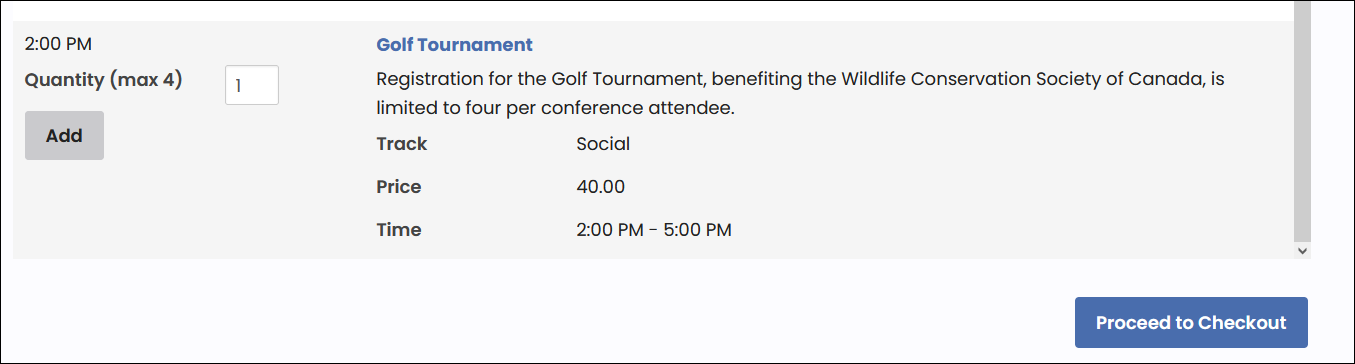
- If there are program items defined, click the Add button next to add program items to the registration. Program items are typically available with events that span multiple days.
- Scroll down, then click Proceed to Checkout.
- From the Cart, enter payment details.
- Click Submit Order. The registration is not complete until the cart is submitted.
- To review the registration, navigate to the user’s account page, then click the My Participation tab. Registrations appear under the Upcoming events area.

Note: The first option is selected by default. To change this, go to the Info tab of the admission option and enter a Sort sequence. See Defining event pricing and registration options.

Managing live events and registrations
Efficient event management ensures a smooth experience for both organizers and participants. Review the following to learn how to find event registrations, manage individual events from the dashboard, transfer or cancel registrations, and generate reports based on participant responses.
You can locate active and cancelled registrations for an event from Events > Find registrations or from the event dashboard.
Note: To add custom queries to the Find registrations page, add the queries to the following location: $/EventManagement/DefaultSystem/Queries/Find registrations
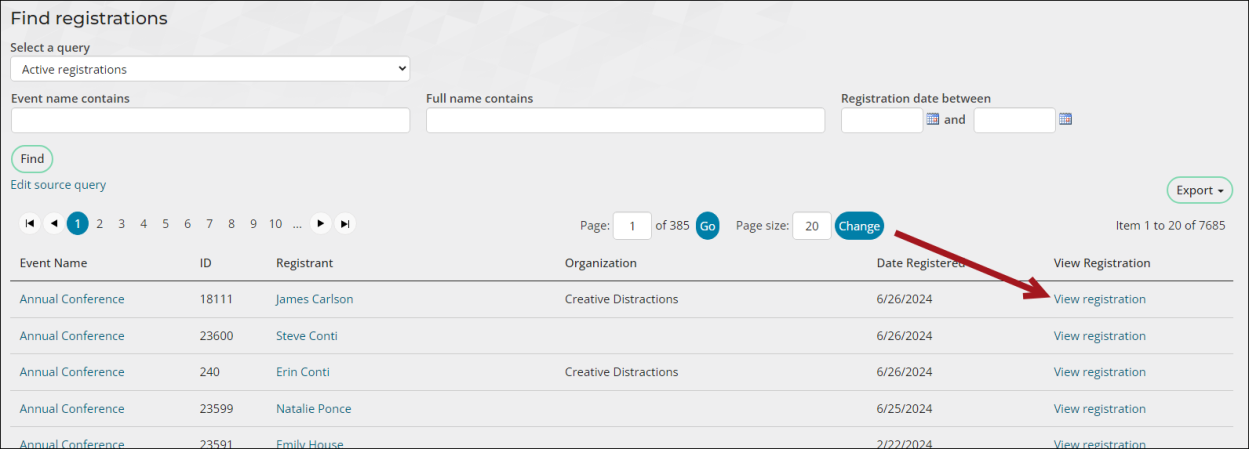
See Finding registrations for more details.
Every event in iMIS has its own unique console. From a single location, staff event managers are able to see at-a-glance statistical information, run reports and print badges, view registrants, and view and edit event and program item details.
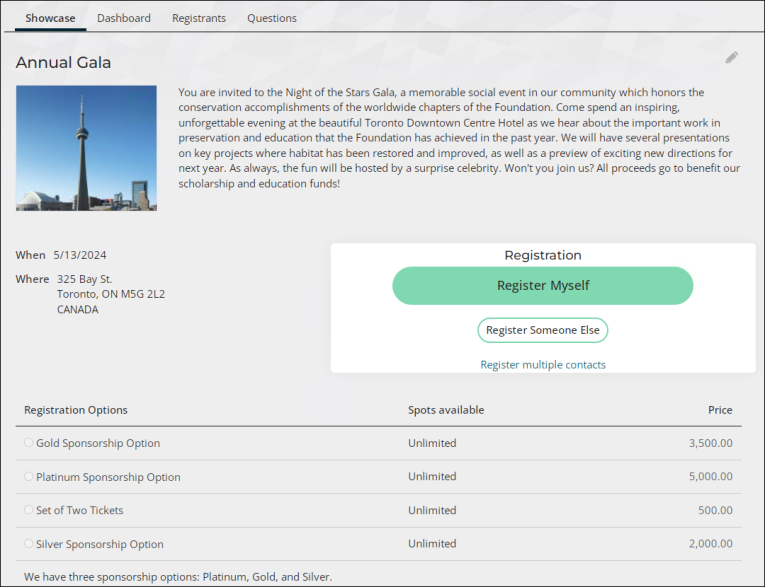
Showcase
The Showcase tab is the landing page for events and displays the same information your event registrants see. Event details, functions, and options are configurable from this section. For more information about using the showcase tab, see Creating an event and Registering for events.
Dashboard
The event-specific Dashboard tab provides a quick view of important, up-to-date registration information and statistics for a specific event. The dashboard information is configurable. See Modifying the event-specific console.
Registrants
The Registrants tab presents a listing of all the registrants for a selected event.
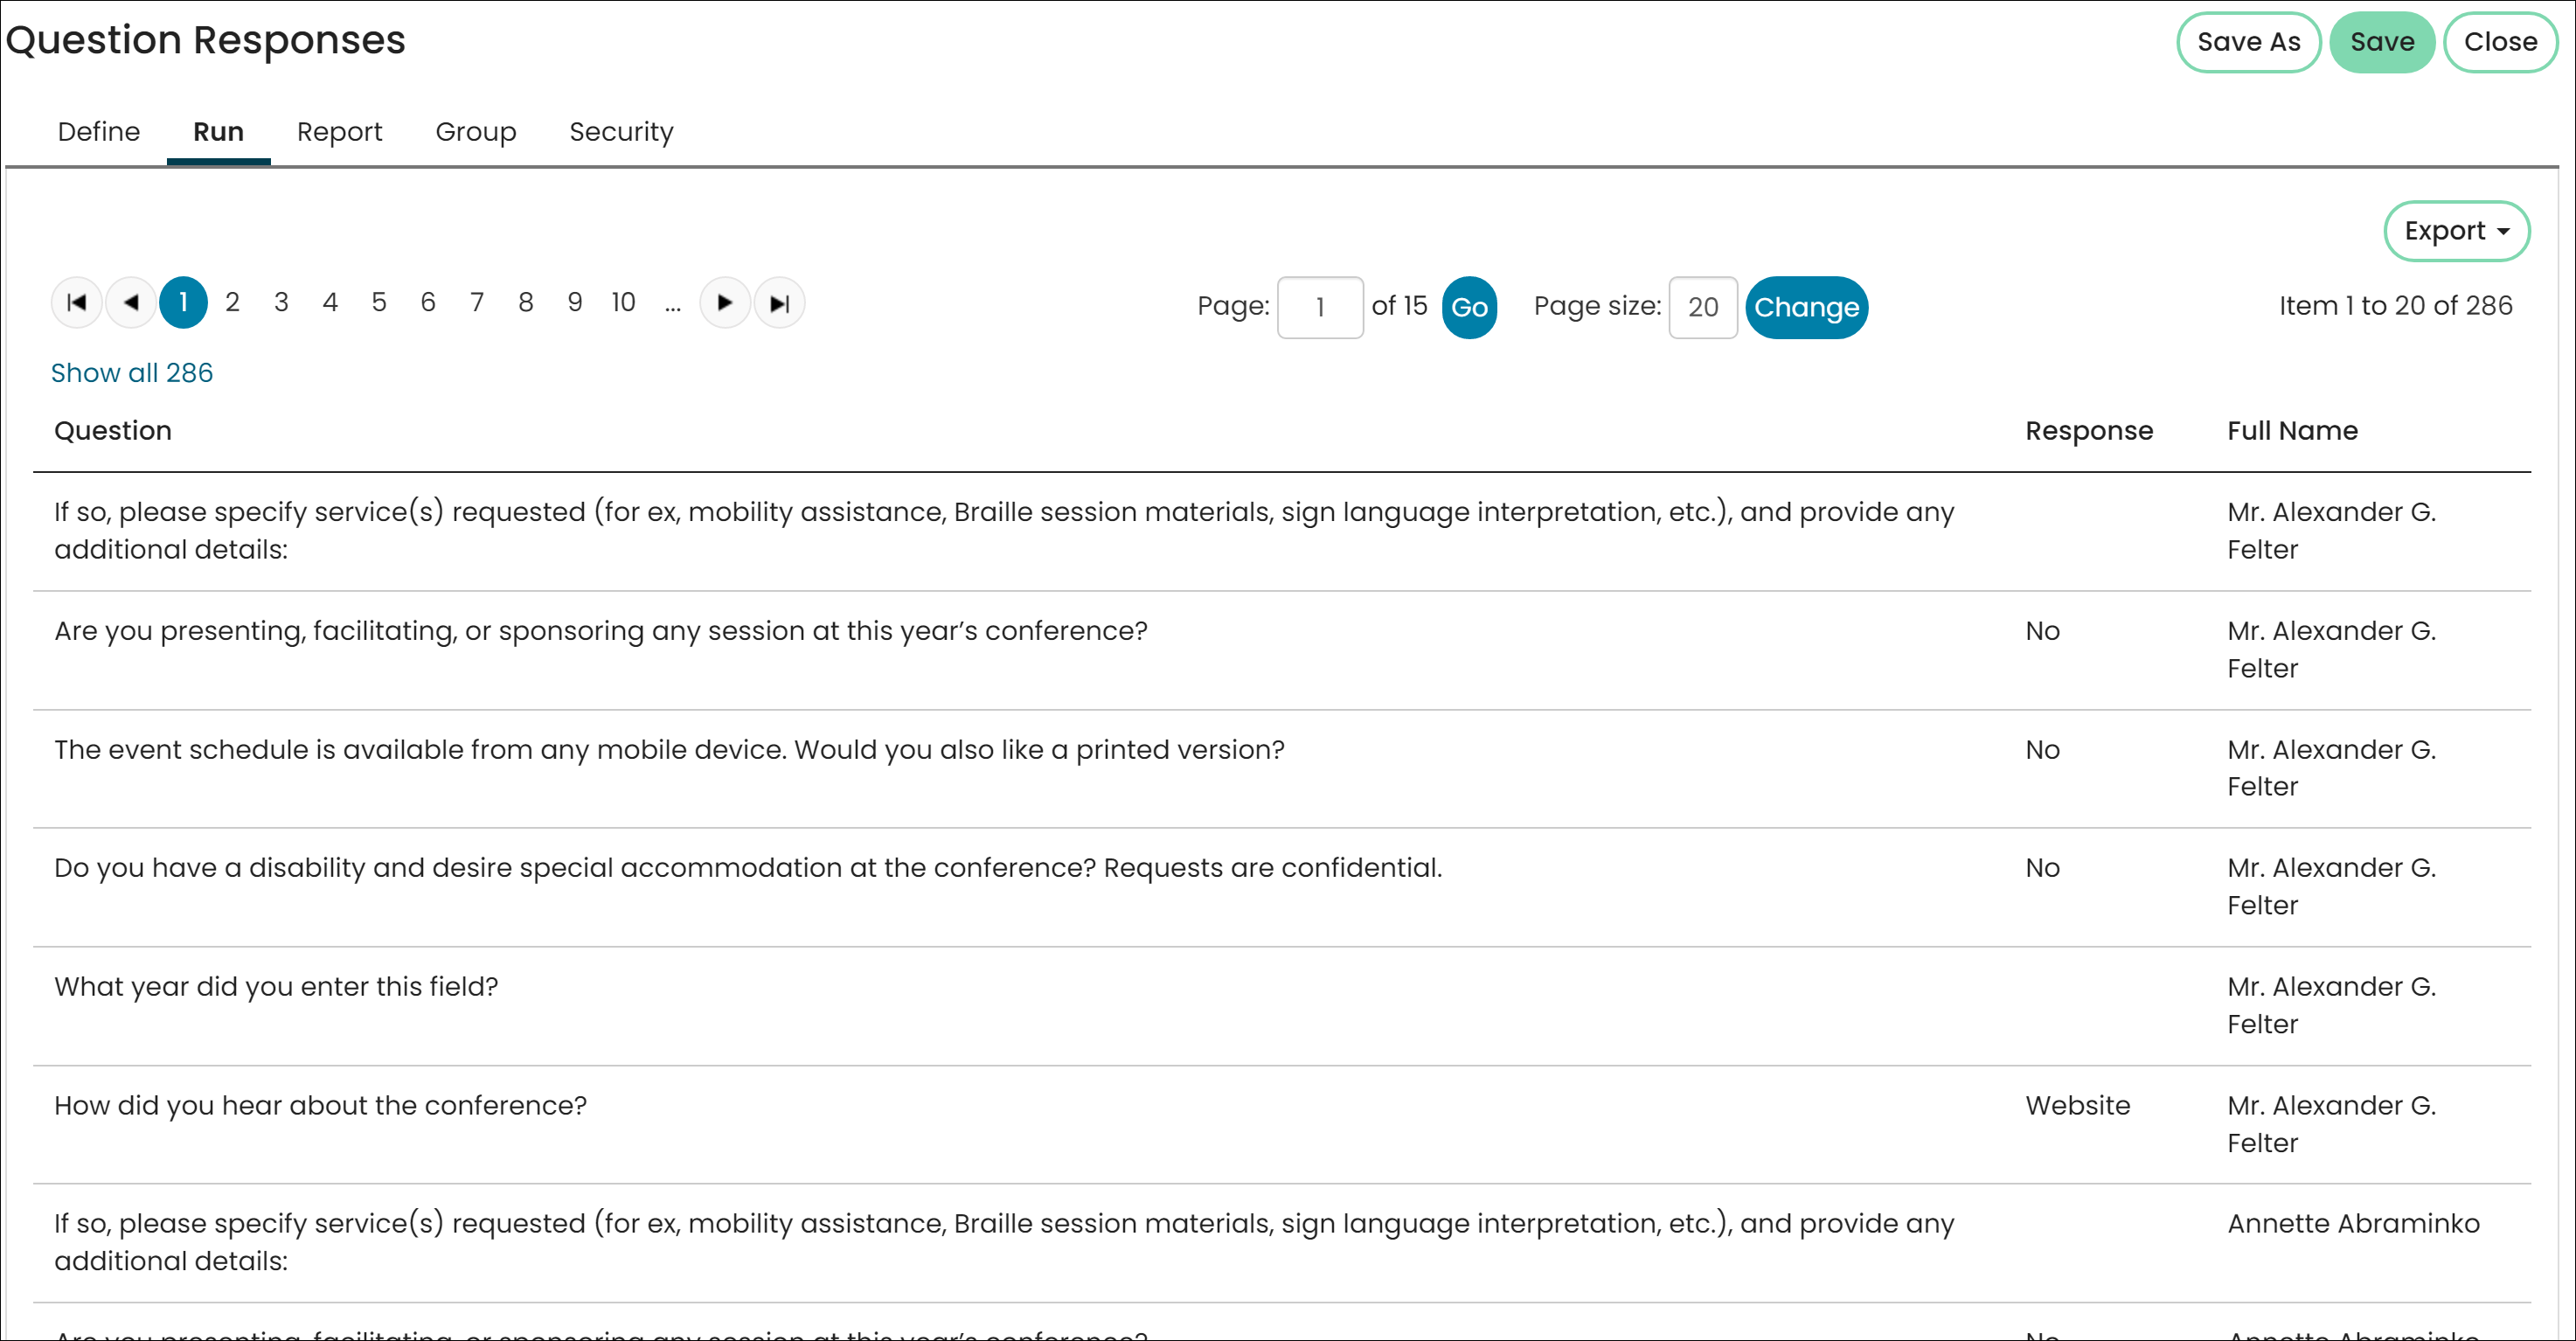
Questions
The Questions tab displays registrant responses to event-level questions.
Note: If you copy an event or use a template to create an event, the event questions are copied over and cannot be deleted. If needed, you can hide questions. See Adding program items to an event for information on how to hide event questions.
See Reporting on events questions for next steps.
Consider the following scenario. A contact has registered and paid for the Annual Conference but can no longer attend. Instead, the registrant wants a coworker to go. The registrant can call in to your organization, and a staff member can help transfer the available credit. After cancelling the contact's registration, there will be a credit available that can be applied to the coworker's registration.
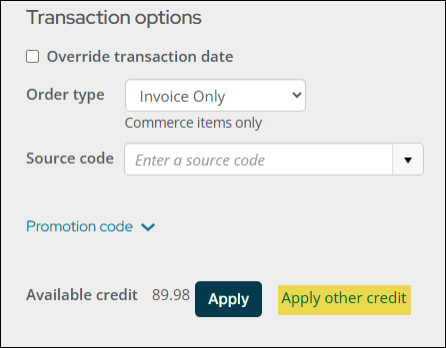
Do the following to apply open credit from one contact's account to another contact's transactions in the cart:
- Make sure the Open Credit payment method is configured. See Applying an open credit for more information.
- Cancel the registration for the original contact if that has not already been done.
- Register the new attendee.
- Acting On behalf of the contact for which you want to apply an existing open credit, go to the cart.
- Select Apply other credit. Use the search filters to locate the contact who has the credit on their account.
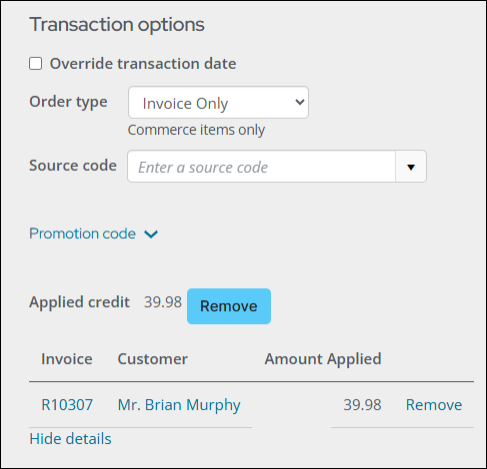
- Select the checkbox next to the invoice you want to apply.
- Click Apply. The balance on the selected invoice is applied to the cart.
Staff users can easily cancel an event registration directly from the event showcase. Public users must request that a staff user cancel their registration for them. A cancelled registration can always be reactivated, if necessary, until the event is closed.
Cancelling a registration for a public user
After a public user has registered for the event (whether they have already paid or chosen to pay later), a staff user must cancel the registration for them.
Do the following as a staff user to cancel a registration for a public user:
- Click the On behalf of icon and begin working on behalf of the registrant.
- Navigate to the event.
- Click Cancel Registration. If the user only wants to remove a particular program item, instead of cancelling the overall registration, scroll to the program items section and click Remove for the program item.
- Click the Cart icon.
- Review the Cart details of the cancellation, then click Submit Order.

Note: Until you click Submit Order in the cart, cancellation can be reversed. On the event Showcase tab, click Undo Cancellation to reverse the cancellation.
Cancelling a registration before checking out
Registrations can be easily cancelled if the registrant has not yet submitted the cart.
Do the following to cancel a registration that has not yet been submitted:
- Go to Events > Find events and search for the event.
- Select the desired event.
- Click Remove. Cancelling an event registration before checking out has the effect of cancelling registration for any or all of its program items as well.

The Questions tab displays registrant responses to event-level questions.
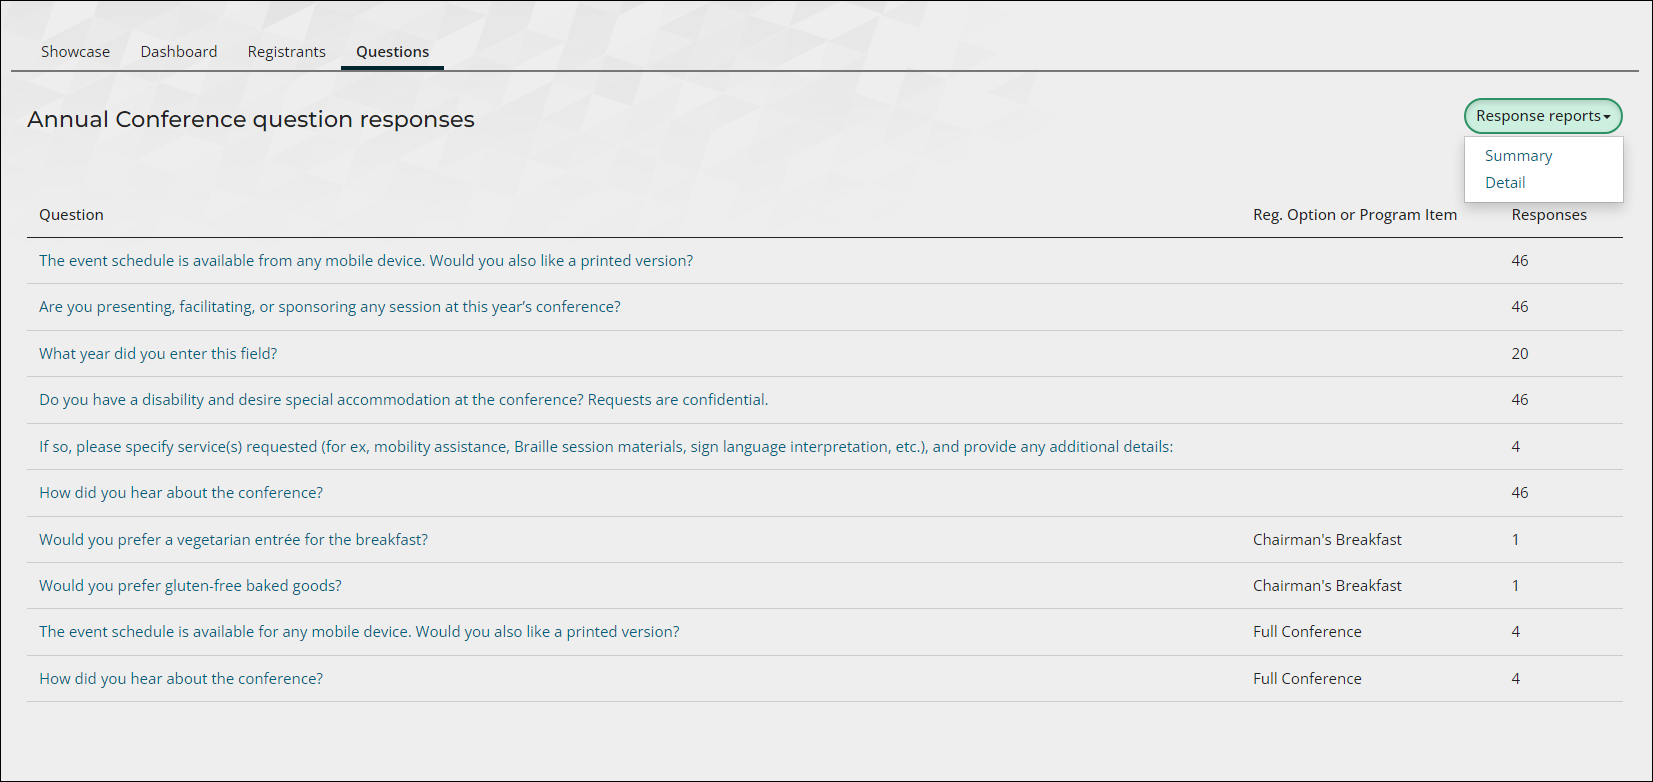
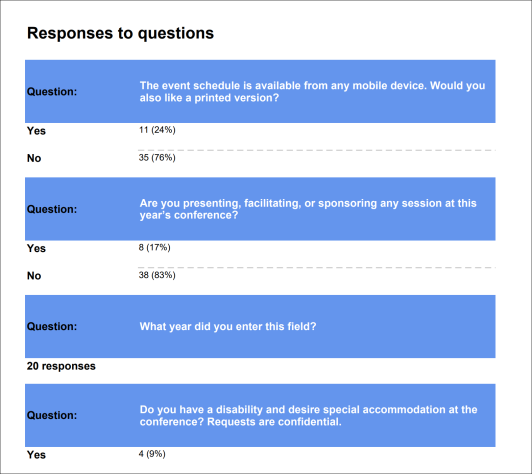
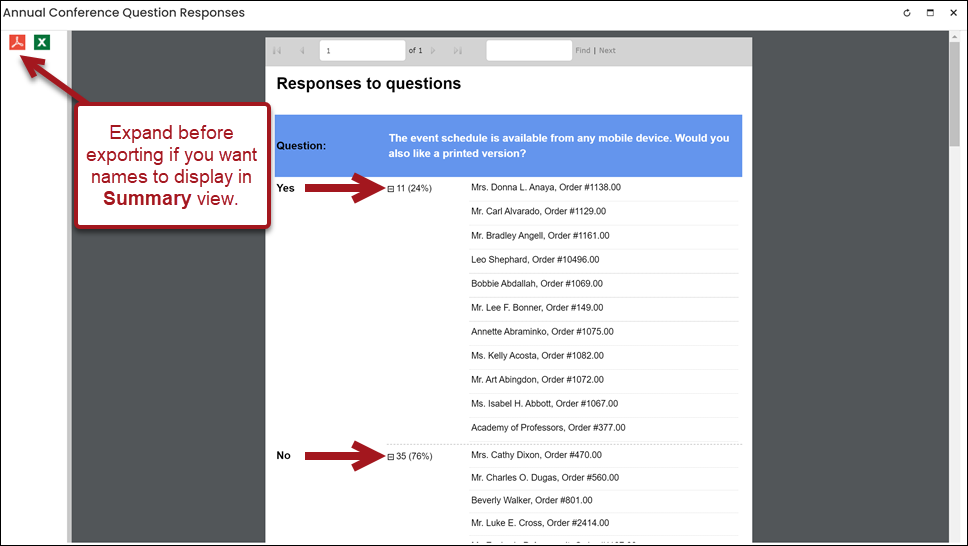
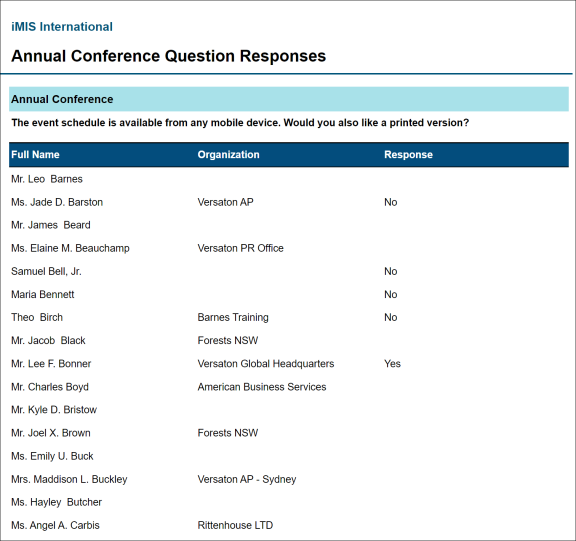
Out-of-the-box reports
Use the Response reports to report on the event questions:
- Summary - Answers are displayed in a percentage format for yes/no questions, in a graph format for multiple-choice questions, and as a collapsible list for open-ended response questions.
- Detail - Responses are displayed per question with the registrants full name and organization.
Tip: Expand each section before exporting the report if you want all data to display in the exported report.
Creating a query of event questions
Event questions can be reported on using the Event Questionand EventQuestionResponse business objects.
See Reporting on event questions for full query configuration details.
Next steps after an event is over
After an event has passed, there are a few follow-ups that help staff to monitor data, ensuring the next event will be just as, if not more, effective and relevant.
Staff users must close an event after it has passed. This guarantees that no errant changes can occur in the event data.
Requirements
The following are required in order to close an event:
- You must be a system administrator, or a staff user with an Events: 5module authorization level.
- At least one registrant does not have outstanding CEU attendance requiring recording for all functions which require CEU attendance to be marked.
- The event’s End date is the current date, in the past, or is undefined.
- The event has at least one active registration.
- The event is not pending, has not been cancelled, or already closed.
Note: If Award continuing education units to attendees when event is closed is enabled and you mark all attendees as absent, you will receive the following message confirming you still want to close the event: All attendees were marked absent for the following functions. Do you wish to close the event anyway?
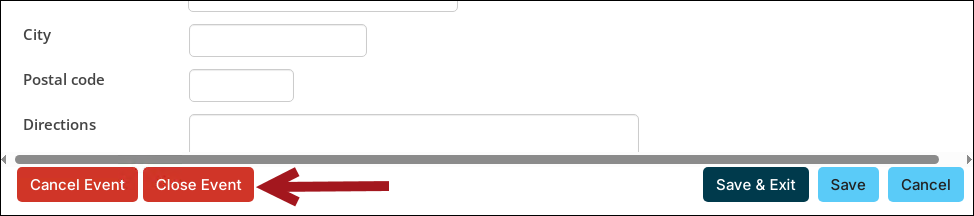
Closing the event
Do the following to close an event:
- Go to Events > Find events, and open the event.
- In the event’s Showcase tab, click the edit icon.
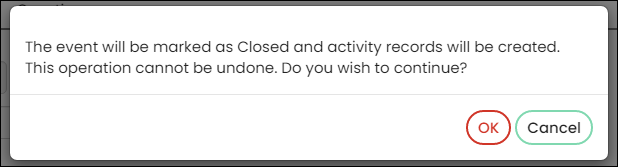
- Scroll to the bottom of the Edit event window and click Close Event.
- Click OK to continue when prompted and close the event.
A message is displayed that says Event has a status of Closed. The Event status is also displayed as a read-only field when the event is open for edit.
After an event is closed, the following are true:
- Closed events are not searchable or accessible by non-staff users.
- A staff user can edit a closed event and register a contact for a closed event but cannot reopen the event.
- The event is no longer available to unauthorized users through search or by a previously accessible URL link.
- The event is removed from the Event Calendar.
- Closed events can be copied.
Note: Enable the Include inactive results option (Events > Find events) to search for a closed event.
Out-of-the-box, the Event dashboard has a button that links directly to the provided Events SSRS reports.
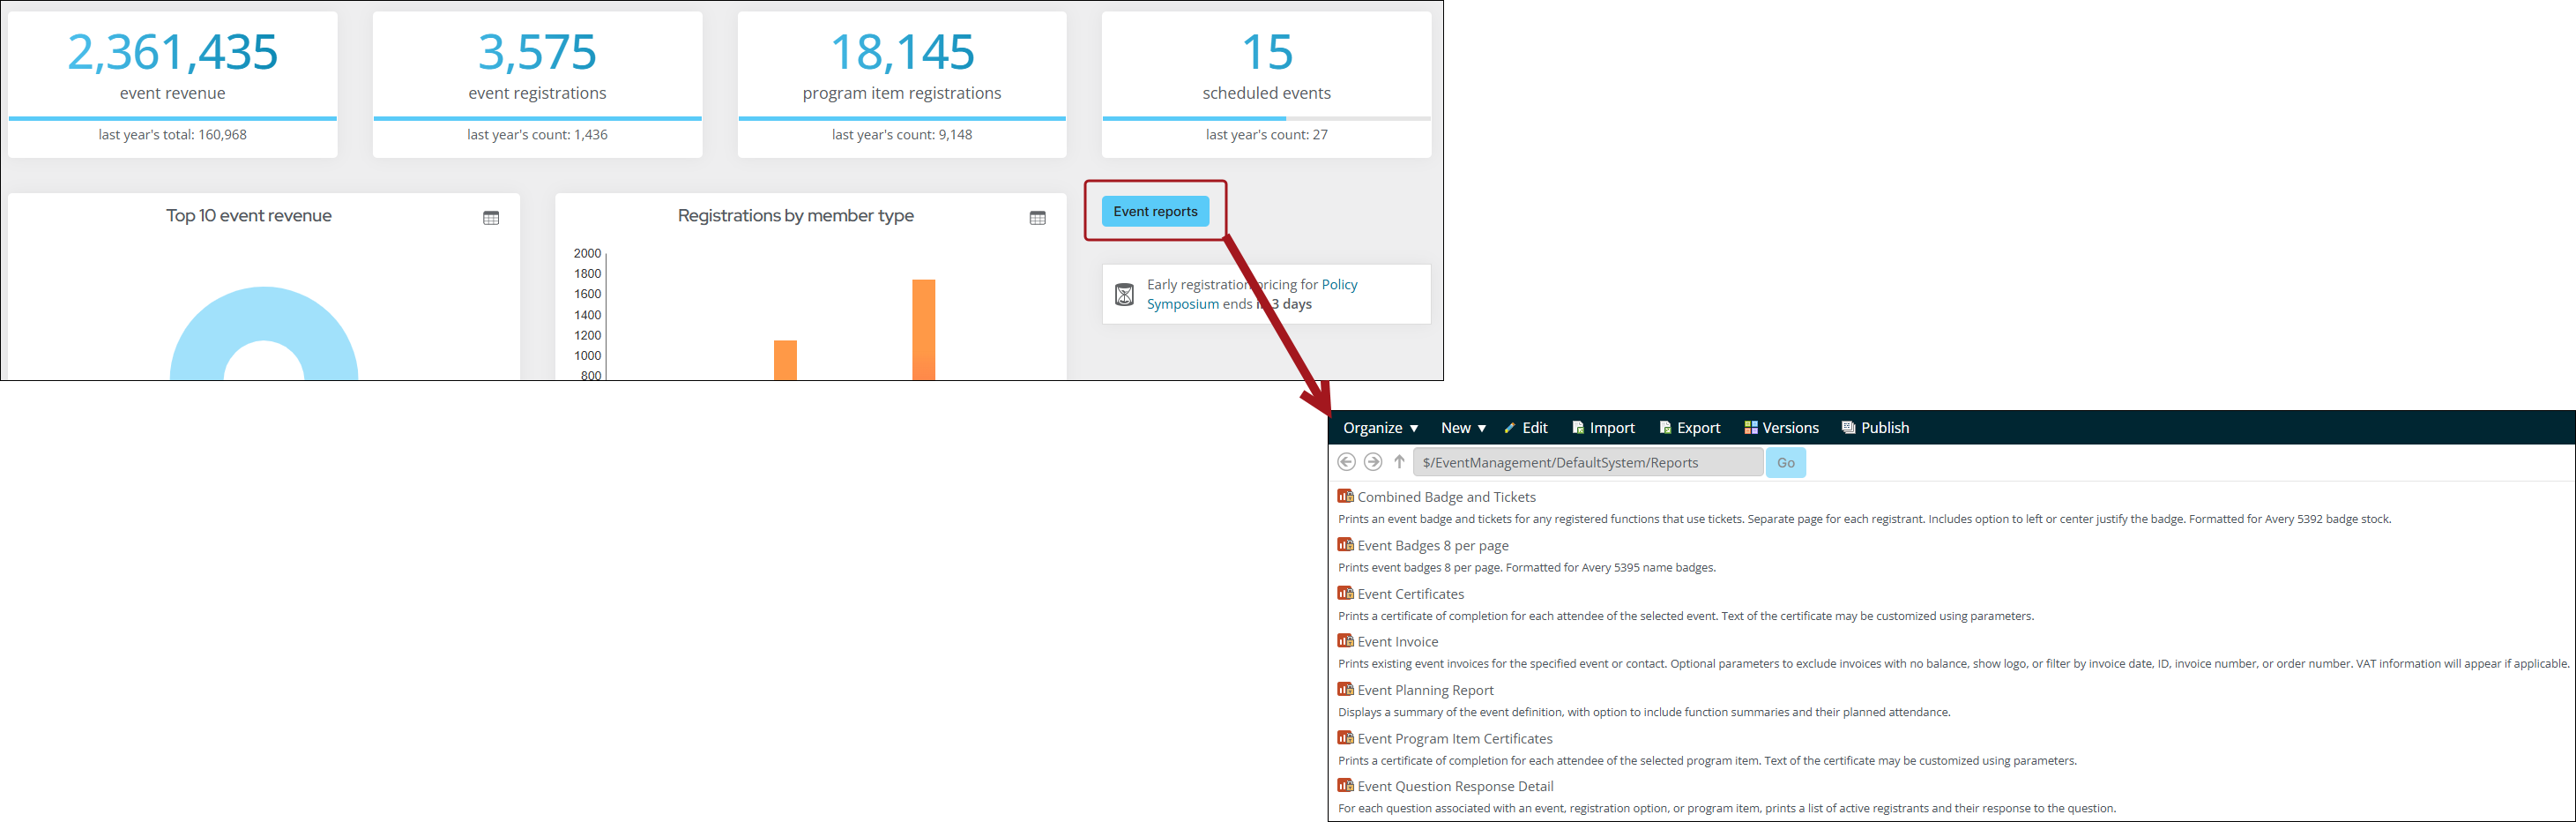
The Event reports and outputs are generated from information gathered during event creation and registration.
Review the following table for details regarding some commonly used reports:
| Report name | Details |
|---|---|
| Combined Badge and Tickets | Prints an event badge and tickets for any registered functions that use tickets. Separate page for each registrant. Includes option to left or center justify the badge. Formatted for Avery 5392 badge stock. |
| Event Certificates | Prints a certificate of completion for each attendee of the selected event. Text of the certificate may be customized using parameters. |
| Event Invoice | Prints existing event invoices for the specified event or contact. Optional parameters to exclude invoices with no balance, show logo, or filter by invoice date, ID, invoice number, or order number. VAT information will appear if applicable. |
| Event Question Response Detail | For each question associated with an event, registration option, or program item, prints a list of active registrants and their response to the question. |
| EventRegistrantsReport.rdl | List of registrants in a two-column layout. |
| Function Roster | Event function rosters for registration options and program items, including fees. |
| Weeks Out Report | Displays the number of registrants for the selected event by the number of weeks prior to the event's begin date. |
To see all the Events SSRS reports, go to Reports > Event reports. See Event reports for further details.
Reporting on events and registrants after the event is closed
All historical event data is automatically retained when an event is closed.
Tip: To report on event questions, see Reporting on event questions.
To report on events and registrants after an event is closed, do the following:
- Go to RiSE > Intelligent Query Architect > New > Query.
- (Summary tab) Name the query.
- (Sources tab) Do the following:
- From the Common sources, add Event registrations and Events (CsRegistration and CsEvents). Use the default join of CsRegistration.Event Code = Cs.EventCode.
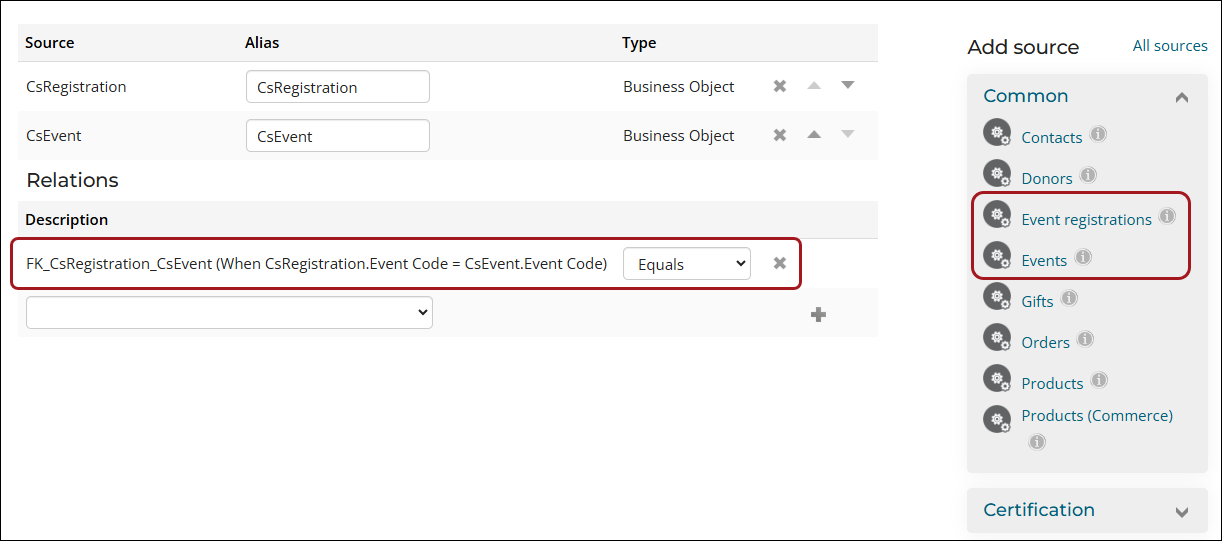
- (Filters tab) From the Add a filter drop-down, select [CsEvent] Event Code and set the Value equal to the closed event's Event code.
- (Display tab) Select the desired display properties for the report.
- Click Save and select the file location.
- Click Run to review the data.
Note: The CsEvent.MUF 1 - 10 properties correlate with the fields defined in the Additional fields for staff use event settings (Settings > Events > General).
After an event has passed, staff may opt to send an email to all attendees, to thank them for their time, and pass along information regarding upcoming events. Out-of-the-box, the Event Thank You communication template can be tailored and sent to any event attendees. By default, the preview function automatically shows registrants from past events that have been closed.
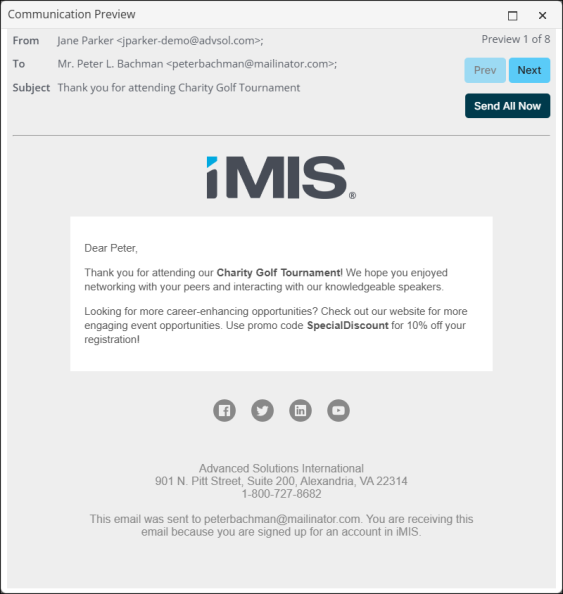
Important! Before sending this communication, be sure to tailor the content to your organization's needs. See Customizing the out-of-the-box templates for full details.
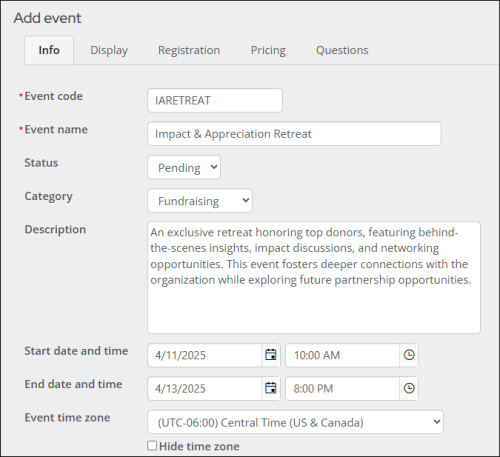
Example: Creating an event
Let’s say that your organization is hosting an exclusive Impact & Appreciation Retreat to recognize and engage its top 100 donors. The event includes a behind-the-scenes look at the organization’s work, impact presentations, and discussions with leadership. Attendees can enjoy networking opportunities, curated experiences, and strategic planning sessions to explore future partnership opportunities.
- Go to Events > Add event.
- Select Create a new event and click Next.
- (Info tab)
- Enter IARETREAT in the Event code field.
- Enter Impact & Appreciation Retreat in the Event name field.
- From the Category drop-down, select Fundraising.
- Enter a Description. For example, “An exclusive retreat honoring top donors, featuring behind-the-scenes insights, impact discussions, and networking opportunities. This event fosters deeper connections with the organization while exploring future partnership opportunities.”
- Enter a Start and End date and time.
- Configure the remaining fields as needed.
- Click Save.
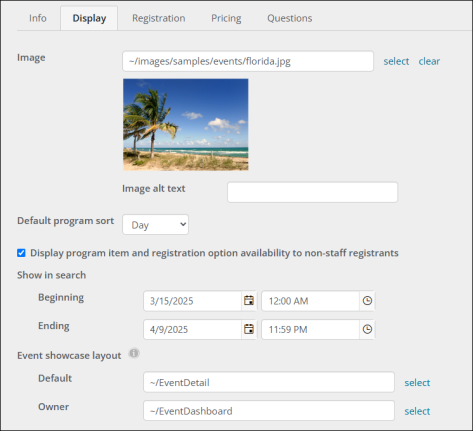
- (Display tab)
- Select an image from the Image Selector, or upload a new one to the Document system.
- Select a Default program sort to set the initial sort order of the event’s program items. For this example, select Day.
- Enable the Display program item and registration option availability to non-staff registrants option to display the program item's and registration option's availability.
- Specify the Show in search Beginning and Ending dates and times. The time displayed for the date and time fields is determined by the Event time zone setting on the Info tab. See Info tab options for more information.
- Click Save.
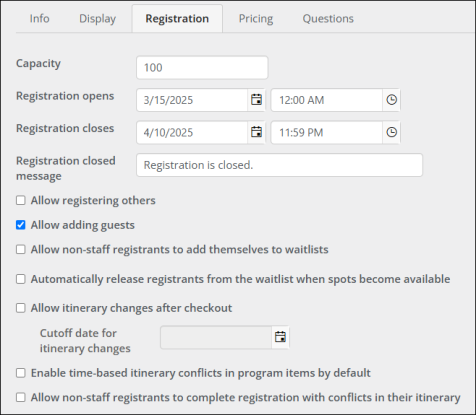
- (Registration tab)
- Enter a Capacity of 100.
- In the Registration opens and Registration closes fields, enter the registration date and time range.
- In the Registration closed message field, enter a message to display on the event Showcase page after the registration has closed to public users. The default message is Registration is closed.
- Enable the Allow adding guests option.
- Configure the remaining fields as needed. For full details of registration options, see Registration tab options.
- Click Save.
- (Pricing tab)
You must define at least one registration option or program item for users to be able to register for your event. In this example, the organization is structuring registration based on donor contribution tiers. The top 10 donors will have a registration option, the next 25% of donors will have a registration option, and additional registration options will be created for other donor levels. In addition, each registration option will only be available to staff, to avoid donors registering for the wrong tier.
- From the drop-down, select a Financial entity to be associated with this event. For this example, leave the Default entity enabled.
- Enter Early and Regular Cutoff dates, if needed.
- Select Add new registration option.
- (Info tab)
- From the Registration option code field, enter 10Donor.
- From the Registration option name field, enter Top 10 Donors Circle.
- Enter the Start and End date and time.
- Enable the Display to staff users only option to restrict users registering for this option on their own.
- Enter a Capacity of 10.

- (Pricing tab)
- For this registration option, select Comp to make the registration option complimentary.
- Click Save & Close.
- (Info tab)
- Create additional registration options with the following configurations:
- Premier Donors Circle
- Price - $1000
- Capacity - 27
- Supporters Circle
- Price - $1500
- Capacity - 63
- Premier Donors Circle
- Be sure to enable the Display to staff users only option to restrict users registering for this option on their own.
- Click Save.
- (Questions tab)
- Click Add new.
- Enter a question text in the Question field. For example, “Do you have any known food allergies?”
- Enable the Required option.
- From the Answer type drop-down, leave Yes/No selected.
- Click Save.
- Click Add new.
- Enter the question text in the Question field. For example, “What is your T-shirt size?”
- Enable the Required option.
- From the Answer type drop-down, select Dropdown list.
- Select Defined by explicit list.
- Enter Small in the Display Value, and 1 in the Data Value.
- Click Add.
- Continue adding options, where Medium equals 2, Large equals 3, and so on.
- Click Save.
- Continue adding questions as necessary, and then click Save & Exit.

- Click Add new.
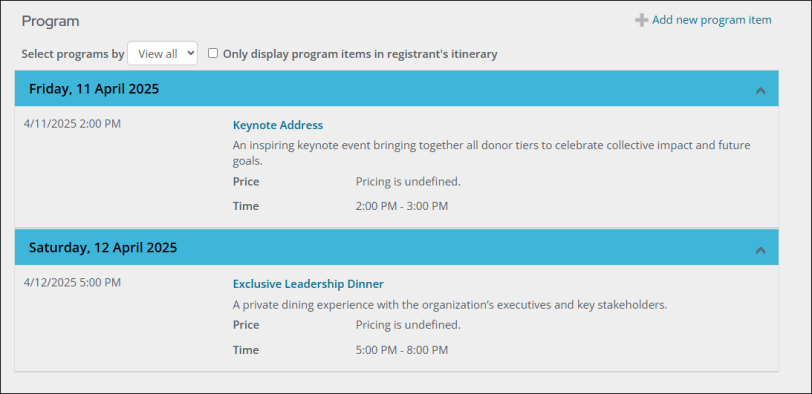
Now that the event has been created, let’s add some program items including an exclusive leadership dinner for the top 10 donors and a keynote address.
- From the Showcase tab, select Add new program item.
- (Info tab)
- Enter a Program item code, such as ELD.
- Enter a Program item name, such as Exclusive Leadership Dinner.
- Enter a Description, for example, “A private dining experience with the organization’s executives and key stakeholders.”
- Enter the Start and End date and time.
- Enter a Capacity of 10.
- Configure the remaining fields as needed.
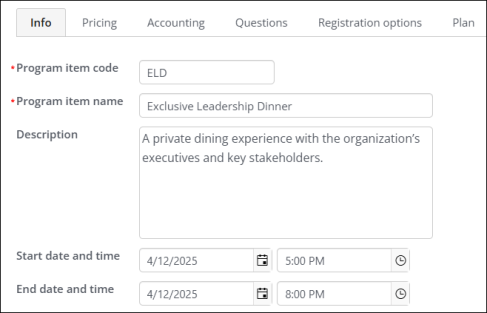
- (Registration options tab)
- From the Display options for this program option drop-down, select Do not display for both the Premier Donors Circle and Supporters Circle registration options.
- Select Display and allow user to add/remove for the Top 10 Donors registration option.
- Enable Register by default? for the Top 10 Donors.

- (Info tab)
- Click Save & Close.
- From the Showcase tab, select Add new program item.
- (Info tab)
- Enter a Program item code, such as KNA.
- Enter a Program item name, such as Keynote Address.
- Enter a Description, for example, “An inspiring keynote event bringing together all donor tiers to celebrate collective impact and future goals.”
- Enter the Start and End date and time.
- Configure the remaining fields as needed.
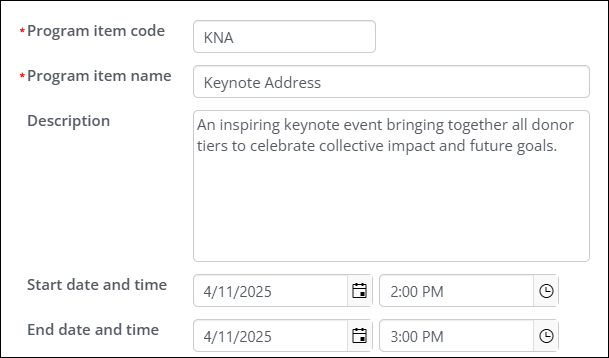
- (Registration options tab)
- From the Display options for this program option drop-down, leave Display and allow user to add/remove selected for each registration option.
- Enable Register by default? for each registration opinion.
- Click Save & Close.
- (Info tab)
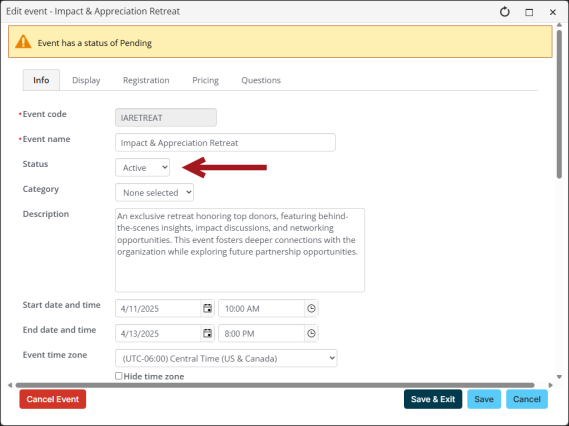
Lastly, be sure to update the status of the event.
- From the Showcase tab, click the edit icon.
- From the Status drop-down, select Active.
- Click Save & Exit.
Best practices
Review the following best practices when working with iMIS Events:
Once an event template is created, it cannot be deleted. Any changes made to a template will not apply to any existing events that already use the template.
When a staff user creates an event based on an event template that has panel data, the panel data from the template is also copied to the new event.
For more information on utilizing event templates, see Managing event templates.
If two people are registered for the same event, and neither person is canceled, then their records will not be merged if a staff user tries to merge two contacts together with Duplicate Merge – Standard or Premium. Their records can be merged if one of the individuals cancels their registration.
Ensure that the Permit public users to register existing contacts option (Settings > Events > General) and the Do not allow adding new contacts setting on the Event Display contact item have been configured. For more information, see Preventing duplicate account creation.
Staff users might experience a problem with existing members or users (who already have usernames or accounts) creating new accounts instead of signing in with their existing accounts when registering for events. The following tips might help mitigate the number of duplicate accounts being created:
Note: To use these tips, make a copy of the out-of-the-box Event page, add the Content Html content item, and then edit the EventDetail shortcut to point to the new copy of the Event page. See Updating out-of-the-box content records for more information.
- Add user instructions on the Event Showcase regarding signing in versus creating a new account. Add a Content Html content item just above or just below the existing Contact Sign In content item. Emphasize that existing members should sign in with their account or use the Forgot my password or Forgot my username links, rather than creating a new account. Staff users can even provide readily accessible contact information or links so that users can receive assistance from staff if they are still having trouble signing in with their existing account.
- Add notes inside your event description area. For example, add a note explaining that users must sign in first, and to use their existing account.
- Configure the existing Contact Sign In content item and change the text for the Create account link text. For example, a staff user could enter Create a new account only if you do not have an existing account.
- Add another warning or set of instructions at the top of the Create Account page with the Content Html content item. Emphasize that it is very important that users log in with their existing account, rather than creating a new account.
Adding one or more of these suggested items to your site should help to mitigate the risk of duplicate account creation.
Staff users should test registration before an event goes live. The following list provides items to check before an event goes live:
- Can a staff user register a member for an event?
- Can a staff user pay for the event registration?
- Can a staff user cancel the registration?
- Can a staff user create new registration options?
For more information on testing registration, see Events testing.
If an event uses special pricing, staff users should test the special pricing before an event goes live. The following list provides items to check before an event goes live:
- Do the event pricing groups look correct?
- Perform a registration on behalf of multiple users. Do the special pricing rules pick up the correct price?
- Can a staff user create a new pricing group?
For more information on testing special pricing, see Events testing.
Event invoices can be automatically generated upon checkout, or manually generated later by a staff user.
When the Automatically generate invoices for registrations and adjustments upon checkout setting (Settings > Events > General) is enabled, event invoices are automatically generated and assigned an invoice number upon checkout. When the setting is disabled, the invoice is assigned a reference invoice number until the invoice is manually generated. To know if an invoice is a reference or an official invoice, review the invoice number.
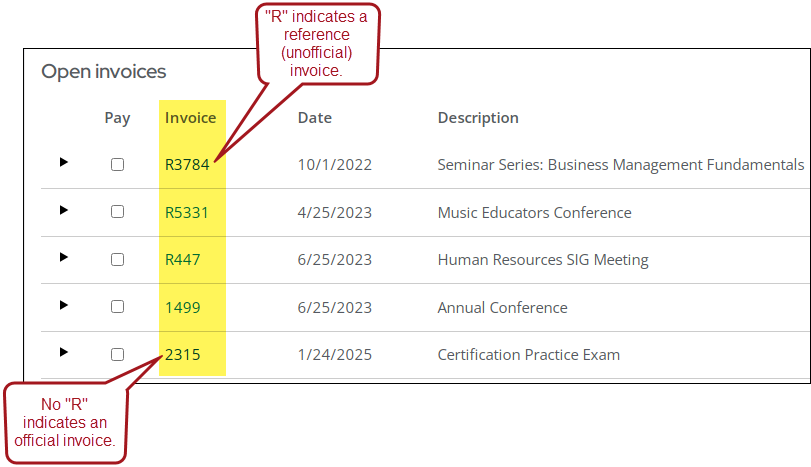
For more information on event invoices, see Event invoices.
When an event has ended, a staff user should close it so it cannot be run again.
Important! Do not delete an event that has ended. Staff users should only delete an event if it is cancelled.